Page is loading ...

P
r
o
t
e
c
t
e
d
b
y
c
o
p
y
r
i
g
h
t
.
C
o
p
y
i
n
g
f
o
r
p
r
i
v
a
t
e
o
r
c
o
m
m
e
r
c
i
a
l
p
u
r
p
o
s
e
s
,
i
n
p
a
r
t
o
r
i
n
w
h
o
l
e
,
i
s
n
o
t
p
e
r
m
i
t
t
e
d
u
n
l
e
s
s
a
u
t
h
o
r
i
s
e
d
b
y
V
o
l
k
s
w
a
g
e
n
A
G
.
V
o
l
k
s
w
a
g
e
n
A
G
d
o
e
s
n
o
t
g
u
a
r
a
n
t
e
e
o
r
a
c
c
e
p
t
a
n
y
l
i
a
b
i
l
i
t
y
w
i
t
h
r
e
s
p
e
c
t
t
o
t
h
e
c
o
r
r
e
c
t
n
e
s
s
o
f
i
n
f
o
r
m
a
t
i
o
n
i
n
t
h
i
s
d
o
c
u
m
e
n
t
.
C
o
p
y
r
i
g
h
t
b
y
V
o
l
k
s
w
a
g
e
n
A
G
.
Repair Manual
Golf 2015 ➤
Golf Variant 2015 ➤
Body Exterior
Edition 02.2016
Service
Service Department. Technical Information

P
r
o
t
e
c
t
e
d
b
y
c
o
p
y
r
i
g
h
t
.
C
o
p
y
i
n
g
f
o
r
p
r
i
v
a
t
e
o
r
c
o
m
m
e
r
c
i
a
l
p
u
r
p
o
s
e
s
,
i
n
p
a
r
t
o
r
i
n
w
h
o
l
e
,
i
s
n
o
t
p
e
r
m
i
t
t
e
d
u
n
l
e
s
s
a
u
t
h
o
r
i
s
e
d
b
y
V
o
l
k
s
w
a
g
e
n
A
G
.
V
o
l
k
s
w
a
g
e
n
A
G
d
o
e
s
n
o
t
g
u
a
r
a
n
t
e
e
o
r
a
c
c
e
p
t
a
n
y
l
i
a
b
i
l
i
t
y
w
i
t
h
r
e
s
p
e
c
t
t
o
t
h
e
c
o
r
r
e
c
t
n
e
s
s
o
f
i
n
f
o
r
m
a
t
i
o
n
i
n
t
h
i
s
d
o
c
u
m
e
n
t
.
C
o
p
y
r
i
g
h
t
b
y
V
o
l
k
s
w
a
g
e
n
A
G
.
List of Workshop Manual Repair Groups
Repair Group
50 - Body Front
55 - Hood, Lids
57 - Front Doors, Central Locking System
58 - Rear Doors
60 - Sunroof
63 - Bumpers
64 - Glass, Window Regulators
66 - Exterior Equipment
Technical information should always be available to the foremen and mechanics, because their
careful and constant adherence to the instructions is essential to ensure vehicle road-worthiness and
safety. In addition, the normal basic safety precautions for working on motor vehicles must, as a
matter of course, be observed.
Service
All rights reserved.
No reproduction without prior agreement from publisher.
Copyright © 2016 Volkswagen AG, Wolfsburg D4B8040D5CD

P
r
o
t
e
c
t
e
d
b
y
c
o
p
y
r
i
g
h
t
.
C
o
p
y
i
n
g
f
o
r
p
r
i
v
a
t
e
o
r
c
o
m
m
e
r
c
i
a
l
p
u
r
p
o
s
e
s
,
i
n
p
a
r
t
o
r
i
n
w
h
o
l
e
,
i
s
n
o
t
p
e
r
m
i
t
t
e
d
u
n
l
e
s
s
a
u
t
h
o
r
i
s
e
d
b
y
V
o
l
k
s
w
a
g
e
n
A
G
.
V
o
l
k
s
w
a
g
e
n
A
G
d
o
e
s
n
o
t
g
u
a
r
a
n
t
e
e
o
r
a
c
c
e
p
t
a
n
y
l
i
a
b
i
l
i
t
y
w
i
t
h
r
e
s
p
e
c
t
t
o
t
h
e
c
o
r
r
e
c
t
n
e
s
s
o
f
i
n
f
o
r
m
a
t
i
o
n
i
n
t
h
i
s
d
o
c
u
m
e
n
t
.
C
o
p
y
r
i
g
h
t
b
y
V
o
l
k
s
w
a
g
e
n
A
G
.
Contents
50 - Body Front . . . . . . . . . . . . . . . . . . . . . . . . . . . . . . . . . . . . . . . . . . . . . . . . . . . . . . 1
1 Lock Carrier . . . . . . . . . . . . . . . . . . . . . . . . . . . . . . . . . . . . . . . . . . . . . . . . . . . . . . . . . . . . 1
1.1 Overview - Lock Carrier . . . . . . . . . . . . . . . . . . . . . . . . . . . . . . . . . . . . . . . . . . . . . . . . . . . . 1
1.2 Lock Carrier, Removing and Installing . . . . . . . . . . . . . . . . . . . . . . . . . . . . . . . . . . . . . . . . 2
1.3 Service Position, Implementing and Resetting . . . . . . . . . . . . . . . . . . . . . . . . . . . . . . . . . . 4
1.4 Lock Carrier, Servicing . . . . . . . . . . . . . . . . . . . . . . . . . . . . . . . . . . . . . . . . . . . . . . . . . . . . 7
2 Fender . . . . . . . . . . . . . . . . . . . . . . . . . . . . . . . . . . . . . . . . . . . . . . . . . . . . . . . . . . . . . . . . 10
2.1 Overview - Fender . . . . . . . . . . . . . . . . . . . . . . . . . . . . . . . . . . . . . . . . . . . . . . . . . . . . . . . . 10
2.2 Overview - Deformation Element . . . . . . . . . . . . . . . . . . . . . . . . . . . . . . . . . . . . . . . . . . . . 11
2.3 Fender, Removing and Installing . . . . . . . . . . . . . . . . . . . . . . . . . . . . . . . . . . . . . . . . . . . . 11
2.4 Fender Brace, Removing and Installing . . . . . . . . . . . . . . . . . . . . . . . . . . . . . . . . . . . . . . . . 14
3 Bulkhead . . . . . . . . . . . . . . . . . . . . . . . . . . . . . . . . . . . . . . . . . . . . . . . . . . . . . . . . . . . . . . 16
3.1 Overview - Bulkhead . . . . . . . . . . . . . . . . . . . . . . . . . . . . . . . . . . . . . . . . . . . . . . . . . . . . . . 16
3.2 Overview - Plenum Chamber Cover . . . . . . . . . . . . . . . . . . . . . . . . . . . . . . . . . . . . . . . . . . 17
3.3 Bulkhead, Removing and Installing . . . . . . . . . . . . . . . . . . . . . . . . . . . . . . . . . . . . . . . . . . 17
3.4 Plenum Chamber Cover, Removing and Installing . . . . . . . . . . . . . . . . . . . . . . . . . . . . . . 19
4 Special Tools . . . . . . . . . . . . . . . . . . . . . . . . . . . . . . . . . . . . . . . . . . . . . . . . . . . . . . . . . . . . 22
55 - Hood, Lids . . . . . . . . . . . . . . . . . . . . . . . . . . . . . . . . . . . . . . . . . . . . . . . . . . . . . . 24
1 Hood . . . . . . . . . . . . . . . . . . . . . . . . . . . . . . . . . . . . . . . . . . . . . . . . . . . . . . . . . . . . . . . . . . 24
1.1 Overview - Hood . . . . . . . . . . . . . . . . . . . . . . . . . . . . . . . . . . . . . . . . . . . . . . . . . . . . . . . . . . 24
1.2 Overview - Release Cable . . . . . . . . . . . . . . . . . . . . . . . . . . . . . . . . . . . . . . . . . . . . . . . . . . 26
1.3 Hood, Removing and Installing . . . . . . . . . . . . . . . . . . . . . . . . . . . . . . . . . . . . . . . . . . . . . . 26
1.4 Hood, Adjusting . . . . . . . . . . . . . . . . . . . . . . . . . . . . . . . . . . . . . . . . . . . . . . . . . . . . . . . . . . 28
1.5 Latch, Removing and Installing . . . . . . . . . . . . . . . . . . . . . . . . . . . . . . . . . . . . . . . . . . . . . . 31
1.6 Latch, Adjusting . . . . . . . . . . . . . . . . . . . . . . . . . . . . . . . . . . . . . . . . . . . . . . . . . . . . . . . . . . 33
1.7 Hood Release Lever, Removing and Installing . . . . . . . . . . . . . . . . . . . . . . . . . . . . . . . . . . 35
1.8 Catch, Removing and Installing . . . . . . . . . . . . . . . . . . . . . . . . . . . . . . . . . . . . . . . . . . . . . . 36
1.9 Catch, Adjusting . . . . . . . . . . . . . . . . . . . . . . . . . . . . . . . . . . . . . . . . . . . . . . . . . . . . . . . . . . 38
1.10 Hinges, Removing and Installing . . . . . . . . . . . . . . . . . . . . . . . . . . . . . . . . . . . . . . . . . . . . 39
1.11 Insulation, Removing and Installing . . . . . . . . . . . . . . . . . . . . . . . . . . . . . . . . . . . . . . . . . . 41
1.12 Gas-Filled Strut, Removing and Installing . . . . . . . . . . . . . . . . . . . . . . . . . . . . . . . . . . . . . . 44
1.13 Gas-Filled Strut, Venting . . . . . . . . . . . . . . . . . . . . . . . . . . . . . . . . . . . . . . . . . . . . . . . . . . 45
1.14 Release Cable, Removing and Installing . . . . . . . . . . . . . . . . . . . . . . . . . . . . . . . . . . . . . . 45
2 Rear Lid . . . . . . . . . . . . . . . . . . . . . . . . . . . . . . . . . . . . . . . . . . . . . . . . . . . . . . . . . . . . . . . . 49
2.1 Overview - Rear Lid . . . . . . . . . . . . . . . . . . . . . . . . . . . . . . . . . . . . . . . . . . . . . . . . . . . . . . 49
2.2 Rear Lid, Removing and Installing . . . . . . . . . . . . . . . . . . . . . . . . . . . . . . . . . . . . . . . . . . . . 50
2.3 Rear Lid, Adjusting . . . . . . . . . . . . . . . . . . . . . . . . . . . . . . . . . . . . . . . . . . . . . . . . . . . . . . . . 55
2.4 Adjusting Buffer, Removing and Installing . . . . . . . . . . . . . . . . . . . . . . . . . . . . . . . . . . . . . . 56
2.5 Adjusting Buffer, Adjusting . . . . . . . . . . . . . . . . . . . . . . . . . . . . . . . . . . . . . . . . . . . . . . . . . . 57
2.6 Latch, Removing and Installing . . . . . . . . . . . . . . . . . . . . . . . . . . . . . . . . . . . . . . . . . . . . . . 58
2.7 Actuator, Removing and Installing . . . . . . . . . . . . . . . . . . . . . . . . . . . . . . . . . . . . . . . . . . . . 60
2.8 Hinges, Removing and Installing . . . . . . . . . . . . . . . . . . . . . . . . . . . . . . . . . . . . . . . . . . . . 64
2.9 Catch, Removing and Installing . . . . . . . . . . . . . . . . . . . . . . . . . . . . . . . . . . . . . . . . . . . . . . 66
2.10 Catch, Adjusting . . . . . . . . . . . . . . . . . . . . . . . . . . . . . . . . . . . . . . . . . . . . . . . . . . . . . . . . . . 67
2.11 Rear Lid Seal, Removing and Installing . . . . . . . . . . . . . . . . . . . . . . . . . . . . . . . . . . . . . . . . 68
2.12 Gas-Filled Strut, Removing and Installing . . . . . . . . . . . . . . . . . . . . . . . . . . . . . . . . . . . . . . 70
2.13 Gas-Filled Strut, Venting . . . . . . . . . . . . . . . . . . . . . . . . . . . . . . . . . . . . . . . . . . . . . . . . . . 72
3 Fuel Filler Door Unit . . . . . . . . . . . . . . . . . . . . . . . . . . . . . . . . . . . . . . . . . . . . . . . . . . . . . . 73
3.1 Overview - Fuel Filler Door Unit . . . . . . . . . . . . . . . . . . . . . . . . . . . . . . . . . . . . . . . . . . . . . . 73
3.2 Fuel Filler Door Unit, Removing and Installing . . . . . . . . . . . . . . . . . . . . . . . . . . . . . . . . . . 74
3.3 Fuel Filler Door, Removing and Installing . . . . . . . . . . . . . . . . . . . . . . . . . . . . . . . . . . . . . . 76
Golf 2015 ➤ , Golf Variant 2015 ➤
Body Exterior - Edition 02.2016
Contents i

P
r
o
t
e
c
t
e
d
b
y
c
o
p
y
r
i
g
h
t
.
C
o
p
y
i
n
g
f
o
r
p
r
i
v
a
t
e
o
r
c
o
m
m
e
r
c
i
a
l
p
u
r
p
o
s
e
s
,
i
n
p
a
r
t
o
r
i
n
w
h
o
l
e
,
i
s
n
o
t
p
e
r
m
i
t
t
e
d
u
n
l
e
s
s
a
u
t
h
o
r
i
s
e
d
b
y
V
o
l
k
s
w
a
g
e
n
A
G
.
V
o
l
k
s
w
a
g
e
n
A
G
d
o
e
s
n
o
t
g
u
a
r
a
n
t
e
e
o
r
a
c
c
e
p
t
a
n
y
l
i
a
b
i
l
i
t
y
w
i
t
h
r
e
s
p
e
c
t
t
o
t
h
e
c
o
r
r
e
c
t
n
e
s
s
o
f
i
n
f
o
r
m
a
t
i
o
n
i
n
t
h
i
s
d
o
c
u
m
e
n
t
.
C
o
p
y
r
i
g
h
t
b
y
V
o
l
k
s
w
a
g
e
n
A
G
.
3.4 Adjusting Element, Removing and Installing . . . . . . . . . . . . . . . . . . . . . . . . . . . . . . . . . . . . 77
4 Special Tools . . . . . . . . . . . . . . . . . . . . . . . . . . . . . . . . . . . . . . . . . . . . . . . . . . . . . . . . . . . . 78
57 - Front Doors, Central Locking System . . . . . . . . . . . . . . . . . . . . . . . . . . . . . . . . . . 79
1 Door . . . . . . . . . . . . . . . . . . . . . . . . . . . . . . . . . . . . . . . . . . . . . . . . . . . . . . . . . . . . . . . . . . 79
1.1 Overview - Door . . . . . . . . . . . . . . . . . . . . . . . . . . . . . . . . . . . . . . . . . . . . . . . . . . . . . . . . . . 79
1.2 Inner Door Seal, Removing and Installing . . . . . . . . . . . . . . . . . . . . . . . . . . . . . . . . . . . . . . 82
1.3 Outer Door Seal, Removing and Installing . . . . . . . . . . . . . . . . . . . . . . . . . . . . . . . . . . . . . . 84
1.4 Door, Removing and Installing . . . . . . . . . . . . . . . . . . . . . . . . . . . . . . . . . . . . . . . . . . . . . . 86
1.5 Door, Adjusting . . . . . . . . . . . . . . . . . . . . . . . . . . . . . . . . . . . . . . . . . . . . . . . . . . . . . . . . . . 89
1.6 Catch, Adjusting . . . . . . . . . . . . . . . . . . . . . . . . . . . . . . . . . . . . . . . . . . . . . . . . . . . . . . . . . . 91
1.7 Door Arrester, Removing and Installing . . . . . . . . . . . . . . . . . . . . . . . . . . . . . . . . . . . . . . . . 93
2 Door Components . . . . . . . . . . . . . . . . . . . . . . . . . . . . . . . . . . . . . . . . . . . . . . . . . . . . . . . . 95
2.1 Overview - Door Components . . . . . . . . . . . . . . . . . . . . . . . . . . . . . . . . . . . . . . . . . . . . . . 95
2.2 Overview - Window Regulator . . . . . . . . . . . . . . . . . . . . . . . . . . . . . . . . . . . . . . . . . . . . . . 97
2.3 Overview - Door Handle and Door Lock . . . . . . . . . . . . . . . . . . . . . . . . . . . . . . . . . . . . . . . . 98
2.4 Window Regulator Motor, Removing and Installing . . . . . . . . . . . . . . . . . . . . . . . . . . . . . . 99
2.5 Window Regulator, Removing and Installing . . . . . . . . . . . . . . . . . . . . . . . . . . . . . . . . . . . . 101
2.6 Door Inner Cover, Removing and Installing . . . . . . . . . . . . . . . . . . . . . . . . . . . . . . . . . . . . 104
2.7 Catch, Removing and Installing . . . . . . . . . . . . . . . . . . . . . . . . . . . . . . . . . . . . . . . . . . . . . . 106
2.8 Lock Cylinder Cap, Removing and Installing . . . . . . . . . . . . . . . . . . . . . . . . . . . . . . . . . . . . 106
2.9 Cap without Lock Cylinder, Removing and Installing . . . . . . . . . . . . . . . . . . . . . . . . . . . . . . 108
2.10 Lock Cylinder, Removing and Installing . . . . . . . . . . . . . . . . . . . . . . . . . . . . . . . . . . . . . . . . 112
2.11 Door Handle, Removing and Installing . . . . . . . . . . . . . . . . . . . . . . . . . . . . . . . . . . . . . . . . 114
2.12 Bracket, Removing and Installing . . . . . . . . . . . . . . . . . . . . . . . . . . . . . . . . . . . . . . . . . . . . 116
2.13 Door Lock, Removing and Installing . . . . . . . . . . . . . . . . . . . . . . . . . . . . . . . . . . . . . . . . . . 119
2.14 Window Guide, Removing and Installing . . . . . . . . . . . . . . . . . . . . . . . . . . . . . . . . . . . . . . 124
2.15 Outer Window Shaft Strip, Removing and Installing . . . . . . . . . . . . . . . . . . . . . . . . . . . . . . 126
2.16 Inner Window Shaft Strip, Removing and Installing . . . . . . . . . . . . . . . . . . . . . . . . . . . . . . 129
2.17 Outer Cover, Removing and Installing . . . . . . . . . . . . . . . . . . . . . . . . . . . . . . . . . . . . . . . . 130
3 Central Locking . . . . . . . . . . . . . . . . . . . . . . . . . . . . . . . . . . . . . . . . . . . . . . . . . . . . . . . . . . 132
3.1 Component Location Overview - Central Locking . . . . . . . . . . . . . . . . . . . . . . . . . . . . . . . . 132
3.2 Driver Door Control Module J386 and Front Passenger Door Control Module J387 , Removing
and Installing . . . . . . . . . . . . . . . . . . . . . . . . . . . . . . . . . . . . . . . . . . . . . . . . . . . . . . . . . . . . 137
3.3 Driver Side Rear Window Regulator Motor Control Module J1016 and Front Passenger Side
Rear Window Regulator Motor Control Module J1017 , Removing and Installing . . . . . . . . 137
3.4 Key Battery, Removing and Installing . . . . . . . . . . . . . . . . . . . . . . . . . . . . . . . . . . . . . . . . 137
3.5 Ignition Key Cap, Removing and Installing . . . . . . . . . . . . . . . . . . . . . . . . . . . . . . . . . . . . . . 140
4 Special Tools . . . . . . . . . . . . . . . . . . . . . . . . . . . . . . . . . . . . . . . . . . . . . . . . . . . . . . . . . . . . 141
58 - Rear Doors . . . . . . . . . . . . . . . . . . . . . . . . . . . . . . . . . . . . . . . . . . . . . . . . . . . . . . 143
1 Door . . . . . . . . . . . . . . . . . . . . . . . . . . . . . . . . . . . . . . . . . . . . . . . . . . . . . . . . . . . . . . . . . . 143
1.1 Overview - Door . . . . . . . . . . . . . . . . . . . . . . . . . . . . . . . . . . . . . . . . . . . . . . . . . . . . . . . . . . 143
1.2 Door, Removing and Installing . . . . . . . . . . . . . . . . . . . . . . . . . . . . . . . . . . . . . . . . . . . . . . 145
1.3 Door, Adjusting . . . . . . . . . . . . . . . . . . . . . . . . . . . . . . . . . . . . . . . . . . . . . . . . . . . . . . . . . . 149
1.4 Catch, Adjusting . . . . . . . . . . . . . . . . . . . . . . . . . . . . . . . . . . . . . . . . . . . . . . . . . . . . . . . . . . 151
1.5 Door Arrester, Removing and Installing . . . . . . . . . . . . . . . . . . . . . . . . . . . . . . . . . . . . . . . . 152
1.6 Inner Door Seal, Removing and Installing . . . . . . . . . . . . . . . . . . . . . . . . . . . . . . . . . . . . . . 154
1.7 Outer Door Seal, Removing and Installing . . . . . . . . . . . . . . . . . . . . . . . . . . . . . . . . . . . . . . 157
2 Door Components . . . . . . . . . . . . . . . . . . . . . . . . . . . . . . . . . . . . . . . . . . . . . . . . . . . . . . . . 159
2.1 Overview - Door Components . . . . . . . . . . . . . . . . . . . . . . . . . . . . . . . . . . . . . . . . . . . . . . 159
2.2 Overview - Window Regulator . . . . . . . . . . . . . . . . . . . . . . . . . . . . . . . . . . . . . . . . . . . . . . 161
2.3 Overview - Door Handle and Door Lock . . . . . . . . . . . . . . . . . . . . . . . . . . . . . . . . . . . . . . . . 162
2.4 Window Regulator Motor, Removing and Installing . . . . . . . . . . . . . . . . . . . . . . . . . . . . . . 163
2.5 Window Regulator, Removing and Installing . . . . . . . . . . . . . . . . . . . . . . . . . . . . . . . . . . . . 165
Golf 2015 ➤ , Golf Variant 2015 ➤
Body Exterior - Edition 02.2016
ii Contents

P
r
o
t
e
c
t
e
d
b
y
c
o
p
y
r
i
g
h
t
.
C
o
p
y
i
n
g
f
o
r
p
r
i
v
a
t
e
o
r
c
o
m
m
e
r
c
i
a
l
p
u
r
p
o
s
e
s
,
i
n
p
a
r
t
o
r
i
n
w
h
o
l
e
,
i
s
n
o
t
p
e
r
m
i
t
t
e
d
u
n
l
e
s
s
a
u
t
h
o
r
i
s
e
d
b
y
V
o
l
k
s
w
a
g
e
n
A
G
.
V
o
l
k
s
w
a
g
e
n
A
G
d
o
e
s
n
o
t
g
u
a
r
a
n
t
e
e
o
r
a
c
c
e
p
t
a
n
y
l
i
a
b
i
l
i
t
y
w
i
t
h
r
e
s
p
e
c
t
t
o
t
h
e
c
o
r
r
e
c
t
n
e
s
s
o
f
i
n
f
o
r
m
a
t
i
o
n
i
n
t
h
i
s
d
o
c
u
m
e
n
t
.
C
o
p
y
r
i
g
h
t
b
y
V
o
l
k
s
w
a
g
e
n
A
G
.
2.6 Window Crank, Removing and Installing . . . . . . . . . . . . . . . . . . . . . . . . . . . . . . . . . . . . . . 168
2.7 Window Crank, Removing and Installing . . . . . . . . . . . . . . . . . . . . . . . . . . . . . . . . . . . . . . 168
2.8 Door Inner Cover, Removing and Installing . . . . . . . . . . . . . . . . . . . . . . . . . . . . . . . . . . . . 170
2.9 Catch, Removing and Installing . . . . . . . . . . . . . . . . . . . . . . . . . . . . . . . . . . . . . . . . . . . . . . 172
2.10 Cap, Removing and Installing . . . . . . . . . . . . . . . . . . . . . . . . . . . . . . . . . . . . . . . . . . . . . . 173
2.11 Door Handle, Removing and Installing . . . . . . . . . . . . . . . . . . . . . . . . . . . . . . . . . . . . . . . . 176
2.12 Bracket, Removing and Installing . . . . . . . . . . . . . . . . . . . . . . . . . . . . . . . . . . . . . . . . . . . . 177
2.13 Door Lock, Removing and Installing . . . . . . . . . . . . . . . . . . . . . . . . . . . . . . . . . . . . . . . . . . 179
2.14 Window Guide, Removing and Installing . . . . . . . . . . . . . . . . . . . . . . . . . . . . . . . . . . . . . . 183
2.15 Outer Window Shaft Strip, Removing and Installing . . . . . . . . . . . . . . . . . . . . . . . . . . . . . . 186
2.16 Inner Window Shaft Strip, Removing and Installing . . . . . . . . . . . . . . . . . . . . . . . . . . . . . . 187
2.17 Outer Cover, Removing and Installing . . . . . . . . . . . . . . . . . . . . . . . . . . . . . . . . . . . . . . . . 188
3 Special Tools . . . . . . . . . . . . . . . . . . . . . . . . . . . . . . . . . . . . . . . . . . . . . . . . . . . . . . . . . . . . 191
60 - Sunroof . . . . . . . . . . . . . . . . . . . . . . . . . . . . . . . . . . . . . . . . . . . . . . . . . . . . . . . . 193
1 Sunroof . . . . . . . . . . . . . . . . . . . . . . . . . . . . . . . . . . . . . . . . . . . . . . . . . . . . . . . . . . . . . . . . 193
1.1 Characteristics - Sliding Sunroof, Sedan . . . . . . . . . . . . . . . . . . . . . . . . . . . . . . . . . . . . . . 193
1.2 Overview - Sunroof . . . . . . . . . . . . . . . . . . . . . . . . . . . . . . . . . . . . . . . . . . . . . . . . . . . . . . . . 194
1.3 Overview - Sunroof Shade . . . . . . . . . . . . . . . . . . . . . . . . . . . . . . . . . . . . . . . . . . . . . . . . . . 201
1.4 Sunroof Frame, Removing and Installing . . . . . . . . . . . . . . . . . . . . . . . . . . . . . . . . . . . . . . 203
1.5 Wind Deflector, Removing and Installing . . . . . . . . . . . . . . . . . . . . . . . . . . . . . . . . . . . . . . 215
1.6 Glass Panel, Removing and Installing . . . . . . . . . . . . . . . . . . . . . . . . . . . . . . . . . . . . . . . . 223
1.7 Rear Sunroof Panel, Removing and Installing . . . . . . . . . . . . . . . . . . . . . . . . . . . . . . . . . . 237
1.8 Glass Panel, Adjusting . . . . . . . . . . . . . . . . . . . . . . . . . . . . . . . . . . . . . . . . . . . . . . . . . . . . 241
1.9 Rear Glass Panel, Adjusting . . . . . . . . . . . . . . . . . . . . . . . . . . . . . . . . . . . . . . . . . . . . . . . . 244
1.10 Height Adjustment, Checking . . . . . . . . . . . . . . . . . . . . . . . . . . . . . . . . . . . . . . . . . . . . . . . . 245
1.11 Slotted Guide Rail Guide, Removing and Installing . . . . . . . . . . . . . . . . . . . . . . . . . . . . . . 246
1.12 Sunroof Front Trim, Removing and Installing . . . . . . . . . . . . . . . . . . . . . . . . . . . . . . . . . . . . 254
1.13 Power Sunroof Control Module J245 , Removing and Installing . . . . . . . . . . . . . . . . . . . . 261
1.14 Roof Shade Control Module J394 , Removing and Installing . . . . . . . . . . . . . . . . . . . . . . . . 272
1.15 Sunroof Seals, Removing and Installing . . . . . . . . . . . . . . . . . . . . . . . . . . . . . . . . . . . . . . 273
1.16 Sunroof Shade, Removing and Installing . . . . . . . . . . . . . . . . . . . . . . . . . . . . . . . . . . . . . . 279
1.17 Power Sunroof Control Module J245 , Programming . . . . . . . . . . . . . . . . . . . . . . . . . . . . . . 297
1.18 Roof Shade Control Module J394 , Programming . . . . . . . . . . . . . . . . . . . . . . . . . . . . . . . . 298
1.19 Operating without Electricity . . . . . . . . . . . . . . . . . . . . . . . . . . . . . . . . . . . . . . . . . . . . . . . . 299
2 Water Drain Hoses . . . . . . . . . . . . . . . . . . . . . . . . . . . . . . . . . . . . . . . . . . . . . . . . . . . . . . . . 302
2.1 Overview - Water Drain Hoses . . . . . . . . . . . . . . . . . . . . . . . . . . . . . . . . . . . . . . . . . . . . . . 302
2.2 Water Drain Hoses, Cleaning . . . . . . . . . . . . . . . . . . . . . . . . . . . . . . . . . . . . . . . . . . . . . . . . 303
2.3 Water Drain Hoses, Removing and Installing . . . . . . . . . . . . . . . . . . . . . . . . . . . . . . . . . . . . 306
3 Special Tools . . . . . . . . . . . . . . . . . . . . . . . . . . . . . . . . . . . . . . . . . . . . . . . . . . . . . . . . . . . . 310
63 - Bumpers . . . . . . . . . . . . . . . . . . . . . . . . . . . . . . . . . . . . . . . . . . . . . . . . . . . . . . . . 312
1 Front Bumper . . . . . . . . . . . . . . . . . . . . . . . . . . . . . . . . . . . . . . . . . . . . . . . . . . . . . . . . . . . . 312
1.1 Overview - Bumper Cover . . . . . . . . . . . . . . . . . . . . . . . . . . . . . . . . . . . . . . . . . . . . . . . . . . 312
1.2 Overview - Attachments . . . . . . . . . . . . . . . . . . . . . . . . . . . . . . . . . . . . . . . . . . . . . . . . . . . . 313
1.3 Overview - Impact Member . . . . . . . . . . . . . . . . . . . . . . . . . . . . . . . . . . . . . . . . . . . . . . . . 316
1.4 Overview - Guides . . . . . . . . . . . . . . . . . . . . . . . . . . . . . . . . . . . . . . . . . . . . . . . . . . . . . . . . 317
1.5 Bumper Cover, Removing and Installing . . . . . . . . . . . . . . . . . . . . . . . . . . . . . . . . . . . . . . 317
1.6 Bumper Cover, Servicing . . . . . . . . . . . . . . . . . . . . . . . . . . . . . . . . . . . . . . . . . . . . . . . . . . 320
1.7 Parking Aid Bracket, Installing . . . . . . . . . . . . . . . . . . . . . . . . . . . . . . . . . . . . . . . . . . . . . . 320
1.8 Parallel Parking Assist Bracket, Installing . . . . . . . . . . . . . . . . . . . . . . . . . . . . . . . . . . . . . . 324
2 Rear Bumper . . . . . . . . . . . . . . . . . . . . . . . . . . . . . . . . . . . . . . . . . . . . . . . . . . . . . . . . . . . . 328
2.1 Overview - Bumper Cover . . . . . . . . . . . . . . . . . . . . . . . . . . . . . . . . . . . . . . . . . . . . . . . . . . 328
2.2 Overview - Attachments . . . . . . . . . . . . . . . . . . . . . . . . . . . . . . . . . . . . . . . . . . . . . . . . . . . . 331
2.3 Overview - Impact Member . . . . . . . . . . . . . . . . . . . . . . . . . . . . . . . . . . . . . . . . . . . . . . . . 335
Golf 2015 ➤ , Golf Variant 2015 ➤
Body Exterior - Edition 02.2016
Contents iii

P
r
o
t
e
c
t
e
d
b
y
c
o
p
y
r
i
g
h
t
.
C
o
p
y
i
n
g
f
o
r
p
r
i
v
a
t
e
o
r
c
o
m
m
e
r
c
i
a
l
p
u
r
p
o
s
e
s
,
i
n
p
a
r
t
o
r
i
n
w
h
o
l
e
,
i
s
n
o
t
p
e
r
m
i
t
t
e
d
u
n
l
e
s
s
a
u
t
h
o
r
i
s
e
d
b
y
V
o
l
k
s
w
a
g
e
n
A
G
.
V
o
l
k
s
w
a
g
e
n
A
G
d
o
e
s
n
o
t
g
u
a
r
a
n
t
e
e
o
r
a
c
c
e
p
t
a
n
y
l
i
a
b
i
l
i
t
y
w
i
t
h
r
e
s
p
e
c
t
t
o
t
h
e
c
o
r
r
e
c
t
n
e
s
s
o
f
i
n
f
o
r
m
a
t
i
o
n
i
n
t
h
i
s
d
o
c
u
m
e
n
t
.
C
o
p
y
r
i
g
h
t
b
y
V
o
l
k
s
w
a
g
e
n
A
G
.
2.4 Overview - Guides . . . . . . . . . . . . . . . . . . . . . . . . . . . . . . . . . . . . . . . . . . . . . . . . . . . . . . . . 336
2.5 Bumper Cover, Removing and Installing . . . . . . . . . . . . . . . . . . . . . . . . . . . . . . . . . . . . . . 337
2.6 Impact Member, Removing and Installing . . . . . . . . . . . . . . . . . . . . . . . . . . . . . . . . . . . . . . 343
2.7 Bumper Cover, Servicing . . . . . . . . . . . . . . . . . . . . . . . . . . . . . . . . . . . . . . . . . . . . . . . . . . 345
2.8 Parking Aid Bracket, Installing . . . . . . . . . . . . . . . . . . . . . . . . . . . . . . . . . . . . . . . . . . . . . . 345
2.9 Parallel Parking Assist Bracket, Installing . . . . . . . . . . . . . . . . . . . . . . . . . . . . . . . . . . . . . . 349
3 Special Tools . . . . . . . . . . . . . . . . . . . . . . . . . . . . . . . . . . . . . . . . . . . . . . . . . . . . . . . . . . . . 354
64 - Glass, Window Regulators . . . . . . . . . . . . . . . . . . . . . . . . . . . . . . . . . . . . . . . . . . 355
1 Repair Information . . . . . . . . . . . . . . . . . . . . . . . . . . . . . . . . . . . . . . . . . . . . . . . . . . . . . . . . 355
1.1 Minimum Curing Times for Bonded Windows . . . . . . . . . . . . . . . . . . . . . . . . . . . . . . . . . . 355
1.2 Window Glass, Servicing . . . . . . . . . . . . . . . . . . . . . . . . . . . . . . . . . . . . . . . . . . . . . . . . . . 355
1.3 Installation Instructions for Bonded Window Glass . . . . . . . . . . . . . . . . . . . . . . . . . . . . . . 356
1.4 Undamaged Window Glass, Preparing for Installation . . . . . . . . . . . . . . . . . . . . . . . . . . . . 357
1.5 New Window Glass, Preparing for Installation . . . . . . . . . . . . . . . . . . . . . . . . . . . . . . . . . . 357
1.6 Body Flange, Preparing for Installation . . . . . . . . . . . . . . . . . . . . . . . . . . . . . . . . . . . . . . . . 359
1.7 Adhesive, Removing . . . . . . . . . . . . . . . . . . . . . . . . . . . . . . . . . . . . . . . . . . . . . . . . . . . . . . 360
2 Windshield . . . . . . . . . . . . . . . . . . . . . . . . . . . . . . . . . . . . . . . . . . . . . . . . . . . . . . . . . . . . . . 362
2.1 Overview - Windshield . . . . . . . . . . . . . . . . . . . . . . . . . . . . . . . . . . . . . . . . . . . . . . . . . . . . 362
2.2 Windshield, Removing and Installing . . . . . . . . . . . . . . . . . . . . . . . . . . . . . . . . . . . . . . . . . . 363
3 Rear Window . . . . . . . . . . . . . . . . . . . . . . . . . . . . . . . . . . . . . . . . . . . . . . . . . . . . . . . . . . . . 368
3.1 Overview - Rear Window . . . . . . . . . . . . . . . . . . . . . . . . . . . . . . . . . . . . . . . . . . . . . . . . . . 368
3.2 Rear Window, Removing and Installing . . . . . . . . . . . . . . . . . . . . . . . . . . . . . . . . . . . . . . . . 369
4 Side Windows . . . . . . . . . . . . . . . . . . . . . . . . . . . . . . . . . . . . . . . . . . . . . . . . . . . . . . . . . . . . 373
4.1 Overview - Front Side Window . . . . . . . . . . . . . . . . . . . . . . . . . . . . . . . . . . . . . . . . . . . . . . 373
4.2 Overview - Rear Side Window . . . . . . . . . . . . . . . . . . . . . . . . . . . . . . . . . . . . . . . . . . . . . . 374
4.3 Front Side Window, Removing and Installing . . . . . . . . . . . . . . . . . . . . . . . . . . . . . . . . . . . . 375
4.4 Rear Side Window, Removing and Installing . . . . . . . . . . . . . . . . . . . . . . . . . . . . . . . . . . . . 377
5 Door Windows . . . . . . . . . . . . . . . . . . . . . . . . . . . . . . . . . . . . . . . . . . . . . . . . . . . . . . . . . . 380
5.1 Overview - Front Door Window . . . . . . . . . . . . . . . . . . . . . . . . . . . . . . . . . . . . . . . . . . . . . . 380
5.2 Overview - Rear Door Window . . . . . . . . . . . . . . . . . . . . . . . . . . . . . . . . . . . . . . . . . . . . . . 381
5.3 Overview - Fixed Rear Door Window . . . . . . . . . . . . . . . . . . . . . . . . . . . . . . . . . . . . . . . . . . 382
5.4 Front Door Window, Removing and Installing . . . . . . . . . . . . . . . . . . . . . . . . . . . . . . . . . . 382
5.5 Rear Door Window, Removing and Installing . . . . . . . . . . . . . . . . . . . . . . . . . . . . . . . . . . . . 387
5.6 Fixed Rear Door Window, Removing and Installing . . . . . . . . . . . . . . . . . . . . . . . . . . . . . . 390
6 Special Tools . . . . . . . . . . . . . . . . . . . . . . . . . . . . . . . . . . . . . . . . . . . . . . . . . . . . . . . . . . . . 392
66 - Exterior Equipment . . . . . . . . . . . . . . . . . . . . . . . . . . . . . . . . . . . . . . . . . . . . . . . . 395
1 Radiator Grille/Front Trim . . . . . . . . . . . . . . . . . . . . . . . . . . . . . . . . . . . . . . . . . . . . . . . . . . 395
1.1 Overview - Radiator Grille . . . . . . . . . . . . . . . . . . . . . . . . . . . . . . . . . . . . . . . . . . . . . . . . . . 395
1.2 Radiator Grille, Removing and Installing . . . . . . . . . . . . . . . . . . . . . . . . . . . . . . . . . . . . . . 396
2 Spoiler . . . . . . . . . . . . . . . . . . . . . . . . . . . . . . . . . . . . . . . . . . . . . . . . . . . . . . . . . . . . . . . . 398
2.1 Overview - Spoiler . . . . . . . . . . . . . . . . . . . . . . . . . . . . . . . . . . . . . . . . . . . . . . . . . . . . . . . . 398
2.2 Spoiler, Removing and Installing . . . . . . . . . . . . . . . . . . . . . . . . . . . . . . . . . . . . . . . . . . . . 399
2.3 Side Spoiler, Removing and Installing . . . . . . . . . . . . . . . . . . . . . . . . . . . . . . . . . . . . . . . . 401
3 Molding/Trim/Extensions/Trim Panels . . . . . . . . . . . . . . . . . . . . . . . . . . . . . . . . . . . . . . . . 406
3.1 Overview - Drip Rail . . . . . . . . . . . . . . . . . . . . . . . . . . . . . . . . . . . . . . . . . . . . . . . . . . . . . . 406
3.2 Overview - Side Sill Trim Panel . . . . . . . . . . . . . . . . . . . . . . . . . . . . . . . . . . . . . . . . . . . . . . 408
3.3 Overview - Heat Shield . . . . . . . . . . . . . . . . . . . . . . . . . . . . . . . . . . . . . . . . . . . . . . . . . . . . 409
3.4 Drip Rail, Removing and Installing . . . . . . . . . . . . . . . . . . . . . . . . . . . . . . . . . . . . . . . . . . . . 409
3.5 Side Sill Trim Panel, Removing and Installing . . . . . . . . . . . . . . . . . . . . . . . . . . . . . . . . . . 411
3.6 Front Door B-Pillar Trim, Removing and Installing . . . . . . . . . . . . . . . . . . . . . . . . . . . . . . . . 414
3.7 Rear Door B-Pillar Trim, Removing and Installing . . . . . . . . . . . . . . . . . . . . . . . . . . . . . . . . 415
3.8 Rear Door C-Pillar Trim, Removing and Installing . . . . . . . . . . . . . . . . . . . . . . . . . . . . . . . . 417
Golf 2015 ➤ , Golf Variant 2015 ➤
Body Exterior - Edition 02.2016
iv Contents

P
r
o
t
e
c
t
e
d
b
y
c
o
p
y
r
i
g
h
t
.
C
o
p
y
i
n
g
f
o
r
p
r
i
v
a
t
e
o
r
c
o
m
m
e
r
c
i
a
l
p
u
r
p
o
s
e
s
,
i
n
p
a
r
t
o
r
i
n
w
h
o
l
e
,
i
s
n
o
t
p
e
r
m
i
t
t
e
d
u
n
l
e
s
s
a
u
t
h
o
r
i
s
e
d
b
y
V
o
l
k
s
w
a
g
e
n
A
G
.
V
o
l
k
s
w
a
g
e
n
A
G
d
o
e
s
n
o
t
g
u
a
r
a
n
t
e
e
o
r
a
c
c
e
p
t
a
n
y
l
i
a
b
i
l
i
t
y
w
i
t
h
r
e
s
p
e
c
t
t
o
t
h
e
c
o
r
r
e
c
t
n
e
s
s
o
f
i
n
f
o
r
m
a
t
i
o
n
i
n
t
h
i
s
d
o
c
u
m
e
n
t
.
C
o
p
y
r
i
g
h
t
b
y
V
o
l
k
s
w
a
g
e
n
A
G
.
3.9 Floor Heat Shield, Removing and Installing . . . . . . . . . . . . . . . . . . . . . . . . . . . . . . . . . . . . 418
3.10 Center Exhaust System Heat Shield, Removing and Installing . . . . . . . . . . . . . . . . . . . . . . 420
3.11 Rear Muffler Heat Shield, Removing and Installing . . . . . . . . . . . . . . . . . . . . . . . . . . . . . . 420
4 Noise Insulation . . . . . . . . . . . . . . . . . . . . . . . . . . . . . . . . . . . . . . . . . . . . . . . . . . . . . . . . . . 422
4.1 Overview - Noise Insulation . . . . . . . . . . . . . . . . . . . . . . . . . . . . . . . . . . . . . . . . . . . . . . . . 422
5 Underbody Panel . . . . . . . . . . . . . . . . . . . . . . . . . . . . . . . . . . . . . . . . . . . . . . . . . . . . . . . . 425
5.1 Overview - Underbody Panels . . . . . . . . . . . . . . . . . . . . . . . . . . . . . . . . . . . . . . . . . . . . . . 425
5.2 Underbody Panels, Removing and Installing . . . . . . . . . . . . . . . . . . . . . . . . . . . . . . . . . . . . 426
5.3 Center Underbody Panels, Removing and Installing . . . . . . . . . . . . . . . . . . . . . . . . . . . . . . 427
5.4 Rear Underbody Panel, Removing and Installing . . . . . . . . . . . . . . . . . . . . . . . . . . . . . . . . 429
5.5 Front Tunnel Brace, Removing and Installing . . . . . . . . . . . . . . . . . . . . . . . . . . . . . . . . . . 430
5.6 Rear Tunnel Brace, Removing and Installing . . . . . . . . . . . . . . . . . . . . . . . . . . . . . . . . . . . . 431
6 Roof Bars/Roof Rails . . . . . . . . . . . . . . . . . . . . . . . . . . . . . . . . . . . . . . . . . . . . . . . . . . . . . . 433
6.1 Overview - Roof Railing . . . . . . . . . . . . . . . . . . . . . . . . . . . . . . . . . . . . . . . . . . . . . . . . . . . . 433
6.2 Roof Railing, Removing and Installing . . . . . . . . . . . . . . . . . . . . . . . . . . . . . . . . . . . . . . . . 434
7 Exterior Rearview Mirror . . . . . . . . . . . . . . . . . . . . . . . . . . . . . . . . . . . . . . . . . . . . . . . . . . . . 435
7.1 Overview - Exterior Rearview Mirror . . . . . . . . . . . . . . . . . . . . . . . . . . . . . . . . . . . . . . . . . . 435
7.2 Exterior Rearview Mirror, Removing and Installing . . . . . . . . . . . . . . . . . . . . . . . . . . . . . . 436
7.3 Mirror Glass, Removing and Installing . . . . . . . . . . . . . . . . . . . . . . . . . . . . . . . . . . . . . . . . 438
7.4 Mirror Adjuster, Removing and Installing . . . . . . . . . . . . . . . . . . . . . . . . . . . . . . . . . . . . . . 439
7.5 Mirror Cap, Removing and Installing . . . . . . . . . . . . . . . . . . . . . . . . . . . . . . . . . . . . . . . . . . 442
7.6 Mirror Trim, Removing and Installing . . . . . . . . . . . . . . . . . . . . . . . . . . . . . . . . . . . . . . . . . . 443
8 Wheel Housing Liner . . . . . . . . . . . . . . . . . . . . . . . . . . . . . . . . . . . . . . . . . . . . . . . . . . . . . . 445
8.1 Overview - Front Wheel Housing Liner . . . . . . . . . . . . . . . . . . . . . . . . . . . . . . . . . . . . . . . . 445
8.2 Overview - Rear Wheel Housing Liner . . . . . . . . . . . . . . . . . . . . . . . . . . . . . . . . . . . . . . . . 446
8.3 Overview - Sill Panel Cover . . . . . . . . . . . . . . . . . . . . . . . . . . . . . . . . . . . . . . . . . . . . . . . . 447
8.4 Front Wheel Housing Liner, Removing and Installing . . . . . . . . . . . . . . . . . . . . . . . . . . . . 447
8.5 Rear Wheel Housing Liner, Removing and Installing . . . . . . . . . . . . . . . . . . . . . . . . . . . . . . 448
9 Name Badges and Emblems . . . . . . . . . . . . . . . . . . . . . . . . . . . . . . . . . . . . . . . . . . . . . . . . 451
9.1 Dimensions - Rear Lid Name Badge and Emblem . . . . . . . . . . . . . . . . . . . . . . . . . . . . . . . . 451
9.2 Dimensions - Fender Name Badges and Emblems . . . . . . . . . . . . . . . . . . . . . . . . . . . . . . 454
9.3 Front Emblems, Removing and Installing . . . . . . . . . . . . . . . . . . . . . . . . . . . . . . . . . . . . . . 454
9.4 Rear Emblem, Removing and Installing . . . . . . . . . . . . . . . . . . . . . . . . . . . . . . . . . . . . . . . . 456
9.5 Name Badges, Removing and Installing . . . . . . . . . . . . . . . . . . . . . . . . . . . . . . . . . . . . . . 457
10 Trailer Hitch . . . . . . . . . . . . . . . . . . . . . . . . . . . . . . . . . . . . . . . . . . . . . . . . . . . . . . . . . . . . 459
10.1 Overview - Trailer Hitch . . . . . . . . . . . . . . . . . . . . . . . . . . . . . . . . . . . . . . . . . . . . . . . . . . . . 459
10.2 Overview - Release Cable . . . . . . . . . . . . . . . . . . . . . . . . . . . . . . . . . . . . . . . . . . . . . . . . . . 461
10.3 Trailer Hitch, Removing and Installing . . . . . . . . . . . . . . . . . . . . . . . . . . . . . . . . . . . . . . . . 462
10.4 Release Cable, Removing and Installing . . . . . . . . . . . . . . . . . . . . . . . . . . . . . . . . . . . . . . 468
11 Special Tools . . . . . . . . . . . . . . . . . . . . . . . . . . . . . . . . . . . . . . . . . . . . . . . . . . . . . . . . . . . . 471
12 Revision History . . . . . . . . . . . . . . . . . . . . . . . . . . . . . . . . . . . . . . . . . . . . . . . . . . . . . . . . . . 473
Golf 2015 ➤ , Golf Variant 2015 ➤
Body Exterior - Edition 02.2016
Contents v

P
r
o
t
e
c
t
e
d
b
y
c
o
p
y
r
i
g
h
t
.
C
o
p
y
i
n
g
f
o
r
p
r
i
v
a
t
e
o
r
c
o
m
m
e
r
c
i
a
l
p
u
r
p
o
s
e
s
,
i
n
p
a
r
t
o
r
i
n
w
h
o
l
e
,
i
s
n
o
t
p
e
r
m
i
t
t
e
d
u
n
l
e
s
s
a
u
t
h
o
r
i
s
e
d
b
y
V
o
l
k
s
w
a
g
e
n
A
G
.
V
o
l
k
s
w
a
g
e
n
A
G
d
o
e
s
n
o
t
g
u
a
r
a
n
t
e
e
o
r
a
c
c
e
p
t
a
n
y
l
i
a
b
i
l
i
t
y
w
i
t
h
r
e
s
p
e
c
t
t
o
t
h
e
c
o
r
r
e
c
t
n
e
s
s
o
f
i
n
f
o
r
m
a
t
i
o
n
i
n
t
h
i
s
d
o
c
u
m
e
n
t
.
C
o
p
y
r
i
g
h
t
b
y
V
o
l
k
s
w
a
g
e
n
A
G
.
Golf 2015 ➤ , Golf Variant 2015 ➤
Body Exterior - Edition 02.2016
vi Contents

P
r
o
t
e
c
t
e
d
b
y
c
o
p
y
r
i
g
h
t
.
C
o
p
y
i
n
g
f
o
r
p
r
i
v
a
t
e
o
r
c
o
m
m
e
r
c
i
a
l
p
u
r
p
o
s
e
s
,
i
n
p
a
r
t
o
r
i
n
w
h
o
l
e
,
i
s
n
o
t
p
e
r
m
i
t
t
e
d
u
n
l
e
s
s
a
u
t
h
o
r
i
s
e
d
b
y
V
o
l
k
s
w
a
g
e
n
A
G
.
V
o
l
k
s
w
a
g
e
n
A
G
d
o
e
s
n
o
t
g
u
a
r
a
n
t
e
e
o
r
a
c
c
e
p
t
a
n
y
l
i
a
b
i
l
i
t
y
w
i
t
h
r
e
s
p
e
c
t
t
o
t
h
e
c
o
r
r
e
c
t
n
e
s
s
o
f
i
n
f
o
r
m
a
t
i
o
n
i
n
t
h
i
s
d
o
c
u
m
e
n
t
.
C
o
p
y
r
i
g
h
t
b
y
V
o
l
k
s
w
a
g
e
n
A
G
.
50 – Body Front
1 Lock Carrier
(Edition 02.2016)
⇒ “1.1 Overview - Lock Carrier”, page 1
⇒ “1.2 Lock Carrier, Removing and Installing”, page 2
⇒ “1.3 Service Position, Implementing and Resetting”,
page 4
⇒ “1.4 Lock Carrier, Servicing”, page 7
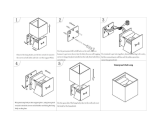
1.1 Overview - Lock Carrier
1 - Support
❑ Right
2 - Bolt
❑ 8 Nm
❑ Quantity: 1 on each side
3 - Bolt
❑ 8 Nm
❑ Quantity: 2 on each side
4 - Lock Carrier with Attach‐
ments
❑ Removing and instal‐
ling. Refer to
⇒ “1.2 Lock Carrier, Re‐
moving and Installing”,
page 2 .
❑ Service position, imple‐
menting and resetting.
Refer to
⇒ “1.3 Service Position,
Implementing and Re‐
setting”, page 4 .
5 - Support
❑ Left
6 - Air Duct
❑ Left
❑ There are different ver‐
sions. Refer to the Parts
Catalog for the alloca‐
tion.
7 - Lock Carrier Support
8 - Bolt
❑ Quantity: 2
❑ Tightening specification -item 13- ⇒ Item 13 (page 25) .
9 - Center Guide
10 - Bolt
❑ Quantity: 3
❑ Tightening specification -item 6- ⇒ Item 6 (page 317) .
Golf 2015 ➤ , Golf Variant 2015 ➤
Body Exterior - Edition 02.2016
1. Lock Carrier 1

P
r
o
t
e
c
t
e
d
b
y
c
o
p
y
r
i
g
h
t
.
C
o
p
y
i
n
g
f
o
r
p
r
i
v
a
t
e
o
r
c
o
m
m
e
r
c
i
a
l
p
u
r
p
o
s
e
s
,
i
n
p
a
r
t
o
r
i
n
w
h
o
l
e
,
i
s
n
o
t
p
e
r
m
i
t
t
e
d
u
n
l
e
s
s
a
u
t
h
o
r
i
s
e
d
b
y
V
o
l
k
s
w
a
g
e
n
A
G
.
V
o
l
k
s
w
a
g
e
n
A
G
d
o
e
s
n
o
t
g
u
a
r
a
n
t
e
e
o
r
a
c
c
e
p
t
a
n
y
l
i
a
b
i
l
i
t
y
w
i
t
h
r
e
s
p
e
c
t
t
o
t
h
e
c
o
r
r
e
c
t
n
e
s
s
o
f
i
n
f
o
r
m
a
t
i
o
n
i
n
t
h
i
s
d
o
c
u
m
e
n
t
.
C
o
p
y
r
i
g
h
t
b
y
V
o
l
k
s
w
a
g
e
n
A
G
.
11 - Bolt
❑ Quantity: 2 on each side
❑ Tightening specification -item 2- ⇒ Item 2 (page 316) .
12 - Impact Member
❑ Overview. Refer to ⇒ “1.3 Overview - Impact Member”, page 316 .
13 - Bolt
❑ Quantity: 4 on each side
❑ Tightening specification -item 3- ⇒ Item 3 (page 316) .
14 - Foam Piece
15 - Air Duct
❑ Right
❑ There are different versions. Refer to the Parts Catalog for the allocation.
1.2 Lock Carrier, Removing and Installing
Special tools and workshop equipment required
♦ Guide Pins - T10093-
♦ Torque Wrench 1331 5-50Nm - VAG1331-
♦ Torque Wrench 1332 40-200Nm - VAG1332-
Note
♦
The lock carrier is a safety-related component. For this reason the lock carrier may only be serviced in the
specified positions.
♦
Replace the lock carrier if it is damaged.
♦
For vehicles with the Distance Regulation Control Module - J428- , the Distance Regulation Control Module
- J428- must be re-aligned during every removal and installation or replacement of the lock carrier.
♦
Notes and work procedures for the Distance Regulation Control Module - J428- . Refer to ⇒ Electrical
Equipment; Rep. Gr. 27 ; Adaptive Cruise Control .
Golf 2015 ➤ , Golf Variant 2015 ➤
Body Exterior - Edition 02.2016
2 Rep. Gr.50 - Body Front

P
r
o
t
e
c
t
e
d
b
y
c
o
p
y
r
i
g
h
t
.
C
o
p
y
i
n
g
f
o
r
p
r
i
v
a
t
e
o
r
c
o
m
m
e
r
c
i
a
l
p
u
r
p
o
s
e
s
,
i
n
p
a
r
t
o
r
i
n
w
h
o
l
e
,
i
s
n
o
t
p
e
r
m
i
t
t
e
d
u
n
l
e
s
s
a
u
t
h
o
r
i
s
e
d
b
y
V
o
l
k
s
w
a
g
e
n
A
G
.
V
o
l
k
s
w
a
g
e
n
A
G
d
o
e
s
n
o
t
g
u
a
r
a
n
t
e
e
o
r
a
c
c
e
p
t
a
n
y
l
i
a
b
i
l
i
t
y
w
i
t
h
r
e
s
p
e
c
t
t
o
t
h
e
c
o
r
r
e
c
t
n
e
s
s
o
f
i
n
f
o
r
m
a
t
i
o
n
i
n
t
h
i
s
d
o
c
u
m
e
n
t
.
C
o
p
y
r
i
g
h
t
b
y
V
o
l
k
s
w
a
g
e
n
A
G
.
Removing
– Only perform the service position using the Guide Pins -
T10093- . Refer to
⇒ “1.3 Service Position, Implementing and Resetting”,
page 4 .
– Disconnect the connector to the lock carrier -1-.
– Together with a second technician, remove the Guide Pins -
T10093- on the left and right longitudinal member. Support the
lock carrier with the attachments -1-. For example on the Scis‐
sor Lift Table - VAS6131B- .
– Remove the bumper carrier and the left and right support. Re‐
fer to ⇒ “1.1 Overview - Lock Carrier”, page 1 .
– Loosen the radiator from the lock carrier -arrow A-, but do not
remove. Refer to ⇒ Rep. Gr. 19 ; Radiator/Coolant Fan .
– Lift the condenser -3- off of the radiator module -2- -arrow B-
and pivot it slightly out of the lock carrier -arrow C-, but do not
remove.
– Remove the lock carrier -1- between the radiator and con‐
denser upward -D arrows-.
Golf 2015 ➤ , Golf Variant 2015 ➤
Body Exterior - Edition 02.2016
1. Lock Carrier 3

P
r
o
t
e
c
t
e
d
b
y
c
o
p
y
r
i
g
h
t
.
C
o
p
y
i
n
g
f
o
r
p
r
i
v
a
t
e
o
r
c
o
m
m
e
r
c
i
a
l
p
u
r
p
o
s
e
s
,
i
n
p
a
r
t
o
r
i
n
w
h
o
l
e
,
i
s
n
o
t
p
e
r
m
i
t
t
e
d
u
n
l
e
s
s
a
u
t
h
o
r
i
s
e
d
b
y
V
o
l
k
s
w
a
g
e
n
A
G
.
V
o
l
k
s
w
a
g
e
n
A
G
d
o
e
s
n
o
t
g
u
a
r
a
n
t
e
e
o
r
a
c
c
e
p
t
a
n
y
l
i
a
b
i
l
i
t
y
w
i
t
h
r
e
s
p
e
c
t
t
o
t
h
e
c
o
r
r
e
c
t
n
e
s
s
o
f
i
n
f
o
r
m
a
t
i
o
n
i
n
t
h
i
s
d
o
c
u
m
e
n
t
.
C
o
p
y
r
i
g
h
t
b
y
V
o
l
k
s
w
a
g
e
n
A
G
.
Note
♦
Never hang the condenser and the hydraulic fluid cooler on the lines.
♦
The lines for the condenser and hydraulics must not be kinked.
Installing
Install in reverse order of removal. Note the following:
Note
♦
Always install the lock carrier onto the attaching points at the
frontmost positions of the oblong holes. Only then can the lock
carrier slide in the event of a crash.
♦
For vehicles with the Distance Regulation Control Module -
J428- , the Distance Regulation Control Module - J428- must
be re-aligned when loosening, removing and installing or re‐
placing the lock carrier.
♦
Notes and work procedures for the Distance Regulation Con‐
trol Module - J428- . Refer to ⇒ Electrical Equipment; Rep.
Gr. 27 ; Adaptive Cruise Control .
Tightening Specifications
♦ Refer to ⇒ “1.1 Overview - Lock Carrier”, page 1
1.3 Service Position, Implementing and Re‐
setting
Special tools and workshop equipment required
♦ Guide Pins - T10093-
♦ Adapters For Service Position - T10467-
♦ Torque Wrench 1331 5-50Nm - VAG1331-
♦ Torque Wrench 1332 40-200Nm - VAG1332-
Moving into Service Position
Note
♦
The lock carrier is a safety-related component. For this reason the lock carrier may not be serviced.
♦
Replace the lock carrier if it is damaged.
♦
For vehicles with the Distance Regulation Control Module - J428- , the Distance Regulation Control Module
- J428- must be re-aligned during every removal and installation or replacement of the lock carrier.
♦
Notes and work procedures for the Distance Regulation Control Module - J428- . Refer to ⇒ Electrical
Equipment; Rep. Gr. 27 ; Adaptive Cruise Control .
Golf 2015 ➤ , Golf Variant 2015 ➤
Body Exterior - Edition 02.2016
4 Rep. Gr.50 - Body Front

P
r
o
t
e
c
t
e
d
b
y
c
o
p
y
r
i
g
h
t
.
C
o
p
y
i
n
g
f
o
r
p
r
i
v
a
t
e
o
r
c
o
m
m
e
r
c
i
a
l
p
u
r
p
o
s
e
s
,
i
n
p
a
r
t
o
r
i
n
w
h
o
l
e
,
i
s
n
o
t
p
e
r
m
i
t
t
e
d
u
n
l
e
s
s
a
u
t
h
o
r
i
s
e
d
b
y
V
o
l
k
s
w
a
g
e
n
A
G
.
V
o
l
k
s
w
a
g
e
n
A
G
d
o
e
s
n
o
t
g
u
a
r
a
n
t
e
e
o
r
a
c
c
e
p
t
a
n
y
l
i
a
b
i
l
i
t
y
w
i
t
h
r
e
s
p
e
c
t
t
o
t
h
e
c
o
r
r
e
c
t
n
e
s
s
o
f
i
n
f
o
r
m
a
t
i
o
n
i
n
t
h
i
s
d
o
c
u
m
e
n
t
.
C
o
p
y
r
i
g
h
t
b
y
V
o
l
k
s
w
a
g
e
n
A
G
.
– Remove the noise insulation. Refer to
⇒ “4.1 Overview - Noise Insulation”, page 422 .
– Remove the front bumper cover. Refer to
⇒ “1.5 Bumper Cover, Removing and Installing”, page 317 .
– Remove the headlamps. Refer to ⇒ Electrical Equipment;
Rep. Gr. 94 ; Headlamp; Headlamp, Removing and Installing .
– Remove the release cable from the trunk lid actuation bracket.
Refer to
⇒ “1.14 Release Cable, Removing and Installing”,
page 45 .
– Disengage the washer fluid reservoir filler tube from the sup‐
port -2-. Refer to ⇒ Electrical Equipment; Rep. Gr. 92 ;
Windshield Washer System; Washer Fluid Reservoir, Remov‐
ing and Installing .
– Remove only one bolt -3- from the left and right longitudinal
members.
– Instead of the bolts, install the Guide Pins - T10093- into the
holes in the left and right longitudinal member.
– Remove the remaining bolts -3- from the left and right longi‐
tudinal members.
– The lock carrier with the attachments -1- can be pulled forward
approximately 10 cm on the Guide Pins - T10093- . Be careful
Golf 2015 ➤ , Golf Variant 2015 ➤
Body Exterior - Edition 02.2016
1. Lock Carrier 5

P
r
o
t
e
c
t
e
d
b
y
c
o
p
y
r
i
g
h
t
.
C
o
p
y
i
n
g
f
o
r
p
r
i
v
a
t
e
o
r
c
o
m
m
e
r
c
i
a
l
p
u
r
p
o
s
e
s
,
i
n
p
a
r
t
o
r
i
n
w
h
o
l
e
,
i
s
n
o
t
p
e
r
m
i
t
t
e
d
u
n
l
e
s
s
a
u
t
h
o
r
i
s
e
d
b
y
V
o
l
k
s
w
a
g
e
n
A
G
.
V
o
l
k
s
w
a
g
e
n
A
G
d
o
e
s
n
o
t
g
u
a
r
a
n
t
e
e
o
r
a
c
c
e
p
t
a
n
y
l
i
a
b
i
l
i
t
y
w
i
t
h
r
e
s
p
e
c
t
t
o
t
h
e
c
o
r
r
e
c
t
n
e
s
s
o
f
i
n
f
o
r
m
a
t
i
o
n
i
n
t
h
i
s
d
o
c
u
m
e
n
t
.
C
o
p
y
r
i
g
h
t
b
y
V
o
l
k
s
w
a
g
e
n
A
G
.
of the wires on the lock carrier. Disconnect the connectors if
necessary.
– Install the Adapters For Service Position - T10467- (quantity:
2 on each side) on the left and right side between the bumper
carrier and the longitudinal member.
Service Position, Resetting
– Remove the Adapters For Service Position - T10467- on the
left and right side between the bumper carrier and longitudinal
member.
– Push the lock carrier with the attachments -1- onto the Guide
Pins - T10093- on the longitudinal members.
– Insert the left and right bolts -3-.
– Remove the left and right Guide Pins - T10093- .
– Align the lock carrier with the attachments -1- on the longitu‐
dinal members and between the fenders. Refer to ⇒ Body
Repair; Rep. Gr. 00 ; Body Gap Dimensions; Front Body .
Golf 2015 ➤ , Golf Variant 2015 ➤
Body Exterior - Edition 02.2016
6 Rep. Gr.50 - Body Front

P
r
o
t
e
c
t
e
d
b
y
c
o
p
y
r
i
g
h
t
.
C
o
p
y
i
n
g
f
o
r
p
r
i
v
a
t
e
o
r
c
o
m
m
e
r
c
i
a
l
p
u
r
p
o
s
e
s
,
i
n
p
a
r
t
o
r
i
n
w
h
o
l
e
,
i
s
n
o
t
p
e
r
m
i
t
t
e
d
u
n
l
e
s
s
a
u
t
h
o
r
i
s
e
d
b
y
V
o
l
k
s
w
a
g
e
n
A
G
.
V
o
l
k
s
w
a
g
e
n
A
G
d
o
e
s
n
o
t
g
u
a
r
a
n
t
e
e
o
r
a
c
c
e
p
t
a
n
y
l
i
a
b
i
l
i
t
y
w
i
t
h
r
e
s
p
e
c
t
t
o
t
h
e
c
o
r
r
e
c
t
n
e
s
s
o
f
i
n
f
o
r
m
a
t
i
o
n
i
n
t
h
i
s
d
o
c
u
m
e
n
t
.
C
o
p
y
r
i
g
h
t
b
y
V
o
l
k
s
w
a
g
e
n
A
G
.
Note
♦
Always install the lock carrier onto the attaching points at the frontmost positions of the oblong holes. Only
then can the lock carrier slide in the event of a crash.
♦
For vehicles with the Distance Regulation Control Module - J428- , the Distance Regulation Control Module
- J428- must be re-aligned when loosening, removing and installing or replacing the lock carrier.
♦
Notes and work procedures for the Distance Regulation Control Module - J428- . Refer to ⇒ Electrical
Equipment; Rep. Gr. 27 ; Adaptive Cruise Control .
Continue to install in the reverse of removal. Note the following:
Note
♦
Make sure that the charge air cooler pressure hoses are re-installed correctly.
♦
The hoses and lines must not be pinched.
– Adjust the headlamps. Refer to ⇒ Electrical Equipment; Rep.
Gr. 94 ; Headlamp; Headlamp, Adjusting .
Tightening Specifications
1.4 Lock Carrier, Servicing
⇒ “1.4.1 Left Headlamp Mount”, page 7
⇒ “1.4.2 Right Headlamp Mount”, page 9
1.4.1 Left Headlamp Mount
Note
The line -2- shows a possible crack.
Golf 2015 ➤ , Golf Variant 2015 ➤
Body Exterior - Edition 02.2016
1. Lock Carrier 7

P
r
o
t
e
c
t
e
d
b
y
c
o
p
y
r
i
g
h
t
.
C
o
p
y
i
n
g
f
o
r
p
r
i
v
a
t
e
o
r
c
o
m
m
e
r
c
i
a
l
p
u
r
p
o
s
e
s
,
i
n
p
a
r
t
o
r
i
n
w
h
o
l
e
,
i
s
n
o
t
p
e
r
m
i
t
t
e
d
u
n
l
e
s
s
a
u
t
h
o
r
i
s
e
d
b
y
V
o
l
k
s
w
a
g
e
n
A
G
.
V
o
l
k
s
w
a
g
e
n
A
G
d
o
e
s
n
o
t
g
u
a
r
a
n
t
e
e
o
r
a
c
c
e
p
t
a
n
y
l
i
a
b
i
l
i
t
y
w
i
t
h
r
e
s
p
e
c
t
t
o
t
h
e
c
o
r
r
e
c
t
n
e
s
s
o
f
i
n
f
o
r
m
a
t
i
o
n
i
n
t
h
i
s
d
o
c
u
m
e
n
t
.
C
o
p
y
r
i
g
h
t
b
y
V
o
l
k
s
w
a
g
e
n
A
G
.
– Remove the front bumper cover. Refer to
⇒ “1.5 Bumper Cover, Removing and Installing”, page 317 .
– Remove the headlamps. Refer to ⇒ Electrical Equipment;
Rep. Gr. 94 ; Headlamp; Headlamp, Removing and Installing .
– Cut or saw the headlamp mount -4- evenly off the lock carrier
-1-.
– Position the rivet -5-.
– Position the new bracket -6- with the spring nut -7-.
– Tighten the bolt -8-.
Tightening Specifications
Component Tightening Specification
Lock carrier bracket 5 Nm
Golf 2015 ➤ , Golf Variant 2015 ➤
Body Exterior - Edition 02.2016
8 Rep. Gr.50 - Body Front

P
r
o
t
e
c
t
e
d
b
y
c
o
p
y
r
i
g
h
t
.
C
o
p
y
i
n
g
f
o
r
p
r
i
v
a
t
e
o
r
c
o
m
m
e
r
c
i
a
l
p
u
r
p
o
s
e
s
,
i
n
p
a
r
t
o
r
i
n
w
h
o
l
e
,
i
s
n
o
t
p
e
r
m
i
t
t
e
d
u
n
l
e
s
s
a
u
t
h
o
r
i
s
e
d
b
y
V
o
l
k
s
w
a
g
e
n
A
G
.
V
o
l
k
s
w
a
g
e
n
A
G
d
o
e
s
n
o
t
g
u
a
r
a
n
t
e
e
o
r
a
c
c
e
p
t
a
n
y
l
i
a
b
i
l
i
t
y
w
i
t
h
r
e
s
p
e
c
t
t
o
t
h
e
c
o
r
r
e
c
t
n
e
s
s
o
f
i
n
f
o
r
m
a
t
i
o
n
i
n
t
h
i
s
d
o
c
u
m
e
n
t
.
C
o
p
y
r
i
g
h
t
b
y
V
o
l
k
s
w
a
g
e
n
A
G
.
1.4.2 Right Headlamp Mount
Note
The line -3- shows a possible crack.
– Remove the front bumper cover. Refer to
⇒ “1.5 Bumper Cover, Removing and Installing”, page 317 .
– Remove the headlamps. Refer to ⇒ Electrical Equipment;
Rep. Gr. 94 ; Headlamp; Headlamp, Removing and Installing .
– Cut or saw the headlamp mount -2- evenly off the lock carrier
-1-.
– Install the new bracket -4- with the spring nut -6-.
– Install the pop rivets -5-.
Golf 2015 ➤ , Golf Variant 2015 ➤
Body Exterior - Edition 02.2016
1. Lock Carrier 9

P
r
o
t
e
c
t
e
d
b
y
c
o
p
y
r
i
g
h
t
.
C
o
p
y
i
n
g
f
o
r
p
r
i
v
a
t
e
o
r
c
o
m
m
e
r
c
i
a
l
p
u
r
p
o
s
e
s
,
i
n
p
a
r
t
o
r
i
n
w
h
o
l
e
,
i
s
n
o
t
p
e
r
m
i
t
t
e
d
u
n
l
e
s
s
a
u
t
h
o
r
i
s
e
d
b
y
V
o
l
k
s
w
a
g
e
n
A
G
.
V
o
l
k
s
w
a
g
e
n
A
G
d
o
e
s
n
o
t
g
u
a
r
a
n
t
e
e
o
r
a
c
c
e
p
t
a
n
y
l
i
a
b
i
l
i
t
y
w
i
t
h
r
e
s
p
e
c
t
t
o
t
h
e
c
o
r
r
e
c
t
n
e
s
s
o
f
i
n
f
o
r
m
a
t
i
o
n
i
n
t
h
i
s
d
o
c
u
m
e
n
t
.
C
o
p
y
r
i
g
h
t
b
y
V
o
l
k
s
w
a
g
e
n
A
G
.
2 Fender
⇒ “2.1 Overview - Fender”, page 10
⇒ “2.2 Overview - Deformation Element”, page 11
⇒ “2.3 Fender, Removing and Installing”, page 11
⇒ “2.4 Fender Brace, Removing and Installing”, page 14
2.1 Overview - Fender
Note
The illustration shows the left side. The right side is identical.
1 - Fender
❑ Removing and instal‐
ling. Refer to
⇒ “2.3 Fender, Remov‐
ing and Installing”, page
11 .
2 - Bolt
❑ 6 Nm
❑ Quantity: 2, A-pillar
3 - Bolt
❑ 6 Nm
❑ Quantity: 2, side sill
4 - Brace Insulation
❑ Inserted between the
fender and A-pillar.
5 - Fender Insulation
❑ Inserted between the
fender and the upper
wheel housing longitudi‐
nal member.
6 - Hex Nut
❑ Quantity: 2
❑ Tightening specification
-item 3-
⇒ Item 3 (page 317) .
7 - Guide
❑ Removing:
– Remove the front bump‐
er cover. Refer to
⇒ “1.5 Bumper Cover,
Removing and Instal‐
ling”, page 317 .
– Remove the hex nut -6-.
❑ There are different versions. Refer to the Parts Catalog for the allocation.
8 - Double Bolt
❑ 6 Nm
❑ Fender brace, quantity 2
Golf 2015 ➤ , Golf Variant 2015 ➤
Body Exterior - Edition 02.2016
10 Rep. Gr.50 - Body Front

P
r
o
t
e
c
t
e
d
b
y
c
o
p
y
r
i
g
h
t
.
C
o
p
y
i
n
g
f
o
r
p
r
i
v
a
t
e
o
r
c
o
m
m
e
r
c
i
a
l
p
u
r
p
o
s
e
s
,
i
n
p
a
r
t
o
r
i
n
w
h
o
l
e
,
i
s
n
o
t
p
e
r
m
i
t
t
e
d
u
n
l
e
s
s
a
u
t
h
o
r
i
s
e
d
b
y
V
o
l
k
s
w
a
g
e
n
A
G
.
V
o
l
k
s
w
a
g
e
n
A
G
d
o
e
s
n
o
t
g
u
a
r
a
n
t
e
e
o
r
a
c
c
e
p
t
a
n
y
l
i
a
b
i
l
i
t
y
w
i
t
h
r
e
s
p
e
c
t
t
o
t
h
e
c
o
r
r
e
c
t
n
e
s
s
o
f
i
n
f
o
r
m
a
t
i
o
n
i
n
t
h
i
s
d
o
c
u
m
e
n
t
.
C
o
p
y
r
i
g
h
t
b
y
V
o
l
k
s
w
a
g
e
n
A
G
.
9 - Fender Brace
❑ Removing and installing. Refer to ⇒ “2.4 Fender Brace, Removing and Installing”, page 14 .
10 - Bolt
❑ 6 Nm
❑ Fender connecting piece, quantity 3
11 - Deformation Element
❑ Front and rear. Refer to ⇒ “2.2 Overview - Deformation Element”, page 11 .
2.2 Overview - Deformation Element
1 - Front Deformation Element
2 - Bolt
❑ 6 Nm
3 - Rear Deformation Element
4 - Bolt
❑ 6 Nm
2.3 Fender, Removing and Installing
Special tools and workshop equipment required
♦ Torque Wrench 1783 - 2-10Nm - VAG1783-
Golf 2015 ➤ , Golf Variant 2015 ➤
Body Exterior - Edition 02.2016
2. Fender 11

P
r
o
t
e
c
t
e
d
b
y
c
o
p
y
r
i
g
h
t
.
C
o
p
y
i
n
g
f
o
r
p
r
i
v
a
t
e
o
r
c
o
m
m
e
r
c
i
a
l
p
u
r
p
o
s
e
s
,
i
n
p
a
r
t
o
r
i
n
w
h
o
l
e
,
i
s
n
o
t
p
e
r
m
i
t
t
e
d
u
n
l
e
s
s
a
u
t
h
o
r
i
s
e
d
b
y
V
o
l
k
s
w
a
g
e
n
A
G
.
V
o
l
k
s
w
a
g
e
n
A
G
d
o
e
s
n
o
t
g
u
a
r
a
n
t
e
e
o
r
a
c
c
e
p
t
a
n
y
l
i
a
b
i
l
i
t
y
w
i
t
h
r
e
s
p
e
c
t
t
o
t
h
e
c
o
r
r
e
c
t
n
e
s
s
o
f
i
n
f
o
r
m
a
t
i
o
n
i
n
t
h
i
s
d
o
c
u
m
e
n
t
.
C
o
p
y
r
i
g
h
t
b
y
V
o
l
k
s
w
a
g
e
n
A
G
.
Note
The following describes the removal and installation of the left fender. Removing and installing the right fender
is identical.
Removing
– Remove the front wheel housing liner. Refer to
⇒ “8.4 Front Wheel Housing Liner, Removing and Installing”,
page 447 .
– Remove the front bumper cover. Refer to
⇒ “1.5 Bumper Cover, Removing and Installing”, page 317 .
– Remove the headlamps. Refer to ⇒ Electrical Equipment;
Rep. Gr. 94 ; Headlamp; Headlamp, Removing and Installing .
– Remove the left plenum chamber cover. Refer to
⇒ “3.4 Plenum Chamber Cover, Removing and Installing”,
page 19 .
– Remove the drip rail. Refer to
⇒ “3.4 Drip Rail, Removing and Installing”, page 409 .
– Remove the hex nut -4- and then remove the guide -5-.
Golf 2015 ➤ , Golf Variant 2015 ➤
Body Exterior - Edition 02.2016
12 Rep. Gr.50 - Body Front
/