Page is loading ...

P
r
o
t
e
c
t
e
d
b
y
c
o
p
y
r
i
g
h
t
.
C
o
p
y
i
n
g
f
o
r
p
r
i
v
a
t
e
o
r
c
o
m
m
e
r
c
i
a
l
p
u
r
p
o
s
e
s
,
i
n
p
a
r
t
o
r
i
n
w
h
o
l
e
,
i
s
n
o
t
p
e
r
m
i
t
t
e
d
u
n
l
e
s
s
a
u
t
h
o
r
i
s
e
d
b
y
V
o
l
k
s
w
a
g
e
n
A
G
.
V
o
l
k
s
w
a
g
e
n
A
G
d
o
e
s
n
o
t
g
u
a
r
a
n
t
e
e
o
r
a
c
c
e
p
t
a
n
y
l
i
a
b
i
l
i
t
y
w
i
t
h
r
e
s
p
e
c
t
t
o
t
h
e
c
o
r
r
e
c
t
n
e
s
s
o
f
i
n
f
o
r
m
a
t
i
o
n
i
n
t
h
i
s
d
o
c
u
m
e
n
t
.
C
o
p
y
r
i
g
h
t
b
y
V
o
l
k
s
w
a
g
e
n
A
G
.
Workshop Manual
Jetta 2011 ➤
Jetta Hybrid 2013 ➤
General body repairs, exterior
Edition 08.2012
Service
Service Department. Technical Information

P
r
o
t
e
c
t
e
d
b
y
c
o
p
y
r
i
g
h
t
.
C
o
p
y
i
n
g
f
o
r
p
r
i
v
a
t
e
o
r
c
o
m
m
e
r
c
i
a
l
p
u
r
p
o
s
e
s
,
i
n
p
a
r
t
o
r
i
n
w
h
o
l
e
,
i
s
n
o
t
p
e
r
m
i
t
t
e
d
u
n
l
e
s
s
a
u
t
h
o
r
i
s
e
d
b
y
V
o
l
k
s
w
a
g
e
n
A
G
.
V
o
l
k
s
w
a
g
e
n
A
G
d
o
e
s
n
o
t
g
u
a
r
a
n
t
e
e
o
r
a
c
c
e
p
t
a
n
y
l
i
a
b
i
l
i
t
y
w
i
t
h
r
e
s
p
e
c
t
t
o
t
h
e
c
o
r
r
e
c
t
n
e
s
s
o
f
i
n
f
o
r
m
a
t
i
o
n
i
n
t
h
i
s
d
o
c
u
m
e
n
t
.
C
o
p
y
r
i
g
h
t
b
y
V
o
l
k
s
w
a
g
e
n
A
G
.
List of Workshop Manual Repair GroupsList of Workshop Manual
Repair GroupsList of Workshop Manual Repair Groups
Repair Group
50 - Body - front
55 - Bonnet, rear lid
57 - Front doors, door components, central locking
58 - Rear doors, door components
60 - Sunroof
63 - Bumpers
64 - Glazing
66 - Exterior equipment
Technical information should always be available to the foremen and mechanics, because their
careful and constant adherence to the instructions is essential to ensure vehicle road-worthiness and
safety. In addition, the normal basic safety precautions for working on motor vehicles must, as a
matter of course, be observed.
Service
All rights reserved.
No reproduction without prior agreement from publisher.
Copyright © 2012 Volkswagen AG, Wolfsburg D3E802DF89D

P
r
o
t
e
c
t
e
d
b
y
c
o
p
y
r
i
g
h
t
.
C
o
p
y
i
n
g
f
o
r
p
r
i
v
a
t
e
o
r
c
o
m
m
e
r
c
i
a
l
p
u
r
p
o
s
e
s
,
i
n
p
a
r
t
o
r
i
n
w
h
o
l
e
,
i
s
n
o
t
p
e
r
m
i
t
t
e
d
u
n
l
e
s
s
a
u
t
h
o
r
i
s
e
d
b
y
V
o
l
k
s
w
a
g
e
n
A
G
.
V
o
l
k
s
w
a
g
e
n
A
G
d
o
e
s
n
o
t
g
u
a
r
a
n
t
e
e
o
r
a
c
c
e
p
t
a
n
y
l
i
a
b
i
l
i
t
y
w
i
t
h
r
e
s
p
e
c
t
t
o
t
h
e
c
o
r
r
e
c
t
n
e
s
s
o
f
i
n
f
o
r
m
a
t
i
o
n
i
n
t
h
i
s
d
o
c
u
m
e
n
t
.
C
o
p
y
r
i
g
h
t
b
y
V
o
l
k
s
w
a
g
e
n
A
G
.
Contents
50 - Body - front . . . . . . . . . . . . . . . . . . . . . . . . . . . . . . . . . . . . . . . . . . . . . . . . . . . . . . 1
1 Lock carrier . . . . . . . . . . . . . . . . . . . . . . . . . . . . . . . . . . . . . . . . . . . . . . . . . . . . . . . . . . . . . . 1
1.1 Tools . . . . . . . . . . . . . . . . . . . . . . . . . . . . . . . . . . . . . . . . . . . . . . . . . . . . . . . . . . . . . . . . . . 1
1.2 Lock carrier - add-on parts . . . . . . . . . . . . . . . . . . . . . . . . . . . . . . . . . . . . . . . . . . . . . . . . . . 2
1.3 Service position . . . . . . . . . . . . . . . . . . . . . . . . . . . . . . . . . . . . . . . . . . . . . . . . . . . . . . . . . . 3
1.4 Removing and installing lock carrier with add-on parts . . . . . . . . . . . . . . . . . . . . . . . . . . . . 6
1.5 Removing and installing pressure hoses . . . . . . . . . . . . . . . . . . . . . . . . . . . . . . . . . . . . . . 8
2 Wing . . . . . . . . . . . . . . . . . . . . . . . . . . . . . . . . . . . . . . . . . . . . . . . . . . . . . . . . . . . . . . . . . . 10
2.1 Tools . . . . . . . . . . . . . . . . . . . . . . . . . . . . . . . . . . . . . . . . . . . . . . . . . . . . . . . . . . . . . . . . . . 10
2.2 Assembly overview - front wing . . . . . . . . . . . . . . . . . . . . . . . . . . . . . . . . . . . . . . . . . . . . . . 11
2.3 Removing and installing front wing . . . . . . . . . . . . . . . . . . . . . . . . . . . . . . . . . . . . . . . . . . . . 11
2.4 Insulation and foam elements for wing and wing end plate . . . . . . . . . . . . . . . . . . . . . . . . 14
2.5 Wing end plate . . . . . . . . . . . . . . . . . . . . . . . . . . . . . . . . . . . . . . . . . . . . . . . . . . . . . . . . . . 15
2.6 Removing and installing wing bracket . . . . . . . . . . . . . . . . . . . . . . . . . . . . . . . . . . . . . . . . 15
3 Plenum chamber cover . . . . . . . . . . . . . . . . . . . . . . . . . . . . . . . . . . . . . . . . . . . . . . . . . . . . 17
3.1 Assembly overview - plenum chamber cover . . . . . . . . . . . . . . . . . . . . . . . . . . . . . . . . . . . . 17
3.2 Removing and installing plenum chamber covers . . . . . . . . . . . . . . . . . . . . . . . . . . . . . . . . 17
4 Noise insulation . . . . . . . . . . . . . . . . . . . . . . . . . . . . . . . . . . . . . . . . . . . . . . . . . . . . . . . . . . 21
4.1 Tools . . . . . . . . . . . . . . . . . . . . . . . . . . . . . . . . . . . . . . . . . . . . . . . . . . . . . . . . . . . . . . . . . . 21
4.2 Assembly overview - noise insulation for combustion engines . . . . . . . . . . . . . . . . . . . . . . 22
4.3 Assembly overview - noise insulation for diesel engines . . . . . . . . . . . . . . . . . . . . . . . . . . 23
5 Underbody cladding . . . . . . . . . . . . . . . . . . . . . . . . . . . . . . . . . . . . . . . . . . . . . . . . . . . . . . 24
5.1 Tools . . . . . . . . . . . . . . . . . . . . . . . . . . . . . . . . . . . . . . . . . . . . . . . . . . . . . . . . . . . . . . . . . . 24
5.2 Assembly overview - underbody panel . . . . . . . . . . . . . . . . . . . . . . . . . . . . . . . . . . . . . . . . 25
5.3 Rear right door underbody cladding . . . . . . . . . . . . . . . . . . . . . . . . . . . . . . . . . . . . . . . . . . 26
6 Cross panel . . . . . . . . . . . . . . . . . . . . . . . . . . . . . . . . . . . . . . . . . . . . . . . . . . . . . . . . . . . . 27
6.1 Tools . . . . . . . . . . . . . . . . . . . . . . . . . . . . . . . . . . . . . . . . . . . . . . . . . . . . . . . . . . . . . . . . . . 27
6.2 Materials . . . . . . . . . . . . . . . . . . . . . . . . . . . . . . . . . . . . . . . . . . . . . . . . . . . . . . . . . . . . . . . . 27
6.3 Assembly overview - bulkhead . . . . . . . . . . . . . . . . . . . . . . . . . . . . . . . . . . . . . . . . . . . . . . 28
7 Tunnel cross-piece . . . . . . . . . . . . . . . . . . . . . . . . . . . . . . . . . . . . . . . . . . . . . . . . . . . . . . . . 29
7.1 Tools . . . . . . . . . . . . . . . . . . . . . . . . . . . . . . . . . . . . . . . . . . . . . . . . . . . . . . . . . . . . . . . . . . 29
7.2 Assembly overview - tunnel cross-piece . . . . . . . . . . . . . . . . . . . . . . . . . . . . . . . . . . . . . . 30
55 - Bonnet, rear lid . . . . . . . . . . . . . . . . . . . . . . . . . . . . . . . . . . . . . . . . . . . . . . . . . . . . 31
1 Bonnet . . . . . . . . . . . . . . . . . . . . . . . . . . . . . . . . . . . . . . . . . . . . . . . . . . . . . . . . . . . . . . . . 31
1.1 Tools . . . . . . . . . . . . . . . . . . . . . . . . . . . . . . . . . . . . . . . . . . . . . . . . . . . . . . . . . . . . . . . . . . 31
1.2 Assembly overview - bonnet . . . . . . . . . . . . . . . . . . . . . . . . . . . . . . . . . . . . . . . . . . . . . . . . 32
1.3 Removing and installing bonnet . . . . . . . . . . . . . . . . . . . . . . . . . . . . . . . . . . . . . . . . . . . . . . 33
1.4 Removing and installing bonnet hinge . . . . . . . . . . . . . . . . . . . . . . . . . . . . . . . . . . . . . . . . 34
1.5 Removing and installing insulation . . . . . . . . . . . . . . . . . . . . . . . . . . . . . . . . . . . . . . . . . . . . 37
1.6 Assembly overview - seals . . . . . . . . . . . . . . . . . . . . . . . . . . . . . . . . . . . . . . . . . . . . . . . . . . 39
1.7 Removing and installing support rod . . . . . . . . . . . . . . . . . . . . . . . . . . . . . . . . . . . . . . . . . . 40
1.8 Assembly overview - bonnet lock and release components . . . . . . . . . . . . . . . . . . . . . . . . 42
1.9 Removing and installing lid lock . . . . . . . . . . . . . . . . . . . . . . . . . . . . . . . . . . . . . . . . . . . . . . 43
1.10 Detaching release cable . . . . . . . . . . . . . . . . . . . . . . . . . . . . . . . . . . . . . . . . . . . . . . . . . . . . 45
1.11 Removing and installing striker pin . . . . . . . . . . . . . . . . . . . . . . . . . . . . . . . . . . . . . . . . . . . . 46
1.12 Assembly overview - release lever and mounting bracket . . . . . . . . . . . . . . . . . . . . . . . . . . 48
1.13 Removing and installing release lever . . . . . . . . . . . . . . . . . . . . . . . . . . . . . . . . . . . . . . . . 49
1.14 Adjusting bonnet . . . . . . . . . . . . . . . . . . . . . . . . . . . . . . . . . . . . . . . . . . . . . . . . . . . . . . . . . . 51
2 Rear lid . . . . . . . . . . . . . . . . . . . . . . . . . . . . . . . . . . . . . . . . . . . . . . . . . . . . . . . . . . . . . . . . 54
2.1 Tools . . . . . . . . . . . . . . . . . . . . . . . . . . . . . . . . . . . . . . . . . . . . . . . . . . . . . . . . . . . . . . . . . . 54
2.2 Assembly overview - rear lid . . . . . . . . . . . . . . . . . . . . . . . . . . . . . . . . . . . . . . . . . . . . . . . . 55
Jetta 2011 ➤ , Jetta Hybrid 2013 ➤
General body repairs, exterior - Edition 08.2012
Contents i

P
r
o
t
e
c
t
e
d
b
y
c
o
p
y
r
i
g
h
t
.
C
o
p
y
i
n
g
f
o
r
p
r
i
v
a
t
e
o
r
c
o
m
m
e
r
c
i
a
l
p
u
r
p
o
s
e
s
,
i
n
p
a
r
t
o
r
i
n
w
h
o
l
e
,
i
s
n
o
t
p
e
r
m
i
t
t
e
d
u
n
l
e
s
s
a
u
t
h
o
r
i
s
e
d
b
y
V
o
l
k
s
w
a
g
e
n
A
G
.
V
o
l
k
s
w
a
g
e
n
A
G
d
o
e
s
n
o
t
g
u
a
r
a
n
t
e
e
o
r
a
c
c
e
p
t
a
n
y
l
i
a
b
i
l
i
t
y
w
i
t
h
r
e
s
p
e
c
t
t
o
t
h
e
c
o
r
r
e
c
t
n
e
s
s
o
f
i
n
f
o
r
m
a
t
i
o
n
i
n
t
h
i
s
d
o
c
u
m
e
n
t
.
C
o
p
y
r
i
g
h
t
b
y
V
o
l
k
s
w
a
g
e
n
A
G
.
2.3 Removing and installing rear lid . . . . . . . . . . . . . . . . . . . . . . . . . . . . . . . . . . . . . . . . . . . . . . 55
2.4 Assembly overview - gas strut . . . . . . . . . . . . . . . . . . . . . . . . . . . . . . . . . . . . . . . . . . . . . . 57
2.5 Removing and installing gas strut . . . . . . . . . . . . . . . . . . . . . . . . . . . . . . . . . . . . . . . . . . . . 57
2.6 Releasing gas from gas strut . . . . . . . . . . . . . . . . . . . . . . . . . . . . . . . . . . . . . . . . . . . . . . . . 60
2.7 Assembly overview - rear lid hinge . . . . . . . . . . . . . . . . . . . . . . . . . . . . . . . . . . . . . . . . . . . . 60
2.8 Removing and installing rear lid hinge . . . . . . . . . . . . . . . . . . . . . . . . . . . . . . . . . . . . . . . . 61
2.9 Removing and installing striker plate . . . . . . . . . . . . . . . . . . . . . . . . . . . . . . . . . . . . . . . . . . 63
2.10 Adjusting rear lid . . . . . . . . . . . . . . . . . . . . . . . . . . . . . . . . . . . . . . . . . . . . . . . . . . . . . . . . . . 64
2.11 Removing and installing rear lid handle release button E234 . . . . . . . . . . . . . . . . . . . . . . 65
2.12 Removing and installing lid lock . . . . . . . . . . . . . . . . . . . . . . . . . . . . . . . . . . . . . . . . . . . . . . 66
2.13 Rear lid seal . . . . . . . . . . . . . . . . . . . . . . . . . . . . . . . . . . . . . . . . . . . . . . . . . . . . . . . . . . . . 66
2.14 Removing and installing rear lid seal . . . . . . . . . . . . . . . . . . . . . . . . . . . . . . . . . . . . . . . . . . 67
2.15 Registration plate carrier . . . . . . . . . . . . . . . . . . . . . . . . . . . . . . . . . . . . . . . . . . . . . . . . . . 69
3 Tank flap unit . . . . . . . . . . . . . . . . . . . . . . . . . . . . . . . . . . . . . . . . . . . . . . . . . . . . . . . . . . . . 70
3.1 Tools . . . . . . . . . . . . . . . . . . . . . . . . . . . . . . . . . . . . . . . . . . . . . . . . . . . . . . . . . . . . . . . . . . 70
3.2 Assembly overview - tank flap unit . . . . . . . . . . . . . . . . . . . . . . . . . . . . . . . . . . . . . . . . . . . . 71
3.3 Removing and installing tank flap unit . . . . . . . . . . . . . . . . . . . . . . . . . . . . . . . . . . . . . . . . 71
3.4 Removing and installing tank filler flap locking motor V155 . . . . . . . . . . . . . . . . . . . . . . . . 73
57 - Front doors, door components, central locking . . . . . . . . . . . . . . . . . . . . . . . . . . 76
1 Front door . . . . . . . . . . . . . . . . . . . . . . . . . . . . . . . . . . . . . . . . . . . . . . . . . . . . . . . . . . . . . . 76
1.1 Tools . . . . . . . . . . . . . . . . . . . . . . . . . . . . . . . . . . . . . . . . . . . . . . . . . . . . . . . . . . . . . . . . . . 76
1.2 Assembly overview - door hinges . . . . . . . . . . . . . . . . . . . . . . . . . . . . . . . . . . . . . . . . . . . . 77
1.3 Removing and installing door . . . . . . . . . . . . . . . . . . . . . . . . . . . . . . . . . . . . . . . . . . . . . . . . 78
1.4 Installing after renewing A-pillar . . . . . . . . . . . . . . . . . . . . . . . . . . . . . . . . . . . . . . . . . . . . . . 81
1.5 Door alignment . . . . . . . . . . . . . . . . . . . . . . . . . . . . . . . . . . . . . . . . . . . . . . . . . . . . . . . . . . 82
2 Door components . . . . . . . . . . . . . . . . . . . . . . . . . . . . . . . . . . . . . . . . . . . . . . . . . . . . . . . . 84
2.1 Tools . . . . . . . . . . . . . . . . . . . . . . . . . . . . . . . . . . . . . . . . . . . . . . . . . . . . . . . . . . . . . . . . . . 84
2.2 Assembly overview - front door . . . . . . . . . . . . . . . . . . . . . . . . . . . . . . . . . . . . . . . . . . . . . . 85
2.3 Removing and installing door cover . . . . . . . . . . . . . . . . . . . . . . . . . . . . . . . . . . . . . . . . . . 86
2.4 Removing and installing door retaining strap . . . . . . . . . . . . . . . . . . . . . . . . . . . . . . . . . . . . 88
2.5 Removing and installing striker pin . . . . . . . . . . . . . . . . . . . . . . . . . . . . . . . . . . . . . . . . . . . . 89
2.6 Assembly overview - door handle and door lock . . . . . . . . . . . . . . . . . . . . . . . . . . . . . . . . 91
2.7 Removing and installing lock cylinder cover cap . . . . . . . . . . . . . . . . . . . . . . . . . . . . . . . . 92
2.8 Removing and installing lock cylinder . . . . . . . . . . . . . . . . . . . . . . . . . . . . . . . . . . . . . . . . 93
2.9 Removing and installing cover cap (without lock cylinder) . . . . . . . . . . . . . . . . . . . . . . . . . . 95
2.10 Removing and installing door handle . . . . . . . . . . . . . . . . . . . . . . . . . . . . . . . . . . . . . . . . . . 98
2.11 Removing and installing door lock . . . . . . . . . . . . . . . . . . . . . . . . . . . . . . . . . . . . . . . . . . . . 100
2.12 Removing and installing bearing bracket . . . . . . . . . . . . . . . . . . . . . . . . . . . . . . . . . . . . . . 103
2.13 Removing and installing window slot inner seal . . . . . . . . . . . . . . . . . . . . . . . . . . . . . . . . . . 105
2.14 Removing and installing window slot outer seal . . . . . . . . . . . . . . . . . . . . . . . . . . . . . . . . . . 108
2.15 Removing and installing door inner seal . . . . . . . . . . . . . . . . . . . . . . . . . . . . . . . . . . . . . . 109
2.16 Removing and installing door outer seal . . . . . . . . . . . . . . . . . . . . . . . . . . . . . . . . . . . . . . 112
2.17 Assembly overview - insulation . . . . . . . . . . . . . . . . . . . . . . . . . . . . . . . . . . . . . . . . . . . . . . 114
3 Central locking . . . . . . . . . . . . . . . . . . . . . . . . . . . . . . . . . . . . . . . . . . . . . . . . . . . . . . . . . . 115
3.1 Fitting location overview - central locking components . . . . . . . . . . . . . . . . . . . . . . . . . . . . 115
3.2 Adapting keys with remote control . . . . . . . . . . . . . . . . . . . . . . . . . . . . . . . . . . . . . . . . . . . . 116
3.3 Assembly overview - battery for folding key with remote control . . . . . . . . . . . . . . . . . . . . 117
3.4 Removing and installing battery for folding key with remote control . . . . . . . . . . . . . . . . . . 118
3.5 Assembly overview - battery for folding key with cover cap . . . . . . . . . . . . . . . . . . . . . . . . 119
3.6 Removing and installing battery for folding key with cover cap . . . . . . . . . . . . . . . . . . . . . . 120
58 - Rear doors, door components . . . . . . . . . . . . . . . . . . . . . . . . . . . . . . . . . . . . . . . . 121
1 Rear door . . . . . . . . . . . . . . . . . . . . . . . . . . . . . . . . . . . . . . . . . . . . . . . . . . . . . . . . . . . . . . 121
1.1 Tools . . . . . . . . . . . . . . . . . . . . . . . . . . . . . . . . . . . . . . . . . . . . . . . . . . . . . . . . . . . . . . . . . . 121
Jetta 2011 ➤ , Jetta Hybrid 2013 ➤
General body repairs, exterior - Edition 08.2012
ii Contents

P
r
o
t
e
c
t
e
d
b
y
c
o
p
y
r
i
g
h
t
.
C
o
p
y
i
n
g
f
o
r
p
r
i
v
a
t
e
o
r
c
o
m
m
e
r
c
i
a
l
p
u
r
p
o
s
e
s
,
i
n
p
a
r
t
o
r
i
n
w
h
o
l
e
,
i
s
n
o
t
p
e
r
m
i
t
t
e
d
u
n
l
e
s
s
a
u
t
h
o
r
i
s
e
d
b
y
V
o
l
k
s
w
a
g
e
n
A
G
.
V
o
l
k
s
w
a
g
e
n
A
G
d
o
e
s
n
o
t
g
u
a
r
a
n
t
e
e
o
r
a
c
c
e
p
t
a
n
y
l
i
a
b
i
l
i
t
y
w
i
t
h
r
e
s
p
e
c
t
t
o
t
h
e
c
o
r
r
e
c
t
n
e
s
s
o
f
i
n
f
o
r
m
a
t
i
o
n
i
n
t
h
i
s
d
o
c
u
m
e
n
t
.
C
o
p
y
r
i
g
h
t
b
y
V
o
l
k
s
w
a
g
e
n
A
G
.
1.2 Assembly overview - door hinges . . . . . . . . . . . . . . . . . . . . . . . . . . . . . . . . . . . . . . . . . . . . 122
1.3 Removing and installing door . . . . . . . . . . . . . . . . . . . . . . . . . . . . . . . . . . . . . . . . . . . . . . . . 123
1.4 Installing after renewing B-pillar . . . . . . . . . . . . . . . . . . . . . . . . . . . . . . . . . . . . . . . . . . . . . . 125
1.5 Door alignment . . . . . . . . . . . . . . . . . . . . . . . . . . . . . . . . . . . . . . . . . . . . . . . . . . . . . . . . . . 126
2 Door components . . . . . . . . . . . . . . . . . . . . . . . . . . . . . . . . . . . . . . . . . . . . . . . . . . . . . . . . 128
2.1 Tools . . . . . . . . . . . . . . . . . . . . . . . . . . . . . . . . . . . . . . . . . . . . . . . . . . . . . . . . . . . . . . . . . . 128
2.2 Assembly overview - rear door . . . . . . . . . . . . . . . . . . . . . . . . . . . . . . . . . . . . . . . . . . . . . . 129
2.3 Removing and installing cover . . . . . . . . . . . . . . . . . . . . . . . . . . . . . . . . . . . . . . . . . . . . . . 130
2.4 Removing and installing door retaining strap . . . . . . . . . . . . . . . . . . . . . . . . . . . . . . . . . . . . 132
2.5 Removing and installing striker pin . . . . . . . . . . . . . . . . . . . . . . . . . . . . . . . . . . . . . . . . . . . . 133
2.6 Assembly overview - door handle and door lock . . . . . . . . . . . . . . . . . . . . . . . . . . . . . . . . 135
2.7 Removing and installing cover cap . . . . . . . . . . . . . . . . . . . . . . . . . . . . . . . . . . . . . . . . . . . . 135
2.8 Removing and installing door handle . . . . . . . . . . . . . . . . . . . . . . . . . . . . . . . . . . . . . . . . . . 138
2.9 Removing and installing door lock . . . . . . . . . . . . . . . . . . . . . . . . . . . . . . . . . . . . . . . . . . . . 140
2.10 Removing and installing bearing bracket . . . . . . . . . . . . . . . . . . . . . . . . . . . . . . . . . . . . . . 143
2.11 Removing and installing window slot inner seal . . . . . . . . . . . . . . . . . . . . . . . . . . . . . . . . . . 145
2.12 Removing and installing window slot outer seal . . . . . . . . . . . . . . . . . . . . . . . . . . . . . . . . . . 148
2.13 Removing and installing door inner seal . . . . . . . . . . . . . . . . . . . . . . . . . . . . . . . . . . . . . . 149
2.14 Removing and installing door outer seal . . . . . . . . . . . . . . . . . . . . . . . . . . . . . . . . . . . . . . 152
2.15 Assembly overview - insulation . . . . . . . . . . . . . . . . . . . . . . . . . . . . . . . . . . . . . . . . . . . . . . 154
60 - Sunroof . . . . . . . . . . . . . . . . . . . . . . . . . . . . . . . . . . . . . . . . . . . . . . . . . . . . . . . . 155
1 Sunroof with glass panel . . . . . . . . . . . . . . . . . . . . . . . . . . . . . . . . . . . . . . . . . . . . . . . . . . 155
1.1 Tools . . . . . . . . . . . . . . . . . . . . . . . . . . . . . . . . . . . . . . . . . . . . . . . . . . . . . . . . . . . . . . . . . . 155
1.2 Function . . . . . . . . . . . . . . . . . . . . . . . . . . . . . . . . . . . . . . . . . . . . . . . . . . . . . . . . . . . . . . . . 155
1.3 Assembly overview . . . . . . . . . . . . . . . . . . . . . . . . . . . . . . . . . . . . . . . . . . . . . . . . . . . . . . . . 156
1.4 Removing and installing sliding/tilting sunroof glass panel . . . . . . . . . . . . . . . . . . . . . . . . 157
1.5 Height-adjustment of glass panel . . . . . . . . . . . . . . . . . . . . . . . . . . . . . . . . . . . . . . . . . . . . 158
1.6 Checking parallel running of glass panel . . . . . . . . . . . . . . . . . . . . . . . . . . . . . . . . . . . . . . 159
1.7 Adjusting parallel running of glass panel . . . . . . . . . . . . . . . . . . . . . . . . . . . . . . . . . . . . . . 160
1.8 Renewing panel seal . . . . . . . . . . . . . . . . . . . . . . . . . . . . . . . . . . . . . . . . . . . . . . . . . . . . . . 160
1.9 Removing and installing wind deflector . . . . . . . . . . . . . . . . . . . . . . . . . . . . . . . . . . . . . . . . 160
1.10 Removing and installing sliding headlining . . . . . . . . . . . . . . . . . . . . . . . . . . . . . . . . . . . . . . 161
1.11 Removing and installing sliding/tilting sunroof drive . . . . . . . . . . . . . . . . . . . . . . . . . . . . . . 162
1.12 Setting drive for sliding/tilting sunroof to zero position . . . . . . . . . . . . . . . . . . . . . . . . . . . . 163
1.13 Performing programming run for drive for sliding/tilting sunroof . . . . . . . . . . . . . . . . . . . . . . 163
1.14 Removing pre-selector control for sliding/tilting sunroof . . . . . . . . . . . . . . . . . . . . . . . . . . . . 164
1.15 Removing and installing carrier unit . . . . . . . . . . . . . . . . . . . . . . . . . . . . . . . . . . . . . . . . . . 165
1.16 Cleaning water drain hoses . . . . . . . . . . . . . . . . . . . . . . . . . . . . . . . . . . . . . . . . . . . . . . . . 167
63 - Bumpers . . . . . . . . . . . . . . . . . . . . . . . . . . . . . . . . . . . . . . . . . . . . . . . . . . . . . . . . 169
1 Front bumper cover . . . . . . . . . . . . . . . . . . . . . . . . . . . . . . . . . . . . . . . . . . . . . . . . . . . . . . 169
1.1 Tools . . . . . . . . . . . . . . . . . . . . . . . . . . . . . . . . . . . . . . . . . . . . . . . . . . . . . . . . . . . . . . . . . . 169
1.2 Repairing front bumper cover . . . . . . . . . . . . . . . . . . . . . . . . . . . . . . . . . . . . . . . . . . . . . . . . 169
1.3 Installing brackets for parking aid system . . . . . . . . . . . . . . . . . . . . . . . . . . . . . . . . . . . . . . 169
1.4 Assembly overview - front bumper cover . . . . . . . . . . . . . . . . . . . . . . . . . . . . . . . . . . . . . . 174
1.5 Removing and installing front bumper cover . . . . . . . . . . . . . . . . . . . . . . . . . . . . . . . . . . . . 175
1.6 Front bumper cover add-on parts . . . . . . . . . . . . . . . . . . . . . . . . . . . . . . . . . . . . . . . . . . . . 177
1.7 Installing front number plate carrier . . . . . . . . . . . . . . . . . . . . . . . . . . . . . . . . . . . . . . . . . . 178
1.8 Assembly overview - guides for front bumper cover . . . . . . . . . . . . . . . . . . . . . . . . . . . . . . 179
1.9 Assembly overview - front bumper carrier . . . . . . . . . . . . . . . . . . . . . . . . . . . . . . . . . . . . . . 180
2 Rear bumper cover . . . . . . . . . . . . . . . . . . . . . . . . . . . . . . . . . . . . . . . . . . . . . . . . . . . . . . . . 181
2.1 Tools . . . . . . . . . . . . . . . . . . . . . . . . . . . . . . . . . . . . . . . . . . . . . . . . . . . . . . . . . . . . . . . . . . 181
2.2 Repairing rear bumper cover . . . . . . . . . . . . . . . . . . . . . . . . . . . . . . . . . . . . . . . . . . . . . . . . 181
2.3 Installing brackets for parking aid system . . . . . . . . . . . . . . . . . . . . . . . . . . . . . . . . . . . . . . 181
2.4 Assembly overview - rear bumper cover . . . . . . . . . . . . . . . . . . . . . . . . . . . . . . . . . . . . . . 186
Jetta 2011 ➤ , Jetta Hybrid 2013 ➤
General body repairs, exterior - Edition 08.2012
Contents iii

P
r
o
t
e
c
t
e
d
b
y
c
o
p
y
r
i
g
h
t
.
C
o
p
y
i
n
g
f
o
r
p
r
i
v
a
t
e
o
r
c
o
m
m
e
r
c
i
a
l
p
u
r
p
o
s
e
s
,
i
n
p
a
r
t
o
r
i
n
w
h
o
l
e
,
i
s
n
o
t
p
e
r
m
i
t
t
e
d
u
n
l
e
s
s
a
u
t
h
o
r
i
s
e
d
b
y
V
o
l
k
s
w
a
g
e
n
A
G
.
V
o
l
k
s
w
a
g
e
n
A
G
d
o
e
s
n
o
t
g
u
a
r
a
n
t
e
e
o
r
a
c
c
e
p
t
a
n
y
l
i
a
b
i
l
i
t
y
w
i
t
h
r
e
s
p
e
c
t
t
o
t
h
e
c
o
r
r
e
c
t
n
e
s
s
o
f
i
n
f
o
r
m
a
t
i
o
n
i
n
t
h
i
s
d
o
c
u
m
e
n
t
.
C
o
p
y
r
i
g
h
t
b
y
V
o
l
k
s
w
a
g
e
n
A
G
.
2.5 Removing and installing rear bumper cover . . . . . . . . . . . . . . . . . . . . . . . . . . . . . . . . . . . . 187
2.6 Assembly overview - guides for rear bumper cover . . . . . . . . . . . . . . . . . . . . . . . . . . . . . . 189
2.7 Assembly overview - rear bumper carrier . . . . . . . . . . . . . . . . . . . . . . . . . . . . . . . . . . . . . . 190
2.8 Assembly overview - towing bracket . . . . . . . . . . . . . . . . . . . . . . . . . . . . . . . . . . . . . . . . . . 190
64 - Glazing . . . . . . . . . . . . . . . . . . . . . . . . . . . . . . . . . . . . . . . . . . . . . . . . . . . . . . . . . . 192
1 Flush bonded windows . . . . . . . . . . . . . . . . . . . . . . . . . . . . . . . . . . . . . . . . . . . . . . . . . . . . 192
1.1 Tools . . . . . . . . . . . . . . . . . . . . . . . . . . . . . . . . . . . . . . . . . . . . . . . . . . . . . . . . . . . . . . . . . . 192
1.2 Materials . . . . . . . . . . . . . . . . . . . . . . . . . . . . . . . . . . . . . . . . . . . . . . . . . . . . . . . . . . . . . . . . 193
1.3 Repairing windscreen . . . . . . . . . . . . . . . . . . . . . . . . . . . . . . . . . . . . . . . . . . . . . . . . . . . . . . 194
1.4 Assembly overview - windscreen . . . . . . . . . . . . . . . . . . . . . . . . . . . . . . . . . . . . . . . . . . . . 195
1.5 Removing windscreen . . . . . . . . . . . . . . . . . . . . . . . . . . . . . . . . . . . . . . . . . . . . . . . . . . . . 195
1.6 Installing windscreen . . . . . . . . . . . . . . . . . . . . . . . . . . . . . . . . . . . . . . . . . . . . . . . . . . . . . . 197
1.7 Assembly overview - rear window . . . . . . . . . . . . . . . . . . . . . . . . . . . . . . . . . . . . . . . . . . . . 198
1.8 Removing undamaged rear window . . . . . . . . . . . . . . . . . . . . . . . . . . . . . . . . . . . . . . . . . . 198
1.9 Removing broken rear window . . . . . . . . . . . . . . . . . . . . . . . . . . . . . . . . . . . . . . . . . . . . . . 199
1.10 Installing rear window . . . . . . . . . . . . . . . . . . . . . . . . . . . . . . . . . . . . . . . . . . . . . . . . . . . . . . 200
1.11 Preparing old undamaged window for glazing . . . . . . . . . . . . . . . . . . . . . . . . . . . . . . . . . . 201
1.12 Preparing new window without precoating for glazing . . . . . . . . . . . . . . . . . . . . . . . . . . . . 201
1.13 Preparing body flange for glazing . . . . . . . . . . . . . . . . . . . . . . . . . . . . . . . . . . . . . . . . . . . . 202
1.14 Installation instructions . . . . . . . . . . . . . . . . . . . . . . . . . . . . . . . . . . . . . . . . . . . . . . . . . . . . 203
1.15 Minimum curing period . . . . . . . . . . . . . . . . . . . . . . . . . . . . . . . . . . . . . . . . . . . . . . . . . . . . 203
1.16 Touching up paint damage . . . . . . . . . . . . . . . . . . . . . . . . . . . . . . . . . . . . . . . . . . . . . . . . . . 203
1.17 Cleaning off excess adhesive sealing material . . . . . . . . . . . . . . . . . . . . . . . . . . . . . . . . . . 203
2 Front door window . . . . . . . . . . . . . . . . . . . . . . . . . . . . . . . . . . . . . . . . . . . . . . . . . . . . . . . . 205
2.1 Tools . . . . . . . . . . . . . . . . . . . . . . . . . . . . . . . . . . . . . . . . . . . . . . . . . . . . . . . . . . . . . . . . . . 205
2.2 Assembly overview - front door window . . . . . . . . . . . . . . . . . . . . . . . . . . . . . . . . . . . . . . . . 206
2.3 Removing and installing door window . . . . . . . . . . . . . . . . . . . . . . . . . . . . . . . . . . . . . . . . 206
2.4 Removing and installing window regulator motor . . . . . . . . . . . . . . . . . . . . . . . . . . . . . . . . 212
2.5 Removing and installing window regulator . . . . . . . . . . . . . . . . . . . . . . . . . . . . . . . . . . . . . . 214
2.6 Removing and installing window channel . . . . . . . . . . . . . . . . . . . . . . . . . . . . . . . . . . . . . . 217
3 Rear door window . . . . . . . . . . . . . . . . . . . . . . . . . . . . . . . . . . . . . . . . . . . . . . . . . . . . . . . . 220
3.1 Tools . . . . . . . . . . . . . . . . . . . . . . . . . . . . . . . . . . . . . . . . . . . . . . . . . . . . . . . . . . . . . . . . . . 220
3.2 Assembly overview - rear door windows . . . . . . . . . . . . . . . . . . . . . . . . . . . . . . . . . . . . . . 221
3.3 Removing and installing door window . . . . . . . . . . . . . . . . . . . . . . . . . . . . . . . . . . . . . . . . 221
3.4 Removing and installing window regulator motor . . . . . . . . . . . . . . . . . . . . . . . . . . . . . . . . 225
3.5 Removing and installing window regulator . . . . . . . . . . . . . . . . . . . . . . . . . . . . . . . . . . . . . . 227
3.6 Removing and installing window channel . . . . . . . . . . . . . . . . . . . . . . . . . . . . . . . . . . . . . . 230
3.7 Removing and installing fixed door window . . . . . . . . . . . . . . . . . . . . . . . . . . . . . . . . . . . . 232
66 - Exterior equipment . . . . . . . . . . . . . . . . . . . . . . . . . . . . . . . . . . . . . . . . . . . . . . . . 235
1 Wheel housing liner . . . . . . . . . . . . . . . . . . . . . . . . . . . . . . . . . . . . . . . . . . . . . . . . . . . . . . 235
1.1 Tools . . . . . . . . . . . . . . . . . . . . . . . . . . . . . . . . . . . . . . . . . . . . . . . . . . . . . . . . . . . . . . . . . . 235
1.2 Assembly overview - front wheel housing liner . . . . . . . . . . . . . . . . . . . . . . . . . . . . . . . . . . 236
1.3 Removing and installing front wheel housing liner . . . . . . . . . . . . . . . . . . . . . . . . . . . . . . . . 236
1.4 Assembly overview - rear wheel housing liner . . . . . . . . . . . . . . . . . . . . . . . . . . . . . . . . . . 239
1.5 Removing and installing rear wheel housing liner . . . . . . . . . . . . . . . . . . . . . . . . . . . . . . . . 240
2 Exterior mirror . . . . . . . . . . . . . . . . . . . . . . . . . . . . . . . . . . . . . . . . . . . . . . . . . . . . . . . . . . . . 243
2.1 Tools . . . . . . . . . . . . . . . . . . . . . . . . . . . . . . . . . . . . . . . . . . . . . . . . . . . . . . . . . . . . . . . . . . 243
2.2 Assembly overview - exterior mirror (manual operation) . . . . . . . . . . . . . . . . . . . . . . . . . . 244
2.3 Assembly overview - exterior mirror (electric operation) . . . . . . . . . . . . . . . . . . . . . . . . . . 245
2.4 Removing and installing mirror glass . . . . . . . . . . . . . . . . . . . . . . . . . . . . . . . . . . . . . . . . . . 245
2.5 Removing and installing trim . . . . . . . . . . . . . . . . . . . . . . . . . . . . . . . . . . . . . . . . . . . . . . . . 247
2.6 Removing and installing mirror housing . . . . . . . . . . . . . . . . . . . . . . . . . . . . . . . . . . . . . . . . 248
2.7 Removing and installing adjustment unit with motor for exterior mirror . . . . . . . . . . . . . . . . 250
Jetta 2011 ➤ , Jetta Hybrid 2013 ➤
General body repairs, exterior - Edition 08.2012
iv Contents

P
r
o
t
e
c
t
e
d
b
y
c
o
p
y
r
i
g
h
t
.
C
o
p
y
i
n
g
f
o
r
p
r
i
v
a
t
e
o
r
c
o
m
m
e
r
c
i
a
l
p
u
r
p
o
s
e
s
,
i
n
p
a
r
t
o
r
i
n
w
h
o
l
e
,
i
s
n
o
t
p
e
r
m
i
t
t
e
d
u
n
l
e
s
s
a
u
t
h
o
r
i
s
e
d
b
y
V
o
l
k
s
w
a
g
e
n
A
G
.
V
o
l
k
s
w
a
g
e
n
A
G
d
o
e
s
n
o
t
g
u
a
r
a
n
t
e
e
o
r
a
c
c
e
p
t
a
n
y
l
i
a
b
i
l
i
t
y
w
i
t
h
r
e
s
p
e
c
t
t
o
t
h
e
c
o
r
r
e
c
t
n
e
s
s
o
f
i
n
f
o
r
m
a
t
i
o
n
i
n
t
h
i
s
d
o
c
u
m
e
n
t
.
C
o
p
y
r
i
g
h
t
b
y
V
o
l
k
s
w
a
g
e
n
A
G
.
2.8 Removing and installing exterior mirror (manual operation) . . . . . . . . . . . . . . . . . . . . . . . . 252
2.9 Removing and installing exterior mirror (electrical operation) . . . . . . . . . . . . . . . . . . . . . . 256
3 Radiator grille . . . . . . . . . . . . . . . . . . . . . . . . . . . . . . . . . . . . . . . . . . . . . . . . . . . . . . . . . . . . 261
3.1 Tools . . . . . . . . . . . . . . . . . . . . . . . . . . . . . . . . . . . . . . . . . . . . . . . . . . . . . . . . . . . . . . . . . . 261
3.2 Removing and installing radiator grille . . . . . . . . . . . . . . . . . . . . . . . . . . . . . . . . . . . . . . . . 261
3.3 Removing and installing emblem . . . . . . . . . . . . . . . . . . . . . . . . . . . . . . . . . . . . . . . . . . . . 264
4 Rear spoiler . . . . . . . . . . . . . . . . . . . . . . . . . . . . . . . . . . . . . . . . . . . . . . . . . . . . . . . . . . . . 268
4.1 Removing and installing rear spoiler . . . . . . . . . . . . . . . . . . . . . . . . . . . . . . . . . . . . . . . . . . 268
5 Mouldings and trims . . . . . . . . . . . . . . . . . . . . . . . . . . . . . . . . . . . . . . . . . . . . . . . . . . . . . . 274
5.1 Water deflector . . . . . . . . . . . . . . . . . . . . . . . . . . . . . . . . . . . . . . . . . . . . . . . . . . . . . . . . . . 274
5.2 Assembly overview - sill panel cover . . . . . . . . . . . . . . . . . . . . . . . . . . . . . . . . . . . . . . . . . . 279
5.3 Assembly overview - B-pillar trim . . . . . . . . . . . . . . . . . . . . . . . . . . . . . . . . . . . . . . . . . . . . 280
5.4 Removing and installing B-pillar trim . . . . . . . . . . . . . . . . . . . . . . . . . . . . . . . . . . . . . . . . . . 281
5.5 Side member extension “GLI” . . . . . . . . . . . . . . . . . . . . . . . . . . . . . . . . . . . . . . . . . . . . . . 282
6 Lettering . . . . . . . . . . . . . . . . . . . . . . . . . . . . . . . . . . . . . . . . . . . . . . . . . . . . . . . . . . . . . . . . 287
6.1 Tools . . . . . . . . . . . . . . . . . . . . . . . . . . . . . . . . . . . . . . . . . . . . . . . . . . . . . . . . . . . . . . . . . . 287
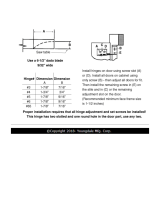
6.2 Installation instructions for lettering and emblems . . . . . . . . . . . . . . . . . . . . . . . . . . . . . . . . 287
6.3 Lettering dimensions . . . . . . . . . . . . . . . . . . . . . . . . . . . . . . . . . . . . . . . . . . . . . . . . . . . . . . 288
Jetta 2011 ➤ , Jetta Hybrid 2013 ➤
General body repairs, exterior - Edition 08.2012
Contents v

P
r
o
t
e
c
t
e
d
b
y
c
o
p
y
r
i
g
h
t
.
C
o
p
y
i
n
g
f
o
r
p
r
i
v
a
t
e
o
r
c
o
m
m
e
r
c
i
a
l
p
u
r
p
o
s
e
s
,
i
n
p
a
r
t
o
r
i
n
w
h
o
l
e
,
i
s
n
o
t
p
e
r
m
i
t
t
e
d
u
n
l
e
s
s
a
u
t
h
o
r
i
s
e
d
b
y
V
o
l
k
s
w
a
g
e
n
A
G
.
V
o
l
k
s
w
a
g
e
n
A
G
d
o
e
s
n
o
t
g
u
a
r
a
n
t
e
e
o
r
a
c
c
e
p
t
a
n
y
l
i
a
b
i
l
i
t
y
w
i
t
h
r
e
s
p
e
c
t
t
o
t
h
e
c
o
r
r
e
c
t
n
e
s
s
o
f
i
n
f
o
r
m
a
t
i
o
n
i
n
t
h
i
s
d
o
c
u
m
e
n
t
.
C
o
p
y
r
i
g
h
t
b
y
V
o
l
k
s
w
a
g
e
n
A
G
.
Jetta 2011 ➤ , Jetta Hybrid 2013 ➤
General body repairs, exterior - Edition 08.2012
vi Contents

P
r
o
t
e
c
t
e
d
b
y
c
o
p
y
r
i
g
h
t
.
C
o
p
y
i
n
g
f
o
r
p
r
i
v
a
t
e
o
r
c
o
m
m
e
r
c
i
a
l
p
u
r
p
o
s
e
s
,
i
n
p
a
r
t
o
r
i
n
w
h
o
l
e
,
i
s
n
o
t
p
e
r
m
i
t
t
e
d
u
n
l
e
s
s
a
u
t
h
o
r
i
s
e
d
b
y
V
o
l
k
s
w
a
g
e
n
A
G
.
V
o
l
k
s
w
a
g
e
n
A
G
d
o
e
s
n
o
t
g
u
a
r
a
n
t
e
e
o
r
a
c
c
e
p
t
a
n
y
l
i
a
b
i
l
i
t
y
w
i
t
h
r
e
s
p
e
c
t
t
o
t
h
e
c
o
r
r
e
c
t
n
e
s
s
o
f
i
n
f
o
r
m
a
t
i
o
n
i
n
t
h
i
s
d
o
c
u
m
e
n
t
.
C
o
p
y
r
i
g
h
t
b
y
V
o
l
k
s
w
a
g
e
n
A
G
.
50 – Body - front
1 Lock carrier
(VRL004906; Edition 08.2012)
1.1 Tools
Special tools and workshop
equipment required
♦ Guide pins -T 10093-
♦ Torque wrench -V.A.G
1331-
♦ Torque wrench -V.A.G
1332-
Jetta 2011 ➤ , Jetta Hybrid 2013 ➤
General body repairs, exterior - Edition 08.2012
1. Lock carrier 1

P
r
o
t
e
c
t
e
d
b
y
c
o
p
y
r
i
g
h
t
.
C
o
p
y
i
n
g
f
o
r
p
r
i
v
a
t
e
o
r
c
o
m
m
e
r
c
i
a
l
p
u
r
p
o
s
e
s
,
i
n
p
a
r
t
o
r
i
n
w
h
o
l
e
,
i
s
n
o
t
p
e
r
m
i
t
t
e
d
u
n
l
e
s
s
a
u
t
h
o
r
i
s
e
d
b
y
V
o
l
k
s
w
a
g
e
n
A
G
.
V
o
l
k
s
w
a
g
e
n
A
G
d
o
e
s
n
o
t
g
u
a
r
a
n
t
e
e
o
r
a
c
c
e
p
t
a
n
y
l
i
a
b
i
l
i
t
y
w
i
t
h
r
e
s
p
e
c
t
t
o
t
h
e
c
o
r
r
e
c
t
n
e
s
s
o
f
i
n
f
o
r
m
a
t
i
o
n
i
n
t
h
i
s
d
o
c
u
m
e
n
t
.
C
o
p
y
r
i
g
h
t
b
y
V
o
l
k
s
w
a
g
e
n
A
G
.
1.2 Lock carrier - add-on parts
1.2.1 Assembly overview
1 - Lock carrier with add-on
parts
❑ Removing and installing
⇒ page 6
❑ Service position
⇒ page 3
2 - Air duct
3 - Bolt
❑ Qty. 2.
❑ Specified torque: 2 Nm.
4 - Bolt
❑ Qty. 3 on each side.
❑ Specified torque: 8 Nm.
5 - Retaining bracket
❑ Left.
6 - Air guide
❑ Left.
7 - Bolt
❑ Qty. 2 on each side.
❑ Specified torque: 8 Nm.
❑ For fastening bumper
carrier -9- to lock carrier
-1-
8 - Bolt
❑ Qty. 3 on left-hand side
❑ Qty. 4 on right-hand side
❑ Specified torque: 60
Nm.
9 - Bumper carrier
10 - Nut
❑ Qty. 2.
❑ Specified torque: 18 Nm.
❑ For fastening lock carrier support -15- to bumper carrier -9-
11 - Bolt
❑ Qty. 3.
❑ Specified torque: 8 Nm.
12 - Centre guide
❑ Guide for front bumper cover
13 - Air guide
❑ Right.
14 - Bolt
❑ Qty. 2.
❑ Specified torque: 12 Nm.
❑ For fastening lock carrier support to lock carrier and bonnet lock
Jetta 2011 ➤ , Jetta Hybrid 2013 ➤
General body repairs, exterior - Edition 08.2012
2 Rep. gr.50 - Body - front

P
r
o
t
e
c
t
e
d
b
y
c
o
p
y
r
i
g
h
t
.
C
o
p
y
i
n
g
f
o
r
p
r
i
v
a
t
e
o
r
c
o
m
m
e
r
c
i
a
l
p
u
r
p
o
s
e
s
,
i
n
p
a
r
t
o
r
i
n
w
h
o
l
e
,
i
s
n
o
t
p
e
r
m
i
t
t
e
d
u
n
l
e
s
s
a
u
t
h
o
r
i
s
e
d
b
y
V
o
l
k
s
w
a
g
e
n
A
G
.
V
o
l
k
s
w
a
g
e
n
A
G
d
o
e
s
n
o
t
g
u
a
r
a
n
t
e
e
o
r
a
c
c
e
p
t
a
n
y
l
i
a
b
i
l
i
t
y
w
i
t
h
r
e
s
p
e
c
t
t
o
t
h
e
c
o
r
r
e
c
t
n
e
s
s
o
f
i
n
f
o
r
m
a
t
i
o
n
i
n
t
h
i
s
d
o
c
u
m
e
n
t
.
C
o
p
y
r
i
g
h
t
b
y
V
o
l
k
s
w
a
g
e
n
A
G
.
15 - Support for lock carrier
16 - Retaining bracket
❑ Right.
1.3 Service position
1.3.1 Moving to service position
Carry out following work:
– Undo bolt -3- on left and right at rear of headlight.
Jetta 2011 ➤ , Jetta Hybrid 2013 ➤
General body repairs, exterior - Edition 08.2012
1. Lock carrier 3

P
r
o
t
e
c
t
e
d
b
y
c
o
p
y
r
i
g
h
t
.
C
o
p
y
i
n
g
f
o
r
p
r
i
v
a
t
e
o
r
c
o
m
m
e
r
c
i
a
l
p
u
r
p
o
s
e
s
,
i
n
p
a
r
t
o
r
i
n
w
h
o
l
e
,
i
s
n
o
t
p
e
r
m
i
t
t
e
d
u
n
l
e
s
s
a
u
t
h
o
r
i
s
e
d
b
y
V
o
l
k
s
w
a
g
e
n
A
G
.
V
o
l
k
s
w
a
g
e
n
A
G
d
o
e
s
n
o
t
g
u
a
r
a
n
t
e
e
o
r
a
c
c
e
p
t
a
n
y
l
i
a
b
i
l
i
t
y
w
i
t
h
r
e
s
p
e
c
t
t
o
t
h
e
c
o
r
r
e
c
t
n
e
s
s
o
f
i
n
f
o
r
m
a
t
i
o
n
i
n
t
h
i
s
d
o
c
u
m
e
n
t
.
C
o
p
y
r
i
g
h
t
b
y
V
o
l
k
s
w
a
g
e
n
A
G
.
– Remove front bumper cover ⇒ page 175 .
– Detach cable from cable coupling ⇒ page 45
– On vehicles with charge air cooler, remove pressure hoses
⇒ page 8 .
– Only remove one bolt -4- on left and right side of each longi‐
tudinal member.
– Attach special tool guide pins -T 10093- to left and right lon‐
gitudinal members where these bolts were located.
– Remove remaining bolts -4- on left and right side of longitudi‐
nal members.
For further removal work, arrange for a second mechanic to se‐
cure the bonnet and support rod.
– Unscrew bolts -3- on left and right from upper part of retaining
brackets -2-.
– The lock carrier with add-on parts -1- can be pulled forwards
-arrows- about 10 cm on the special tool guide pins -T 10093- .
When doing this, be careful with the electrical wires/cables
leading to lock carrier and, if necessary, detach connectors.
Jetta 2011 ➤ , Jetta Hybrid 2013 ➤
General body repairs, exterior - Edition 08.2012
4 Rep. gr.50 - Body - front

P
r
o
t
e
c
t
e
d
b
y
c
o
p
y
r
i
g
h
t
.
C
o
p
y
i
n
g
f
o
r
p
r
i
v
a
t
e
o
r
c
o
m
m
e
r
c
i
a
l
p
u
r
p
o
s
e
s
,
i
n
p
a
r
t
o
r
i
n
w
h
o
l
e
,
i
s
n
o
t
p
e
r
m
i
t
t
e
d
u
n
l
e
s
s
a
u
t
h
o
r
i
s
e
d
b
y
V
o
l
k
s
w
a
g
e
n
A
G
.
V
o
l
k
s
w
a
g
e
n
A
G
d
o
e
s
n
o
t
g
u
a
r
a
n
t
e
e
o
r
a
c
c
e
p
t
a
n
y
l
i
a
b
i
l
i
t
y
w
i
t
h
r
e
s
p
e
c
t
t
o
t
h
e
c
o
r
r
e
c
t
n
e
s
s
o
f
i
n
f
o
r
m
a
t
i
o
n
i
n
t
h
i
s
d
o
c
u
m
e
n
t
.
C
o
p
y
r
i
g
h
t
b
y
V
o
l
k
s
w
a
g
e
n
A
G
.
1.3.2 Moving from service position
Carry out following work:
– Push lock carrier together with add-on parts -1- on the guide
pins -T10093- and onto the longitudinal member.
– Fit bolts -3- and -4- in place.
– Align lock carrier together with add-on parts -1- to longitudinal
members and between wings ⇒ Body Repairs; Rep. gr. 00 ;
Body gaps/shut lines; Body - front .
Specified torque for bolts -3-: 8 Nm.
Specified torque for bolts -4-: 60 Nm.
Further installation is performed in the reverse order of removal.
Note
♦
Make sure that the charge air cooler pressure hoses are properly refitted ⇒ page 8 .
♦
Hoses and lines must not be pinched.
Jetta 2011 ➤ , Jetta Hybrid 2013 ➤
General body repairs, exterior - Edition 08.2012
1. Lock carrier 5

P
r
o
t
e
c
t
e
d
b
y
c
o
p
y
r
i
g
h
t
.
C
o
p
y
i
n
g
f
o
r
p
r
i
v
a
t
e
o
r
c
o
m
m
e
r
c
i
a
l
p
u
r
p
o
s
e
s
,
i
n
p
a
r
t
o
r
i
n
w
h
o
l
e
,
i
s
n
o
t
p
e
r
m
i
t
t
e
d
u
n
l
e
s
s
a
u
t
h
o
r
i
s
e
d
b
y
V
o
l
k
s
w
a
g
e
n
A
G
.
V
o
l
k
s
w
a
g
e
n
A
G
d
o
e
s
n
o
t
g
u
a
r
a
n
t
e
e
o
r
a
c
c
e
p
t
a
n
y
l
i
a
b
i
l
i
t
y
w
i
t
h
r
e
s
p
e
c
t
t
o
t
h
e
c
o
r
r
e
c
t
n
e
s
s
o
f
i
n
f
o
r
m
a
t
i
o
n
i
n
t
h
i
s
d
o
c
u
m
e
n
t
.
C
o
p
y
r
i
g
h
t
b
y
V
o
l
k
s
w
a
g
e
n
A
G
.
1.4 Removing and installing lock carrier with
add-on parts
1.4.1 Removing
Note
♦
The lock carrier is a safety-relevant component. It must not be repaired for this reason.
♦
In the event of damage, renew lock carrier.
Carry out following work:
– Move to service position ⇒ page 3 .
– Detach any electrical connectors.
– Drain coolant and disconnect coolant lines ⇒ Engine; Rep. gr.
19 ; Parts of the cooling system; Draining and filling coolant .
– Disconnect coolant lines for condenser ⇒ Heating, air condi‐
tioning; Rep. gr. 87 ; Repairs to the refrigerant circuit which
Jetta 2011 ➤ , Jetta Hybrid 2013 ➤
General body repairs, exterior - Edition 08.2012
6 Rep. gr.50 - Body - front

P
r
o
t
e
c
t
e
d
b
y
c
o
p
y
r
i
g
h
t
.
C
o
p
y
i
n
g
f
o
r
p
r
i
v
a
t
e
o
r
c
o
m
m
e
r
c
i
a
l
p
u
r
p
o
s
e
s
,
i
n
p
a
r
t
o
r
i
n
w
h
o
l
e
,
i
s
n
o
t
p
e
r
m
i
t
t
e
d
u
n
l
e
s
s
a
u
t
h
o
r
i
s
e
d
b
y
V
o
l
k
s
w
a
g
e
n
A
G
.
V
o
l
k
s
w
a
g
e
n
A
G
d
o
e
s
n
o
t
g
u
a
r
a
n
t
e
e
o
r
a
c
c
e
p
t
a
n
y
l
i
a
b
i
l
i
t
y
w
i
t
h
r
e
s
p
e
c
t
t
o
t
h
e
c
o
r
r
e
c
t
n
e
s
s
o
f
i
n
f
o
r
m
a
t
i
o
n
i
n
t
h
i
s
d
o
c
u
m
e
n
t
.
C
o
p
y
r
i
g
h
t
b
y
V
o
l
k
s
w
a
g
e
n
A
G
.
must only be carried out by suitable workshops with expert
mechanics; Removing and installing condenser .
– Support bonnet and remove support rod from bonnet.
– Together with a second mechanic, unscrew guide pins -
T10093- from left and right longitudinal member -2- and lift out
lock carrier with add-on parts -1-.
WARNING
Do not start the engine if the air conditioning system and/or the
coolant system lines are disconnected.
Note
♦
Do not hang condenser and hydraulic oil cooler from lines.
♦
Do not kink condenser and hydraulic lines.
1.4.2 Installing
Jetta 2011 ➤ , Jetta Hybrid 2013 ➤
General body repairs, exterior - Edition 08.2012
1. Lock carrier 7

P
r
o
t
e
c
t
e
d
b
y
c
o
p
y
r
i
g
h
t
.
C
o
p
y
i
n
g
f
o
r
p
r
i
v
a
t
e
o
r
c
o
m
m
e
r
c
i
a
l
p
u
r
p
o
s
e
s
,
i
n
p
a
r
t
o
r
i
n
w
h
o
l
e
,
i
s
n
o
t
p
e
r
m
i
t
t
e
d
u
n
l
e
s
s
a
u
t
h
o
r
i
s
e
d
b
y
V
o
l
k
s
w
a
g
e
n
A
G
.
V
o
l
k
s
w
a
g
e
n
A
G
d
o
e
s
n
o
t
g
u
a
r
a
n
t
e
e
o
r
a
c
c
e
p
t
a
n
y
l
i
a
b
i
l
i
t
y
w
i
t
h
r
e
s
p
e
c
t
t
o
t
h
e
c
o
r
r
e
c
t
n
e
s
s
o
f
i
n
f
o
r
m
a
t
i
o
n
i
n
t
h
i
s
d
o
c
u
m
e
n
t
.
C
o
p
y
r
i
g
h
t
b
y
V
o
l
k
s
w
a
g
e
n
A
G
.
Carry out following work:
– Fit lock carrier -1- on longitudinal members -2-.
– Screw in guide pins -T10093- on left and right sides.
– Moving from service position ⇒ page 5
Further installation is performed in the reverse order of removal.
• During assembly, ensure that all connectors and hose con‐
nections are properly installed.
– Align lock carrier together with add-on parts -1- to longitudinal
members and between wings ⇒ Body Repairs; Rep. gr. 00 ;
Body gaps/shut lines; Body - front .
1.5 Removing and installing pressure hoses
1.5.1 Pressure hose with push-on coupling
Releasing pressure hose
Carry out following work:
– Disengage retaining clip -1- in direction of -arrow a-.
– Pull pressure hose -2- in direction of -arrow b- out of coupling
-3-.
Fitting pressure hose so that it latches into place
Carry out following work:
• Ensure that the retaining clip -2- is in the upper position.
– Insert pressure hose -3- in direction of -arrow- into coupling
-1-.
– Press retaining clip -2- all the way downwards.
Note
♦
If the retaining clip cannot be pushed down fully, the pressure
hose is not inserted sufficiently in the coupling.
♦
Press pressure hose again and lock retaining clip.
• Check push-on coupling by pulling on it.
Jetta 2011 ➤ , Jetta Hybrid 2013 ➤
General body repairs, exterior - Edition 08.2012
8 Rep. gr.50 - Body - front

P
r
o
t
e
c
t
e
d
b
y
c
o
p
y
r
i
g
h
t
.
C
o
p
y
i
n
g
f
o
r
p
r
i
v
a
t
e
o
r
c
o
m
m
e
r
c
i
a
l
p
u
r
p
o
s
e
s
,
i
n
p
a
r
t
o
r
i
n
w
h
o
l
e
,
i
s
n
o
t
p
e
r
m
i
t
t
e
d
u
n
l
e
s
s
a
u
t
h
o
r
i
s
e
d
b
y
V
o
l
k
s
w
a
g
e
n
A
G
.
V
o
l
k
s
w
a
g
e
n
A
G
d
o
e
s
n
o
t
g
u
a
r
a
n
t
e
e
o
r
a
c
c
e
p
t
a
n
y
l
i
a
b
i
l
i
t
y
w
i
t
h
r
e
s
p
e
c
t
t
o
t
h
e
c
o
r
r
e
c
t
n
e
s
s
o
f
i
n
f
o
r
m
a
t
i
o
n
i
n
t
h
i
s
d
o
c
u
m
e
n
t
.
C
o
p
y
r
i
g
h
t
b
y
V
o
l
k
s
w
a
g
e
n
A
G
.
1.5.2 Pressure hose with and ribbed union
and hose clamp
Removing pressure hose
Carry out following work:
– Loosen screw of hose clamp -A-.
– Pull pressure hose together with hose clamp -A- off the ribbed
union.
Fitting pressure hose
Carry out following work:
– Push pressure hose together with hose clamp -A- onto ribbed
union as far as it will go.
– Tighten screw of hose clamp -A-.
Caution
The hose clamp screw -A- must be tightened as prescribed
⇒ page 9 . If the tightening torque is too low or too high, the
pressure hose may slip off the ribbed union when the vehicle
is being driven.
Specified torque for hose clamps
1 - Hose clamp -a- = 13 mm wide: 5.5 Nm
2 - Hose clamp -b- = 9 mm wide: 3 Nm
Jetta 2011 ➤ , Jetta Hybrid 2013 ➤
General body repairs, exterior - Edition 08.2012
1. Lock carrier 9

P
r
o
t
e
c
t
e
d
b
y
c
o
p
y
r
i
g
h
t
.
C
o
p
y
i
n
g
f
o
r
p
r
i
v
a
t
e
o
r
c
o
m
m
e
r
c
i
a
l
p
u
r
p
o
s
e
s
,
i
n
p
a
r
t
o
r
i
n
w
h
o
l
e
,
i
s
n
o
t
p
e
r
m
i
t
t
e
d
u
n
l
e
s
s
a
u
t
h
o
r
i
s
e
d
b
y
V
o
l
k
s
w
a
g
e
n
A
G
.
V
o
l
k
s
w
a
g
e
n
A
G
d
o
e
s
n
o
t
g
u
a
r
a
n
t
e
e
o
r
a
c
c
e
p
t
a
n
y
l
i
a
b
i
l
i
t
y
w
i
t
h
r
e
s
p
e
c
t
t
o
t
h
e
c
o
r
r
e
c
t
n
e
s
s
o
f
i
n
f
o
r
m
a
t
i
o
n
i
n
t
h
i
s
d
o
c
u
m
e
n
t
.
C
o
p
y
r
i
g
h
t
b
y
V
o
l
k
s
w
a
g
e
n
A
G
.
2 Wing
2.1 Tools
Special tools and workshop equipment required
♦ Torque wrench -V.A.G 1783-
Jetta 2011 ➤ , Jetta Hybrid 2013 ➤
General body repairs, exterior - Edition 08.2012
10 Rep. gr.50 - Body - front

P
r
o
t
e
c
t
e
d
b
y
c
o
p
y
r
i
g
h
t
.
C
o
p
y
i
n
g
f
o
r
p
r
i
v
a
t
e
o
r
c
o
m
m
e
r
c
i
a
l
p
u
r
p
o
s
e
s
,
i
n
p
a
r
t
o
r
i
n
w
h
o
l
e
,
i
s
n
o
t
p
e
r
m
i
t
t
e
d
u
n
l
e
s
s
a
u
t
h
o
r
i
s
e
d
b
y
V
o
l
k
s
w
a
g
e
n
A
G
.
V
o
l
k
s
w
a
g
e
n
A
G
d
o
e
s
n
o
t
g
u
a
r
a
n
t
e
e
o
r
a
c
c
e
p
t
a
n
y
l
i
a
b
i
l
i
t
y
w
i
t
h
r
e
s
p
e
c
t
t
o
t
h
e
c
o
r
r
e
c
t
n
e
s
s
o
f
i
n
f
o
r
m
a
t
i
o
n
i
n
t
h
i
s
d
o
c
u
m
e
n
t
.
C
o
p
y
r
i
g
h
t
b
y
V
o
l
k
s
w
a
g
e
n
A
G
.
2.2 Assembly overview - front wing
Note
Only the left side is shown. The right side is similar.
1 - Wing
❑ Removing and installing
⇒ page 11
2 - Bolt
❑ Qty. 1, A-pillar.
❑ Qty. 2, wheel housing
❑ Qty. 1, side member
❑ Qty. 2, wing bracket
❑ Qty. 3, wing connection
piece
❑ Specified torque: 6 Nm.
3 - Wing end plate
❑ Removing and installing
⇒ page 15
4 - Insulation of wing end plate
❑ Placed in front of wing
end plate ⇒ page 14
❑ Not installed in all model
versions
5 - Foam element
❑ Inserted between wing
and longitudinal mem‐
ber for top of wheel arch
⇒ page 14 .
6 - Wing bracket
❑ Removing and installing
⇒ page 15
7 - Bolt
❑ Qty. 2.
❑ Specified torque: 6 Nm.
2.3 Removing and installing front wing
Note
The removal and installation sequence is only described for the
left wing. Removal and installation of the right wing is similar.
Jetta 2011 ➤ , Jetta Hybrid 2013 ➤
General body repairs, exterior - Edition 08.2012
2. Wing 11

P
r
o
t
e
c
t
e
d
b
y
c
o
p
y
r
i
g
h
t
.
C
o
p
y
i
n
g
f
o
r
p
r
i
v
a
t
e
o
r
c
o
m
m
e
r
c
i
a
l
p
u
r
p
o
s
e
s
,
i
n
p
a
r
t
o
r
i
n
w
h
o
l
e
,
i
s
n
o
t
p
e
r
m
i
t
t
e
d
u
n
l
e
s
s
a
u
t
h
o
r
i
s
e
d
b
y
V
o
l
k
s
w
a
g
e
n
A
G
.
V
o
l
k
s
w
a
g
e
n
A
G
d
o
e
s
n
o
t
g
u
a
r
a
n
t
e
e
o
r
a
c
c
e
p
t
a
n
y
l
i
a
b
i
l
i
t
y
w
i
t
h
r
e
s
p
e
c
t
t
o
t
h
e
c
o
r
r
e
c
t
n
e
s
s
o
f
i
n
f
o
r
m
a
t
i
o
n
i
n
t
h
i
s
d
o
c
u
m
e
n
t
.
C
o
p
y
r
i
g
h
t
b
y
V
o
l
k
s
w
a
g
e
n
A
G
.
2.3.1 Removing
Carry out following work:
– Remove wheel housing liners ⇒ page 236 .
– Pull out foam between wing and longitudinal member
⇒ Item 5 (page 11) .
– Pull out insulation of wing end plate, if it exists
⇒ Item 4 (page 11) .
– Remove wing end plate ⇒ page 15 .
– Remove front bumper cover ⇒ page 175 .
– Remove guide at side for front bumper cover ⇒ page 179 .
– If featured, remove water channel ⇒ page 274 .
– Remove bolts -2-.
– Remove wing -1- carefully.
Jetta 2011 ➤ , Jetta Hybrid 2013 ➤
General body repairs, exterior - Edition 08.2012
12 Rep. gr.50 - Body - front
/