Rhino-Rack 32109 User manual

Type
User manual

This manual is also suitable for

Rhino-Rack SUNSEEKER II Awning 2.0 metres (32109)
Important: Please read these instructions carefully prior to installation.
Please refer to your tting instruction to ensure that the roof racks are installed in the correct locations.
Check the contents of kit before commencing tment and report any discrepancies.
Place these instructions in the vehicle’s glove box after installation is complete.
Important Information
Recommendations
It is essential that all bolt connections be checked after driving a short distance when you rst install your Rhino
SUNSEEKER II Awning. Bolt connections should be checked again at regular intervals (probably once a week
is enough, depending on road conditions, usage, loads and distances travelled). You should also check the
roof bars each time they are retted.
Use only non-stretch fastening ropes or straps.
Please remove SUNSEEKER II Awning and crossbars when putting vehicle through an automatic car wash.
Load Ratings
With the addition of the SUNSEEKER II Awning, the load capacity of your crossbars will have to be adjusted
accordingly. The SUNSEEKER II Awning and 2 crossbars weigh approximately 15kg.
Note for Dealers and Fitters
It is your responsibility to ensure this tting instruction is given to the end user or client
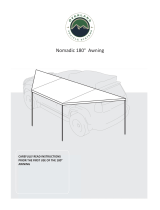
Layout
Note: Use caution in windy
conditions! The pegs and ropes
must always be used when the
SUNSEEKER II awning is open.
Page 1 of 13
Rhino-Rack SUNSEEKER II Awning 2.0 metres (32109)
Page 2 of 14
Parts List
Tools Required:
Tape measure, Spanner, Knife
Care Instruction:
Wash and clean vehicle roof racks prior to tment
Item Component Name Qty
1SUNSEEKER II 2.0m Awning 1
2Crossbar Bracket 2
3M8 x 20mm T-Bolt 4
4M8 X 17mm Flat Washer 4
5M8 Nyloc Nut 4
6M8 Channel Nut 2
7M8 Spring Washer 2
8M8 x 25mm Hex Bolt 2
9Metal Peg 2
10 Guy Rope 2
11 Metal Hook 2
12 Awning Extension Adapter 1
13 Fitting Instruction 1
For Sportz / Aero Crossbar / Pioneer Trays
For Heavy Duty Crossbar
13
9
10
11
12
5
2
4
6
4
7
8
3
5
2
4
3
4
5
3
MINIMUM
800mm
For Heavy Duty CrossbarFor Sportz / Aero Crossbar / Pioneer
1A 1B
Do not tighten bolts
fully at this point. Do not tighten nut and
bolt fully at this point.
ASSEMBLED VIEW ASSEMBLED VIEW
Alternate Congurations
RHINO SPORTZ
RHINO AERO
RHINO HEAVY DUTY
Distance measured from
bar centre to bar centre
Distance measured from
bar centre to bar centre
Rhino-Rack SUNSEEKER II Awning 2.0 metres (32109)
Page 3 of 14
Minimum Crossbar Distance
Fitting Instruction
Rhino-Rack SUNSEEKER II Awning 2.0 metres (32109)
Page 4 of 14
Adjust the location of the crossbar bracket assembly
to suit the crossbar distance on your vehicle.
Adjust the location of the crossbar bracket assembly
to suit the crossbar distance on your vehicle.
Channel nut must sit across
the bar when tightened.
3A 3B
2A
4A
2B
4B
Cut buer strip to size. Cut buer strip to size.
Zipper Zipper
Insert the crossbar bracket
assemblies as shown.
Insert the crossbar bracket
assemblies as shown.
Tighten hardware fully
once the position of the
awning had been set.
Tighten hardware and bolt
fully once the position of the
awning had been set.
Rhino-Rack SUNSEEKER II Awning 2.0 metres (32109)
Page 5 of 14
The awning
must not sit
further out than
the bar end
Ensure that
the awning
sits within the
bar end
Pioneer Fitment
OR
A
A
B
B
A B
Rhino-Rack SUNSEEKER II Awning 2.0 metres (32109)
Page 6 of 14
Operation Instruction
1
3
2
Undo the velcro straps at (A) and (B).
Unroll the awning fabric as shown.
B
A
Rhino-Rack SUNSEEKER II Awning 2.0 metres (32109)
Page 7 of 14
Swing the side pole outwards, loosen and extend inner pole as shown. Pole is a 3 stage twist pole.
Repeat for the other side.
4
5
Rhino-Rack SUNSEEKER II Awning 2.0 metres (32109)
Page 8 of 14
6
7
Swing the pole downwards as shown.
Extend pole (3 stage pole) and secure
it in place.
Rhino-Rack SUNSEEKER II Awning 2.0 metres (32109)
Page 9 of 14
8
9
Extend each inner pole into the opposite bar as shown. Apply outward pressure, then twist and lock pole into
position. Repeat on the other side.
Tension awning to the
horizontal poles with the
velcro straps as shown.
Rhino-Rack SUNSEEKER II Awning 2.0 metres (32109)
Page 10 of 14
Approx. 45º
Metal Peg
Guy Rope
Metal Hook
GROUND
10
12
11
approx. 45 ° degrees
SUN
Rhino-Rack SUNSEEKER II Awning 2.0 metres (32109)
Page 11 of 14
RAIN
13
14
Storing Instruction
Undo the metal hooks,
guy ropes and pegs.
Store these items away
in the supplied bag.
Undo the velcro straps
and swing each pole
away from you.
Rhino-Rack SUNSEEKER II Awning 2.0 metres (32109)
Page 12 of 14
15
16
17
Place your arms wide apart and pull the fabric towards you as you roll it up.
This will help to align the awning fabric and keep it rolled up neatly.
Push the horizontal poles into the recess in the bar. Secure awning with velcro straps.
Rhino-Rack SUNSEEKER II Awning 2.0 metres (32109)
Page 13 of 14
18
19
Zip up the awning when not in use.
Place the cover over the secured awning.
Rhino-Rack SUNSEEKER II Awning 2.0 metres (32109)
Awning Extension Adapter (to use with SUNSEEKER II accessories)
A
B
Part 31101
A
B
Part 32111
approx. 45 ° degrees
1
3
2
Optional Side Wall Extension (Sold Separately)
Part 32112
  • Page 1 1
  • Page 2 2
  • Page 3 3
  • Page 4 4
  • Page 5 5
  • Page 6 6
  • Page 7 7
  • Page 8 8
  • Page 9 9
  • Page 10 10
  • Page 11 11
  • Page 12 12
  • Page 13 13
  • Page 14 14

Rhino-Rack 32109 User manual

Type
User manual
This manual is also suitable for

Ask a question and I''ll find the answer in the document

Finding information in a document is now easier with AI