Uniden DASH VIEW 30R Vehicle Recorder Owner's manual

Category
Dashcam
Type
Owner's manual

Uniden DASH VIEW 30R Vehicle Recorder captures Full HD resolution videos with an impressive 140-degree wide angle lens. It also features a built-in GPS to accurately pinpoint your location and speed. With the Wi-Fi connectivity and a dedicated app, you can easily access, view, and share your recorded footage on your smartphone or tablet.

Uniden DASH VIEW 30R Vehicle Recorder captures Full HD resolution videos with an impressive 140-degree wide angle lens. It also features a built-in GPS to accurately pinpoint your location and speed. With the Wi-Fi connectivity and a dedicated app, you can easily access, view, and share your recorded footage on your smartphone or tablet.

DASH VIEW 30R
Accident CAM
Vehicle Recorder
For more exciting new products please visit our website:
Australia: www.uniden.com.au
2
UNIDEN DASH VIEW 30R Vehicle Recorder
Important Safety Instructions
NOTE
Uniden does not represent this product to be waterproof. Do not
expose this product to Rain or Moisture.
NOTE
This product is intended for use in a motor vehicle. Don’t install
the device where it will block the driver’s view of the road
(including the mirrors!) or the deployment of the airbag.
NOTE
Keep your attention on the road! Don’t try to operate or focus
on any device while driving. If you have to concentrate on a
device, pull off the road for a few minutes.
NOTE
Ensure that the camera lens is kept clean and there is nothing
blocking the lens.
NOTE
Don’t leave the device in direct sunlight for a long period of time
or where the temperature could go above 60°C.
NOTE
You should examine, check and/or verify the device at least
once a month including the associated SD card, to ensure the
recording are working properly.
NOTE
Never attempt to disassemble, repair or make any modications
to your device.
Important Safety Instructions ............................................. 2
What’s In The Box...................................................................4
Make Sure These Items Arrived in the Box ................................................. 4
Controls & Indicators ............................................................ 5
Installation ............................................................................ 7
Location .................................................................................................................. 7
Installing the Camera ........................................................................................ 7
Installing the Rear Camera .............................................................................. 8
Installing the Optional Hardwiring Kit ......................................................... 8
Operation .............................................................................. 9
Micro SD Card ....................................................................................................... 9
GPS Reception Information .............................................................................9
Power On ............................................................................................................. 10
Power O ............................................................................................................. 10
Recording .............................................................................................................11
Using the App .................................................................................................... 12
Uniden Player ..................................................................................................... 19
Troubleshooting ................................................................................................ 21
Specication ....................................................................................................... 22
Warranty .............................................................................. 23
3
UNIDEN DASH VIEW 30R Vehicle Recorder
Contents
4
UNIDEN DASH VIEW 30R Vehicle Recorder
Make Sure These Items Arrived in the Box
If any item is missing or damaged, contact your place of purchase
immediately. Never use damaged products!
Need help? Get answers at our website:
www.uniden.com.au for Australian model.
Protection lm
3M Stickers
Owner’s Manual
DASH VIEW 30
with sticker mount
bracket attached
What’s In The Box
Cigarette Charger
Micro USB
data cable
Hardwiring Kit
32GB MLC High
Endurance micro
SD Card
Rear Camera
with sticker mount
Controls & Indicators
UNIDEN DASH VIEW 30R 5Vehicle Recorder
1 2
34
56
7
89
10
Dash VIEW 30
Rear Camera
丝印:pantong877C
6
12
11
6Vehicle RecorderUNIDEN DASH VIEW 30R
Ref Component Description
1 REC LED Flashing RED when the device is recording
2 MIC Records sound.
3 GPS LED Solid Green when the device GPS is connected.
4 Speaker / Reset If the device fails to operate properly, try resetting the
device. Press the reset button by using a ne pen or
paperclip.
5 Bracket Slot Slot in the sticker mount bracket.
6 Camera Lens
7 Micro USB Port Insert DC car charger micro USB cable or the Hard
wiring kit micro USB connector.
Connect to PC for data (SD card) transfer.
8 Micro SD Card
Slot
Insert micro SD Card (up to 128GB min Class U1).
9 AV In Port Insert optional rear camera AV connector.
10 Smart One
Touch Button
Press one time to start event recording.
Press two times to turn on/off audio recording.
Press three times to switch the Wi-Fi band between
5GHz and 2.4GHz
Press and hold 5 seconds to switch On/Off Wi-Fi access
point.
Press and hold 10 seconds to format SD card.
Press one time to access SD card les when connected
to PC.
11 3M Sticker
12 AV Connector Connect to the front camera AV In Port.
7
UNIDEN DASH VIEW 30R Vehicle Recorder
Installation
Location
To have a better view, try to install the camera at the center of the windshield.
Make sure the lens is located in a place where the windshield is clean to
ensure the view is clear.
Make sure the device is not installed in a place where it will interfere with the
airbag. Make sure the GPS will not be obstructed by the windshield’s sun
control lm (window tint).
Installing the Camera
1. The sticker mount bracket comes pre-installed with the camera. Otherwise,
slot the sticker mount bracket into the device bracket slot and make sure
it ts tightly.
2. Clean the area you desire to have the dash cam placed before sticking the
device.
3. Peel off the 3M sticker protective lm from the mount bracket.
4. Press and apply force on the mount onto the windshield behind the rear-
view mirror.
5. Arrange and hide the cables to avoid obstruction for the driver’s view.
6. Adjust the viewing angle of the camera by rotating the body of the camera.
We recommend the camera should point slightly downwards ~10° below
eye level.
NOTE
Do not install the product in a location where it can obstruct
the driver’s eld of vision.
8Vehicle RecorderUNIDEN DASH VIEW 30R
Installing the Rear Camera
Install the rear camera at the centre top of the rear windshield.
1. Clean the area before installation.
2. Peel off the sticker protective lm from the 3M sticker.
3. Press and apply force on the sticker mount onto the back windshield. The
AV cable outlet needs on the left side in the car facing forward direction.
4. Connect the rear camera to the front camera with the AV cable.
5. Arrange and hide the cables to avoid obstruction for the driver’s view.
6. Adjust the viewing angle of the camera by rotating the body of the camera.
We recommend the camera should point slightly downwards ~10° below
eye level.
Installing the Optional Hardwiring Kit
If you wish to use the parking mode on the camera, you will need to install the
hardwiring kit provided.
1. Locate the location of the fuse box in your vehicle.
2. There are 3 wires that need to be connected: connect the Yellow cable
that goes to a constant fuse, RED cable that goes to an ignition-switched
fuse and BLACK cable that goes to a metal ground bolt.
YELLOW cable connect to BATTERY (+)
RED cable connect to car ACC
BLACK cable connect to car GROUND
3. Connect the micro USB end of the hardwiring cable to the camera micro
USB port.
4. Start your vehicle to see if it works. Arrange and hide the cables to avoid
obstruction for the driver’s view.
It is advisable to get a car electrician to professionally install the hardwiring
kit.
Micro SD Card
The device can support micro SDHC cards (High Capacity SD) or SDXC
cards (Extended Capacity SD) up to 128GB in capacity. A micro SD card of at
least 16GB capacity and minimum speed of Class 10/U1 is required.
Insert a formatted micro SD card gently in the slot at the side of the unit. To
remove the card from the slot, press the edge of the micro SD card inwards
for it to pop out and then pull it out of the slot.
It is important to format the micro SD card before using it, so as to avoid any
damage to the les created on DASH VIEW 30R.
Uniden only recommends using good quality MLC/SLC micro SD cards.
Please check with SD card manufacturer to ensure that the SD card used is
rated for Dash Cam recording.
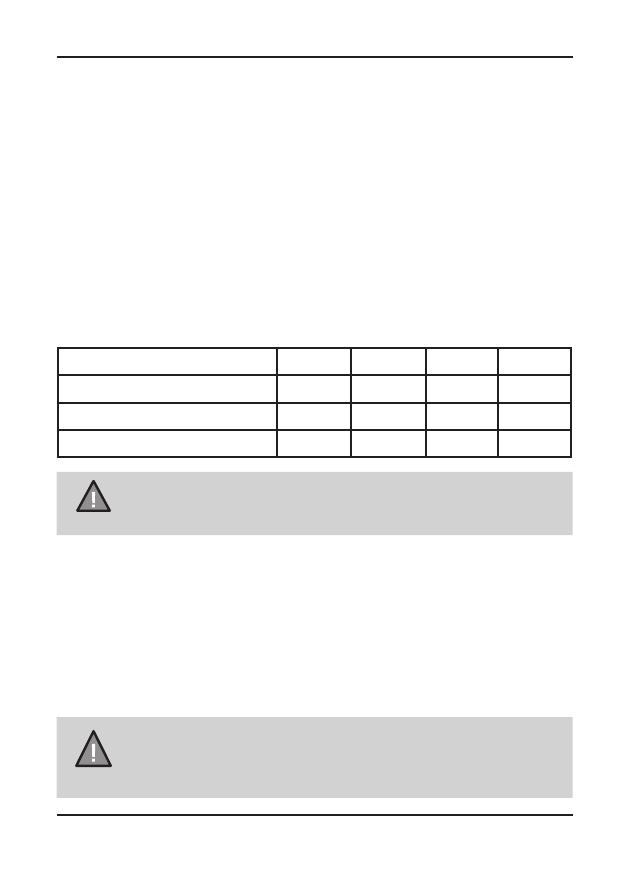
Video Storage Capacity
Refer to the table below for reference for the recording time for different card
capacity and some of the recording resolution.
Resolution 16GB 32GB 64GB 128GB
1440P 30fps+ 1080P 30fps H.265 55 mins 110 mins 220 mins 440 mins
1080P 60fps+ 1080P 30fps H.265 60 mins 120 mins 240 mins 480 mins
1080P 30fps+ 1080P 30fps H.265 70 mins 140 mins 280 mins 560 mins
NOTE
A compatible micro SD card has to be inserted before you start
using the unit. Ensure that the unit is switched off before inserting or
removing the micro SD card.
Operation
9Vehicle RecorderUNIDEN DASH VIEW 30R
GPS Reception information
Surroundings with tall buildings, tunnels or poor weather conditions may
result in poor GPS reception or even lose GPS signal. Over-tinting or a rain
sensor on the windshield can affect GPS reception.
If the signal is unstable even when you are driving, please try changing the
installation spot of your dash camera. For the rst time use, it takes about
15~20 minutes to get GPS signal, and after that, it normally takes about 3
minutes.
NOTE
Sticker mount is difcult to remove after it is installed and will
not stick well on a curved/textured or wet surface.
10
UNIDEN DASH VIEW 30R Vehicle Recorder
Power On
NOTE
When connected to a car charger with power, the camera will
automatically power on and start recording.
1. Connect the other end of the DC car adaptor to your car’s cigarette
lighter.
2. Connect the DC car micro USB adaptor to the power connector USB port
found on the camera.
3. The camera will power on automatically when the car supplies the power
to the camera.
4. The RED led on the camera will start ashing and recording starts
automatically.
NOTE
Be sure insert the SD card before powering up the device.
Format the SD card before you start recording for the rst time.
Power Off
When the car’s engine is turned off, the device will automatically turn off in a
few seconds.
Power Information
The device is designed mainly for in-vehicle use, drawing on vehicle power or
the vehicle battery when using the hardwing kit (HWK-1R).
The Dash VIEW 30R has an in-built high quality, long life supercapacitor. It
provides enough backup power to ensure any recording in progress is stored
safely before shutting the camera off.
11
UNIDEN DASH VIEW 30R Vehicle Recorder
Recording
When connected to a car charger with power, the unit automatically goes into
the record mode and starts recording.
A ashing RED led on the device indicates that the device is recording.
NOTE
To record a video, ensure that a valid micro SD card is inserted
in the given slot. Also note, that inserting/removing the SD card
when the device is recording causes the device to shutdown
and in worst case malfunction.
Protect the Current Recording
While recording, if you want to protect the current recordings, then press the
Smart One Touch button ONCE. Those recordings have been locked and will
not be overwritten by normal video recordings.
This also applies when the G-Sensor registers an impact while recording.
12
UNIDEN DASH VIEW 30R Vehicle Recorder
Using the App
The Uniden Dash View app allows you to control the Dash View camera via
WiFi. You can easily preview, browsing les, playback and download the
les in the SD card into your mobile phone. The app also allows you to make
changes to the device setting.
The Dash View camera WiFi access point is On by default. You can conrm
this with the Smart One Touch Button is glowing blue.
NOTE
Connect your mobile phone to your Dash View within a line of
sight range of 10m.
NOTE
Press and hold the WiFi button for 5 seconds to turn on/off the
WiFi access point.
1. Search and download the “Uniden Dash View” App from the App Store
for iOS devices or Play Store for Android devices.
2. Go to your mobile phone WiFi setting and connect to the camera’s
access point. The SSID usually starts with DASHVIEW_.... and the
default password is 12345678.
3. Go to the Dash View app and tap the camera.
Camera
Tap to view live video stream from the camera, take a snapshot, and view
camera settings.
Downloaded Video
Tap the Downloaded Video tab to view or playback downloaded photos or
videos even when then the camera is not connected.
About
Tap to view app information or clear app cache data.
Camera is connected Camera is not connected
Home Screen
When your mobile phone is connected to the camera’s WiFi access point, the
camera image will show on the home screen.
13
UNIDEN DASH VIEW 30R Vehicle Recorder
14
UNIDEN DASH VIEW 30R Vehicle Recorder
Live View
Device Settings
Microphone
Resolution settings
SD Card
Snapshot
Recording Switch
Switch Mode
Full Screen Mode
SD Card
Back
File Recording Timer
Camera View Switch
Recording
Resolution
NOTE
You can change Wi-Fi SSID and password in the Camera
Settings using the app.
Back
Return to home screen.
SD Card
When SD card is not inserted, it will indicates “No Card”.
File Recording Timer
Indicates the loop recording timer.
Snapshot
Take a quick snapshot and save to the SD card.
Recording Switch
Start/stop the connected camera recording.
SD Card
Tap the SD Card to access the saved snapshots or videos onto the SD
Card. You can tap to the video le to play directly or download the video
le to the mobile phone storage.
Display Mode
Not applicable for Dash VIEW 30R series camera.
Camera View Switch
Switch camera view between front and rear camera.
Resolution Settings
Tap to change the recording resolution. You will need to stop the
recording to make changes.
Microphone
Turn on/off the connected camera audio recording.
Recording Resolution
Indicates the selected recording resolution.
Full Mode
Tap to view live video preview in full screen mode.
Device Settings
Modify camera settings.
15
UNIDEN DASH VIEW 30R Vehicle Recorder
16 Vehicle RecorderUNIDEN DASH VIEW 30R
Video Settings
Resolution Set the recording resolution for the
front camera. The options available are:
2560x1440P 30fps, 1920x1080P 60fps
and 1920x1080P 30fps. Higher resolutions
will give you a sharper image, but take up
more memory on the card. The rear camera
resolution is xed at 1920x1080P 30fps.
Video Coding Select the video compression standard. The
playback of H.265 coded videos depends
on your computer’s hardware and software.
Older computers may not support H.265 video
playback. If you encounter issues please check
your computer’s video playback capabilities.
WDR Turn on/off the Wide Dynamic Range (WDR)
feature to improves the overall exposure
throughout your entire image.
Time Stamp Opt to have the date and time displayed on the
recordings.
GPS Stamp Opt to have the GPS coordinates displayed on
the recordings.
Anti-Flicker Change depending on the electrical power
frequency in your area (Default setting is 50Hz
and you may not have to change this setting).
Device Settings
NOTE
Please note that when you access the Device Settings, the
device still stop recording.
Pair your mobile phone with the Dash View camera and go to live view
screen and tap the device settings icon to access settings menu. Any
changes to the settings will take effect concurrently.
17
UNIDEN DASH VIEW 30R Vehicle Recorder
Audio Settings
Audio Recording Use this setting to enable or disable audio
recording.
Volume Adjust the camera volume level.
Function
Camera Alert Set the alert distance when there is a xed
Speed, Red Light or Red Light-Speed Camera.
Parking Mode Parking mode only works with the optional
Hardwiring Kit (HWK-1R) and when the unit is
powered off. When the parking is enabled and the
G-Sensor detects vibration, the camera will turn
on and start recording about a minute and turn
off. The unit must have sufcient external power
supplied in order to record and the G-Sensor
must also be turned on.
G-Sensor This functions helps protect/lock video les in
case of a sudden movement/collision. You can
change the sensitivity level of the G-sensor.
Time Lapse
Recording
Time Lapse setting helps you compress a
long recording to just under a few seconds. By
default, the option is turned off.
The options available are Off, 0.2S, 0.5S and
1S.
For example, if you opt for 1S, then an image
is captured every 1 second. The captured
images are then stitched together to playback
a high speed video.
Loop Recording Use this option to set the length of each video
clip.
18
UNIDEN DASH VIEW 30R Vehicle Recorder
System Settings
Time Sync Sync the device time with the mobile phone
time.
Time Zone Set the correct time zone for the GPS to get
the correct time settings for the device. GPS
time will overwrites any time synced with the
mobile phone.
Daylight Saving Enable or disable daylight saving time.
GPS Info To view the GPS signal connection status and
strength.
Car Plate Stamp Tap to edit the car plate stamp.
Storage Information Indicates the capacity of the inserted micro SD
card.
Format SD Card Use this option to format the SD card. (All les
will be permanently erased.)
Factory Default Settings Resets the device to factory settings. Note that
restoring defaults will not erase data on the
SD card.
WiFi Tap to view and change the WiFi SSID and
password for the WiFi access point
Device Information Display the device rmware version.
19
UNIDEN DASH VIEW 30R Vehicle Recorder
Connecting to a PC
The Dash View camera can be connected to a PC (plug the USB data cable
into the micro USB port). You can view the SD card contents on the PC.
When the device is detected on the PC as an external drive, all snapshots
can be found in the front_photo/back_photo folder. The normal recording
video les can be found in the front_norm/back_norm folder. All the event
recording les are stored in the front_emr/back_emr folder. Recorded les in
parking mode are stored in the front_park/back_park folder.
Uniden Player
Uniden Player allows you to view the recordings on the Dash View camera
and trace them on a map. The software is supported on Windows 7, Windows
8 Windows 10 and on macOS.
Installing Uniden Player
Download the Uniden Player from the Uniden website. You may need to
unzip the le using the appropriate archiving software before you can use the
player. Double click on the Uniden Player icon.
Access the Recorded Files
Before playing the recorded les on the Uniden Player, ensure that you can
access the les easily.
Either remove the micro SD card from the recorder, and access the card
(les) on the computer via a card reader.
or
Connect one end of the micro USB data cable to the camera and the other
end to the USB port on your computer and then press the Smart One Touch
button on the camera to access the SD Card les.
20
UNIDEN DASH VIEW 30R Vehicle Recorder
Ensure that the PC is connected to the internet to view the map screen.
2. Click on the Open icon to open the les on to the Uniden Player.
3. Click on the PLAY button (Playback Controls) to start playback.
NOTE
Uniden Player version is subject to change without notice. See
Uniden website to download the latest GPS Player.
Click on the ‘Snapshot’ icon to take photos of the recording. These photos will
automatically save into a folder named ‘screenshot’. This folder is located in
the Uniden Player folder stored in your PC.
View the Recorded Files
To view the recorded les on the Uniden Player, follow the steps below:
1. Start the Uniden Player (i.e., double click on the Uniden Player icon on
your desktop, or click windows start and search from the program listing).
Video
Playback
Screen
Playback
Controls
Driving
Direction
Map
Driving
Speed
Snapshot
Open
  • Page 1 1
  • Page 2 2
  • Page 3 3
  • Page 4 4
  • Page 5 5
  • Page 6 6
  • Page 7 7
  • Page 8 8
  • Page 9 9
  • Page 10 10
  • Page 11 11
  • Page 12 12
  • Page 13 13
  • Page 14 14
  • Page 15 15
  • Page 16 16
  • Page 17 17
  • Page 18 18
  • Page 19 19
  • Page 20 20
  • Page 21 21
  • Page 22 22
  • Page 23 23
  • Page 24 24
  • Page 25 25
  • Page 26 26
  • Page 27 27
  • Page 28 28

Uniden DASH VIEW 30R Vehicle Recorder Owner's manual

Category
Dashcam
Type
Owner's manual

Uniden DASH VIEW 30R Vehicle Recorder captures Full HD resolution videos with an impressive 140-degree wide angle lens. It also features a built-in GPS to accurately pinpoint your location and speed. With the Wi-Fi connectivity and a dedicated app, you can easily access, view, and share your recorded footage on your smartphone or tablet.

Ask a question and I''ll find the answer in the document

Finding information in a document is now easier with AI