Page is loading ...

TWO HANDLE MINI-WIDESPREAD
LAVATORY FAUCETS
LLAVES DE LAVAMANOS DE DOS MANIJAS
DE MINI-EXTENSIÓN
ROBINETS DE STYLE “À ENTRAXE LONG” À
DEUX POIGNÉES POUR LAVABO STANDARD
1
®
U
P
C
Model/Modelo/Modèle
4575 Series/Series/Seria
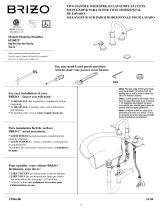
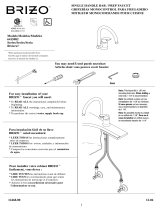
Para instalación fácil de su llave Delta
usted necesitará:
•LEER TODAS las instrucciones completamente
antes de empezar.
•LEER TODOS los avisos, cuidados, e
información de mantenimiento.
•Comprarlasconexionescorrectasparael
suministro de agua.
For easy installation of your Delta
faucet you will need:
•ToREAD ALL the instructions completely
before beginning.
•ToREAD ALL warnings, care, and maintenance
information.
•Topurchasethecorrectwater supply hook-up.
T
E
F
L
O
N
SILICONE
T
E
F
L
O
N
Icons
Write purchased model number here.
Escriba aquí el número del modelo comprado.
Inscrivez le numéro de modèle ici.
You may need/Usted puede necesitar/
Articles dont vous pouvez avoir besoin:
SILICONE
T
E
F
L
O
N
Icons
SILICONE
T
E
F
L
O
N
Icons
Pour installer votre robinet Delta
facilement, vous devez:
•LIRE TOUTES les instructions avant de débuter;
•LIRE TOUS les avertissements ainsi que toutes
les instructions de nettoyage et d’entretien;
•Acheterlebonnécessairederaccordement.
US. Pat. 3,645,493, 3,786,995, 4,523,604, 4,562,960, 4,593,430, 4,218,785, 4,577,653, 4,765,365
SILICONE
T
E
F
L
O
N
5/30/08Rev.A
3/32” (2.38mm)
54176 54176 54176 54176 54176 54176
54176 54176 54176 54176 54176 54176
®
ASMEA112.18.1/CSAB125.1
ASMEA112.18.2/CSAB125.2
NSF-61
ICC/ANSIA117.1

CLEANING AND CARE
Careshouldbegiventothecleaningofthisproduct.Althoughitsfinish
is extremely durable, it can be damaged by harsh abrasives or polish.
Toclean,simplywipegentlywithadampclothandblotdrywithasoft
towel.
Allparts and finishes of theDelta
®
faucet are warranted to the original consumer purchaser to
be free from defects in material & workmanship for as long as the original consumer pur-
chaserownstheirhome. Delta FaucetCompanyrecommends using a professionalplumberfor
all installation & repair.
Delta
willreplace,FREEOFCHARGE,duringthewarrantyperiod,anypartorfinishthatproves
defective in material and/or workmanship under normal installation, use & service. Replacement
partsmaybeobtainedbycalling1-800-345-DELTA(intheU.S.andCanada)orbywritingto:
In the United States: In Canada:
Delta
FaucetCompany Delta
FaucetCanada
ProductService TechnicalServiceCentre
55E.111thStreet 420BurbrookPlace
Indianapolis,IN46280 London,ONN6A4L6
This warranty is extensive in that it covers replacement of all defective parts and even finish,
but these are the only two things that are covered. LABOR CHARGES AND/OR DAMAGE
INCURREDININSTALLATION,REPAIR,ORREPLACEMENTASWELLASANYOTHERKIND
OF LOSS OR DAMAGES ARE EXCLUDED. Proof of purchase (original sales receipt) from
theoriginalconsumerpurchasermustbe made availabletoDeltafor all warrantyclaims.THIS
IS THE EXCLUSIVE WARRANTY BY DELTA FAUCET COMPANY, WHICH DOES NOT
MAKE ANY OTHER WARRANTY OF ANY KIND, INCLUDING THE IMPLIED WARRANTY
OFMERCHANTABILITY.
This warranty excludes all industrial, commercial & business usage, whose purchasers are
herebyextendedafiveyearlimitedwarrantyfromthe dateofpurchase,with allothertermsof
this warranty applying except the duration of the warranty. This warranty is applicable to
Delta
®
faucets manufactured after January 1, 1995.
Some states/provinces do not allow the exclusion or limitation of incidental or consequential
damages,sotheabovelimitationorexclusionmaynotapplytoyou.Anydamagetothisfaucetas
aresultofmisuse,abuse,orneglect,oranyuseofotherthangenuineDelta
®
replacement parts
WILLVOIDTHEWARRANTY.
Thiswarrantygivesyouspecificlegalrights,andyoumayalsohaveotherrightswhichvaryfrom
state/provincetostate/province.ItappliesonlyforDelta
®
faucets installed in the United States of
America,Canada,andMexico.
LIFETIME FAUCET AND FINISH LIMITED WARRANTY
©2008,MascoCorporationofIndiana
TouteslespiècesetlesfinisdurobinetDelta
®
sont protégés contre les défectuosités de matériau
et les vices de fabrication par une garantie qui est consentie au premier acheteur et qui demeure
validetantquecelui-cidemeurepropriétairedesamaison.Deltarecommandedefaireappelàun
plombier compétent pour l'installation et la réparation du robinet.
Pendant la période de garantie, Delta remplacera GRATUITEMENT toute pièce ou tout fini,
présentant une défectuosité de matériau ou un vice de fabrication pour autant que l'appareil
ait été installé, utilisé et entretenu correctement. Pour obtenir des pièces de rechange, veuillez
communiquer par téléphone au numéro 1-800-345-DELTA (aux États-Unis ou au Canada)
etparécritàl'unedesadressessuivantes:
Aux États-Unis Au Canada
DeltaFaucetCompany DeltaFaucetCanada
ProductService Centredeservicestechniques
55E.111thStreet 420BurbrookPlace
Indianapolis,IN46280 London,OntarioN6A4L6
La présente garantie s'applique au remplacement de toutes les pièces défectueuses, y compris
le fini, et elle ne couvre que ces éléments. LES FRAIS DE MAIN-D'OEUVRE ET (OU) LES
DOMMAGES PROVOQUÉS AU COURS DE L'INSTALLATION, DE LA RÉPARATION OU DU
REMPLACEMENT D'UN ÉLÉMENT AINSI QUE LES PERTES OU DOMMAGES DE TOUTE
AUTRENATURENESONTPASCOUVERTSPARLAGARANTIE.Touteréclamationenvertude
laprésentegarantiedoitêtreadresséeàDelta,accompagnéedelapreuved'achat(originaldela
facture)dupremieracheteur.CETTEGARANTIEESTLASEULEOFFERTEPARDELTAFAUCET
COMPANY OU DELTA FAUCET CANADA, SELON LE CAS. ELLE EXCLUT TOUTE AUTRE
GARANTIE,YCOMPRISLAGARANTIEIMPLICITEDEQUALITÉMARCHANDE.
Les robinets installés dans un établissement industriel ou commercial ou dans une place
d'affaires sont protégés par une grantie étandue de cinq ans qui prend effet à compter de la
dated'achat.Touteslesautresconditionsdelagarantiedecinqanssontidentiquesàcelledela
présente garantie. La présente garantie s'applique à tous les robinets Delta
®
fabriqués après le
1er janvier 1995.
DanslesÉtatsoulesprovincesoùilestinterditd'exclureoudelimiterlesresponsabilitésàl'égard
desdommagesindirectsoufortuits,lesexclusionsetleslimitessusmentionnées nes'appliquent
pas. Les dommages résultant d'une mauvaise utilisation, d'une utilisation abusive de la négligence
ou de l'utilisation de pièces autres que des pièces d'origine Delta
®
RENDENT LA GARANTIE
NULLEETSANSEFFET.
La présente garantie vous donne des droits précis qui peuvent varier selon votre lieu de résidence.
Ellenes'appliquequ'auxrobinetsDelta
®
installésauxÉtats-Unis,auCanadaetauMexique.
GARANTIE À VIE LIMITÉE DES ROBINETS ET DE LEURS FINIS
INSTRUCTIONS DE NETTOYAGE
Ilfautlenettoyeravecsoin.Mêmesisonfiniestextrêmementdurable,il
peut être abîmé par des produits fortement abrasifs ou des produits de
polissage. Il faut simplement le frotter doucement avec un chiffon humide
etlesécheràl'aided'unchiffondoux.
2
54176Rev.A
©2008,DivisiondeMascoIndiana
LIMPIEZA Y CUIDADO DE SU LLAVE
Tenga cuidado al ir a limpiar este producto. Aunque su acabado es
sumamente durable, puede ser afectado por agentes de limpieza o para
pulir abrasivos. Para limpiar su llave, simplemente frótela con un trapo
húmedo y luego séquela con una toalla suave.
©2008,MascoCorporacióndeIndiana
Todas las piezas y acabados de la llave Delta
®
están garantizados al consumidor comprador
original, de estar libres de defectos de material y fabricación, por el tiempo que el consumidor
comprador original sea dueño de su casa. Delta Faucet Company recomienda que use un
plomero profesional para todas las instalaciones y reparaciones.
Delta reemplazará, LIBRE DE CARGO, durante el período de garantía, cualquier pieza o
acabado que pruebe tener defectos de material y/o fabricación bajo instalación normal, uso y
servicio. Piezas de repuesto pueden ser obtenidas llamando al 1-800-345-DELTA (en los
EstadosUnidosyCanada)oescribiendoa:
En los Estados Unidos: En Canada:
DeltaFaucetCompany DeltaFaucetCanada
ProductService TechnicalServiceCentre
55E.111thStreet 420BurbrookPlace
Indianapolis,IN46280 London,ONN6A4L6
Estagarantíaesextensivaenloquecubreelreemplazamientodetodaslaspiezasdefectuosasy
hastaelacabado,peroéstassonlasúnicasdoscosasqueestáncubiertas.CARGOSDELABOR
Y/O DAÑOS INCURRIDOS EN LA INSTALACIÓN, REPARACIÓN, O REEMPLAZAMIENTO
COMO TAMBIÉN CUALQUIER OTRO TIPO DE PÉRDIDA O DAÑOS ESTÁN EXCLUÍDOS.
Prueba de compra (recibo original de venta) del comprador consumidor original debe de ser
disponible a Delta para todos los reclamos. ESTA ES LA GARANTÍA EXCLUSIVA DE DELTA
FAUCET COMPANY, QUE NO HACE CUALQUIER OTRA GARANTÍA DE CUALQUIERTIPO,
INCLUYENDOLAGARANTÍAIMPLÍCITADECOMERCIALIZACIÓN.
Estagarantía excluyetodo usoindustrial,comercialyde negocio,acuyoscompradoresseles
daunagarantíalimitadaextendidadecincoañosdesdelafechadecompra,contodoslosotros
términosdeestagarantíaaplicados,exceptoeldeduracióndeésta.Estagarantíaesaplicablea
lasllavesdeDelta
®
fabricadasdespuésdeEnero1,1995.
Algunos estados/provincias no permiten la exclusión o limitación de daños incidentales o
consecuentes,demaneraquelalimitaciónoexclusiónarribaescritapuedenoaplicarleausted.
Cualquierdañoaestallave,resultadodelmal uso,abuso,odescuido,ocualquierotro usode
piezasderepuestoquenoseangenuinasdeDelta
®
ANULARÁNLAGARANTÍA.
Esta garantía le da derechos legales específicos, y usted puede, también tener otros dere-
chos que varían de estado/provincia a estado/provincia. Es aplicable sólo a las llaves Delta
®
instaladasenlosEstadosUnidosdeAmerica,CanadayMexico.
GARANTÍA LIMITADA DE POR VIDA DE LA LLAVE Y SU ACABADO

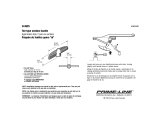
Step 1
3750015
FRONT
FRONT
FRONT
T
A.
Insert body (1) through sink and snap into place using plastic
"umbrella" (2). NOTE:Thefrontofthevalveislabeled(3).
B.
Install gasket (1), base (2), and snap ring (3) over each end valve (4).
Besuresnapringisfullyseatedingroove(5).
1
C.
Remove "umbrella" (1) and be sure snap rings seat in bases (2). Install
gasket (3), base (4), and spout (5).
D.
Handtightentwooutsidenuts(1)andtightenspoutnut(2)withbasinwrench
or other similar tool.
A.
B.
D.
2
1
2
3
4
5
3
1
1
5
54176Rev.A
A.
Introduisezlecorps(1)danslelavaboetbloquez-leenplaceàl’aide
du “parapluie” en plastique (2). NOTE-L’avantdelasoupapeest
identifié par une étiquette (3).
B.
Installez le joint (1), l’embase (2) et le segment d’arrêt (3) sur chaque
soupape(4).Assurez-vousquelesegmentd’arrêtestbiencalédans
la rainure (5).
C.
Enlevezle“parapluie”(1)etassurez-vousquelesegmentd’arrêtestcalé
dans chacune des bases (2). Installez ensuite le joint (3), l’embase (4) et
le bec (5).
D.
Serrezlesdeuxécrousextérieurs(1)àlamainetserrezl'écrou(2)dubec
avecunecléàrobinetouunoutilsemblable.
A.
Introduzca el cuerpo (1) a través del lavamanos y coloque a presión
en su sitio utilizando un “paraguas” plástico (2). NOTA:Elfrentede
la válvula está marcado con etiqueta (3).
B.
I
nstale el empaque (1), base (2), y el aro de resorte (3) sobre cada
válvulafinal(4).Asegúresedequelosarosderesorteesténcom-
pletamente sentados en la ranura (5).
C.
Quiteel“paraguas”(1)yasegúresequelosarosderesortesesténsentados
en bases (2). Instale el empaque (3), base (4) y el tubo de salida (5).
D.
Aprieteamanolasdostuercas(1)exterioresyaprietelatuerca(2)del
tubo de salida de agua con una herramienta para lavabos u otra
herramienta similar.
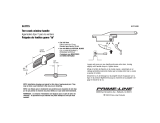
2
1
FRONT
FRONT
C.
1
2
4
5
3

2
E.
6
54176Rev.A
1
2
E.
Install the handles (1). Be sure glide ring (2) is properly seated in bottom
of handle before installing.
1
2
3
1/2" (12.7mm) IPS
Choosehook-upsfor1/2"I.P.S.connections:
(1) Ballnoseriser(3/8"O.D.coppertubing),or
(2) 1/2" I.P.S. faucet connector
Use the enclosed coupling nuts (3) with the ball nose risers (1).
Donotovertighten.
E.
Posez les poignées (1).
Assurez-vous que l’anneau de glissement (2) est bien
calé au fond de la poignée avant l’installation.
Choisissezdesraccordscompatibles1/2poIPS:
1) tubes-raccordsàportéesphérique(tubeencuivre3/8pod.e.)ou
2) raccords de robinet 1/2 po IPS.
Sivousutilisezdestubes-raccordsàportéesphérique(1),servez-vous
des écrous de raccordement fournis (3). Prenez garde de trop serrer.
E.
Instale las manijas (manerales) (1).
Antes de instalar, asegúrese que el
aro para deslizar (2) esté apropiadamente colocado en la parte inferior
de la manija.
EscojalasconexionesparaconexionesIPSde1/2":
(1) Tubomontantebola-nariz(tuberíadecobre3/8"D.E.),o
(2) ConexióndellaveIPS1/2"
Utilice las tuercas de acoplamiento incluidas (3) con tubo montante
bola-nariz(1).Noaprietedemasiado.
1

A.
Remove stopper (1) and flange (2).
B.
Screw nut (1) all the way down.
Push washer (2) and gasket (3) down.
C.
Remove tailpiece (1) from body (2),
addTeflon
®
tape (3), replace tailpiece.
3
D.
Applysiliconetoundersideofflange(1).Insert
body (2) into sink. Screw flange (1) into body (2).
E.
Pivot (1) must face faucet. Pull assembly (2)
down firmly and hold in place.
DONOTTWIST.
F.
Tightennut/washer/gasket(1),cleanoffexcess
silicone(2).DONOTTWIST.
Step 3b
Step 3f
Step 3d
SILICONE
Step 3a
A.
B.
Step 3c
C.
D.
Step 3e
E.
F.
Step 3g
G.
G.
Remove pivot nut (1). Install horizontal rod
(2) and stopper (3) as removable (4) or
non-removable(5).Handtightenpivotnut(1).
H.
Attachhorizontalrod(1)tostrap(2)using
clip (3). Insert lift rod (4) into strap and tighten
screw(5).Connectassemblytodrain(6).
A.
Quiteeltapón(1)yelreborde(2).
B.
Atornillelatuerca(1)completamentehasta
abajo.Empujelaarandela/roldana(2)yel
empaque (3) hacia abajo.
C.
Quiteeltubodecola(1)delcuerpo(2),
apliquecintaTeflon
®
(3), coloque otra
vez el tubo de cola.
D.
Apliquesilicónalaparteinteriordelreborde(1).
Inserteelcuerpo(2)enellavamanos.Atornilleel
reborde (1) en el cuerpo (2).
E.
Elpivote(1)debedeestardefrentealallave.
Haleelensamble(2)haciaabajofirmementey
sujételoensitio.NOLOGIRE.
F.
Aprietelatuerca/arandela/empaque(1),limpieel
excesodesilicón(2).NOLOGIRE.
G.
Quitelatuercadelpivote(1).Instalela
barra horizontal (2) y el tapón (3) como
desmontable(4)ofijo(5).Aprieteamano
la tuerca del pivote (1).
H.
Una la barra horizontal (1) a la barra chata
(2) utilizando el gancho (3). Introduzca la
barra de alzar (4) dentro de la barra chata
de articulación y apriete el tornillo (5).
Conecteelensamblealdesagüe(6).
A.
Enlevezlabonde(1)etlacollerette(2).
B.
Serrez l’écrou (1) pour le faire descendre
complètement. Poussez la rondelle (2) et
le joint (3) vers le bas.
C.
Enlevezleraccorddroitdevidange(1)du
corps(2),appliquezdurubandeTeflon
® (3),
puis remettez le raccord droit en place.
D.
Appliquezducomposéàlasiliconesousla
collerette (1). Introduisez le corps (2) dans le lavabo,
puis vissez la collerette (1) dans le corps (2).
E.
Lepivot(1)doitfairefaceaurobinet.Tirez
l’ensemble(2)verslebasfermementetmaintenez-
leenplace.PRENEZGARDEDELETORDRE.
F.
Serrez l’écrou contre la rondelle et le joint (1), puis
enlevezlesurplusdecomposéàlasilicone(2).
PRENEZGARDEDETORDRELEPIVOT.
G.
Enlevezl’écroudupivot(1).Installezlatige
horizontale (2) et la bonde (3) de manière que
la bonde soit amovible (4) ou non amovible (5).
Serrezl’écrou(1)dupivotàlamain.
H.
Fixezlatigehorizontale(1)aufeuillard(2)
àl’aidedel’agrafe(3).Introduisezlatirette(4)
danslefeuillardetserrezlavis(5).Fixez
l’ensemble au renvoi (6).
1
2
1
2
3
1
2
1
2
1
2
H.
1
5
3
2
4
1
3
1
2
3
6
4
5
2
7
54176Rev.A
4

8
54176Rev.A
Maintenance
If faucet leaks from spout outlet–Shut off water supplies–
Replace Seats and Springs (1).*
Ifleakpersists–Shutoffwatersupplies–ReplaceStemUnitAssembly(2).*
Quiteelaereador(1)usandolallavedetuercas(2)proporcionadacon
su llave de agua y gire las manijas de la llave de agua (3) a la posición
completamente abierta.Abralossuministrosdeaguacaliente
yfría(4)ydejequeelaguacorraporlaslíneasporunminuto.
Importante:Estolimpiacualquierescombroquepudieracausardaño
a las partes internas.
Examinetodaslasconexionesdondeseñalanlasflechasporsihay
filtracionesdeagua.Aprietedenuevosiesnecesario,pero
no apriete demasiado.
4
Entretien
Si le robinet fuit par la sortie du bec–coupez l’eau–puis remplacez les
sièges et les ressorts (1).*
Si le robinet fuit encore–coupez l’eau–puis remplacez l’obturateur (2).*
Remove aerator (1) using supplied wrench (2) and turn faucet handles
(3)tothefullonmixedposition.Turnonhotandcoldwatersupplies(4)
and flush water lines for one minute. Important:Thisflushesawayany
debris that could cause damage to internal parts.
Checkallconnectionsatarrowsforleaks.Re-tightenifnecessary,but
do not overtighten.
Retirez l’aérateur (1) en utilisant la clé (2) et
tournez les
poignées
(3)durobinetenpositiond’écoulementmaximumdel’eau
chaude et de l’eau froide. Rétablissez l’alimentation en eau chaude et
en eau froide (4), puis laissez s’écouler l’eau une minute.
Important: Il faut laisser s’écouler l’eau pour évacuer les saletés qui
pourraient abîmer les éléments internes du robinet.
Vérifiezl’étanchéitédetouslesraccordsidentifiésparuneflèche.
Resserrez les raccords au besoin, mais prenez garde de trop
les serrer.
Mantenimiento
Si la llave tiene filtraciones del pico del tubo de salida–
Cierrelossuministrosdeagua–ReemplacelosAsientosyResortes(1).*
Silafiltraciónpersiste–Cierrelossuministrosdeagua–Reemplaceel
ensambledelaUnidaddelaEspiga(2).*
1
4
3
* Install stems (2) and 1/4 turn stop (3) correctly for proper handle rotation.
1
2
3
*Instalelasespigas(2)yelpare(tope)aun1/4degiracíon(3)
correctamente para obtener una rotación debida.
* Installer correctement les obturateurs (2) et la butée 1/4 de tour (3) pour
que les manettes tournent dans le bon sens.
1
2
3
3
2
/