Page is loading ...

Models/Modelos/Modèles
6516019
Series/Series/Seria
Trevit
Writepurchasedmodelnumberhere.
Escriba aquíelnúmero del modelocomprado.
Inscrivez lenuméro demodèleici.
Youmay need/Usted puedenecesitar/
Articlesdontvouspouvez avoirbesoin:
For easyinstallationofyour
BRIZOtfaucetyouwill need:
*ToREAD ALL theinstructionscompletely before
beginning.
*ToREAD ALL warnings,care,and maintenance
information.
*To purchasethe correctwater supplyhook--up.
Parainstalaciónfácil desullave
BRIZOtusted necesitará:
*LEERTODASlasinstruccionescompletamente
antesde empezar.
*LEERTODOSlosavisos,cuidados,einformación
demantemiento.
*Comprarlasconexionescorrectaspara elsuministro
deagua.
Pourinstaller votre robinetBRIZOt
facilement, vousdevez :
*LIRE TOUTESlesinstructionsavantdedébuter.
*LIRE TOUSlesavertissementsainsiquetoutes
lesinstructionsdenettoyage etd’entretien.
*Acheterlebon raccordementnécessaire pour
l’alimentationeneau.
12826.00 11.04
1
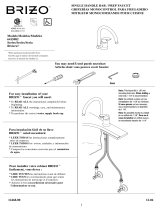
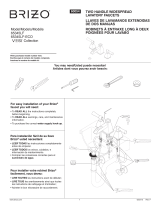
TWO HANDLE WIDESPREAD LAVATORY FAUCETS
MEZCLADORPARA SUPERFICIEHORIZONTAL
DE LAVABO
MELANGEUR SUR PAROIHORIZONTALE POUR LAVABO
3mm
t
CSAB125
ASMEA112.18.1
ICC/ANSIA117.1
Note:The back edge of the faucetbody
mustbe atleast1 1/2inchesfromthe
backsplashonwall in orderto allowthe
lift rod tofunction properly.
Nota:La orilla posteriordelcuerpo de la
llave de agua debe estara porlomenos
1 1/2 pulgadasdelprotectorde pared
en la pared para permitirque la barra de
levantefuncione apropiadamente.
Note:Le rebord arrièreducorpsdu ro-
binetdoitsetrouveràaumoins1 1/2 po
du dosseretsurlemurpourque latirette
puissefonctionnercorrectement.

2
12
1
Fig.1
INSTALLATIONOFSPOUT
A.Makesureo--ring (1)isin place as shown.
B.Insertspoutassemblyintomounting surface.
C.Slipfixing washer(2)overmounting stud and securewith nut(3).
Option:If mounting surface isuneven,usesiliconesealantunder
faucet in place ofgasket.
INSTALACIÓN DEL CAÑO
A.Aseguresequelajuntatórica (1)estéposicionada comosemuestra en
eldibujo.
B.Introducirlallaveporelorificio delasuperficiedemontaje.
C.Situarlapieza defijación (2)enlavarillaroscadayfijarmediantela
tuerca (3).
Opcional:Si lasuperficiedemontajeno estálisa,aplicarun cordón de
silicona enlugardelajuntadegoma.
INSTALLATIONDUBEC
A.Assurez--vousquelejoint torique(1)esten place.
B.Placez lerobinetdansletrou d’installation.
C.Placez larondelledefixation (2)surletoulon fileté etfixez--la avec
l’écrou (3).
Option:Si lasurface d’installation est inégale,utilisez un matériau d’é-
tanchéitédesiliconesouslerobinetaulieudujoint.
3
2
3
4
6
1
2
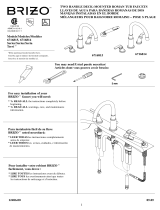
Fig.2
INSTALLATIONOFVALVEASSEMBLY
A.Insertvalve assemblyintomounting surface making surethat the
base(1)isin place as shown.
B.Assemblerubbergasket(2)and metalwasher(3)as shownand se-
curewith nut(4).
C.Theflexiblehose connectionsat thevalvebody arehand tightened
only.Nowrenchesarerequiredforthisassembly.
D.Screwininlethoses(5),red orbluemarkings,into valvebodiesin
theholesfurthestawayfrom thespout.
E.Screwin outlethoses(6),red orbluedashlines,intothevalvebodies.
F.Connect theoutlethoses(6)tothespout.
12826.00
INSTALACION DE LASLLAVES.
A.Introducirel juego deválvulaporelorificio demontaje,cuidarque
labase(1)esté ensu posición correcta comosemuestra.
B.Colocarlajuntadegoma(2)ylapletinametálica (3)comosemues-
tra,fijarmediantelatuerca (4).
C.Elaprietedelosenlacesflexiblesalcuerpo delgrifo deberealizarse a
mano.Noesnecesario utilizarherramientasde apriete.
D.Atornillarlosflexiblesde entrada(5),marcacionesenrojooblu,por
loscuerposenlosorificioslomáslejosdelcaño.
E.Atornillarlosflexiblesdesalida(6),lineasenrojooblue,porlos
cuerpos.
F.Conectarlosflexiblesdesalida(6)enelcaño.
INSTALLATION DE L’ASSEMBLAGEDESOUPAPE
A.Placez l’assemblagedesoupapedansletrou d’installation en vous
assurantquelarosace (1)esten place commemontré.
B.Assemblez lejointencaoutchouc(2)et larondellemétallique(3)
commemontré etfixez avec l’écrou (4).
C.Ilfautserrerlesflexiblesàlaboîteàsoupapeàmainseulement.Il
n’estpasnécessaired’utiliserune clépource montage.
D.Serrez lesflexiblesd’arrivé(5),marquéesenrougeou bleu,dansles
boîtesàsoupapedanslestrouslespluséloignésdu bec.
E.Serrez lesflexiblesdedécharge(6),lignesrougesou bleues,dansles
boîtesàsoupape.
F.Raccordez lesflexiblesdedécharge(6)au bec.
5

3
34
12
3
1/2”(12.70mm)IPS
4
Forfixedspout
Para caño fijo
Pourbec fixé
12826.00
2
1
3
4
HAGALASCONEXIONESALASLÍNEASDEAGUA:
Escoja conexionesde1/2”IPS:
(1)Tubo montantedebola(tuberíade cobre3/8”D.E.)o
(2)Conexión I.P.S.de1/2”parallaves.
Utilice lastuercasde acoplamientoincluídas(3)con lostubosmontantes
debola(1).Utilice dosllavesfijascuando apriete(4).Noaprietedemasia-
do.
Fig.3
MAKECONNECTIONSTOWATERLINES:
Choosehook--upsfor1/2”I.P.S.connections:
(1)Ball noseriser (3/8”O.D.coppertubing),or
(2)1/2”I.P.S.faucetconnector.
Usethe enclosedcoupling nuts(3)withtheball noserisers(1).
Usetwowrenches(4)whentightening.Do notovertighten.
RACCORDEZ LESTUYAUX D’EAU CHAUDEETD’EAU
FROIDE.
Choisissez desraccordscompatibles1/2”IPS:
(1)tubes--raccordsàportée sphérique(tube encuivre3/8”d.e.),ou
(2) raccordsderobinet1/2”IPS.
Sivousutilisez destubes--raccordsàportée sphérique(1),servez--vous
desécrousderaccordementfournis(3).Utilisez deux clés(4)pourserrer
lesraccords.Prenez gardedetrop serrer.
Fig.4
OPTIONAL:
INSTALL SWIVEL LIMITATION
A.Unscrewthescrew(4)and removethespout(3).
B.Fit thetwoswivel limitation elements(1 and 2)intherecess on
thestud.(Element1-- plasticlimitation,element2-- metalbushing).
C.Install theswivelspout(3)on thestud.
D.Install thescrew(4)for fixing thespout tothemetalbushing.(2)
OPCIONAL:
INSTALACIÓN DEL BLOQUEODEL CAÑO GIRATORIO
A.Desatornillarel tornillo(4)y dejarelcaño (3).
B.Montarlasdosunidadesdebloqueo(1-- 2)enlaranura enelracor
(Unidad1-- bloqueo deplástico,unidad2-- bloqueometálico).
C.Fijarelcaño giratorio(3)enelracor.
D.Apretarel tornillo(4)paralafijación delcaño enelbloqueo
metálico(2).
FACULTATIF:
INSTALLEZ LALIMITATIONDUMOUVEMENTPIVOTANT
A.Dévissez levis(4)etenlevez lebec (3).
B.Montez lesdeux plaquesdeserrure(1et2)enreces surlatubulure
(Elément1–arrêten plastique,élément2–arrêt métallique).
C.Montez lebec pivotant(3)surlatubulure.
D.Montez levis(4)pour fixation du becàl’arrêt métallique(2).

4
5
15
14
13
912
11
16
2
1
3
4
5
6
7
8
10
17
E.Colocarlapieza deplástico(8)dentro delcuerpo (9)yroscareste enla
válvula(3).Nota:Elorificioroscado (16)debe estarorientado haciala
llave.Empujarhacia abajolaválvulayreajustarlaspiezascolocadasen
elpasoD.
F.Colocarel tapón (2)dentro delaválvula(3).Colocarlapieza negra(11)
enlavarilla(12)asulado corto.Colocartambiénlapieza deplástico
(13)enlavarillaporsulado largo.
G.Introducirlavarilla(12)enelcuerpo (9).Apretarlatuerca de acopla-
mientoalorificioroscado.
H.Unirlavarilla(12)al tornillo de apriete(14).Introducirelaccionador
(17)atravésdelcuerpo delallavedentro del tornillo de apriete(14).
Apretarel tornillo(15)ycomprobarelbuenfuncionamiento delsiste-
ma.
INSTALACIÓN DEL DESAGÜEAUTOMÁTICO.
A.Quitarelprotectordeplástico(1)yel tapón (2)delaválvula(3).
B.Desmontarelracordedesagüe(10)delcuerpo (9)aplicando TeflónÒa
la zonaroscadadel tubo.Roscaréste(10)denuevo enelcuerpo (9).
C.Colocarlajuntadegomablanca (4)enlaválvula(3).Sepuedeutilizar
un cordón desiliconasisedesea.Introducirlaválvula enelorificio de
desagüedel lavabo/fregadero,etc
D.Colocarlajuntadegomablanca (5),con su parte cónica hacia arriba,
ylajuntadefibra(6)enlaválvula(3)pordebajo del lavabo/fregade-
ro.Roscarlatuerca (7)enlaválvula(3)peronoapretardefinitivamen-
tetodavía.
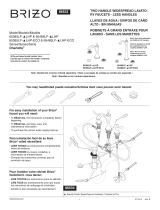
Fig.5
POP--UPINSTALLATION
A.Removeplasticstoppercap(1)and stopper(2)fromflange(3).
B.Removetailpiece (10)frombody (9)and applyTeflonâtapeto
threadson tailpiece.Screwtailpiece (10)backinto body (9).
C.Slidewhitegasket(4)ontoflange(3).(Siliconemay beusedtoreplace
gasket ifdesired.) Insertflangeintosink.
D.Push black gasket(5),conesideup,and fiberwasher(6)ontoflange
(3)fromundersink.Screwnut(7)ontoflange(3)butdo notsecurein
place yet.
E.Place whiteplasticseal(8)into body (9)and screwbody (9)ontoflange
(3).Note:Pivot(16)mustface faucet.Pull assembly downand tighten
nut/washer/gasketon flange(3).
F.Place stopper(2)intoflange(3).Place blackseal(11)onto pivotrod
(12)fromshortend and pivotnut(13)from long end.
G.Insertpivotrod (12)into body (9).Tighten pivotnut.
H.Attach pivotrod (12)toclamp(14).Install liftrod (17)through faucet
body intoclamp(14).Tightenscrew(15)and check operation of
stopper.
INSTALLATION DU VIDAGEAUTOMATIQUE
A.Enlevez le chapeau deprotection (1)et lebouchon (2)delabonde à
bouchon (3).
B.Enlevez leraccord devidage(10)du corps(9)etappliquez unebande
adhésivedeTéflonÒaufiletagedu raccord devidage.Vissez lerac-
cord devidage(10)surle corps(9)denouveau.
C.Faitesglisserlejointblanc(4)surlabondeàbouchon (3).(On peut
éventuellementutilisersilicone aulieudujoint).Passez labonde à
bouchon danslelavabo.
D.Poussez lejointnoir(5),avec le côté conique en haut,et lejointen
fibre(6)surlabondeàbouchon (3)dedessousdu lavabo.Vissez
l’écrou (7)surlabondeàbouchon (3)sansfixerencore en place.
E.Placez lejointen plastiqueblanche(8)dansle corps(9)etvissez le
corps(9)surlabondeàbouchon (3).Note: lemembredu pivot(16)
doit êtretournéverslerobinet.Tirez en basl’assemblage etserrez
l’écrou et lesjoints surlabondeàbouchon (3).
F.Placez lebouchon (2)danslabondeàbouchon (3).Placez lejointnoir
(11)surlatigehorizontale(12)àl’extrémité courte et l’écrou (13)à
l’extrémitélongue.
G.Placez latigehorizontale(12)dansle corps(9).Serrez l’écrou du pi-
vot.
H.Fixez latigehorizontale(12)àlapièce deserrage(14).Installez la
tirettedevidage(17)àtraversle corpsdu mitigeuretdanslapièce de
serrage(14).Serrez levis(15)etcontrôlez lefonctionnementdu bou-
chon.
12826.00

5
67
1
Fig.6
FLUSHYOUR SYSTEM
Remove aerator(1)and turn bothfaucethandles(2)tothefull open
position.Turn on hotand coldwatersuppliesand flushwaterlinesfor
oneminute.
Important: Thisflushesawayany debristhatcouldcausedamageto
internalparts.
PURGAR SUSISTEMA
Quite elaireador(1)y girelasdosmanijasdelallave(2)alaposición
completamente abierta.Abralos suministrosde agua calienteyfríay
deje correrelaguaporlaslíneasporun minuto.
Importante:Estolimpia cualquierescombro quepueda causardaño a
laspartesinternas.
RINCEZ LE ROBINET
Enlevez l’aérateur(1)et tournez lesdeux manettes(2)en position d’ou-
verturemaximale.Rétablissez l’alimentation eneauchaude eteneau
froide et laissez coulerl’eau pendantuneminute.
Important: Lefait delaissercoulerl’eau permetd’évacuerlescorps
étrangersquipourraientabîmerlescomposantsinternesdu robinet.
2
2
Fig.7
CHECKCONNECTIONS
Checkall connectionsforleaks.Re--tightenifnecessary,but
do notovertighten.
VERIFICAR UNIONES
Verificartodasuniones sihayfugas.Apretardenuevo,si
necesario,no aprietedemasiado.
CONTROLEZ LESASSEMBLAGES
Contrôlez touslesassemblages s’il yadesfuites.Reserrez si
nécessaire,maisprenez gardedenepastrop serrer.
12826.00

6
8
2
1
ENTRETIEN
FERMEZ L’ARRIVÉE D’EAU AVANTD’EXAMINER
L’ASSEMBLAGEDESOUPAPE
Si lemitigeur fuit parlebec ou souslamanette–remplacez
latêtedu robinet(1).
Si lemitigeur fuit àlabasedu bec -- Remplacez lesjoints
toriques(2).
Fig.8
MAINTENANCE
SHUTOFF WATERSUPPLIESBEFORESERVICING
VALVEASSEMBLY.
If faucet leaksoutofspoutorunderhandle-- replace valve
cartridge(1).
If faucet leaksatbaseofspout-- replace O--rings(2).
MANTENIMIENTO
CERRAR LA VÁLVULASDE ENTRADA ANTESDE
PROCEDERALA REPARACIÓN.
Si lallavegotea porelcaño o pordebajo delamaneta–
reemplazarelcabezal(1).
Si lallavegotea porelbasedelcaño -- reemplazarlasjuntas
tóricas(2).
12826.00

7
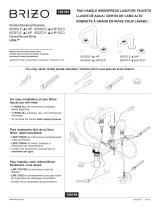
sPlease specifyfinishwhen ordering thisreplacementpart.
sSedeberá especificarelacabado cuando pida estapiezaderecambio.
sVeuillezspécifierlefiniàlapassation de commandede ces pièces détachées.
19.RP36298 s
Lift rod
Varillatirador
Tirettede vidage
15.RP38906s
Stopper
Tapón
Bouchon de vidage
17.RP38908
PivotSeat&Gasket
Asiento pivoteyjunta
Jointetsiègedu pivot
16.RP38907s
Flange
Válvula
Bondeàbouchon
12.RP5861
Coupling nuts
Tuercas de acoplamiento
Ecrousdebranchement
14.RP28823
Nut&washer
Tuerca y arandela
Écrou etrondelle
20.RP38909s
Pop--up waste,complete
Vaciadorautomático,completo
Soupapede vidage,complète
8
15
16
17
20
18
14
19
4.RP36269s
Handle+colourmark
Manija+marcación de color
Manette+marquagede couleur
1.RP36263s
Aerator
Aireador
Aérateur
6516019
5
2
1
2.RP36264s
Spoutwithaerator
Caño con aireador
Bec avec aérateur
3.RP36261
Orings
Juntas tóricas
Jointstoriques
5.RP36262
Swivel limitation
Bloqueo delmovimiento delcaño
Limitation du bec mobile
4
6
7
x2
3
12
8.RP36267
Oring
Juntatórica
Joint torique
BN =BrillianceRBrushedNickel
Nosuffixisrequiredforchrome.
Para cromonoes necesariounsufijo.
Aucun suffixe n’estexigépourchrome
18.RP36271
Clampwithscrew
Anillo de apriete con tornillo
Pièce de serrage avec vis
9
11
10
13
10.RP36273
Hose
Flexo
Flexible
11 RP36275
Hose
Flexo
Flexible
9.RP36274s
Base
Base
Larosace
13.RP36276
Gasket,Nut&washer
Tuerca y arandela
Écrou etrondelle
12826.00
6.RP36265
Valve cartridge,cold
Montura cerámica,fría
Cartouche,froid
7.RP36266
Valve cartridge,hot
Montura cerámica,caliente
Cartouche,chaud
21
21.RP40119
Setscrew& Allenkey
Tornillo depresión &yllave Allen
Visd’arrêtetcléhexagonale

8
Toutesles pièceset lesfinis du robinetBRIZOtsontprotégéscontreles défectuosités dematé-
riauet les vices defabrication parunegarantiequiestconsentie au premieracheteuretquide-
meurevalidetantque celui--cidemeurepropriétairedesamaison.Deltarecommandedefaire
appelàun plombiercompétentpourl’installation et laréparation du robinet.
Pendant lapériodedegarantie,DeltaremplaceraGRATUITEMENTtoutepièce ou toutfini,
présentantunedéfectuositédematériau ou un vice defabrication pourautantquel’appareil ait été
installé,utilisé etentretenu correctement.Pourobtenirdes piéces derechange,veuillez communi-
querpartéléphone au numéro 1--877--345--BRIZO(2749) (aux États--Unis ou auCanada)etpar
écrit àl’unedesadresses suivantes:
AuxÉtats--Unis
DeltaFaucetCompany
ProductService
55 E.111thStreet
Indianapolis,IN46280
AuCanada
DeltaFaucetCanada
Centredeservicestechniques
420 Burbrook Place
London,OntarioN6A4L6
PLACEMENTD’UN ÉLÉMENTAINSIQUE LES PERTESOU DOMMAGESDE TOUTE AUTRE
NATURENESONTPASCOUVERTS PARLA GARANTIE.Touteréclamation en vertu delaprésen-
tegarantiedoit être adresséeàDelta,accompagnée delapreuved’achat(originaldelafacture)du
premieracheteur.CETTE GARANTIE EST LASEULE OFFERTE PARDELTAFAUCET COMPANY
OUTDELTAFAUCET CANADA.SELON LE CAS.ELLE EXCLUT TOUTE AUTREGARANTIE,Y
COMPRISLA GARANTIEIMPLICITE DEQUALITÉ MARCHANDE.
Cettegarantie exclut toutusageindustrielou commercialou dans les places d’affaires,dont les
acheteurs sontcouverts parunegarantielimitée de cinq ans quiprend effetà compterdeladate
d’achat.Touteslesautresconditions delagarantiede cinq ans sont identiquesà celles delaprésente
garantieàl’exception deladurée de celle--ci.Laprésentegaranties’appliqueàtous lesrobinets
BRIZOtfabriquésaprèsle1erjanvier1995.
Dans les États ou les provinces òu il est interdit d’exclureou delimiterlesresponsabilitésàl’égard
des dommagesindirects ou fortuits,lesexclusions et leslimites susmentionnées nes’appliquentpas.
Les dommagesrésultantd’unemauvaiseutilisation,d’uneutilisation abusivedelanégligence ou de
l’utilisation depiècesautres quedes pièces d’origineDeltarRENDENT LA GARANTIENULLE ET
SANSEFFET.
Laprésentegarantievous donnedes droits précis quipeuventvarierselon votrelieu derésidence.
Ellenes’appliquequ’aux robinetsBRIZOtinstallésaux États--Unis,auCanada etau Mexique.
All partsand finishes oftheBRIZOtfaucetarewarrantedtotheoriginalconsumerpurchaserto
befree fromdefectsinmaterialand workmanshipforaslong astheoriginalconsumerpurchaser
owns theirhome.DeltaFaucetCompany recommends using aprofessionalplumber forall in-
stallation and repair.
Deltawill replace,FREE OFCHARGE,during thewarranty period,any partor finish thatproves
defectiveinmaterialand/orworkmanship undernormal installation,use and service.Replacement
partsmay beobtainedbycalling 1--877--345--BRIZO(2749) (intheU.S.and Canada)orby
writing to:
Todaslas piezas y acabados delallaveBRIZOtetán garantizados alconsumidorcomprador
original,de estarlibres dedefectos dematerialyfabricación,porel tiempo que elconsumidor
compradorsea dueño desu casa.DeltaFaucetCompany recomiendaqueuseun plomero
profesionalparatodaslasinstalaciones y reparaciones.
Deltareemplazará,LIBREDECARGO,durante elperíodo degarantía,cualquierpieza oacabado
quepruebetenerdefectos dematerialy/ofabricación bajoinstalación normal,uso y servicio.
Piezas derepuesto pueden serobtenidasllamando al1--877--345--BRIZO(2749) (enlos Estados
Unidos y Canada)oescribiendo a:
IntheUnited States:
DeltaFaucetCompany
ProductService
55 East111thStreet
Indianapolis,IN46280.
InCanada:
DeltaFaucetCanada
TechnicalService Centre
420 Burbrook Place
London ON N6A4L6
Enlos Estados Unidos:
DeltaFaucetCompany
ProductService
55 East111thStreet
Indianapolis,IN46280
EnCanada:
DeltaFaucetCanada
TechnicalService Centre
420 Burbrook Place
London ON N6A4L6
COMOTAMBIÉNCUALQUIEROTROTIPO DEPÉRDIDA O DAÑOSESTÁN EXCLUIDOS.
Pruebade compra(recibo originaldeventa)delcompradorconsumidororiginaldebedeser
disponibleaDeltaparatodos los reclamos.ESTAESLA GARANTÍAEXCLUSIVA DEDELTA
FAUCET COMPANY,QUENO HACECUALQUIEROTRA GARANTÍA DECUALQUIERTIPO,
INCLUYENDO LA GARANTÍAIMPLÍCITA DECOMERCIALIZACIÓN.
Estagarantía excluyetodo uso industrial,comercialy denegocio,cuyos compradores seles da
unagarantíalimitada extendidade cincoaños desdelafechade compra,con todos los otros
términos de estagarantía aplicados,exeptoeldeduración de ésta.Estagarantía esaplicablealas
llaves deBRIZOtfabricadas después deEnero 1,1995.
Algunos estados/provincias no permitenla exclusiónolimitación dedaños incidentales o
consecuentes,demaneraquelalimitaciónoexclusión arriba escritapuedeno aplicarleausted.
Cualquierdaño a estallave,resultado demaluso,abuso,o descuido,ocualquierotro uso de
piezas derepuesto queno sean genuinas deDeltarANULARÁN LA GARANTÍA.
Estagarantíaledaderechos legalesespecíficos,y usted puedetambiéntenerotros derechos que
varian de estado/provinciaaestado/provincia.Es aplicablesóloalasllavesBRIZOtinstaladasen
los Estados Unidos deAmerica,Canaday Mexico.
CLEANINGAND CARE
Careshould begiventothe cleaning ofthis product.Although itsfinish isextremely durable,it
can bedamaged by harsh abrasives orpolish.To clean,simplywipegentlywithadampclothand
blotdrywithasoft towel.
LIFETIMEFAUCET AND FINISHLIMITEDWARRANTY
WELL ASANY OTHERKIND OFLOSS ORDAMAGESARE EXCLUDED.Proofofpurchase
(originalsalesreceipt) from theoriginalconsumerpurchasermustbemade availabletoDeltafor
all warrantyclaims.THISISTHE EXCLUSIVEWARRANTYBY DELTAFAUCET COMPANY,
WHICH DOESNOT MAKEANY OTHERWARRANTY OFANY KIND,INCLUDING THE
IMPLIEDWARRANTY ORMERCHANTABILITY.
Thiswarrantyexcludesall industrial,commercialand business usage,whosepurchasersare
hereby extendedafiveyearlimitedwarrantyfrom thedateofpurchase,withall otherterms of
thiswarrantyapplying except theduration ofthewarranty.Thiswarrantyisapplicableto
BrizotfaucetsmanufacturedafterJanuary 1,1995.
Somestates/provinces do notallowthe exclusion orlimitation ofincidentalorconsequential
damages,so the abovelimitation orexclusion may notapplyto you.Any damagetothisfaucet
asaresult ofmisuse,abuse,orneglect,orany useofotherthan genuineDeltarreplacement
partsWILL VOIDTHEWARRANTY.
Thiswarranty gives you specificlegalrights,and you mayalso haveother rightswhich vary
fromstate/province to state/province.Itapplies onlyforBrizotfaucetsinstalledinthe
UnitedStates ofAmerica,Canada,and Mexico.
Thiswarrantyisextensiveinthatitcoversreplacementofall defectivepartsand evenfinish,but
these aretheonlytwothings thatare covered.LABOR CHARGESAND/ORDAMAGEIN-
CURREDININSTALLATION,REPAIR,OR REPLACEMENTAS
ã2004,MascoCorporation of Indiana
LIMPIEZA Y CUIDADODESULLAVE
Debedetenercuidado enlalimpieza de esteproducto.Aunquesu acabado esextremadamente
durable,puedeserdañado porabrasivos o pulimentos ásperos.Paralimpiarsimplementefrote
suavemente con un paño húmedo,y séquelocon un paño suave.
GARANTÍALIMITADA DEPOR VIDA DE LALLAVEYSU ACABADO
Estagarantía esextensiva enlo que cubre elreemplazamiento detodaslas piezas defectuosas y
hasta elacabado,peroéstas son las únicas dos cosas que estáncubiertas.CARGOSDE LABOR
Y/O DAÑOSINCURRIDOSENLAINSTALACIÓN,REPARACIÓN,OREEMPLAZAMIENTO
INSTRUCTIONSDENETTOYAGE
Ilfaut lenettoyeravec soin.Mêmesison finiestextrèmementdurable,il peutêtre abîmépardes
produitsfortementabrasifs ou des produits depolissage.Ilfautsimplement lefrotterdoucement
avec un chiffon humide et lesécheràl’aided’un chiffon doux.
GARANTIEÀ VIE LIMITÉE DESROBINETSET DE LEURSFINIS
Laprésentegaranties’applique auremplacementdetoutesles pièces défectueuses,ycomprisle
fini,etellene couvreque ceséléments.LES FRAISDE MAIN D’OEUVREET(OU)LESDOM-
MAGES PROVOQUÉSAU COURSDE L’INSTALLATION,DE LARÉPARATION OU DU REM--
ã2004,Division deMascoIndiana
ã2004,MascoCorporatión deIndiana
12826.00
/