Page is loading ...

150 Mini Instruction manual
International edition
Rev
1.1
-
July 2016

Thank You!
The team that designed the Vortex Mini would like to thank you for purchasing this product.
Many hours of development, and testing time went into the product, we truly hope that this is reflected in your
experience with the product.
The 150 Mini was designed as an entry-level racer, priced much lower than it’s 250 Pro big brother, but with all of
the features, and twice the smiles.
We would love to hear your feedback on the product, whether good or bad, at [email protected].
2

WARNING
Congratulations on your purchase of one of the hobby’s first ARF pure-bred racing quadcopters. A product
designed by FPV Racers, for FPV Racers.
Do not expect it to fly like a DJI Phantom™ . It does not have a return-to-home feature, no GPS, and it does not
have stabilization features that will allow your little brother to fly (to be honest, we think your little brother might
be faster than you around the back yard…)
Take it easy if you are new to the world of FPV racing, try to avoid slamming the quad into the first wall before you
have mastered slaloming through the trees on the way to the wall.
Acro mode is something that should be learned as soon as possible, flying any other mode is a bit like driving a
Lamborghini around a parking-lot in reverse… not exactly what you bought the Lambo for.
Please carefully read the recommendations in this manual, and the related getting-started guides, as far as
equipment/battery selection, and how to run the Vortex 150 Mini Wizard.
REMOVE PROPS
Mini-quad props can do serious damage when coming in contact with human skin, risk of deep cuts and
lacerations should be avoided at all cost.
So when you are working on a quad with the battery connected, it is highly recommended to REMOVE ALL PROPS,
unless you are just about to fly. Keep in mind that when setting up mini-quads, there is always a remote chance
that a configuration change can spin up motors unexpectedly.
ImmersionRC accepts no responsibility, or liability, for any injury, or damage, to persons or property, caused by the use of
the Vortex.
INSTALL ANTENNA
The Video Transmitter included in the Vortex may be damaged permanently if run without the supplied SpiroNET
Antenna. Please take care to install this antenna before every flight, and when powering up the Vortex for even a
short time period.
ImmersionRC accepts no responsibility for damage caused to the Vortex by operating without a suitable Tx antenna
installed.
3

Getting Started for Newcomers to Race Drones
This manual focuses on preparing your 150 Mini for first flight, and how to maintain it in the future. One step that
is highly recommended for newcomers to the world of racing drones is to take the first flight within the safety of a
simulator.
Lugus Studios ‘Liftoff’ simulator contains a full realistic 3d simulation of the Vortex 150 Mini, and is an ideal way to
get the hang of flying a racer without breaking props.
Get the hang of hovering, turning, carving around flags, racing through gates, before charging your first battery.
Liftoff is distributed on the Steam platform, and may be downloaded from here:
http://store.steampowered.com/app/410340/
4


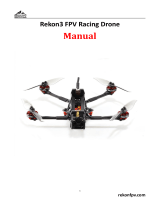
The Anatomy of a Vortex 150 Mini
Connectors and Switches
1) USB connector, used to configure the flight controller and upgrade the Vortex firmware.
Note that when used with most USB hosts, a separate battery connection is not required when
connecting to the USB connector.
Please be careful not to put too much strain on this connector. It is a lightweight surface-mount part, and if the
quad is dragged around by the USB cord it may not survive.
2) Reset button, used to change Video Tx band, to restart the wizard and also to put a spektrum receiver in
bind mode.
Press and release after 1st beep to change video band, release after 2nd beep to restart the wizard,
release after 3rd beep to put a (non-autobind) spektrum rx in bind mode, finally release after 4th beep to
cancel operation.
Note: To bind a Spektrum Rx using the reset button, the vortex must be placed in SPEKTRUM 1024/2048 mode,
and not AUTO mode, using the Vortex Configurator on a PC or Mac.
6

WARNING: Be careful how much pressure is placed on this small button. It is a surface-mount part which
may easily be damaged with a heavy-hand. Use an appropriate tool to access the recessed button (a bent
paper-clip works fine), and do not push harder after the first ‘click’ is felt.
3) Synergy FC/OSD button, used to enter firmware update mode in the case of a ‘bricked’ OSD. Note that
we don’t expect this button to ever be needed, but this is where it is located just incase...
See the
Firmware Upgrades
chapter for more details.
4) Receiver Connector (All Protocols, CPPM, SBus, DSMX™, etc.)
The Vortex 150 Mini has a single connector for all supported receivers. 5V and 3.3V power supplies are
available, to support most of the commonly used receivers on the market today. In most cases, one of the
supplied cables will suffice, but if a cable must be built, follow the pinout below:
7

Note that a piece of double-sided tape may be used to secure the receiver on top of the metal can beside
the connector.
Receiver antennas may be routed through one of the 6 available slots. Two at the back of the quad in the
LED diffuser, and four in the side-plates.
In most cases the best solution is to route them through the rear, but certain receivers may experience
reduced range due to the close proximity of the 5.8GHz Tx antenna. If this occurs, consider relocating one
or both of the receiver antennas through one of the slots in the side-plates towards the front of the quad.
8

5) XT-30 Battery Connector
In order to reduce weight (and to arrive below the 250g weight limit for un-registered drones in the USA,
and other countries) XT-30 Battery connectors are used instead of the more popular XT-60s. It is highly
recommended to stick with this connector, and purchase batteries with XT-30s pre-installed. .
Note 1: Pay EXTREME attention to the polarity of batteries connected to this connector, especially
those soldered ‘DIY’. A reverse-polarity connection, even for a fraction of a second will let out the
‘magic smoke’ and destroy most of the electronics in the Vortex Mini.
Note 2: When unplugging the battery, especially one with a new, and rather tight connector, take care
to hold the cables, and avoid unnecessary strain on the Vortex PDB. Pulling these cables too hard may
pull the traces off of the PCB.
Note 2: When unplugging the battery, especially one with a new, and rather tight connector, take care
to hold the cables, and avoid unnecessary strain on the Vortex PDB. Pulling these cables too hard may
pull the traces off of the PCB.
Note 3: XT-30 connectors are a lot less robust than their XT-60 cousins. Be careful not to force them
together with incorrect polarity. With enough force, the plastic shell will crack, and result in a destroyed
quad!
Connector Part Numbers and Sources
If any of the connectors on the Vortex 150 Mini are damaged, or if 3rd party components are to be integrated into
the system, the following list of connectors and pre-crimped wires should be useful.
Cable
Description
Manufacturer’s PN
Digikey PN
FUN/GPS Signal Connector
Picoblade 5 pin
0510210500
WM1723-ND
Camera Signal Connector
Picoblade 3 pin
0510210300
WM1721-ND
Picoblade Signal Wires
(all Picoblade connectors)
Picoblade
0006660013
WM2320-ND
9

Arm Assembly
When changing an arm, a soldering iron is required, to remove the ESC + and - battery cables, along with the signal
cable.
Note: The choice of soldered connections here, instead of the much more convenient connector option may
not seem ideal, but this is the best way to transmit the 20+ Amps of battery juice to the ESCs and motors
without losses.
Camera Mounting
Flight Camera
The Vortex 150 Mini is equipped with a state-of-the-art FatShark 600 TVL CCD camera. This camera has custom
mounting points designed for race quads, which match up with the camera shroud.
To remove the camera, simply remove the two hex-head screws under the nose of the quad and tilt the camera
shroud upwards.
Carefully unplug the 4-pin camera connector from the PDB without putting too much strain on the cables.
10

Note that the camera tilt is adjustable. Loosen the two upper-screws and tilt the camera to the desired angle,
before re-tightening them.
Cool Feature Alert: The 150 Mini has a cool way to control the camera settings directly from the Vortex OSD.
Lost Model Alarm
The Lost Model Alarm on the Vortex 150 Mini sounds when the quad is disarmed after landing, or if a receiver
failsafe occurs.
The alarm is designed to be as simple as possible, without controls which could allow it to be accidentally disabled,
resulting in a lost quad.
NOTE: The alarm is driven directly from the OSD on the 150 Mini, and not from the Flight Controller, so
changing beeper settings in the Betaflight configurator will not change its behavior.
11

The Touch’n’Race (TNR) Tag
The Touch’n’Race tag is located behind the plastic side-plate of the right-side of the quad (looking from the back).
A TNR Wand may be used to not only query the video transmission frequency before powering-up the quad, but
also to set it to any of the supported channels before powering up.
12

The On Screen Display (OSD)
The Welcome Screen
Each time the Vortex is powered up, and before sticks are moved, the following welcome screen is displayed.
This shows various pieces of status information, including the Flight Controller version number, and Flight
Controller API version which is fairly important for OSD compatibility.
Moving the pitch/roll stick (right stick for mode 2’ers) will dismiss the menu.
13

The Main Menu
For Mode 2’ers, holding the throttle stick down and to the left will enter the main menu. Note that this stick
position needs to be held for a few seconds before the menu appears.
Note that some menus are multi-page, take a look in the top-right corner of the display to see how many pages in
the current menu, and which is selected.
To navigate the menu, use the pitch/roll stick.
14

The OSD Setup Menu
Various OSD setup parameters are available in this menu.
The Landscape, defines the elements that are shown on the main screen in flight, including an EzOSD-type
landscape (the default), a clutter-free landscape for hardcore racers, and a gaming mode which is currently in Beta
form (documented later in this manual).
The Pseudo lets you name your quad. This is useful when several Vortexes are being used in a race, and simplifies
Video Tx channel assignments.
The Pack Capacity should be set to the capacity of your flight battery. The OSD will track battery consumption, and
will warn, with screen-center alarms, if it gets critical.
NOTE: It is highly recommended to set this to match the flight pack that you are using to allow the OSD to
warn you when the battery is reaching critical levels.
15

Alarms may be enabled and disabled in the Alarms Setup menu.
It is highly recommended to start flying with all alarms enabled, and disable them if required after getting used to
the quad.
16

The LED Setup Menu
The RGB LEDs on the rear of the Vortex are fully programmable, with colors, and various patterns.
For Parameter Mode = Intensity, the intensity of the LEDs will reflect the current throttle position.
For Parameter Mode = Frequency the blink rate of the LEDs will reflect the current throttle position.
For Parameter Mode = Gradient, the LEDs will shift from the foreground color, to the background color, based
upon the current throttle position.
Other modes will be supported in future firmware updates.
17

The Flight Controller Menus
In-field tweaking of flight-controller menus is possible without a laptop and USB cable.
All of the critical parameters, PIDs, Expos, Loop time, etc. are available.
General configuration settings should not need changing, except to enable Air Mode (which is highly
recommended).
18

Note that the PID Settings menu is a two page menu, keep moving the caret down to access the second page.
19

/