
1
Sidewall Propeller Fans • Wall Mount Collar
®
Document 451424
Wall Mount Collar for
Sidewall Propeller Fans
Assembly and Installation Instructions
Please read and save these instructions for future reference. Read carefully before attempting to
assemble, install, operate or maintain the product described. Protect yourself and others by observing
all safety information. Failure to comply with instructions could result in personal injury and/or property
damage!
Wall collars offer a method for
mounting sidewall propeller
fans. Standard construction
is of galvanized steel (painted
steel is optional) with heavy-
gauge mounting flanges and
prepunched mounting holes.
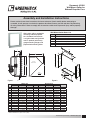
Wall Mount Collar Parts List
Item Description
1 Top Panel with Damper Lip
2 Bottom Panel with Weep Holes
3 & 4 Side Panels (interchangeable on fan sizes 24 thru 72)
5 & 6 Top and Bottom Flanges (interchangeable)
7 & 8 Side Flanges (interchangeable)
8 Fasteners
2
1
3
4
5
6
7
8
Weep
Holes
Figure 2
Size
Wall Collar Weatherhood
Damper
A B* W.O. C D E Width
8 12
7
⁄8 (327) 16
1
⁄8 (410) 14
1
⁄4 (362) 1
9
⁄16 (40) 13
1
⁄4 (337) 11
1
⁄4 (286) 10
1
⁄2 (267) 10 (254)
10 14
7
⁄8 (378) 16
1
⁄8 (410) 16
1
⁄4 (413) 1
9
⁄16 (40) 14
7
⁄8 (378) 13
3
⁄8 (340) 12
1
⁄2 (318) 12 (305)
12 17
7
⁄8 (454) 16
1
⁄8 (410) 19
1
⁄4 (489) 1
9
⁄16 (40) 16
3
⁄8 (416) 15
5
⁄8 (397) 14
1
⁄2 (368) 14 (356)
14 19
7
⁄8 (505) 18
3
⁄8 (467) 21
1
⁄4 (540) 1
9
⁄16 (40) 17
1
⁄2 (445) 17
5
⁄8 (448) 16
1
⁄2 (419) 16 (406)
16 21
7
⁄8 (556) 18
3
⁄8 (467) 23
1
⁄4 (591) 1
9
⁄16 (40) 19
3
⁄8 (492) 19
5
⁄8 (498) 18
1
⁄2 (470) 18 (457)
18 23
7
⁄8 (606) 18
3
⁄8 (467) 25
1
⁄4 (641) 1
9
⁄16 (40) 22 (559) 21
5
⁄8 (549) 20
1
⁄2 (521) 20 (508)
20 25
7
⁄8 (657) 18
3
⁄8 (467) 27
1
⁄4 (692) 3 (76) 24
3
⁄4 (629) 23
5
⁄8 (600) 22
1
⁄2 (572) 22 (559)
24 31
7
⁄8 (810) 18
3
⁄8 (467) 33
3
⁄4 (857) 3 (76) 26
7
⁄8 (683) 30
3
⁄8 (772) 29
1
⁄8 (740) 26 (660)
30 37
7
⁄8 (962) 18
3
⁄8 (467) 39
3
⁄4 (1010) 3 (76) 29
1
⁄8 (740) 36
1
⁄2 (927) 35
1
⁄8 (892) 32 (813)
36 43
7
⁄8 (1114) 18
3
⁄4 (476) 45
3
⁄4 (1162) 3 (76) 33 (838) 42
1
⁄2 (1080) 41
1
⁄8 (1045) 38 (965)
42 49
7
⁄8 (1127) 18
3
⁄4 (476) 51
3
⁄4 (1314) 3 (76) 35
3
⁄4 (908) 48
1
⁄2 (1232) 47
1
⁄8 (1197) 44 (1118)
48 55
7
⁄8 (1419) 18
7
⁄8 (479) 57
3
⁄4 (1467) 3 (76) 40
3
⁄8 (1026) 54
5
⁄8 (1387) 53
1
⁄4 (1353) 50 (1270)
54 61
7
⁄8 (1572) 20
1
⁄8 (512) 63
3
⁄4 (1619) 3 (76) 44
3
⁄4 (1137) 60
7
⁄8 (1546) 59
1
⁄2 (1511) 56 (1422)
60 67
7
⁄8 (1724) 21 (533) 69
3
⁄4 (1772) 3 (76) 48
3
⁄8 (1229) 67 (1702) 65
5
⁄8 (1667) 62 (1575)
72 81
7
⁄8 (2080) 22 (559) 83
3
⁄4 (2127) 3 (76) 53
1
⁄4 (1353) 79
1
⁄2 (2019) 78
1
⁄8 (1984) 74 (1880)
*All sizes except 20 and 72 are 2 in (51 mm) larger if a VCD damper is used. For complete dimensional information refer to
submittal. All dimensions given in inches (mm).
A
WALL
OPENING
SQ.
B
C
D
E
Airflow
Exhaust
Optional
Weatherhood
Figure 1

2 Sidewall Propeller Fans • Wall Mount Collar
®
BROWN
06/17/2008
1/1
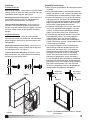
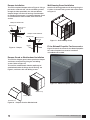
Figure 3 Figure 4
Figure 8 - Assembled Wall Mount Collar as viewed
from exterior
Slip damper
flange under
lip
Slip damper
flange under
lip
Figure 6 Figure 7
Hardware
Fan Sizes 8 thru 20:
Wall Collar Assembly - Use 1/4-20 x 3/4 inch threaded
cutting screws for each hole when attaching side, top
and bottom panels together, see Figure 3.
Mounting Fan Panel to Wall Collar - Use 1/4-20 x 3/4
inch threaded cutting screws for attaching the fan
panel to the wall mount collar, see Figure 5.
Flange to Wall Collar Mounting - Use 1/4-20 x 3/4
inch bolts, nuts and lock washers when attaching
flanges to the wall mount collar, see Figure 4. (Do not
use a flat washer under the bolt head for attaching
flanges).
Fan Sizes 24 thru 72:
Wall Collar Assembly - Use 5/16 x 3/4 inch bolts,
nuts and lock washers to attach side, top and bottom
panels together, see Figure 4. (Use flat washers over
slotted holes).
Mounting Fan Panel to Wall Collar - Use 5/16-18 x 1
inch thread cutting screws to attach the fan panel to
the wall mount collar, see Figure 5.
Flange to Wall Collar Mounting - Use 5/16 x 1 inch
bolts and washers are used to attach the mounting
flanges to the wall mount collar.
Assembly Instructions
1. Refer to Figure 2 and Identify all components before
assembly.
2. Using specified fasteners, attach bottom panel (2)
to both side panels (3 & 4). Lap the side panels over
the bottom panel for waterproofing. Finger tighten.
3. Fasten both side panels (3 & 4) to the top panel (1).
Lap top panel over side panels for waterproofing
and fasten with specified hardware. Wide formed
edges must all be on the exterior side of the wall
mount collar. Finger tighten the fasteners.
4. Fasten both side flanges (7 & 8) to the side panels
(3 & 4). Use specified hardware (bolts, nuts, lock
washers, and flat washers) per flange and finger
tighten. (Place flat washers over slotted holes).
5. Fasten both top and bottom flanges (5 & 6) to the
top and bottom panels (1 & 2) using specified
hardware (bolts, nuts, lock washers, and flat
washers). (Place flat washers over slotted holes).
Tighten all fasteners securely. The wall mount collar
is now ready for installation.
6. If an optional damper is to be installed, slip the
damper flange under the damper lip of the wall
mount collar, see Figures 6 & 7. (If an optional
damper guard or weatherhood is to be installed,
see page 3). Using #12 x 3/4 inch self-drilling
screws and a 5/16 inch socket on the end of a
pneumatic or electric drill, run the self-drilling
screws through the holes provided on the damper
flange into the wall mount collar. Install additional
self-drilling screws in the damper flange including
both sides and the bottom. (On sizes 8 thru 20
do not use self-drilling screws on the damper lip).
Check damper for freedom of movement.
Figure 5

3Sidewall Propeller Fans • Wall Mount Collar
®
Figure 11 - Wall Housing Guard
Figure 10 - Damper Guard or Weatherhood
Weatherhood
Damper Guard
Wall Housing
Figure 9 - Damper
Wall Housing
Weatherhood
(Optional)
Damper
Damper Installation with and without Weatherhood
Damper Installation with and without Weatherhood
Wall Housing
Weatherhood
(Optional)
Damper
Damper Installed Inside
Damper Installed Outside
Damper Installation
To install an optional damper, refer to Figure 9. Using a
pneumatic or electric drill, run the self-drilling screws
through the holes provided in the side and bottom
damper flanges into the wall housing. Check damper
for freedom of movement. If an optional damper guard
or weatherhood is to be installed, refer to the next
section.
Damper Guard or Weatherhood Installation
To install the damper guard, center guard over damper
and fasten to wall housing using the self-drilling
screws. Refer to Figure 10.
To install the weatherhood, slide the top flange of
weatherhood under the flange of wall housing, see
Figure 6, and fasten with self-drilling screws.
Wall Housing Guard Installation
Attach wall housing guard to wall housing using the
1/4-20 x 3/4 thread cutting screw with washer. Refer
to Figure 11.
Figure 12 - Sidewall Propeller Fan Accessories
Fit for Sidewall Propeller Fan Accessories
Figure 12 reveals the correct fit for sidewall propeller
fans after all optional accessories have been
assembled and installed.

4
451424 • Sidewall Propeller Fans • Wall Mount Collar, Rev. 3, March 2013 Copyright 2013 © Greenheck Fan Corporation
As a result of our commitment to continuous improvement, Greenheck reserves the right to change specifications
without notice.
Specific Greenheck product warranties are located on greenheck.com within the product area tabs and in the
Library under Warranties.
Greenheck Sidewall Propeller Fans catalog provides additional
information describing the equipment, fan performance,
available accessories, and specification data.
®
Phone: 715.359.6171 • Fax: 715.355.2399 • Parts: 800.355.5354 • E-mail: [email protected] • Website: www.greenheck.com
Our Commitment
AMCA Publication 410-96, Safety Practices for Users and
Installers of Industrial and Commercial Fans, provides
additional safety information. This publication can be obtained
from AMCA International, Inc. at www.amca.org.
-
 1
1
-
 2
2
-
 3
3
-
 4
4


Ask a question and I''ll find the answer in the document
Finding information in a document is now easier with AI
Related papers
-
Greenheck 472040 Weatherhood Operating instructions
-
-
-
-
-
-
-
-
-
Other documents
-
Greenheck Fan SE1 User manual
-
-
-
 American Aldes Premium HRV300DDD Operation and Installation Manual
-
-
-
Lifebreath CONTROLAIR 15 95MAX Installation guide
-
Lifebreath CONTROLAIR 15 95MAX User manual
-
-
