Page is loading ...

1
SimpliFire • Format Mantel Instruction Manual • 2042-951 Rev. D • 1/23
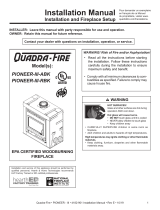
Format Mantel
SF-FM43-WH, SF-FM50-WH, SF-FM60-WH
Model: SF-FORMAT36
- Instructions -
NOTICE! DO NOT discard this manual.
Important service and maintenance instructions
included.
Once the appliance is mounted to the wall
and the preferred electrical connection has
been installed, the mantel can be installed.
Preparation
Remove the mantel and hardware from the packaging.
Tools and Supplies Needed
Magnetic Phillips screwdriver
KIT COMPONENTS SF-FM43-WH SF-FM50-WH SF-FM60-WH
Mantel Top 1 1 1
Mantel Bottom 1 1 1
Mantel Side Panel 2 2
Thumb Screw 2 2 2
Rubber Washer 2 2 2
M5*35 Screw 2 4 4
M6x18mm Flat Washer 2 4 4
Installation Instructions 1 1 1
Touch Up Paint Pen 1 1 1
Renishing (Optional)
Mantel is nished in white. If renishing is desired, the
following steps are recommended prior to assembling
the mantel:
• Properly cover any areas of work space that you do
not want to be painted.
• Lightly scu the existing nish with 320 grit sandpa-
per.
• Remove dust using lint free cloth.
• For best results, apply a base coat of spray paint
primer to evenly cover the mantel.
• Wait the recommended amount of time per the paint
and primer instructions, then apply a spray paint
top coat in the color of choice to evenly cover the
mantel.
• Apply additional top coats until desired coverage is
achieved.
NOTICE:
• Follow all recommended guidelines for the materials
you are using.
• Do not spray paint near the appliance.
• Do not spray paint while the appliance is operating.
• Always wear appropriate goves, eye protection,
clothing and a respirator or mask when painting.
• The room or area you are spraying must be well
ventilated and must be properly masked in order
to preventing overspray from covering woodwork,
oors or funishings.

SimpliFire • Format Mantel Instruction Manual • 2042-951 Rev. D • 1/232
A
BC
DE
F
G
I
H
J
K
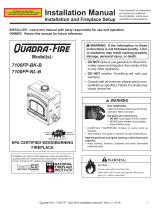
Model A B C D E F G H I J K
SF-FM50-WH in. 50 6-7/8 36-1/16 12-5/8 23-5/16 5-1/8 7-7/8 3-11/16 7/8 5-1/2 9-7/8
mm 1270 175 916 321 592 130 200 93 22 140 250
SF-FM60-WH in. 59-7/8 11-13/16 36-1/16 12-5/8 23-5/16 5-1/8 7-7/8 3-11/16 7/8 5-1/2 9-7/8
mm 1520 300 916 321 592 130 200 93 22 140 250
Mantel Options
There are three available mantels.
B
A
D
E
C
F
G
H
I
J
K
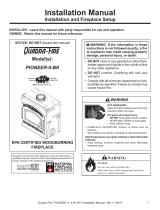
Model A B C D E F G H I J K
SF-FM43-WH in. 37-13/16 43-5/16 36-1/16 12-5/8 23-5/16 5-1/8 7-7/8 3-11/16 5-1/2 9-7/8 3-9/16
mm 960 1100 916 321 592 130 200 94 140 250 91

3
SimpliFire • Format Mantel Instruction Manual • 2042-951 Rev. D • 1/23
Figure 1
Figure 2
3. Before installing the top mantel, bend the mounting
tabs slightly into a more open position to allow for
clearance while installing the mantel. See Figure 3.
Figure 3
MOUNTING TAB
4. Slide the top mantel section onto the appliance See
Figure 4.
Figure 4
TOP MANTEL
SF-FM43-WH Installation
1. Slide the bottom mantel section onto the appliance
and connect the bottom mantel wire connection to the
appliance wire connector protruding from the bottom
of the appliance (the cover plate on the bottom of the
appliance may need to be removed to access the wire
connector). See Figure 1 and 2.
2. Fasten the bottom mantel section to the appliance with
two M5*35 Phillips screws. See Figure 5.

SimpliFire • Format Mantel Instruction Manual • 2042-951 Rev. D • 1/234
5. Once the top mantel is in place, bend the mounting tabs
at a 90° angle so it is ush against the inner surface
of the appliance.
6. Secure the top mantel to the appliance using two (2)
M5X12 thumb screws with rubber washers. See Figure
5.
Figure 5
M5*35 PHILLIPS
SCREWS and WASHERS
M5X12 THUMB
SCREWS WITH RUBBER
WASHERS
SF-FM50-WH and SF-FM60-WH Installation
1. Slide the bottom mantel section onto the appliance
and connect the bottom mantel wire connection to the
appliance wire connector protruding from the bottom
of the appliance (the cover plate on the bottom of the
appliance may need to be removed to access the wire
connector). See Figure 6.
2. Fasten the bottom mantel section to the appliance with
two M5*35 Phillips screws. See Figure 10.
Figure 6
3. Attach the side panel wire connector to the connector
on the bottom mantel section. Slide the side panels
into the recess between the bottom mantel section and
the wall. Take care not to pinch the wire between the
side panel and the wall. See Figure 7.
Figure 7
4. Before installing the top mantel, bend the mounting
tabs slightly into a more open position to allow for
clearance while installing the mantel. See Figure 8.
Figure 9
5. Slide the top mantel section onto the appliance. See
Figure 9.
6. Once the top mantel is in place, bend the the mounting
tabs at a 90° angle so it is ush against the inner
surface of the appliance.
MOUNTING TAB
Figure 8

5
SimpliFire • Format Mantel Instruction Manual • 2042-951 Rev. D • 1/23
7. Secure the top mantel to the appliance using two (2)
M5X12 thumb screws with rubber washers. See Figure
10.
8. Secure the side panels using two (2) provided M5*35
screws.
Figure 10
SimpliFire, a brand of Hearth & Home Technologies
7571 215th Street West, Lakeville, MN 55044
www.hearthnhome.com
NOTICE: The total weight of objects placed on the
mantel shelf must not exceed 50 lbs (23 Kg).
M5X12 THUMB
SCREWS WITH RUBBER
WASHERS
M5*35 PHILLIPS
SCREWS and WASHERS
50 lbs
(23 kg)
Figure 11
/