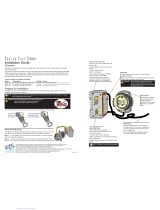
4 Source 4WRD Color Installation and User Manual
AVERTISSEMENT : Prendre connaissance des avertissements
de sécurité suivants avant toute utilisation :
Ne pas installer le projecteur sur ou à côté d’une surface
inflammable.
Ne pas utiliser ce projecteur avec un cordon
d’alimentation endommagé. Si le cordon d’alimentation
(câble) est abîmé, il doit être remplacé.
Installer et accrocher le projecteur uniquement par les
trous de fixation principaux de la lyre.
Accrocher le projecteur à une structure convenable en
utilisant seulement du matériel adapté au poids du
projecteur.
En plus de l'accroche principale, fixer une élingue de
sécurité (modèle ETC400SC ou autre câble/dispositif de
sécurité certifié) au corps du projecteur. Un point
d’accroche (trou) approprié est prévu dans la patte qui
ressort du boîtier du projecteur.
Déconnecter l’alimentation et le DMX et laisser le
projecteur refroidir avant d’enlever ou installer
l'optique découpe ou les autres adaptateurs, et avant
tout nettoyage et entretien.
WARNING: Note the following safety warnings before use:
The Source 4WRD Color is not user serviceable. Field
modification of the Source 4WRD Color will void your
ETC warranty.
Do not use the fixture below 5°C (41°F).
Minimum storage temperature is 5°C (41°F). When the
fixture has been stored or transported in cold
temperatures, allow it to warm to room temperature
for a minimum of 1hour before applying power.
Applying power to a cold fixture will cause damage to
the fixture and void the ETCwarranty.
Do not use this fixture if a glass lens is deeply scratched
or cracked. Damaged lenses must be replaced.
To prevent wiring damage, or abrasion, do not expose
wiring to edges of sheet metal or other sharp objects.
Use the fixture in dry locations only, where humidity
does not exceed 90 percent (non-condensing). These
fixtures are not intended for outdoor use.