Fraser Hill Farm FSSL074A-GN Operating instructions

Type
Operating instructions

Fraser Hill Farm FSSL074A-GN is an exquisite snowing street lamp with various decorations that can be used indoors or outdoors. This street lamp has a waterproof design, ensuring it can withstand rain and snow. It features two lamp holders that can be adjusted to the desired direction, each with a switch to control the light and music. You can enjoy the mesmerizing sight of falling snowflakes and shining lights accompanied by soothing music. The assembly process is straightforward, and the lamp can be easily decorated with the included wreath and bowknot.

Fraser Hill Farm FSSL074A-GN is an exquisite snowing street lamp with various decorations that can be used indoors or outdoors. This street lamp has a waterproof design, ensuring it can withstand rain and snow. It features two lamp holders that can be adjusted to the desired direction, each with a switch to control the light and music. You can enjoy the mesmerizing sight of falling snowflakes and shining lights accompanied by soothing music. The assembly process is straightforward, and the lamp can be easily decorated with the included wreath and bowknot.

Snowing Street Lamp
Assembly Manual
ENGLISH
1) Schematic diagram
2) Component list
No.
Name
Quantity
1
Firmware (rear part)
1
2
L-shape support (right)
1
3
Lamp holder (right)
1 set
4
Firmware (front part)
1
5
Y-shaped connection wire
1 set
6
Short lamp-post (6.5in)
1 set
7
Long Lamp-post (17in)
2
8
Adapter (12V AC 1000mA)
1
9
Extended wire (137in)
1
10
Power wire (137in)
(59in lamp-post , 79in out of lamp-post)
1
11
Additional base
1 set (4)
12
Ground nail
1 set (4)
13
Lamp base
1
14
Square base
1
15
Connector of long lamp-post (2.5in)
1
16
Brand
1
17
Wreath + bowknot
1 set
18
Lamp pendant
2
19
Lamp holder (left)
1 set
20
L-shaped support (left)
1
21
Screw
6+1
Firmware
4+1
(Lamp base)
Note: 1,2,3,4,5,6,7,8 are wire connectors
3) Installation steps
The assembly shall be made from bottom to top, and the
main steps are shown as below:
1. Installation of lamp base and lamp-post
(see series figures A-F above)
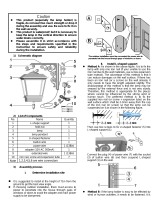
A/B: Use 4 screws to combine the lamp base (13) with
square base (14).
C/D/E: In order to stabilize the street lamp, it is required to
combine with the additional base. Firstly, it is required to
combine 4 pieces of additional base (11) as a whole, and
then combine the whole additional base (11) with lamp
base (13). Note: If the lamp is used outdoor and the lamp
base can be fixed via ground nail, it will be unnecessary to
use the additional base (11).
F: Installation of lamp post. Screw all lamp posts, connector
of long lamp post and square bases (6), (7), (15) and (14)
according to the sequence shown in above figure. Note:
Each screw thread must be tightly screwed; otherwise the
lamp post will incline or loosen.
2. Combination of lamp support
Fasten two L-shaped supports (2)(20) as a whole via two
firmware (1)(4) according to the figure and description
below:
Place the firmware (front part) (4) on console flatly, with
opening upwards; and then put left and right L-shaped
support (2)(20) in the troughs of firmware (4), and then bury
Y-shaped connection wire (5) and its connector
according to the figure, and then use the firmware (rear part)
(1) to cover the above mentioned parts and adjust the
matching state of each part, and finally fasten each part as
a whole lamp support via 6 small screws.
3. Combination: lamp post +
lamp support + lamp holder
(See series figures A -E as right)
A. Threading: penetrate the power wire and its connector
(5) in the lamp base through square base and lamp post (In
order for convenience, the lamp base and lamp post can
be horizontally or vertically placed upon threading, so as to
draw out the connector (5) and place it correctly for later
use);
B. Assembly of lamp support: Connect the connectors (5)
and (6) of the wires, and put the combined connectors and
their wires into lamp post (6), and then screw the lamp
support and fix it on lamp post (6). Note: it is required to
screw the thread as much as possible and adjust the
direction of lamp support so that its direction is consistent
with that of lamp base.
C. Assembly of lamp holder: Take out of lamp holder (3)
or (19), and then install it at left (or right) of lamp support
according to individuals willing, and then insert the plug (7)
(or 8) into the jack at top of lamp holder.
D. Lift the lamp holder upwards so that the upper part of
plug (7) and its connection wire can enter into the hole of
L-shape support, and then turn the fix nut to let it tightly fit
the thread of the upper part of the lamp holder until the
lamp holder and lamp support become a whole; meanwhile,
notice to adjust the direction of lamp holder till the
satisfaction. Note: a. The fixed nut must be tightly screwed,
otherwise, the waterproof effect will be seriously affected! b.
The lamp holder is fragile, and the damage resulting from
falling on ground is forbidden! c. When there is only one
lamp holder at two ends of lamp support, the lamp post
may incline due to imbalanced stress; therefore, it is
required to stabilize the lamp post before installation of the
second lamp holder; at this time, it will be better to ask
another person to assist the installation.
Repeat the above mentioned C/D step to complete the
installation of the second lamp holder.
E. Install the two lamp pendants (18) for decoration on the
lower part of lamp holder.
4. Positioning, power-on,
waterproof and examination
A. Positioning: Place the street lamp modules at the
position arranged. Note: a. If the street lamp are placed
outdoor, please adopt the ground nail (12) to fix the lamp
base as much as possible to avoid being blown down by
wind; b. The street lamp shall be placed in place without
disturbance, so as to avoid the damage due to knockdown.
B. Power-on: Tightly connect the connectors (1) and (4) of
adapter (8) and power wire (10). If the power wire (10) is
not long enough, extended wire (9) between them and then
connect the adapter and main power.
C. Waterproof: If the street lamp is used outdoor, please
complete the below (see series figures a-e):
a. Please screw the nut at top of lamp holder tightly;
otherwise this will affect the item from being waterproof.
b. All connection points 1 and 2, 3 and 4, 5 and 6, 7 or 8
and lamp holder must be screwed tightly to avoid water
and electricity leakage.
c. The adapter itself is not waterproof, and it is required
that the connecting point between adapter and main
power should be located indoors, free from rain and
snow to avoid the electricity leakage or electric shock
risk.
d. The two ends of lamp support are arranged with drip
hole, and this hole should be unobstructed.
e. The lamp holder should be kept vertical and avoid
inclined to ensure the waterproof effect.
D. Examination: The bottom of each lamp holder is
arranged with a switch (as shown below). One of the lamp
holders can play music, and the music is controlled by its
switch (left figure); when the switch is placed on the left.
You should be able to see the shining light and
snowflakes falling in this lamp holder, with music playing. If
the above-mentioned isnt functioning, check whether all
connecting points 1 and 2, 3 and 4, 5 and 6, 7 or 8 are
connected well with its lamp holder. You can also place this
switch at right to close music according to your own
demand. A similar lamp holder has the same function as
the above lamp holder except that it cannot play music.
The below switch function is shown on the right.
5. Decorate and enjoy
As shown in the figure below, arrange the plaque (16) and
the wreath + bowknot (17) to the upper side of the lamp
post to complete installation. If the street lamp is to be
installed outside, the decorations do not have to be
installed.
  • Page 1 1
  • Page 2 2
  • Page 3 3
  • Page 4 4

Fraser Hill Farm FSSL074A-GN Operating instructions

Type
Operating instructions

Fraser Hill Farm FSSL074A-GN is an exquisite snowing street lamp with various decorations that can be used indoors or outdoors. This street lamp has a waterproof design, ensuring it can withstand rain and snow. It features two lamp holders that can be adjusted to the desired direction, each with a switch to control the light and music. You can enjoy the mesmerizing sight of falling snowflakes and shining lights accompanied by soothing music. The assembly process is straightforward, and the lamp can be easily decorated with the included wreath and bowknot.

Ask a question and I''ll find the answer in the document

Finding information in a document is now easier with AI