Page is loading ...

Page
◆ PRECAUTION 3
◆ USAGE OF DISK 5
◆ BEFORE YOU BEGIN 6
◆ COMPATIBLE DVD DISCS 7
◆ INSTALLATION IN THE CAR 8
◆ VIEW OF A/V BOX & DVD (HEAD UNIT) 9
◆ A/V BOX POWER CABLE LINE 10
◆ USING THE KEY 11
◆ REMOTE CONTROL 13
◆ COMPATIBILITY OF THE UNIT 15
◆ MAIN KEY 16
OSD DISPLAY MENU
- MAIN MENU
- SYSTEM MENU (PAGE 1 & PAGE 2)
- PICTURE MENU
- SCREEN MENU
- SOUND MENU (PAGE 1 & PAGE 2)
◆ RADIO MODE 24
◆ TV MODE 25
◆ DVD MODE 27
◆ BASIC DISC MENU CONTROL 28
◆ MP3 DISC 29
◆ FAST FORWARD / BACKWARD 31
Contents
Contents
1

Contents
◆
◆
◆
◆
◆
◆
◆
◆
◆
◆
◆
◆
◆
◆
◆
◆
◆
OSD MENU (A/V, NAVI, CAMERA)
ZOOM MODE
DVD MODE(REPEATING A SPECIFIC SECTION)
DVD MODE(VCD PBC FUNCTION)
DVD (CONTROL DVD MODE ON OPERATION)
DVD MODE(AUDIO SETUP)
DVD MODE(VIDEO SETUP)
DVD MODE(DVD SETUP - PREFERENCE)
MULTI MODE PLAY
34
DVD MODE(DVD SETUP - EXIT)
DVD MODE(RANDOM PLAY)
REPEAT MODE ( A / B )
35
36
37
38
39
CD / DVD CHANGER MODE (OPTION)
DVD MODE(GENERAL SETUP)
32
33
Page
DVD MODE ( SET UP DISPLAY & LANGUAGE )
SUBTITLE
RDS RADIO(EUROPE ONLY)
52
54
40
41
45
46
50
49
51
Contents
2

BE SURE TO READ THIS PRECAUTION
BEFORE USE TO PREVENT ACCIDENTS OF USERS.
Upon running or parking, adjust the volume so that
you can hear external sound.
Upon stop, if starting this product after switching off the ignition,
pay attention to an electric discharge.
Avoid moisture.
The function of this product is subject to change without prior notice.
This product is compatible with the NTSC/PAL system.
RESET KEY
When screen operation is not enabled or other problems occur,
press the RESET key.
Or, when this product does not operate normally, press the RESET key.
Press the key with a sharp drill or a ball-point pen.
Precaution
3

BE SURE TO READ AND UNDERSTAND THE FOLLOWING
MATTERS FOR SAFE DRIVING AND TO AVOID PRODUCT DAMAGES.
Do not install and fix the DVD or VIDEO screen at a visible position from drivers
to avoid accidents.
The rear video outlet of this product can be connected to the display unit so
that passengers at rear seats can view DVD or VIDEO CD.
This product requires(common-cathode)DC12V.
When a heavy impact is applied, there may occur a problem in product
operation.
Do not put this product near conductors.
Do not repair and alter/remodel this product for other uses.
Do not install this product at a visible position from drivers to reduce danger
of accidents and avoid violation of related laws.
Keep it in mind that, in come countries, drivers or passengers in a vehicle
are not allowed to view the screen of televisions or other monitors in law.
Precaution
4

THE FOLLOWING ARE PRECAUTIONS WHEN USING A DISK.
Although playable, a disk in a peculiar form(Heart shape, a shape
other than circles, etc.) can not be played. Such disks cause player troubles.
This product requires use of 12cm circular disks only.
For all disks, check damage, scratch, and warp before use.
When handling disks, be careful so that the recording side of disks
is not touched by hands or other alien materials.
Avoid direct rays of light or high temperature.
When using a heater in a vehicle in cold winter, the product may be
condensed.
Do not forcibly insert and remove disks.
Do not clean the disk surface with thinner, benzene, and other chemicals.
If the road surface is irregular, there may occur a problem in the play of this
product.
Slowly polish contaminated disks with soft, well-dried cloth.
Usage of DISK
5

This product can be applied to DVD, TV, RADIO, CD, MP3 CD and VCD.
Since region codes differ according to countries, products with different
region codes can not be used. See the following features:
Able to support various subtitle languages.
Able to look and listen within various angles.
Able to enjoy play of screens repeatedly.
Still image and image play by frame enabled.
Able to provide such sound quality as to enable users to
enjoy DVD movies or music supporting 5.1 channel function
just like at a theater. However, this function limits only to
DVD titles enabling 5.1 channel support.
Able to enjoy movies or music supporting DTS function.
However, this function limits only to DVD titles enabling
5.1 channel support.
♣ Ref : There may be different functions on each VIDEO DISC & DVD DISC.
And some functions may not be operated.
Dolby Digital
Play of
Slow Motion
ID3 Function
for MP3 Media
limits only to video CD V2.0
Supports ID3 OSD function in MP3 format media. However,
D3 Type III JPEG information is not supported.
Multi Audio
Multi Aspect
Freely supported in a variety of audio systems recorded.
Convertible in wide screen, letter box and Pan & Scan display.
Able to play slow motion.
PBC function
Video CD
Able to use video CD supporting PBC function. However, this function
Multi Subtittle
Repeat Play
Mutil Angle
Still Image
Before you begin
6

Compatible DVD Discs
DVD
VIDEO CD
Dolby Digital
VIDEO FORMATIC
AUDIO DISC
7

※ Cautions : Please separate Battery Units before setting
products to prevent from fire and electric shock.
Installation In The CAR
POWER
CABLE
ANT CABLE
DATA
CABLE
CD
CHANGER
NAVIGATION
(
AV3
)
REAR CAMERA
(
AV2
)
AV1 INPUT
AUX OUT
5.1CH
LINE OUT
8

- AV BOX - FRONT
- AV BOX - REAR
- DVD (HEAD UNIT)
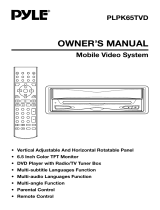
A/V BOX & DVD Instructions (Head Unit)
AV1 INPUT NAVIGATION
& AV3 INPUT
5.1CH AUDIO LINE OUT
AV2 & REAR CAMERA INPUT
VIDEO,AUDIO L,R LINE OUT
CD CHANGER
DATA CABLE
POWER CABLE
CENTER AMP
DATA CABLE
S/PDIF DIGITAL
(Mono Headsets Available)
9

ACC
GREEN/BLACK
SIDE BRAKE
YELLOW
WHITE
REAR CAMERA
YELLOW
FRONT L-
BACK UP(+14.4V)
NO CONNECT
REAR R-
VIOLET
VIOLET/BLACK
NO CONNECT
FRONT R-
BLACK/WHITE
WHITE/BLACK
REAR L-
FRONT L+
FRONT R+GRAY
REAR R+
GRAY/BLACK
REAR L+
1
4
3
CONNECTCOLOR
GND
17
PIN NO
2
5
6
7
8
9
10
GREEN
11
19
18 BLACK
BLUE/WHITE
ORANGE
NC14
15
BLUE
16 BLACK
RED
BACK UP(+14.4V)
ORANGE/WHITE
NC12
13 ILL
GND
REMOTE
AUTO ANT20
A/V BOX Power Cable Line
19 17 15 13 11 9 7 5 3 1
20 18 16 14 12 10 8 6 4 2
WIRE VIEW
10

Monitor OPEN/CLOSE
LCD Display (Time / Disply)
BAND Change on TV & RADIO Mode.
AS/PS : AUTO Search/ PROGRAN Search on TV & RADIO Mode.
L/R (Volume Control : 0 ~ 40), Move Cusor on DVD Mode,
UP/DW (TV/RADIO Search)
Restart
POWER ON/OFF
Turns On/Off Audio Outputs
Save in Memory No1 on TV/RADIO Mode.
And select Stored No1. DISC DOWN on CDC Mode.
Save in Memory No2 on TV/RADIO Mode.
And select Stored No2. DISC UP on CDC Mode.
Save in Memory No3 on TV/RADIO Mode.
And select Stored No3. TRACK DOWN on CDC Mode.
Save in Memory No4 on TV/RADIO Mode.
And select Stored No4. TRACK UP on CDC Mode.
Save in Memory No5 on TV/RADIO Mode.
And select Stored No5. ALL RANDOM on CDC Mode.
Save in Memory No6 on TV/RADIO Mode.
And select Stored No6. ALL REPEAT on CDC Mode.
DISC Eject
It shows Signal of CD is inserted ,or not.
Using the KEY
11

3D Stereo Surround on DVD Mode.
DVD Surround Off->Rock->Pop->Live->Dance->Techno
->Classic->Soft->Off
Select play mode on DVD Mode (RANDOM,SINGLE,REPEAT ONE,
REPEAT FOLDER, FOLDER,CHAPTER REPEAT,TITLE REPEAT)
But it depends on Discs.
Stop play on DVD Mode
Track Down(Chapter) on DVD Mode
Replay and Pause on DVD Mode
Track Up(Chapter) on DVD Mode
* Ref : The above KEYS operate only on DVD Mode.
Using the KEY
12

RADIO TV CDC DVD
No1
Memory CH
No1
Memory CH DISC DOWN NO 1
No2
Memory CH
No2
Memory CH DISC UP NO 2
No3
Memory CH
No3
Memory CH
TRAC
K
DOWN NO 3
No4
Memory CH
No4
Memory CH TRACK UP NO 4
No5
Memory CH
No5
Memory CH
Random
Play NO 5
No6
Memory CH
No6
Memory CH Replay NO 6
INTRO NO 7
NO 8
NO 9
Memorize
NO 0
RETURN
TITLE
MENU
DVD MENU
MENU
ENTER
TRAC
K
UP/DOWN
FF/REW
STOP
PLAY
/PAUSE
Pla
y&
Replay
AF(RDS)
EU ONLY
SUBTITLE
ON/OFF
Monitor OPEN/CLOSE
Power ON/OFF & Change MODE
Turns On/Off Audio & Change NAVI MODE
Audio Volume
Move
Remote control
13

RADIO TV CDC DVD
TA(RDS)
EU ONLY AUDIO
PTY(RDS)
EU ONLY
ANGLE
BAND BAND A ▶ B
AS/PS AS/PS 3D SOUND
LIST OF CH ZOOM
BEFORE CH REPLAY
SEEK- SEEK-
PBC
CONTROL
SEEK+ SEEK+ PROGRAM
MONITOR DISTANCE CHANGE
EJECT
MAIN MENU
MONITOR VISIBLE ANGLE
FRONT LCD DISPLAY
CLOCK ON/OFF
Remote control
14

Description of the Compatibility of the Product
For some DVDs, some operations may not be enabled depending on software
characteristics. Also, a method of systematizing the dual operation mode title
and chapter while playing with disks enabling menu operation may cause the
function of repeated play not to be performed. In such a case, a mark of " "
is displayed. Such a mark may not be displayed in some disks.
The contents of a DVD consist of several titles, and a title is composed of
several chapters. A single product recorded with DVDs corresponds to
a single title with several scenes (chapters).
However, some disks may not be produced as above according to
the intention of DVD producers.
The contents of VIDEO CDs consist of tracks, and one track corresponds to
one song. For some disks, a track consists of one index.
For VIDEO CDs with the PBC function, users can use a menu to execute play mode.
At this time, the use of Repeat or Search function may not be enabled.
When operating some DVD-VIDEO disks, there may occur unavailable
functions. Play may not be enabled according to the status of DVD-
VIDEO disks. For disks recorded and produced in VIDEO format, the
Play function of this product may not be provided due to disk
characteristics, scratch or comtamination on the surface of disks.
Contamination and condensed materials of internal lens may cause play troubles.
Also, owing to contamination of the selection of menus may not be provided.
Play may be impossible for copied DVD-VIDEO disks.
Compatibility Of The Unit
15

- Setting MAIN MENU by Remote Control KEY.
- Eject CD
- Control sound by Remote Control KEY(Left) and Front Button(Right).
- OPEN / CLOSE Monitor by Remote Control and Front Button.
♣ Ref : All functions of this unit must be on ACC.
- OPEN / CLOSE MONITOR
- POWER ON / OFF
- POWER On/Off on Remote Control KEY(Left) and Front Button(Right).
- DISC EJECT
- TIME
- Time ON/OFF display.
- MAIN MENU
※ MAIN MENU - SYSTEM, PICTURE, SCREEN, SOUND SETTING.
- AUDIO CONTROL
Main KEY
16

- MAIN MENU
Press MENU KEY and SEL KEY for the above picture. Push Arrows KEY of Remote Control.
◎ SYSTEM : Setting Time, ON/OFF Buzzer, REAR CAMERA ON/OFF,
NAVIGATION ON/OFF.
◎ PICTURE : BRIGHT,CONTRAST,COLOR,TINT,DIMMER.
◎ SCREEN : FULL,WIDE,NORMAL
◎ SOUND : FADER,BALANCE,TREBLE,BASS,WOOFER,CENTER
of Remote Control or SEL KEY (Unit Front) with closing LCD monitor.
- FADER, BALANCE, TREBLE, BASS, CENTER, WOOFER
& BUZZER ON/OFF CONTROL : These functions are displayed
on LCD monitor.
♣ Ref : Speaker Volume control is available when you press Menu KEY
OSD Display Menu (Main Menu)
MAIN MENU
SELECT :
▲ ▼ ENTRY :◀
▶
SYSTEM
PICTURE
SCREEN
SOUND
EXIT
17

- SYSTEM MENU(PAGE1)
SYSTEM MENU has 2 pages. Move to SYSTEM MENU from selecting Arrow KEY
of MAIN MENU for setting SYSTEM MENU.
◎ WATCH : Press Arrows Key for control of TIME.
◎ BUZZER : BUZZER ON/OFF when pressing Remote Control KEY and this unit's KEY.
◎ CAMERA : For setting REAR CAMERA.
A. When switch on CAMERA, AV2 will be changed into REAR CARMERA MODE.
Upon putting rear gear OSD of camera will appear.
B. When switch off CAMERA, CAMERA MODE is chan
g
ed into AV2. Pleae select AV2 Mod
e
for other line-out functions. When chan
g
in
g
it into AV2 Mode, AV2 can be used for out
p
◎ NAVI : NAVIGATION FUNCTION
A. Upon selecting NAVI KEY AV3 is changed into NAVI. Press NAVI KEY of Remote Control
longer for seeing NAVIGATION DISPLAY.
B. NAVI OFF : NAVI MODE is changed into AV3 for other lineout functions.
System Menu (Page 1)
SYSTEM MENU
SELECT : ▲ ▼ ADJUST :◀ ▶
WATCH : PM 00:00
BUZZER : ON
CAMERA : OFF
NAVI : OFF
NEXT PAGE
RETURN
18

-SYSTEM MENU(PAGE 2)
◎ LOCK : Lock Function
Be sure to enter Pass word for Lock Function when you turn on.
Initial Pass Word is "1234".
◎ MODIFY : Modify Pass Word Of Lock Function.
For changing pass word.
: Before P/W → New P/W Enter.
Please do not lose your P/W.
◎ RESET : Press this key " ▶" to format this system for 3 seconds.
(Memorized Radio and TV Channel will be deleted.
All options of MENU will be formated)
◎ RESET : Press this key " ▶" to format this system for 3 seconds.
System Menu (Page2)
SYSTEM MENU
SELECT : ▲ ▼ ADJUST :◀ ▶
LOCK : OFF
MODIFY : LOCK
RESET : OFF
BACK PAGE
RETURN
19

-PICTURE MENU
Press Picture KEY by UP/DW cursor for setting Picture Display.
◎ BRIGHT, CONTRAST, COLOR, TINT, DIMMER : By using UP/DW KEY or L/R KEY.
♣ Ref : BRIGHT Control (-15 ~ +15)
CONTRAST Control (-15 ~ +15)
CLOR Control (-15 ~ +15)
TINT Control (-15 ~ +15)
DIMMER Control (0 ~ 15)
Picture Menu
PICTURE MENU
BRIGHT : 0
CONTRAST : 0
COLOR : 0
TINT : 0
DIMMER : 0
RETURN
SELECT : ▲ ▼ ADJUST :◀ ▶
▶[
◀]
20
/