
SENSI
TM
SMART THERMOSTAT
Manual Operation
Models: 1F87U-42WF, ST55
Version: January 2020
©2020 Emerson Electric Co. All rights reserved
R-5029.

Sensi Smart Thermostat | MANUAL OPERATION GUIDE 2
Table of Contents
Buttons and Icons 3
Basic Functionality 4
Manual Settings 6
Menu Configurations 8
Wiring Terminals 9
Back of the Face Plate 10

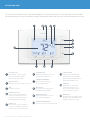
BUTTONS AND ICONS
The Sensi Smart Thermostat can be operated through Wi-Fi using the Sensi app or it can be operated at the actual wall
unit. Advanced features such as thermostat settings, scheduling and email alerts are only available through the Sensi app.
WIFI STATUS ICON
Indicates Wi-Fi connection status.
When you turn Wireless Off on
the thermostat, this is blank.
BACKLIGHT BUTTON
Illuminates the thermostat for 10 seconds
TIME
Displays current time.
KEYPAD LOCKOUT ICON
This icon indicates the thermostat
is locked out. No changes can be
made at the thermostat. (Can only
be enabled from the Sensi app).
BATTERY ICON
When the bars get low, remember to
change the 2 AA Alkaline batteries in
the back of the thermostat face plate.
UP ARROW BUTTON
Adjusts the temperature set point
or thermostat configuration.
CURRENT SET TEMPERATURE
Current set temperature the
thermostat will maintain.
MENU BUTTON
Access thermostat configurations.
(See page 6 for more details).
DOWN ARROW BUTTON
Adjusts the temperature set point
or thermostat configuration.
CURRENT ROOM TEMPERATURE
The room temperature at the thermostat.
SCHEDULE BUTTON
Toggles the schedule On or Off.
(The thermostat runs a program
based on time and temperature set
points when Schedule is On).
FAN BUTTON
Switches fan mode from Auto
or On. Leave the fan mode on
Auto to allow the thermostat to
control the fan as necessary.
MODE BUTTON
Switches system mode between Heat,
Cool, Off or Aux. (Auto Mode is only
available using the Sensi app).
Sensi Smart Thermostat | MANUAL OPERATION GUIDE 3

Sensi Smart Thermostat | MANUAL OPERATION GUIDE 4
Switching System Mode
Press the “Mode” button to switch between all available system mode settings. When
the Mode is “Off” the thermostat will not bring on your heating or cooling systems.
Fan Mode
If you want to circulate the indoor blower, you can switch Fan to “On.” Turn the
Fan back to “Auto” when you want the thermostat to control your indoor blower
as necessary. Leaving the Fan in “On” will run your blower continuously.
Holding One Temperature
If you want to hold one temperature, turn Schedule “Off.” Then, adjust the
set point using the up and down arrow buttons. The thermostat will hold
this temperature, in the set Mode, until you turn Schedule back “On” or until
you adjust the set point again using the up and down arrow buttons.
Temporary Hold
When your schedule is set to “On,” your Sensi thermostat controls your home based on
the time and temperature settings in the current schedule. To temporarily change your
temperature use the up and down arrows in the app or on the thermostat. Your Sensi
thermostat will display “Temporarily Set To” on the thermostat and will hold your new
temperature until the next scheduled set point with a minimum hold time of two hours.
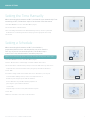
BASIC FUNCTIONALITY

Sensi Smart Thermostat | MANUAL OPERATION GUIDE 5
BASIC FUNCTIONALITY
Circulating Fan
If you want to circulate the air in your home using your indoor blower fan, you can set
this feature in the app or at the thermostat. A percentage is selected to indicate how
often the fan should run each hour, You can set 5% increments from 10% – 100%.
EXAMPLE:
If you set the Circulating Fan to 50%, the fan will run 30 minutes every hour.
If any heat/cool cycles occur during the hour, their runtime
is subtracted from the overall fan run time.
Setting the feature from the
thermostat:
1. Press “Menu”
2. Press “Next” until you come to “Fn Setup”.
3. Use the up arrow button to toggle the percentage you’d like the fan to run each hour.
4. Press “Exit”
Turn Wi-Fi Off
If connecting to Wi-Fi is not an option, you can turn off Wi-Fi on the thermostat
and manually set a time and a schedule from the wall unit. To turn off Wi-Fi:
1. Press “Menu”.
2. Press “Next” until you see “Wireless (Setup)” at the top of the screen.
“On” should be flashing at the top.
3. Use the up or down arrow button to change it to “Off”.
4. Press “Exit”.

Sensi Smart Thermostat | MANUAL OPERATION GUIDE 6
Setting the Time Manually
When connecting the thermostat to Wi-Fi, the time will sync automatically. If not
connecting to Wi-Fi, follow these steps to set the time at the thermostat.
1. Turn Wi-Fi Off. (Refer to section “Turn Wi-Fi Off” on page 4).
2. Press and hold the “Schedule” button.
3. The screen will go blank and the time will start flashing at the top. Use the up and down
arrow buttons to rotate through the times until you get to the appropriate time of day.
4. Press “Exit”.
Setting a Schedule
When connecting the thermostat to Wi-Fi, the schedule is
programmed based on time and temperature set points from the
Sensi app. If you are not connecting to Wi-Fi, follow these steps
to set a basic 7 day schedule with 4 mandatory set points.
(More robust scheduling options are only available through the Sensi app.)
1. Turn Wi-Fi Off. (Refer to section “Turn Wi-Fi Off” on page 4).
2. Use the “Mode” button to set which type of schedule it will be: Heat or Cool.
3. Press and hold the “Schedule” button, until you see the time flash at the top of the screen
a. Adjust the time on the thermostat if needed, using the up and down arrow buttons.
4. Press “Next”
5. You will see a large number in the middle of the screen. This refers to your set point.
a. The time will be flashing at the top of the screen. Adjust the time of
the first set point using the up and down arrow buttons.
b. Press “Next”. The set point will be flashing. Adjust the set
point using the up and down arrow buttons.
c. Press “Next”.
d. Repeat steps a-c for the second, third and fourth set points.
6. Press “Exit”.
7. Make sure “Schedule” is set to “On” on the thermostat.
MANUAL SETTINGS

Sensi Smart Thermostat | MANUAL OPERATION GUIDE 7
MANUAL SETTINGS
Example Schedule
If you need to keep track of your time and temperature set points, use this table.
SAMPLE SCHEDULE
COMPLETE YOUR SCHEDULE
PERIOD DAILY START TIME DAILY TEMP
Heat
1st 6:00 am 70° F
2nd 8:00 am 62° F
3rd 5:00 pm 70° F
4th 10:00 pm 62° F
Cool
1st 6:00 am 78° F
2nd 8:00 am 85° F
3rd 5:00 pm 78° F
4th 10:00 pm 82° F
PERIOD DAILY START TIME DAILY TEMP
Heat
1st 6:00 am
2nd 8:00 am
3rd 5:00 pm
4th 10:00 pm
Cool
1st 6:00 am
2nd 8:00 am
3rd 5:00 pm
4th 10:00 pm

Sensi Smart Thermostat | MANUAL OPERATION GUIDE 8
Pressing “Menu” at the thermostat allows you to change a series of settings to customize the thermostat
for your specific system. Refer to the chart below for a complete listing of thermostat configurations
and what they stand for. If you are installing the thermostat on the wall for the first time, we highly
recommend that you download the Sensi app and follow the installation instructions.
However, if you are experiencing an issue or you want to check your system configurations, you
can manually configure your thermostat as well. Learn more about how to properly configure your
thermostat by searching “configure” on our support site at sensi.emerson.com/en-us/support.
MENU CONFIGURATIONS
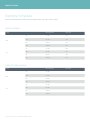
CONFIGURATION MENU ITEMS REFERENCE
Display Code Menu item Default Options
Wireless Setup
Connects Thermostat to Wi-Fi network
— Connect
Fahrenheit or Celsius F
F
C
Outdoor Equipment
Configuration
Cooling or heat pumps
AC2
AC1 – Conventional Cooling 1
(Single Stage)
AC2– Conventional Cooling 2
(Two-Stage)
HP1 – Heat Pump 1 (Single Stage)
HP2– Heat Pump 2 (Two-Stage)
AC0– No Cooling
Indoor Equipment
Configuration
For Gas or Electric Heat
EL2
EL1– Electric 1 (Single Stage)
EL2– Electric 2 (Two-Stage)
FAn
GA1 Gas 1 (Single Stage)
GA2 Gas 2 (Two-Stage)
Reversing Valve Position Selects “O” or
“B” Setting For Heat Pumps Only
O
O
B
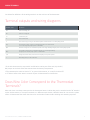
2
Fn Circulating Fan OFF Off/10% – 100% (5% increments)
H AA
Humidification
Add Accessory
OFF Off/On
H SP
Humidification
Set Point
OFF Off/5% – 50% (5% increments)
dH AA
Dehumidification
Add Accessory
Od
Od/Oc
Od – Optimal dehumidification
(Overcool to dehumidify)
Oc – Optimal comfort
(Wired dehumidification)
dH SP
Dehumidification
Set Point
OFF Off/40% – 95% (5% increments)
Wireless Radio
Turns Wi-Fi Radio On/Off
ON Off/On

Sensi Smart Thermostat | MANUAL OPERATION GUIDE 9
See below for definitions of the wiring terminals on the sub-base of the thermostat.
Terminal outputs and wiring diagrams
* If the old thermostat has separate RC and RH wires coming out of the wall, clip the RC/
RH jumper on the back of the thermostat above the battery compartment.
**The common wire could be labeled “C” on your old thermostat, or it could be labeled “B”
or “X.” Please refer to the owner’s manual of your old thermostat for clarification.
Does Wire Color Correspond to the Thermostat
Terminals?
Wire color does not always correspond to the thermostat letters. A white wire may be attached to the “W” terminal
on the old thermostat, or it may be attached to a different terminal with a different letter. Be sure to take a photo
of the old thermostat that shows the wire colors and terminal letters before labeling and removing any wires.
WIRING TERMINALS
TERMINAL LABEL DEFINITION
RH* Power for heating, 24V
RC* Power for cooling, 24V
C** Common wire, 24V
G Indoor blower (fan)
Y First outdoor stage cooling on conventional systems or first heat and cool on heat pump systems
Y2/*
Second outdoor stage cooling on conventional systems or second heat and
cool on two stage heat pump systems or humidifier
W/E First indoor stage heat on conventional systems or first stage auxiliary/emergency heat on heat pump systems
W2/*
Second indoor stage heat on conventional systems or second stage auxiliary/
emergency heat on heat pump systems or dehumidifier
O/B Changeover (reverse valve) connection for heat pump or zone panel systems
L Heat Pump system, “L” wire connection

Sensi Smart Thermostat | MANUAL OPERATION GUIDE 10
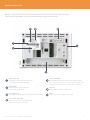
Below is a picture of the back of the Sensi thermostat face plate. The back plate shows the jumper
wires, battery compartment, and some useful information about your thermostat.
BACK OF THE FACE PLATE
SENSI SECURITY CODE
Necessary for connecting to Wi-Fi. Also found
on the Welcome Guide in the packaging.
MODEL NUMBER
Illustrates whether you purchased the
professional or the DIY model.
APPLE HOMEKIT CODE
The 8 digit code used to add Sensi Thermostat to Apple HomeKit..
RC/RH INTERNAL JUMPER WIRE
Only clip this if you have separate RC and RH
transformers coming out of the wall.
BATTERY COMPARTMENT
Two AA Alkaline batteries are used for back-up purposes. When
you see the battery indicator bar on the thermostat display reach
3 bars, replace these batteries to maintain Wi-Fi connectivity.
DATE CODE
When your thermostat was manufactured.
MAC ID
Unique number that identifies the thermostat.
-
 1
1
-
 2
2
-
 3
3
-
 4
4
-
 5
5
-
 6
6
-
 7
7
-
 8
8
-
 9
9
-
 10
10


Ask a question and I''ll find the answer in the document
Finding information in a document is now easier with AI
Related papers
-
 Sensi ST55 Owner's manual
-
Emerson Sensi Touch Smart WiFi Thermostat Owner's manual
-
 Emerson Thermostats ST75 User manual
-
Sensi 1F87U-42WF Owner's manual
-
 Sensi Sensi ST75 Installation guide
-
Sensi 1F96U-42WFB / 1F96U-42WF Owner's manual
-
Emerson White Rodgers Sensi Smart Thermostat Pro Installation guide
-
-
-
Sensi 1F95U-42WF User manual


Other documents
-
 Emerson Thermostats ST75W Installation guide
-
Sensi 1F96U-42WF User manual
-
 Emerson Thermostats ST75W User guide
-
Canon 7950A525 Datasheet
-
 Sensi ST55 User manual
-
Sensi ST76 Series User manual
-
 Sensi 1F76U-22WFB Series Lite Smart Thermostat Installation guide
-
Lennox International Inc. icomfort Wi-Fi User manual
-
White-Rodgers Sensi Touch Wi-Fi Thermostat Installation guide
-


