CYBEX CALLISTO User manual

Category
Strollers
Type
User manual

CYBEX CALLISTO is a stroller for children from birth up to 15 kg, featuring a hood, adjustable handle height, reclining backrest, and leg rest, as well as a 5-point safety harness and bumper bar for added security. With automatic front wheel swivel locks, brakes, and a compact fold, it's convenient for everyday use and travel.

CYBEX CALLISTO is a stroller for children from birth up to 15 kg, featuring a hood, adjustable handle height, reclining backrest, and leg rest, as well as a 5-point safety harness and bumper bar for added security. With automatic front wheel swivel locks, brakes, and a compact fold, it's convenient for everyday use and travel.

CY_170_0393_A0513
CYBEX GmbH
Riedinger Str. 18 | 95448 Bayreuth |Deutschland
www.cybex-online.com –
[watch instructional video here]
www.facebook.com/cybex.online
EN / MY
USER GUIDE
CYBEX CALLISTO
8.
7.
3.
9.
4.
5.
6.
1
TERIMA KASIH KERANA MEMBELI CYBEX CALLISTO. PRODUK INI IALAH KERETA SORONG UNTUK KANAK-KANAK DARIPADA BARU LAHIR DAN
SEHINGGA 15 KG. IA SESUAI UNTUK SEORANG KANAK-KANAK SAHAJA. KERETA SORONG INI DILENGKAPI DENGAN HUD - SEMUA CIRINYA ADA
DITERANGKAN DI DALAM ARAHAN. DALAM MEMBANGUNKAN CYBEX CALLISTO KAMI MAHU MEMASTIKAN ANDA BAHAWA TUMPUAN UTAMA
KAMI ADALAH KESELAMATAN, KESELESAAN DAN PENGENDALIAN YANG MUDAH. PRODUK INI TELAH DIBANGUNKAN DI BAWAH KAWALAN
MUTU YANG KETAT DAN MEMENUHI SEMUA STANDARD KESELAMATAN YANG BERKAITAN. SEKIRANYA ANDA ADA SEBARANG SOALAN, SILA
HUBUNGI KAMI PADA BILA-BILA MASA.
Pelanggan yang dihormati
PENTING: SILA BACA ARAHAN INI DENGAN TELITI SEBELUM GUNA DAN SIMPAN UNTUK RUJUKAN DI MASA AKAN DATANG. KESELAMATAN ANAK ANDA
MUNGKIN MENERIMA KESAN JIKA ANDA TIDAK MENGIKUTI ARAHAN INI.
THANK YOU VERY MUCH FOR PURCHASING THE CYBEX CALLISTO. THIS PRODUCT IS A STROLLER FOR CHILDREN SUITABLE FROM BIRTH AND UP
TO 15 KG. IT IS SUITABLE FOR ONE CHILD ONLY. THE STROLLER IS EQUIPPED WITH A HOOD – ALL FEATURES ARE EXPLAINED IN THE INSTRUCTIONS.
IN DEVELOPING THE CYBEX CALLISTO WE CAN ASSURE YOU THAT OUR MAIN FOCUS WAS BOTH SAFETY, COMFORT AND EASY OPERATION. THE
PRODUCT HAS BEEN DEVELOPED UNDER STRICT QUALITY CONTROL AND MEETS ALL RELEVANT SAFETY STANDARDS. SHOULD YOU HAVE ANY
QUESTIONS, PLEASE FEEL FREE TO CONTACT US AT ANY TIME.
Dear Customer
IMPORTANT: READ THESE INSTRUCTIONS CAREFULLY BEFORE USE AND KEEP THEM FOR FUTURE REFERENCE. YOUR CHILD’S SAFETY MAY BE AFFECTED IF YOU DO NOT
FOLLOW THESE INSTRUCTIONS.
2
EN CONTENT
General Information & Safety ............................................................................. 2
Instructions for maintenance .............................................................................. 3
Cleaning ............................................................................................................... 3
Instructions for use ............................................................................................... 3
1. Opening the stroller ....................................................................................... 3
2. Assembing the wheels .................................................................................. 3
3. Automatic front wheel swivel locks ............................................................. 3
4. Using the brakes ............................................................................................ 3
5. Using the harness system .............................................................................. 3
6. Adjusting the harness system for newborns ................................................ 4
7. Removing the headhugger and shoulder pads ........................................ 4
8. Attaching the bumper bar ........................................................................... 4
9. Reclining the leg rest ..................................................................................... 4
10. Reclining the backrest .................................................................................. 4
11. Adjusting height of the handle .................................................................... 4
12. Folding the stroller ......................................................................................... 4
13. Carrying the stroller ....................................................................................... 4
14. Removing the seat cover ............................................................................. 4
15. Attaching the canopy .................................................................................. 4
16. To remove the complete sub seat ............................................................... 5
17. Attaching the rain cover (optional) ............................................................ 5
Disposal ................................................................................................................. 5
Warranty ................................................................................................................ 5
GENERAL INFORMATION & SAFETY
For new born babies we recomend to adjust the backreest into the lowest (flattest
recline position.
Follow all instructions carefully to avoid incorrect handling as this can impair the
stroller’s correct function.
Use of this stroller with a child weighing more than 15 kg will cause excessive wear and
tear on the stroller.
Your child’s safety is your responsibility. Always use the harness system to prevent your
child from falling or sliding out of the seat. This vehicle is suitable for one child only.
The harness always needs to be attached and adjusted correctly. If not adjusted
correctly according to the instructions, the stability of the stroller will be affected.
The harness and seat belt do not replace the permanent supervision by an adult.
To attach an additional full harness system for safety reasons ‘D’ rings (according to
EN13210 or BS6684) are provided.
The child should be clear of any moving parts while making adjustments. To avoid
injuries prevent children from grabbing the stroller while folding and unfolding.
WARNING: IT MAY BE DANGEROUS TO LEAVE YOUR CHILD
UNATTENDED.
WARNING: DO NOT LET YOUR CHILD PLAY WITH THIS PRODUCT.
WARNING! ENSURE YOUR CHILD IS CLEAR OF MOVING PARTS
WHILE MAKING ADJUSTMENTS OR OPENING OR FOLDING THE
STROLLER.
WARNING: THIS VEHICLE IS INTENDED FOR CHILDREN FROM
BIRTH UP TO 15 KG (UP TO 17,5 KG LOAD CAPACITIY).
WARNING: ENSURE THAT ALL THE LOCKING DEVICES ARE
ENGAGED BEFORE USE.
WARNING: ALWAYS USE THE CROTCH STRAP IN COMBINATION
WITH THE WAIST BELT.
WARNING: USE A HARNESS SYSTEM AS SOON AS THE CHILD
CAN SIT UNAIDED.
WARNING: THIS PRODUCT IS NOT SUITABLE FOR RUNNING OR
SKATING.
WARNING: ANY LOAD ATTACHED TO THE HANDLES AFFECTS
THE STABILITY OF THE STROLLER.
Do not carry additional children, do not hang shopping bags from the handle bars or
carry shopping bags on the stroller except in the stroller’s basket.
Maximum load 2 kg, maximum load for the canopy pocket 0,5 kg. Otherwise the
stroller is likely to become unstable. Overloading can also damage the vehicle.
3
Damages caused by the use of accessories not approved by CYBEX, such as rain
covers, buggy boards, bag hooks, etc. will not be covered by the terms of our warranty.
It may be unsafe to use replacement parts other than those approved by CYBEX.
Before using the stroller, always check whether the accessories are well secured.
Please make sure that the brake is locked while placing and removing the children.
Never lift the stroller with the child inside; never ascend or descend stairs or escalators
with the child inside or when using other means of transportation.
When opening and closing the stroller, do not use force, as incorrect folding can
damage or break the stroller. Check the instruction manual if necessary.
Drive carefully over curbs and gravel roads. The vehicle will be damaged by repeated
impact.
Make sure your child does not use the footrest to stand on.
Do not expose the stroller to any artificial heat or direct sunlight.
INSTRUCTIONS FOR MAINTENANCE
The user is responsible for the regular maintenance of the stroller. All connecting parts
and rivets have to be tightened and secured properly. It is particularly important to
ensure that the locking and swiveling mechanism are treated regularly with Teflon spray
(dry lubricant). It is important that brakes, wheels and tyres are not impaired during use.
Inspect them regularly and repair or replace if necessary. STOP using any product that
does not appear structurally sound.
Do not make any modifications to the product. If you have any complaints or
problems, please contact your supplier or importer.
A service should be scheduled every 12 months.
You can also treat the other moving parts with Teflon spray (dry lubricant). After
spraying on the Teflon, wipe the product with a soft cloth.
Use only original CYBEX replacement parts. It may be unsafe to use substitutes.
The frame tubes covered by the locking mechanism and turning mechanism should
also be regularly cleaned and sprayed. This will ensure that you enjoy your stroller
without any problems.
CLEANING
Do not use abrasives to clean the frame! Use a damp cloth and a mild detergent and
dry thoroughly.
Should the stroller be exposed to salt water, please rinse it down with fresh (tap) water
as soon as possible afterwards.
Seat covers are machine washable at max. 30° C on delicate cycle. The canopy can
be hand washed with mild detergent at max. 30° C.
Please make note of the care label. Do not tumble dry. Let covers dry completely
before reuse.
All CYBEX fabrics have been tested, but when the stroller is very wet, the water may
permeate the lining through the bottom edges and seams and leave water stains
on the upholstery. We advise you to use a rain cover to avoid this. Also please do not
fold or store the product while wet. If the stroller is wet, allow to dry with the canopy
extended. Never store in a damp environment as this can cause mildew to form.
Note! Please wash the cover separately before you use it the first time. Do not tumble
dry and do not expose to direct sunlight! Do not iron!
THIS PRODUCT WAS APPROVED ACCORDING TO THE
EN1888:2012 STANDARD.
INSTRUCTIONS FOR USE
IMPORTANT: READ THESE INSTRUCTIONS CAREFULLY BEFORE
USE AND KEEP THEM FOR FUTURE REFERENCE. YOUR CHILD’S
SAFETY MAY BE AFFECTED IF YOU DO NOT FOLLOW THESE
INSTRUCTIONS.
1. OPENING THE STROLLER
a) Before opening the pushchair the safety lock needs to be released.
b) After releasing the safety clip you can unfold the pushchair.
c) Step on the footboard until it locks in place with an audible click.
d) Please make sure that the handle bar is safely locked as well.
2. ASSEMBING THE WHEELS
a), b) Front wheel assembly.
c), d) e) Rear wheel assembly. Make sure that both mudguards point outwards.
f) After assembling the wheels the bowden brake cable can easily be lodged into
the designated slots.
WARNING: CHECK THAT THE SEAT UNIT ATTACHMENT DEVICES
AND CARRYCOT/CAR SEAT ADAPTERS ARE CORRECTLY
ENGAGED.
5. USING THE HARNESS SYSTEM
a) To fasten the harness system insert left and right side fasteners into the central
harness buckle.
b) To tighten the belts pull the strap on the front of the central harness buckle.
c) To release the belt system press the release button located on the seat in front of
the belt lock while pulling at the shoulder belts.
d) To release the fasteners squeeze the grooves on left and right side of the central
harness buckle.
e) Adjust the length of the crotch strap with the corresponding slider under the seat
cover.
3. AUTOMATIC FRONT WHEEL SWIVEL LOCKS
4. USING THE BRAKES
Regardless of their position, the front wheels can be automatically locked into place by
stepping on the lock button (wait for an audible CLICK). To release the lock press again
until you hear a CLICK.
Tilt the lever located at the right wheel to secure the brake. To release the brake tilt the
lever again.
4
7. REMOVING THE HEADHUGGER AND SHOULDER PADS
a) Remove the headhugger as soon as the headhugger does no longer fit over the
child´s shoulders.
b) Remove the velcros of the headhugger on the top left and right side on the back of
the seat cover. Release the loops at the end of the shoulder straps from the triangle
in the belt system, situated at the bottom of the backrest under the seat cover.
Completely pull the shoulder straps out of the holes in the backrest.
c) Pull the shoulder straps through the shoulder pads and the headhugger. Make sure
to feed the straps back through the holes in the backrest mechanism and attach
them to the triangle.
8. ATTACHING THE BUMPER BAR
a) Slide in latches on left and right side into gadgets sewn into the seat fabric.
b) Press buttons on left and right end of the bumper bar to take it off.
9. RECLINING THE LEG REST
a) Press the leg rest on both front edges and push down.
b) Simply lift the leg rest to put it back to the starting position.
10. RECLINING THE BACKREST
a) Pull the recline lever on the back of the seat to recline the backrest.
b) To raise it again just lift the backrest of the seat. The backrest can be engaged in 5
different positions.
a) b) Push button underneath the handle bar and slide up upper part of handle bar to
extend it until it clicks in place. Shorten the handle bar by pushing the button again.
11. ADJUSTING HEIGHT OF THE HANDLE
Remove all contents from the basket. If attached, ensure the canopy is folded back.
a) Push the primary lock lever underneath the pedal button.
Lift the pushed primary lock lever to release the stretching system.
b) Push down the secondary lock lever (extended bar on right side of the locking
system).
c), d) Press the button at the handle bar and fold the buggy by pushing it slightly
forward. PLEASE NOTE: Keep the button pushed the whole time. To make folding
easier lift the locking lever with your foot. Fold the buggy together carefully until the
safety clip is securely locked.
e) The brake can be used even with a folded buggy. With a locked brake the folded
buggy can rest against a wall to prevent inadvertent rolling.
12. FOLDING THE STROLLER
Pull the flexible carring handle on right rear tube and lift the stroller.
13. CARRYING THE STROLLER
14. REMOVING THE SEAT COVER
Slightly fold the stroller to reduce tension.
Remove the canopy from the stroller, if attached.
a) Take the seat cover’s hooks (3) off the frame on left and right side
Open the press buttons (4) of the straps connected to the seat side panels and the
basket rear tube.
Open the flaps (5) which are fixed with velcro over the tubes, one on each side.
Feed the strap with the slider (6) of the central harness buckle through the hole in
the seat fabric.
b) Feed the loops on the end of the shoulder straps through the triangle in the backrest
(7).
c) Feed the shoulder straps through the holes in the seat fabric (8).
Open the press buttons which are on the left and the right side from the seat on the
bottom from the fabric.
Pull the seat cover over the belt shifting button on the seat.
Slide the fabrics from the seat base tubes.
Reverse this procedure to refit the seat cover and the harness. Make sure that the
seat tubes slide back into the pockets inside the seat cover.
a) Attach the canopy adaptor on to the inside of the frame tubes of the buggy.
b) To remove the canopy reverse procedure.
c), d), e) Extend the canopy and place canopy rear flap behind the seat.
f) Lie-flat position: Put the rear flap over the seat’s back rest and fixate it with the two
velcros underneath.
g), h), i), The canopy is adjustable to various positions. The Canopy has a height
adjustment and a forward rotation function. To rotate open the zip located at the
top of the canopy.
The canopy has a fully ratcheting function to create complete coverage. Simply pull
on the front of the canopy to the desired position. The height can be easily adjusted by
simply sliding the canopy up or down the frame. The entire canopy can also be tilted
forward. For maximum coverage, unzip the extra panel on top of canopy and pull
forward.
j) The canopy flap at the rear of the stroller can be rolled up and fixed with a velcro
fastener, if required.
15. ATTACHING THE CANOPY
6. ADJUSTING THE HARNESS SYSTEM FOR NEWBORNS
Release the loops at the end of the shoulder straps from the triangle in the belt
system, situated at the bottom of the backrest under the seat cover.
Completely pull the shoulder straps out of the holes in the backrest.
Feed the shoulder straps through the two bottom holes. Make sure to feed the
straps back through the holes in the backrest mechanism and re-attach them to
the triangle.
To adjust the length of the shoulder straps to newborns please attach the inner loop
of the shoulder strap ends to the triangular ring.
Switch back to the upper holes as soon as the shoulder straps do no longer fit over the
child´s shoulders.
You can use the haedhugger and the shoulder pads separately.
5
Remove the canopy
a) Undo the press buttons that attach the seatcover with the rear frame.
b) Unhook the side panels at the left and right upper end out of the adaptor.
c) Open the adaptor on the left and the right side under the seat unit.
d) Pull out the complete sub seat towards the front of the buggy.
e) To attach the subseat reverse this procedure. Ensure that the buggy is not
completely unfolded.
16. TO REMOVE THE COMPLETE SUB SEAT
17. ATTACHING THE RAIN COVER (OPTIONAL)
Extend the rain cover over the stroller like shown in the image.
To fit the rain cover fasten the velcro strips around the frame at the top and bottom on
both sides of the buggy.
DISPOSAL
When you are done using your CYBEX CALLISTO, a proper disposal is important.
Garbage disposal may vary in every country. Please contact your local waste
management company to make sure you are taking the right steps to dispose of the
CYBEX CALLISTO. Always follow the disposal regulations of your country.
WARRANTY
The following warranty applies solely in the country where this product was initially
sold by a retailer to a customer. The warranty covers all manufacturing and material
defects, existing and appearing, at the date of purchase or appearing within a
term of two (2) years from the date of purchase from the retailer who initially sold the
product to a consumer (manufacturer’s warranty). In the event that a manufacturing
or material defect should appear, we will – at our own discretion – either repair the
product free of charge or replace it with a new product. To obtain such warranty it is
required to take or ship the product to the retailer, who initially sold this product to a
customer and to submit an original proof of purchase (sales receipt or invoice) that
contains the date of purchase, the name of the retailer and the type designation of this
product. This warranty shall not apply in the event that this product is taken or shipped
to the manufacturer or any other person other than the retailer who initially sold this
product to a consumer. Please check the product with respect to completeness and
manufacturing or material defects immediately at the date of purchase or, in the
event that the product was purchased in distance selling, immediately after receipt. In
case of a defect stop using the product and take or ship it immediately to the retailer
who initially sold it. In a warranty case the product has to be returned in a clean and
complete condition. Prior to contacting the retailer, please read this instruction manual
carefully. This warranty does not cover any damages caused by misuse, environmental
influence (water, fire, road accidents etc.) or normal wear and tear. It does solely apply
in the event that the use of the product was always in compliance with the operating
instructions, if any and all modifications and services were performed by authorized
persons and if original components and accessories were used. This warranty does not
exclude, limit or otherwise affect any statutory consumer rights, including claims in tort
and claims with respect to a breach of contract, which the buyer may have against
the seller or the manufacturer of the product.
6
MAKLUMAT AM & KESELAMATAN
Bagi bayi baru lahir kami mengesyorkan melaraskan penyandar belakang kepada
kedudukan menyandar paling rendah (paling rata).
Ikuti semua arahan betul-betul untuk mengelakkan pengendalian yang salah kerana
ini boleh mendatangkan kesan kepada fungsi kereta sorong yang betul.
Penggunaan kereta sorong ini untuk kanak-kanak yang beratnya melebihi 15 kg akan
menyebabkan haus dan lusuh yang berlebihan kepada kereta sorong.
Keselamatan anak anda adalah tanggungjawab anda. Sentiasa gunakan sistem
abah-abah untuk mencegah anak anda daripada terjatuh atau menggelongsor dari
tempat duduk. Kereta sorong ini sesuai untuk seorang kanak-kanak sahaja.
Abah-abah perlu disambungkan dan dilaraskan dengan betul. Jika tidak dilaraskan
dengan betul menurut arahan, kestabilan kereta sorong akan terganggu.
Abah-abah dan tali pinggang keselamatan tidak boleh menggantikan pengawasan
sepanjang masa oleh orang dewasa.
Untuk menyambungkan sistem abah-abah penuh tambahan untuk keselamatan
cincin 'D' (menurut EN13210 atau BS6684) disediakan.
Kanak-kanak perlu jauh daripada sebarang bahagian yang bergerak semasa
membuat pelarasan. Untuk mengelak kecederaan cegah kanak-kanak daripada
memegang kereta sorong semasa dilipat dan dibuka.
AMARAN: BAHAYA JIKA MENINGGALKAN ANAK ANDA TANPA
DIJAGA. AMARAN: JANGAN BIAR ANAK ANDA BERMAIN
DENGAN PRODUK INI.
DARIPADA BARU LAHIR HINGGA MAKS. 15 KG (DIUJI EN1888) –
2.5 KG BEBAN TAMBAHAN (DIUJI OLEH INTERTEK)
AMARAN: PASTIKAN SEMUA PERANTI PENGUNCI DIPASANG
SEBELUM PENGGUNAAN.
AMARAN: SENTIASA GUNAKAN TALI PENGIKAT KELANGKANG
BERSAMA DENGAN TALI PINGGANG.
AMARAN: GUNAKAN SISTEM ABAH-ABAH SEBAIK SAHAJA
KANAK-KANAK BOLEH DUDUK TANPA DIBANTU.
AMARAN: PRODUK INI TIDAK SESUAI UNTUK BERLARI ATAU
MELUNCUR
AMARAN: SEBARANG BEBAN YANG DISANGKUT KEPADA
PEMEGANG AKAN MEMBERI KESAN KEPADA KESTABILAN
KERETA SORONG.
Jangan bawa kanak-kanak tambahan, jangan sangkut beg beli-belah pada bar
pemegang atau membawa beg beli-belah di atas kereta sorong kecuali di dalam
bakul kereta sorong.
MY KANDUNGAN
I. Maklumat Am & Keselamatan.........................................................................6
ARAHAN PENYELENGGARAAN ........................................................................... 7
Membersihkan ..................................................................................................... 7
Arahan penggunaan .......................................................................................... 7
1. Membuka kereta sorong .............................................................................. 7
2. Memasang roda .......................................................................................... 7
3. Mengunci pusingan roda depan secara automatik ................................ 7
4. Menggunakan brek ...................................................................................... 7
5. Menggunakan Sistem Abah-abah ............................................................. 7
6. Melaraskan Sistem Abah-abah untuk Bayi Baru Lahir ............................... 8
7. Membuka Pemegang Kepala dan Pad Bahu .......................................... 8
8. Memasang bampar bar .............................................................................. 8
9. Menyandarkan alas kaki .............................................................................. 8
10. Menyandarkan penyandar tempat duduk ............................................... 8
11. Melaraskan ketinggian pemegang ............................................................ 8
12. Melipat kereta sorong ................................................................................... 8
13. Membawa kereta sorong............................................................................. 8
14. Membuka alas tempat duduk ..................................................................... 8
15. Memasang kanopi ........................................................................................ 8
16. Untuk membuka sub tempat duduk lengkap ............................................ 9
17. Memasang penutup hujan (opsyenal ........................................................ 9
Pelupusan ............................................................................................................. 9
Jaminan ................................................................................................................ 9
AMARAN! PASTIKAN ANAK ANDA JAUH DARIPADA
BAHAGIAN YANG BERGERAK SEMASA MEMBUAT
PENYELARASAN ATAU MEMBUKA ATAU MELIPAT KERETA
SORONG.
7
Kerosakan disebabkan oleh penggunaan aksesori yang tidak diluluskan oleh CYBEX,
seperti penutup hujan, papan buggy, penyangkut beg dan sebagainya tidak akan
dilindungi oleh terma jaminan kami. Penggunaan alat ganti selain daripada yang
diluluskan oleh CYBEX mungkin tidak selamat. Sebelum menggunakan kereta sorong,
sentiasa periksa sama ada aksesori sudah dipasang dengan selamat.
Sila pastikan brek dikunci semasa meletakkan dan mengangkat kanak-kanak. Jangan
angkat kereta sorong dengan kanak-kanak berada di dalam: jangan naik atau
turun tangga atau tangga bergerak dengan kanak-kanak di dalam atau semasa
menggunakan pengangkutan yang lain.
Semasa membuka dan menutup kereta sorong, jangan gunakan kekuatan, kerana
melipat dengan cara yang salah boleh merosakkan atau mematahkan kereta sorong.
Baca manual arahan jika perlu.
Sorong dengan berhati-hati apabila melalui susur jalan dan jalan kerikil. Kereta sorong
akan rosak akibat impak yang berulang.
Pastikan anak anda tidak berdiri di atas alas kaki.
Jangan dedahkan kereta sorong kepada sebarang haba buatan atau cahaya
matahari secara terus.
Beban maksimum 2 kg, beban maksimum untuk poket kanopi 0,5 kg. Jika tidak kereta
sorong mungkin menjadi tidak stabil. Beban berlebihan juga boleh merosakkan kereta
sorong.
ARAHAN PENYELENGGARAAN
Pengguna bertanggungjawab untuk kerap menyelenggarakan kereta sorong. Semua
bahagian yang bersambung serta rivet perlu diketatkan dan dipasang dengan
betul. Adalah penting untuk memastikan bahawa mekanisme kunci dan mekanisme
berpusing disemburkan dengan semburan Teflon (pelincir kering) secara kerap.
Adalah penting untuk brek, roda dan tayar tidak rosak semasa penggunaan. Periksa
bahagian ini dengan kerap dan baiki atau gantikan jika perlu. BERHENTI daripada
menggunakan produk yang kelihatan tidak kukuh.
Jangan buat sebarang pengubahsuaian kepada produk. Jika anda mempunyai
sebarang aduan atau masalah, sila hubungi pembekal atau pengimport anda.
Servis perlu dijadualkan setiap 12 bulan.
Anda juga boleh menggunakan semburan Teflon (pelincir kering) untuk bahagian
bergerak yang lain. Selepas semburan Teflon, lap produk dengan kain lembut.
Gunakan hanya alat ganti CYBEX yang asli. Penggunaan alat ganti yang lain mungkin
tidak selamat.
Tiub rangka yang dilekapkan dengan mekanisme kunci dan mekanisme berpusing
perlu dibersihkan dan disemburkan dengan kerap. Ini akan memastikan anda boleh
menikmati penggunaan kereta sorong tanpa sebarang masalah.
MEMBERSIHKAN
Sila ambil perhatian tentang label penjagaan. jangan guna mesin pengering. Biarkan
alas kering betul-betul sebelum digunakan semula.
Semua fabrik CYBEX telah diuji, tetapi apabila kereta sorong terlalu basah, air mungkin
meresap ke lapisan melalui bahagian bawah dan kelim dan meninggalkan kesan air
pada upholsteri. Kami menasihatkan anda untuk menggunakan penutup hujan untuk
mengelakkan perkara ini. Dan juga jangan lipat atau simpan kereta sorong semasa
basah. Jika kereta sorong basah, biarkannya kering dengan kanopi dipanjangkan
keluar. Jangan simpan di persekitaran yang lembap kerana ini boleh menyebabkan
kulat terbentuk.
Perhatian! Sila basuh pelapik secara berasingan sebelum anda menggunakan buat
kali pertama. Jangan gunakan mesin pengering dan jangan dedahkan kepada
cahaya matahari secara terus! Jangan seterika!
PRODUK INI DILULUSKAN MENURUT STANDARD EN1888:2012
ARAHAN PENGGUNAAN
PENTING: SILA BACA ARAHAN INI DENGAN TELITI SEBELUM
GUNA DAN SIMPAN UNTUK RUJUKAN DI MASA AKAN
DATANG. KESELAMATAN ANAK ANDA MUNGKIN TERJEJAS
JIKA ANDA TIDAK MENGIKUTI ARAHAN INI.
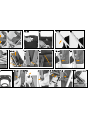
1. MEMBUKA KERETA SORONG
a) Sebelum membuka kereta sorong, lepaskan tuil pengunci lipatan.
b) Setelah melepaskan tuil pengunci lipatan, kereta sorong boleh dibuka.
c) Langkah pada kaki katil sehingga terpasang dengan bunyi "klik".
d) Sila pastikan bahawa bar pemegang dikunci dengan selamat.
2. MEMASANG RODA
a) b) Memasang Roda Depan
c), d) e) Memasang roda belakang. Pastikan bahawa kedua-dua slebor menunjukkan
ke arah luar.
f) Selepas memasang brek, kabel bowden boleh dipasang ke dalam bahagian yang
ditetapkan.
AMARAN: PASTIKAN PERANTI TAMBAHAN KERUSI DAN
ADAPTER CARRYCOT / KERUSI KERETA DILETAKKAN DENGAN
BETUL.
3. MENGUNCI PUSINGAN RODA DEPAN SECARA AUTOMATIK
Tekan Tuil Kunci Pusingan Depan dalam mana-mana kedudukan roda untuk mengunci
roda depan (sehingga "klik”). Angkat Tuil Kunci Pusingan Depan ke atas sekali lagi
sehingga “klik” untuk melepaskan Kunci Pusingan
Jangan gunakan penyental untuk membersihkan rangka! Gunakan kain lembap dan
bahan pencuci lembut dan keringkan betul-betul.
Sekiranya kereta sorong terdedah kepada air masin, sila bilas dengan air tawar (air
paip) dengan segera selepas itu.
Alas tempat duduk boleh dibasuh mesin pada suhu maks. 30° C pada kitaran lembut.
Kanopi boleh dicuci tangan menggunakan bahan pencuci lembut pada kepanasan
maks. 30°C.
8
7. MEMBUKA PEMEGANG KEPALA DAN PAD BAHU
a) Buka pemegang kepala sebaik sahaja ia tidak muat pada bahagian bahu bayi.
b) Buka velkro pemegang kepala di bahagian atas sebelah kiri dan kanan pada
bahagian belakang alas tempat duduk. Lepaskan gelung di bahagian hujung
pengikat bahu daripada segi tiga dalam sistem tali pinggang, terletak di bawah
penyandar belakang di bawah alas tempat duduk
Tarik pengikat bahu keluar sampai habis daripada lubang pada penyandar
belakang.
c) Tarik pengikat bahu melalui pad bahu dan pemegang kepala. Pastikan untuk
memasukkan pengikat semula melalui lubang pada mekanisme penyandar
belakang dan sambungkan pada segi tiga.
8. MEMASANG BAMPAR BAR
a) Selitkan selak di sebelah kiri dan kanan pada gajet yang dijahit pada fabrik tempat
duduk.
b) Tekan butang di sebelah kiri dan kanan bampar bar untuk mengeluarkannya
9. MENYANDARKAN ALAS KAKI
a) Tekan alas kaki di kedua-dua hujung depan dan tekan ke bawah.
b) Cuma angkat alas kaki untuk mengembalikannya kepada kedudukan asal.
10. MENYANDARKAN PENYANDAR TEMPAT DUDUK
a) Tarik tuil sandar di bahagian belakang tempat duduk bagi menyandarkan
penyandar belakang.
b) Untuk menaikkannya semula cuma angkat penyandar belakang tempat duduk.
Penyandar belakang boleh diletakkan dalam 5 kedudukan berbeza.
a) b) Tekan butang di bawah bar pemegang dan tolah bahagian atas bar
pemegang untuk memanjangkannya sehingga klik masuk. Pendekkan bar
pemegang dengan menekan semula butang.
11. MELARASKAN KETINGGIAN PEMEGANG
Keluarkan semua kandungan daripada bakul. Jika dipasang, pastikan kanopi dilipat
semula.
a) Tekan tuil pengunci utama di bawah butang pedal.
Angkat tuil pengunci utama untuk melepaskan sistem regangan.
b) Tekan tuil pengunci kedua (bar yang terjulur di sebelah kanan sistem pengunci).
c), d) Tekan butang pada bar pemegang dan lipat kereta sorong dengan
menolaknya sedikit ke hadapan. SILA AMBIL PERHATIAN: Butang perlu ditekan
sepanjang masa. Untuk memudahkan kerja melipat, angkat tuil pengunci
menggunakan kaki anda. Lipat kereta sorong dengan berhati-hati sehingga klip
keselamatan telah terkunci.
e) Brek boleh digunakan walaupun kereta sorong telah dilipat. Dengan brek yang
terkunci, kereta sorong yang berlipat boleh disandarkan pada dinding dan tidak
akan menggelongsor secara tidak sengaja.
12. MELIPAT KERETA SORONG
Tarik pemegang pembawa fleksibel pada tiub kanan belakang dan angkat kereta
sorong.
13. MEMBAWA KERETA SORONG
14. MEMBUKA ALAS TEMPAT DUDUK
Lipat sedikit kereta sorong untuk mengurangkan tegangan.
Alihkan kanopi daripada kereta sorong, jika terpasang.
a) Buka penyangkut alas tempat duduk (3) daripada rangka di sebelah kiri dan
kanan.
Buka butang tekan (4) bagi pengikat yang disambungkan ke panel sebelah
tempat duduk dan tiub belakang bakul.
Buka penutup (5) yang dipasang dengan velkro pada tiub, satu bagi setiap sisi.
Masukkan pengikat dengan gelongsor (6) pengancing abah-abah tengah melalui
lubang pada fabrik tempat duduk.
b) Masukkan gelung pada bahagian hujung pengikat bahu melalui segi tiga pada
penyandar belakang (7).
c) Masukkan pengikat bahu melalui lubang pada fabrik tempat duduk (8).
Buka butang tekan di sebelah kiri dan kanan tempat duduk di bahagian bawah
fabrik.
6. MELARASKAN SISTEM ABAH-ABAH UNTUK BAYI BARU LAHIR
Lepaskan gelung di bahagian hujung pengikat bahu daripada segi tiga dalam
sistem tali pinggang, terletak di bawah penyandar belakang di bawah alas
tempat duduk.
Tarik pengikat bahu keluar sampai habis daripada lubang pada penyandar
belakang.
Masukkan pengikat bahu melalui dua lubang bawah. Pastikan untuk memasukkan
pengikat semula melalui lubang pada mekanisme penyandar belakang dan
sambungkan semula pada segi tiga.
Untuk melaraskan panjang pengikat bahu bagi bayi baru lahir sila pasangkan
bahagian dalam gelung pada hujung pengikat bahu kepada cincin segi tiga.
Ubah semula kepada lubang atas sebaik sahaja pengikat bahu tidak lagi muat pada
bahu bayi.
Anda boleh gunakan pemegang kepala dan pad bahu secara berasingan.
5. MENGGUNAKAN SISTEM ABAH-ABAH
a) Untuk menutup hanya selitkan lidah pengancing di kiri dan kanan ke dalam
pengancing abah-abah.
b) Untuk menutup hanya selitkan lidah pengancing di kiri dan kanan ke dalam
pengancing abah-abah.
c) Untuk melepaskan sistem tali pinggang telan butang pelepas yang terletak di atas
tempat duduk di depan pengunci tali pinggang dan tarik tali pinggang bahu.
d) Untuk melepaskan pengancing abah-abah, cuma tekan kedua-dua bahagian
pengancing abah-abah bersama-sama.
e) Panjang tali pengikat kelangkang dilaraskan dengan menggerakkan
penggelongsor di bawah kerusi.
4. MENGGUNAKAN BREAK
Dongakkan tuil yang terletak di roda depan untuk menahan brek. Untuk Melepaskan
brek, dongakkan tuil sekali lagi.
9
a) Pasangkan adaptor kanopi kepada bahagian dalam tiub rangka kereta sorong.
b) Untuk membuka kanopi terbalikkan prosedur ini.
c), d), e) Panjangkan kanopi dan letakkan penutup belakang kanopi ke belakang
tempat duduk.
f) Kedudukan mendatar: Letakkan penutup belakang di atas penyandar belakang
tempat duduk dan lekatkan menggunakan dua velkro di bawah.
g), h), i), Kanopi boleh dilaraskan kepada pelbagai kedudukan. Kanopi ada
pelarasan ketinggian dan fungsi pusingan ke depan. Untuk memusingkan buka zip
yang terletak di bahagian atas kanopi.
Kanopi mempunyai fungsi gear sehala untuk menghasilkan liputan penuh. Hanya
tarik bahagian depan kanopi kepada kedudukan yang diingini. Ketinggian boleh
dilaraskan dengan mudah dengan hanya menggelongsor kanopi ke atas atau ke
bawah rangka. Keseluruhan kanopi juga boleh dicondongkan ke depan. Untuk
liputan maksimum, buka zip panel tambahan pada bahagian atas kanopi dan tarik
ke depan.
j) Penutup kanopi pada bahagian belakang kereta sorong boleh digulung dan
diikat menggunakan kancing velkro, jika perlu.
15. MEMASANG KANOPI
Buka kanopi
a) Buka butang tekan yang menyambungkan alas tempat duduk dengan rangka
belakang.
b) Buka penyangkut panel susu di kiri dan kanan sebelas atas daripada adaptor.
c) Buka adaptor di sebelah kiri dan kanan di bawah tempat duduk.
d) Tarik seluruh tempat duduk kecil ke arah depan kereta sorong.
e) Untuk memasang tempat duduk kecil terbalikkan prosedur ini. Pastikan kereta
sorong tidak dibuka sepenuhnya.
16. UNTUK MEMBUKA SUB TEMPAT DUDUK LENGKAP
17. MEMASANG PENUTUP HUJAN (OPSYENAL)
Panjangkan penutup hujan di atas kereta sorong seperti dalam gambar.
Untuk memasang penutup hujan ketatkan kepingan velkro din sekeliling rangka di
bahagian atas dan bawah kedua-dua sisi kereta sorong.
PELUPUSAN
Apabila anda selesai menggunakan CYBEX CALLISTO, pelupusan yang sewajarnya
perlu dilakukan. Pelupusan sisa mungkin berbeza di setiap negara. Sila hubungi
syarikat pengurusan sisa tempatan anda untuk memastikan anda mengambil langkah
yang wajar dalam melupuskan CYBEX CALLISTO. Sentiasa ikut peraturan pelupusan
negara anda.
JAMINAN
Jaminan berikut terpakai hanya di negara di mana produk ini mula-mula dijual oleh
peruncit kepada pelanggan. Jaminan meliputi semua kerosakan pembuatan dan
bahan, yang sedia ada dan muncul, pada tarikh pembelian atau muncul dalam
tempoh dua (2) tahun selepas tarikh pembelian daripada peruncit yang mula-
mula menjual produk kepada pengguna (jaminan pembuat). Sekiranya kerosakan
pembuatan atau bahan muncul, kami akan - mengikut budi bicara kami - sama
ada membaiki produk secara percuma atau menggantikannya dengan produk
yang baharu. Untuk mendapatkan jaminan ini, adalah perlu untuk mengambil atau
menghantar produk kepada peruncit, yang mula-mula menjual produk ini kepada
pelanggan dan menyerahkan bukti pembelian asal (resit jualan atau invois) yang
mengandungi tarikh pembelian, nama peruncit dan jenis gelaran produk ini. Jaminan
ini tidak terpakai sekiranya produk ini diambil atau dihantar kepada pembuat atau
mana-mana orang lain selain daripada peruncit yang mula-mula menjual produk
ini kepada pengguna. Sila periksa produk berkaitan kesempurnaan dan kerosakan
pembuatan atau bahan dengan segera pada tarikh pembelian, atau sekiranya
produk dibeli dengan jualan jarak jauh, sebaik sahaja selepas penerimaan. Sekiranya
rosak, berhenti menggunakan produk dan hantar atau kirimkan segera kepada
peruncit yang mula-mula menjualnya. Dalam kes jaminan, produk perlu dipulangkan
dalam keadaan bersih dan lengkap. Sebelum menghubungi peruncit, sila baca
manual arahan ini dengan teliti. Jaminan ini tidak melindungi sebarang kerosakan
akibat salah guna, pengaruh persekitaran (air, api, kemalangan jalan raya dan
sebagainya) atau haus an lusuh yang biasa. Ia hanya terpakai dalam keadaan
penggunaan produk ini hanya mematuhi arahan pengendalian., jika ada dan
semua pengubahsuaian dan servis dilakukan oleh mereka yang layak dan hanya
komponen dan aksesori asli sahaja yang digunakan. Jaminan ini tidak mengecualikan,
mengehadkan atau memberi kesan kepada mana-mana hak berkanun pelanggan,
termasuk tuntutan tort dan tuntutan berkaitan pelanggaran kontrak, yang mana
pembeli mungkin ada terhadap penjual atau pembuat produk.
Tarik alas tempat duduk melepasi butang pengalih tali pinggang pada tempat
duduk.
Tarik fabrik daripada tiub dasar tempat duduk.
Terbalikkan prosedur ini untuk memasang semula alas tempat duduk dan abah-
abah. Pastikan tiub tempat duduk masuk semula ke dalam poket sebelah dalam
alas tempat duduk.
  • Page 1 1
  • Page 2 2
  • Page 3 3
  • Page 4 4
  • Page 5 5
  • Page 6 6
  • Page 7 7
  • Page 8 8
  • Page 9 9
  • Page 10 10
  • Page 11 11
  • Page 12 12
  • Page 13 13
  • Page 14 14
  • Page 15 15
  • Page 16 16
  • Page 17 17

CYBEX CALLISTO User manual

Category
Strollers
Type
User manual

CYBEX CALLISTO is a stroller for children from birth up to 15 kg, featuring a hood, adjustable handle height, reclining backrest, and leg rest, as well as a 5-point safety harness and bumper bar for added security. With automatic front wheel swivel locks, brakes, and a compact fold, it's convenient for everyday use and travel.

Ask a question and I''ll find the answer in the document

Finding information in a document is now easier with AI