
Page 1/8AM_01_18_23 Installation Instructions - AHDS-7810v2
Wireless Observation Camera System
with 7” HD DVR Monitor
AHDS-7810v2
Recommended Tools Diculty Level
Install Time
Panel Removal ToolScrew Driver Zip Ties Socket Set
Electrical TapeWire CuttersWire Strippers
Wrench
1hr 30m - 2hr
Questions? Call the Brandmotion technical support line at (734) 619-1250 or CLICK HERE

Page 2/8AM_01_18_23 Installation Instructions - AHDS-7810v2
Vehicle Application:
Universal
Part Number: AHDS-7810v2
Kit Contents
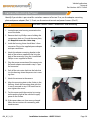
Recommended Tools Components for installing the AHDS-7810v2
Kit Contents:
1x 7” Mointor & Cigarette Power Adapter
1x Monitor Suction Cup Mount
1x Monitor U-Bracket Mount
1x Wireless Camera & Power Harness
1x Universal Camera Bracket
1x Pre-Wired Camera Bracket

Page 3/8AM_01_18_23 Installation Instructions - AHDS-7810v2
Vehicle Application:
Universal
Part Number: AHDS-7810v2
Monitor Mounting & Power
Part 1a. Temporary Mounting the Monitor
1. Take the suction-cup mount and loosen the
top thumb screw and slide onto the back of
the monitor.
2. Tighten the top of the mount at the desired
location.
Decide which Monitor Mounting is best, Part 1a.
Temporary Mounting & Part 1b. Permanent Mount-
ing
Part 1b. Permanent Mounting the Monitor
1. Choose a desired mounting location on the
dashboard to screw the U-Bracket in.
2. Take the monitor and slide in between the
U-bracket so the holes on the side line up, use
the provided screws to secure the monitor.

Page 4/8AM_01_18_23 Installation Instructions - AHDS-7810v2
Vehicle Application:
Universal
Part Number: AHDS-7810v2
Monitor Mounting & Power
Part 2a. Temporary Powering the Monitor
1. Take the power cable with a cigarette adapt-
er and plug into the monitor cable and the
cigarette outlet. Make sure to route the wire
that will not interfere with any operation of
the vehicle.
Decide which Power Solution is best, Part 2a. Tem-
porary Power & Part 2b. Permanent Power
Part 2b. Permanant Powering the Monitor
1. Using the power harness with the cigarette
lighter plug, cut the plug o of the harness
and discard the plug
2. Connect the red wire to the accessory and the
black wire to ground.

Page 5/8AM_01_18_23 Installation Instructions - AHDS-7810v2
Vehicle Application:
Universal
Part Number: AHDS-7810v2
Camera Mounting & Power
Part 1 Pre-Wire Camera Power Connections and Mounting
1. Locate the pre-wire housing mounted to the
rear of the trailer.
2. Remove the 4 tiny Phillips screws holding the
square cover plate on. Discard the cover plate,
but Keep the screws for a later step.
3. Inside the housing, there should be a 3.5mm
connector. Plug in the supplied power adaptor
and tape connection.
4. Attach the adaptor mounting bracket to the
back of the camera supplied in the kit to the
back of the camera by using the 4 small black
Phillips screws supplied in the kit.
5. Plug the power connection of the camera into
the power adaptor connected in step 3. Tape
the connector.
6. Push all the extra wire slack into the hole that
is in the housing where the power wire is com-
ing from.
7. Attach the antenna to the camera.
8. Align the mounting plate to the 4 holes in the
housing. Attach the mounting plate with the
4 screws removed in step 2. Be careful not to
over-tighten the screws.
9. Test the camera with the monitor by turning
on the parking light of the vehicle to supply
power to the camera.
10. If the camera does not show on any channel
follow the instructions for connecting addi-
tional cameras.
Identify if your trailer is pre-wired for a wireless camera i.e Furrion. If so, use the adapter mounting
plate and power adapter (Part 1). If not, use the universal mount and power harness (Part 2).

Page 6/8AM_01_18_23 Installation Instructions - AHDS-7810v2
Vehicle Application:
Universal
Part Number: AHDS-7810v2
Camera Mounting & Power
Part 2 Universal Camera Power Connection and Mounting
1. Remove the rear center top marker light so the
wiring is exposed.
2. Splice the power harness into the power &
ground wires that are connected to the light.
3. Feel inside the hole where the light power
wires are coming through to nd out where
the “stud” of the trailer wall is to see where you
can drill a hole to run the power connector
of the harness through for the camera. (If the
stud is next to the power wire hole, drill a ½
inch hole under the center maker light. If the
stud is under the power wire hole, drill a ½
inch hole next to the center light between the
center and right side marker light.
4. Run the connector or the camera power har-
ness through the hole just drilled.
5. Reinstall the light that was removed in step 1.
Make sure the base plate of the light is sealed
to the trailer wall to prevent water from enter-
ing.
6. Connect the universal mounting plate to the
back of the camera by using the 4 small black
Phillips screws.
7. Connect the power harness to the camera.
Tape the connector to make sure it does not
get unplugged.

Page 7/8AM_01_18_23 Installation Instructions - AHDS-7810v2
Vehicle Application:
Universal
Part Number: AHDS-7810v2
Camera Mounting & Power
Part 2 Universal Camera Power Connection and Mounting Cont.
1. Connect the power harness to the camera.
Tape the connector to make sure it does not
get unplugged.
2. Push all the extra wire slack into the drilled
hole, until the camera bracket touches the
trailer. Mark the 4 holes to drill for mounting.
3. Pull the camera away from the trailer and drill
the four 1/16” holes.
4. Push the wires back in the hole and seal them
with silicone. Mount the camera with 4 Phillips
screws that were just drilled.
5. Attach the antenna to the camera.
6. Test the camera with the monitor by turning
on the parking light of the vehicle to supply
power to the camera.
7. If the camera does not show on any channel
follow the instructions for connecting addi-
tional cameras.

Page 8/8AM_01_18_23 Installation Instructions - AHDS-7810v2
Vehicle Application:
Universal
Part Number: AHDS-7810v2
Pairing a New/Additional Camera
Part 1 Pairing New/Additional Camera
1. Follow steps outlined in Section 2: Camera
Mounting & Power for mounting & connecting
to power
2. Once Connected return to the monitor you
wish to connect too & turn on the vehicle.
NOTE: the trailer the camera is connected to
must also be powered, you only have 45 sec-
onds to connect to the camera to the monitor
once powered up.
3. Select the channel # you wish to connect too
4. Select the “M” button and then “SD” when the
selection is over “Paring”. The pairing process
will now begin.
-
 1
1
-
 2
2
-
 3
3
-
 4
4
-
 5
5
-
 6
6
-
 7
7
-
 8
8


BrandMotion AHDS-7810v2-Final-Instructions-1.pdf Installation guide
- Type
- Installation guide
- This manual is also suitable for
Ask a question and I''ll find the answer in the document
Finding information in a document is now easier with AI
Related papers
-
BrandMotion AHDS-7810v2-Final-Instructions.pdf Installation guide
-
-
-
-
-
BrandMotion AHDS-7650 Installation guide
-
-
-
-
BrandMotion 9002-7803V2 Universal Two-camera Trailer Vision System Installation guide
Other documents
-
A.O. Smith AH - 290 User manual
-
DRIVEN DRWC7CM Owner's manual
-
Akai MPC Renaissance User guide
-
3M 4420 User manual
-
-
Xerox 9400 User manual
-
Furrion Aurora 43 Inch Full Shade Smart 4K UHD LED Outdoor TV User manual
-
Furrion FSBN4W-BL Owner's manual
-
Furrion FSPK10MWT-BL User manual
-
Akai MPC Essentials User manual