Page is loading ...

Metra. The World’s Best Kits.
®
MetraOnline.com © COPYRIGHT 2020 METRA ELECTRONICS CORPORATION REV. 8/18/20 INST107-TO1HG
INSTALLATION INSTRUCTIONS
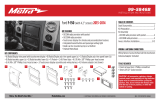
107-TO1HG
Patent Pending
Attention! Let the vehicle sit with the key
out of the ignition for a few minutes before
removing the factory radio. When testing the
aftermarket equipment, ensure that all factory
equipment is connected before cycling the
key to ignition.
KIT FEATURES
• ISO DDIN radio provision*
• Painted gloss black
KIT COMPONENTS
• A) Radio trim panel • B) Radio brackets • C) #8 x 3/8” Phillips screws (4) • D) #4 x 3/8” Phillips screws (4)
TOOLS REQUIRED
• Panel removal tool • Phillips screwdriver
• 10mm Socket wrench • Cutting tool
TABLE OF CONTENTS
Dash Disassembly ..................................................2
Kit Assembly
–Shallow DDIN radio provision .............................3
–Pioneer modular DDIN radio provision .............4
WIRING & ANTENNA CONNECTIONS
(sold separately)
Visit axxessinterfaces.com or metraonline.com
for harness and interface options
Antenna Adapter: 40-LX11
A B C D
Toyota RAV4 2019-Up
Visit MetraOnline.com for more detailed information about the product and up-to-date vehicle
specific applications
* Designed for ISO DDIN radios which have an “L” shaped chassis design with the
radio chassis at the bottom of the screen. Compatible with Pioneer modular radios
† Refer to the radio manufacturer for current models

1.800.221.0932
|
MetraOnline.com
2
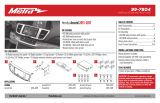
1. Remove the trim panel behind the radio.
(Figure A)
2. Remove (4) 10mm screws securing the
radio. Unclip and slide out the radio,
then unplug and remove. (Figure B)
3. Remove the (6) screws on radio back
and separate panels from around the
factory radio face. (Figure C)
Continue to Kit Preparation
(Figure B)
(Figure C)
(Figure A)
DASH DISASSEMBLY

REV. 8/18/2020 INST107-TO1HG
3
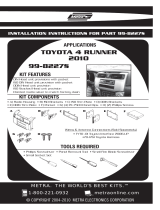
Bottom chassis DDIN radio provision
1. Using pliers or cutting tool, remove the
shown inside mounting tabs from the
radio brackets. (leave the smallest inner
mounting tabs) (Figure A)
2. Secure the radio to the radio brackets
with screws supplied with radio.
(Figure B)
3. Secure the radio/bracket assembly to
the radio trim panel using (4) Phillips
screws provided. (Figure C)
4. Secure the radio assembly into the
factory radio panels using (4) of the
factory screws. (screws are also provided
if needed) (Figure D)
5. Locate the factory wiring harness and
antenna connector in the dash and
complete all necessary connections to
the radio. Metra recommends using
the proper mating adapter from Metra
and/or Axxess. Test the radio for proper
operation.
6. Slide the radio assembly into to the
dash, then secure using the factory
screws and snap the trim back in place.
(Figure A)
(Figure C)
(Figure B) (Figure D)
KIT ASSEMBLY
Remove shaded areas

1.800.221.0932
|
MetraOnline.com
4
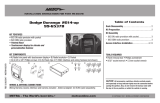
Pioneer Modular DDIN radio provision
Note: For steps 1 and 2, reference the
installation manual provided with the radio
for which hardware to use. The display
screen and radio chassis use two different
types of screws.
1. Secure the radio display to the radio
brackets using (4) screws supplied with
the radio. (Figure A)
2. Secure the radio brackets to the radio
chassis using (4) screws supplied with
the radio. (Figure B)
3. Connect the radio display to the radio
chassis.
4. Secure the new radio assembly to the
radio trim panel . (Figure C)
5. Assemble the radio assembly into the
factory radio panels using the outside
(4) factory screws (screws are also
provided if needed). (Figure D)
6. Locate the factory wiring harness and
antenna connector in the dash and
complete all necessary connections to
the radio. Metra recommends using
the proper mating adapter from Metra
and/or Axxess. Test the radio for proper
operation.
7. Slide the radio assembly into to the
dash, then secure using the factory
screws.
8. Reassemble the dash in reverse
order of disassembly to complete the
installation.
(Figure C)(Figure A)
(Figure B) (Figure D)
KIT ASSEMBLY

REV. 8/18/2020 INST107-TO1HG
5


REV. 8/18/2020 INST107-TO1HG
7

KNOWLEDGE IS POWER
Enhance your installation and fabrication skills by
enrolling in the most recognized and respected
mobile electronics school in our industry.
Log onto www.installerinstitute.com or call
800-354-6782 for more information and take steps
toward a better tomorrow.
®
Metra recommends MECP
certified technicians
Metra. The World’s Best Kits.
®
MetraOnline.com © COPYRIGHT 2020 METRA ELECTRONICS CORPORATION REV. 8/18/20 INST107-TO1HG
INSTALLATION INSTRUCTIONS
107-TO1HG
Having difficulties? We’re here to help.
Contact our Tech Support line at:
386-257-1187
Or via email at:
techsupport@metra-autosound.com
Tech Support Hours (Eastern Standard Time)
Monday - Friday: 9:00 AM - 7:00 PM
Saturday: 10:00 AM - 7:00 PM
Sunday: 10:00 AM - 4:00 PM
/