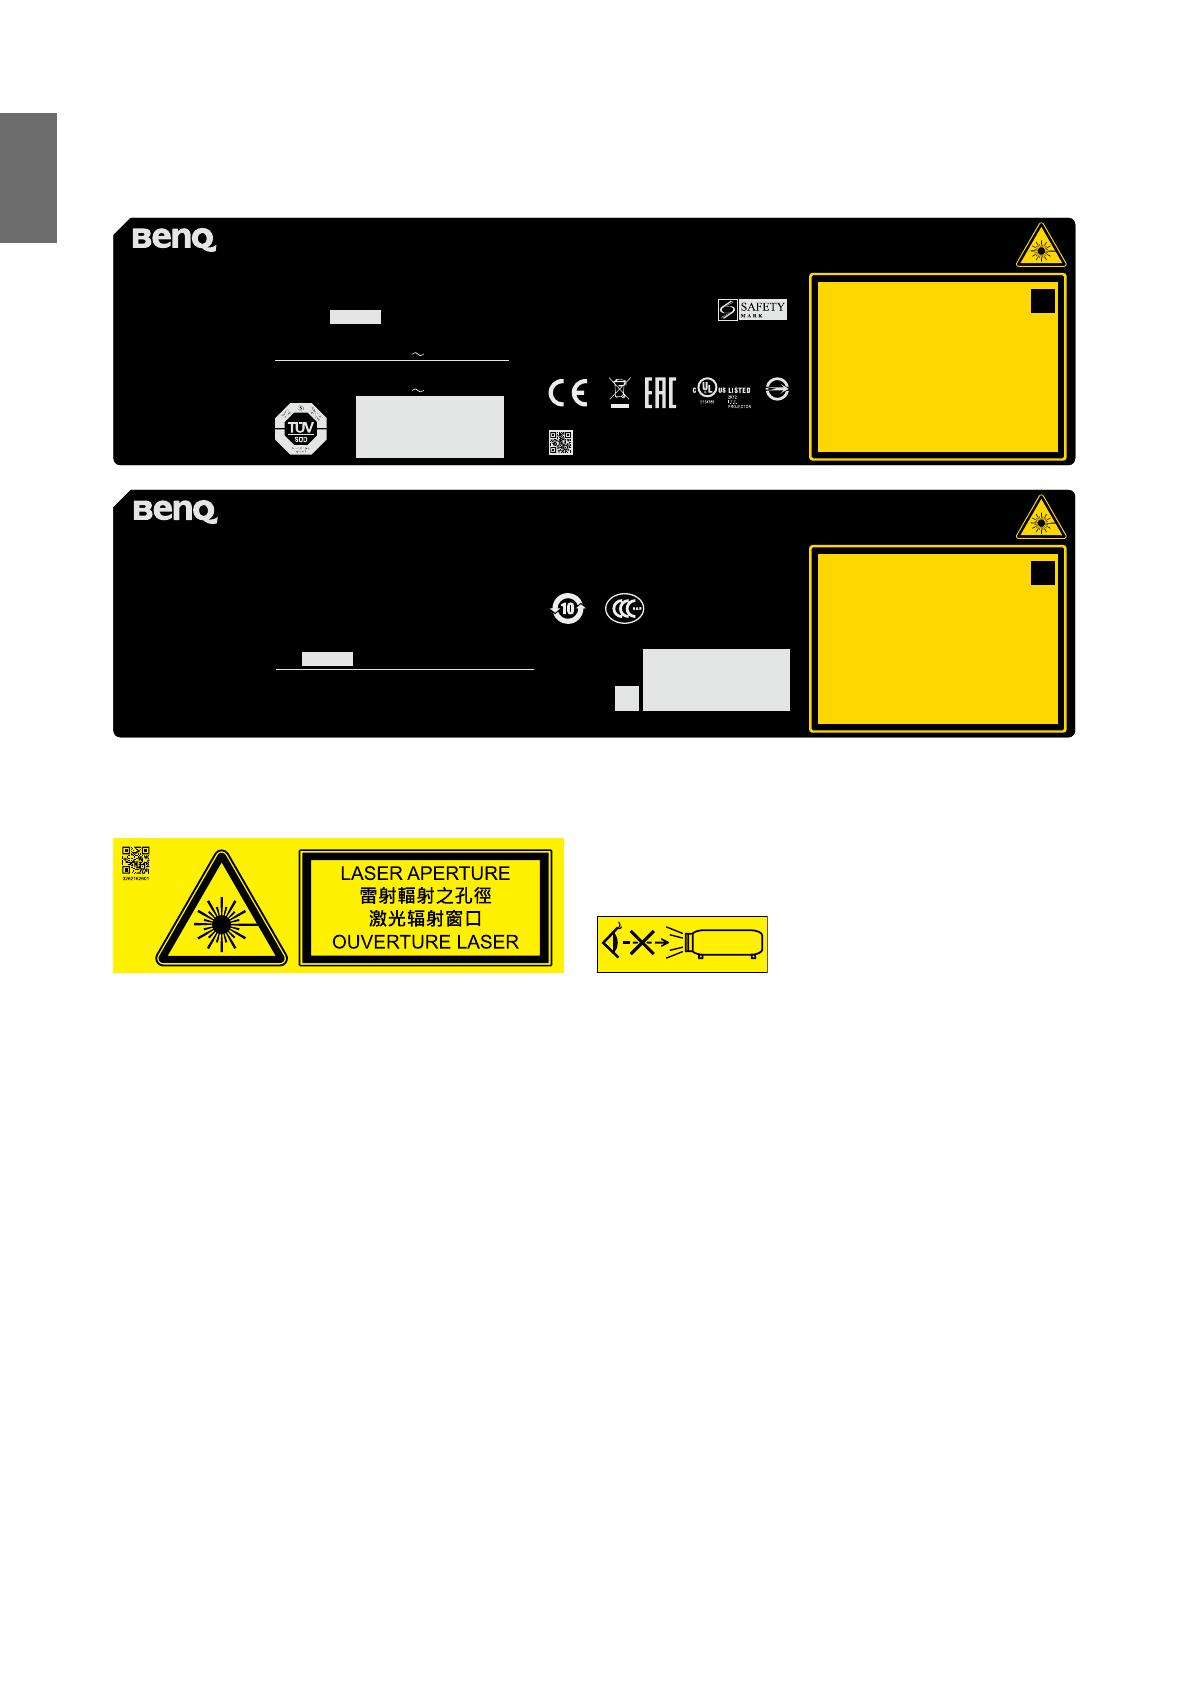
BenQ LU9915 User manual

Category
Data projectors
Type
User manual
LU9915
Digital Projector
User Manual
V1.00
Table of Contents
Important safety guidelines .......................................................... 5
Safety notication ................................................................................................................................. 5
Warning to California residents ......................................................................................................... 5
Notication (Canada) ............................................................................................................................ 5
CE notication ........................................................................................................................................ 5
FCC notication ..................................................................................................................................... 6
Light module............................................................................................................................................ 6
Laser safety notication and caution ................................................................................................. 6
Interlock switches protection ............................................................................................................. 7
Laser parameters ................................................................................................................................... 7
Product label ........................................................................................................................................... 8
Hazard warning symbol and aperture label ...................................................................................... 8
Warning .................................................................................................................................................... 9
Important safety instructions ....................................................... 10
Overview ......................................................................................... 13
Shipping contents .......................................................................................................... 13
Projector exterior view ................................................................................................. 14
Front and upper side view ................................................................................................................... 14
Rear and upper side view ..................................................................................................................... 14
IO panel........................................................................................................................... 15
Control panel and functions .......................................................................................... 16
Notes on remote controller operation ............................................................................................ 18
Remote control operation ................................................................................................................... 18
Install remote controller battery ........................................................................................................ 18
Connecting to the projector ............................................................................................................... 19
Installation ...................................................................................... 21
Projection lens selection and Installation .................................................................... 21
Installing the new lens ........................................................................................................................... 21
Removing the existing lens from the projector .............................................................................. 22
Choosing a location ....................................................................................................... 23
Projection distance and screen size ............................................................................. 24
Lens shift adjustable range ............................................................................................ 26
Making connections ....................................................................................................... 27
Preparations ............................................................................................................................................ 27
Connect to PC ....................................................................................................................................... 27
Connect to video equipment .............................................................................................................. 28
Connect to control port ...................................................................................................................... 28
Connect to screen trigger ................................................................................................................... 29
Connect to external digital transmitter ............................................................................................ 30
Operations ...................................................................................... 31
Preparations ................................................................................................................... 31
Turning the projector on or off..................................................................................... 32
Selecting an input source .............................................................................................. 33
Using the menus ............................................................................................................ 34
Adjusting the image position ............................................................................................................... 34
Fine-tuning the image size and clarity ......................................................................... 35
Adjusting the projection angle ..................................................................................... 35
Correcting picture distortion ....................................................................................... 36
Auto-adjusting the image ...................................................................................................................... 36
Turning off the projector ............................................................................................... 37
Using On-Screen Display ............................................................... 38
Using the Menus ..................................................................................................................................... 38
Navigating the OSD ............................................................................................................................... 38
On-Screen Display (OSD) menus ................................................................................. 39
OSD menu - Picture ...................................................................... 46
OSD menu - Display ...................................................................................................... 47
OSD menu - Setup ......................................................................................................... 51
OSD menu - Advanced .................................................................................................. 55
OSD menu - System ...................................................................................................... 57
OSD menu - Information .............................................................................................. 59
Additional information .................................................................. 60
Cleaning the lens ............................................................................................................ 60
Care of the projector ..................................................................................................... 60
Cleaning the projector case ................................................................................................................. 60
Storing the projector ............................................................................................................................ 60
Specications .................................................................................................................. 61
Dimension ....................................................................................................................... 63
Timing chart ................................................................................................................... 64
3D supported timing ..................................................................................................... 65
RS232 command control ............................................................................................... 66
Control the projector through network ...................................................................... 78
Set up the projector for networking ................................................................................................. 78
Control the projector through web browser ................................................................................. 79
Projector status ...................................................................................................................................... 79
Projector control ................................................................................................................................... 80
Crestron RoomView ............................................................................................................................. 80
Network setup ....................................................................................................................................... 82
Alert mail setup ...................................................................................................................................... 83
Troubleshooting ............................................................................................................. 84
Indicator messages ................................................................................................................................. 84
Common problems and solutions ...................................................................................................... 85
Tips for troubleshooting ....................................................................................................................... 85
Image problems ...................................................................................................................................... 85
Remote control problems .................................................................................................................... 86
BenQ ecoFACTS .................................................................................................................................... 87
Copyright ................................................................................................................................................. 88
Disclaimer ................................................................................................................................................ 88
Patents ...................................................................................................................................................... 88
Statement regarding hyperlinks and third-party websites ............................................................ 88
About the BenQ Support .............................................................................................. 89
10/ 20/ 17
English
5
Important safety guidelines
Thank you for purchasing the high quality product! Read the Manual carefully to obtain the best
performance. The Manual provides instructions to use the menu and implement operation.
Safety notication
CAUTION
To turn off main power, ensure to unplug from power outlet.
CAUTION
To prevent electric shock, do not open the cabinet. There are high-voltage components
inside. Refer service to qualied service personnel.
CAUTION
The symbol warns the user about electric shock caused by voltage not insulated.
Therefore, it is dangerous to make any kind of contact with any parts of inside units.
WARNING!
This symbol alerts the user that important information which should be read carefully
to avoid problems concerning the operation and maintenance.
WARNING!
To prevent the projector from electrical discharge or electric shock, do not expose
the projector to rain or moist environment. Do not use the plug with an extension
cord or an outlet unless all the prongs can be fully inserted.
Warning to California residents
Handling the cables supplied with this equipment might expose user to a little lead, a chemical
known to the Stage of California, resulting in risks of barrenness. Please remember to wash hands
after handling.
Notication (Canada)
This class A digital equipment complies with Canadian CAN ICES-3 (A).
CE notication
This is a class A product. In a domestic environment this product may cause radio interference in
which case the user may be required to take adequate measures.
English
6
FCC notication
This equipment has been tested and found to comply with the limits for a Class A digital device, pursuant to Part 15
of the FCC Rules. These limits are designed to provide reasonable protection against harmful interference when the
equipment is operated in a commercial environment. This equipment generates, uses, and can radiate radio frequency
energy, and if it is not installed and used in accordance with the instruction manual, it may cause harmful interference
to radio communications. Operation of this equipment in a residential area is likely to cause harmful interference, in
which case the user will be required to correct the interference at his own expense.
Operation is subject to the following two conditions:
1) this device may not cause interference and
2) this device must accept any interference received, including interference that may cause undesired operation of the
device
FCC Caution: Any changes or modications not expressly approved by the party responsible for compliance could void
the user’s authority to operate this equipment.
WARNING!
Changes or modications without approval from BenQ could void the users
authorization to operate the product.
Light module
A light module containing multiple laser diodes acts as the light source in the product.
These laser diodes are sealed in the light module. It is recommended to ask dealer for
maintenance or repair services of the light module.
End user is not allowed to replace the light module.
Contact distributor who provides the qualied service for light module replacement and further
information.
Laser safety notication and caution
CLASS 3R LASER PRODUCT
This Laser Product is designated as Class 3R during all procedures of operation.
LASER LIGHT - AVOID DIRECT EYE EXPOSURE.
Do not point laser or allow reected laser light toward other people or reective objects.
Direct or scattered light can be hazardous to eyes and skin.
There is a potential hazard of eye exposure to laser radiation if the included instructions are not
followed.
Caution use of controls, adjustments or performance of procedures other than those specied
herein may result in hazardous radiation exposure.
English
7
Interlock switches protection
SWITCH A:Will be activated when the
top cover is removed. The projector is
then being powered off.
SWITCH B(x2):Will be activated when the projection
lens is removed. The projector is then being powered off.
Laser parameters
Wavelength :450nm - 460nm
Mode of operation: Pulsed, due to frame rate
Pulse width: 0.5ms
Maximum laser energy: 0.253mJ
Total internal power: >100W
Apparent source size: >10mm, at lens stop
Divergence: >100 mili Radian
English
8
Product label
Manufacturer’s ID Label, Explanatory Label and Certication Statement Label.
Complies with FDA performance standards for laser
products except for deviations pursuant to Laser
Notice No. 50, dated June 24, 2007
XXXXXXXXXX
LASER RADIATION
AVOID DIRECT EYE EXPOSURE
CLASS 3R LASER PRODUCT
Emitted wavelength : 450-460 nm
Max. Pulse energy: 0.253 mJ, Pulse duration: 0.5 ms
CLASS 1 LASER PRODUCT
IEC/EN 60825-1:2014 PRODUIT LASER DE CLASSE 1
IEC/EN 60825-1:2014
斵⫂巹⫂弽󰜌䖲㉣㕲旰㑺䗺䘙䨇䯘5斵⫂䏠⍿
㮠搵: 450-460 nm
㖾⟥俆圛侻悍: 0.253 mJ俆圛㔀摑: 0.5 ms
RAYONNEMENT LASER
EXPOSITION DIRECTE DANGEREUSE POUR LES YEUX
APPAREIL À LASER DE CLASSE 3R
longueur d'onde : 450-460nm
maximum énergie de impulsion : 0.253 mJ,
durée de impulsion : 0.5 ms
GB 7247.1-2012 / IEC/EN 60825-1:2007
㹾 幎⫂弽󰜌䗺䘙⊕⃮䖲㉣䀥⫂3R䬹㹾 ᵥ⍿
㮠搽 : 450-460 nm
㖾⟥俇⁰侻悍: 0.253 mJ俇⁰㒴: 0.5 ms
BenQ Corporation
16 Jihu Road,Neihu,
Ta ipei 114, Ta iwan (Тайвань)
⦻壤⎱怙⏊┭㗵⟡曢态
⏗⋾ⷩ114ⅎ㸽⌧⟡㸽巖!
16
(For EU) IMPORTER:
BENQ Europe B.V.
Meerenakkerweg 1-17,
5652 AR, Eindhoven,
the Netherlands
Laite on liitettävä suojakoskettimilla varustettuun pistorasiaan
Apparatet må tilkoples jordet stikkontakt
Apparaten skall anslutas till jordat uttag
Apparatets stikprop skal tilsluttes en stikkontakt med jord,
som giver forbindelse til stikproppens jord
CAN ICES-3(A) /NMB-3(A)
孍␱ὦ䔏俬Ɲ
㭋䂡䔙桅岮姱㉧堺娔₀Ə㖣Ⱜἶ䒗⡪Ḕὦ䔏㘩Ə⏖僤㛪怇ㇷ⯫栢
㓥⊼Ə✏㭋䨕ガ㲨ᷲƏὦ䔏俬㛪墒奨㰩㎈⎽㞷Ẃ恐䕝䙫⯴䬽˛
R41086
RoHS
Made in China / Buatan China / Сделано в Китае /
壤怇䔉✗Ḕ⛲3264645601 WJ XXXX
Product Name / Nama Produk / Nom du produit /
Наименование товара / ⒨⏴ :
Digital Projector / Proyektor / Projecteur digital /
Цифровые проекторы / 㕟ἴ㉼⽘㩆
Model Name / Nama Model / Nom du modèle /
Модель / ❲噆 : LU9915
P/N / 䔉⒨㖀噆!: 9H.JHG77.26E
Rev. / ހҁ!;
Power Rating / Nilai Daya / Puissance nominale /
Диапазон питающего напряжения /
栴⮁曢⢺栢䍮曢㴨!: 100-130 V , 50/60Hz, 13.40A
Power Rating / Nilai Daya / Puissance nominale /
Диапазон питающего напряжения /
栴⮁曢⢺栢䍮曢㴨!: 200-240 V , 50/60Hz, 6.20A
X X X X X X - X X
Complies with FDA performance standards for laser
products except for deviations pursuant to Laser
Notice No. 50, dated June 24, 2007
XXXXXXXXXX
LASER RADIATION
AVOID DIRECT EYE EXPOSURE
CLASS 3R LASER PRODUCT
Emitted wavelength : 450-460 nm
Max. Pulse energy: 0.253 mJ, Pulse duration: 0.5 ms
CLASS 1 LASER PRODUCT
IEC/EN 60825-1:2014 PRODUIT LASER DE CLASSE 1
IEC/EN 60825-1:2014
斵⫂巹⫂弽󰜌䖲㉣㕲旰㑺䗺䘙䨇䯘5斵⫂䏠
㮠搵: 450-460 nm
㖾⟥俆圛侻悍: 0.253 mJ俆圛㔀: 0.5 ms
RAYONNEMENT LASER
EXPOSITION DIRECTE DANGEREUSE POUR LES YEUX
APPAREIL À LASER DE CLASSE 3R
longueur d'onde : 450-460nm
maximum énergie de impulsion : 0.253 mJ,
durée de impulsion : 0.5 ms
GB 7247.1-2012 / IEC/EN 60825-1:2007
㹾 幎⫂弽󰜌䗺䘙⊕⃮䖲㉣䀥⫂3R䬹㹾 ᵥ⍿
㮠搽 : 450-460 nm
㖾⟥俇⁰侻悍: 0.253 mJ俇⁰㒴: 0.5 ms
XXXXXXXXXX WJ XXXX
ֺ垹͹LU9915
սդ͹㦧䬤܎ڧ㷬
ѣ㴂㶩䆯垹͹Q31/0105000031C003
䟗սމ垹͹9H.JHG77.26C
娸ଭ䟗֪͹Иⴚ
娸ଭ֌͹ޢׂ朅ପ߄ஒҸ՛
֪֭͹Їࢁ١斴ㅳ⧘䄉ੜ૨207D1
߆⥽䒠俠͹ͧ0512ͨ68073600
࣍ߎ
框ؔ朅⺷栴ࣤ朅ࡶ͹100-130V ~, 50/60Hz, 9.50A
框ؔ朅⺷栴ࣤ朅ࡶ͹200-240V ~, 50/60Hz, 4.50A
㆙࿌:
࠴䎹A伥䟗սͫ֨ࣿࡴ䝬׋Иͫ实䟗սՕਈ㫵ଭۨ
䐘俠朅ٴ㤿澞֨悤䱷ە䀖ЈͫՕਈ஬੽ऀ㛼ㆎٴ㤿
㠉ՈӤㅲՕ੧ङݒޑ澞
Hazard warning symbol and aperture label
RG2
English
9
Warning
Please make sure the Voltage Switch is selected at the right voltage in the region where projector is
being used.
Note
Default seting is 230V.
English
10
Important safety instructions
Thank you for your purchase of this quality BenQ projector. For the best results, please read
through this manual carefully as it is your guide through the control menus and operation.
1. Please read this user manual before you
operate your projector. Keep this manual in
a safe place for future reference.
Read
Manual
2. Always place the projector on a level,
horizontal surface during operation.
- Do not place the projector on an unstable
cart, stand, or table as it may fall and be
damaged.
- Do not place inammables near the
projector.
- Do not use if tilted at an angle of more
than 10 degrees left to right, nor at angle
of more than 15 degrees front to back.
3. Do not store the projector on end vertically.
Doing so may cause the projector to fall
over, causing injury or resulting in damage.
4. Do not place the projector in any of the
following environments:
- space that is poorly ventilated or conned.
At least 50 cm clearance from walls and
free ow of air around the projector is
recommended.
- locations where temperatures may become
excessively high, such as the inside of a car
with all windows closed.
- locations where excessive humidity, dust, or
cigarette smoke may contaminate optical
components, shorten the projector’s
lifespan and darken the screen.
- locations near re alarms.
- locations with an ambient temperature
above 35°C/95°F.
- locations where altitude is higher than
1500 meters/4920 feet above sea level.
4920-
9840
feet
English
11
5. Do not block the vents holes while the
projector is on (even in standby mode):
- Do not cover the projector with any item.
- Do not place the projector on a blanket,
bedding or any other soft surface.
6. In areas where the mains power supply
voltage may uctuate by ±10 volts, it is
recommended that you connect your
projector through a power stabilizer, surge
protector or uninterruptible power supply
(UPS) as appropriate to your situation.
UPS
7. Do not step on the projector or place any
objects upon it.
8. Do not place liquids near or on the
projector Liquids spilled into the projector
will void your warranty. If the projector does
become wet, disconnect it from the power
point and call BenQ to have the projector
repaired.
9. Do not look straight to the projector lens
during operation. It may harm your sight.
10. This projector is capable of displaying
inverted images for ceiling mount installation.
Use only BenQ's Ceiling Mount Kit for
mounting.
English
12
11. When you think service or repair is
required, take the projector only to a
suitably qualied technician.
12. Do not attempt to disassemble this
projector. There are dangerous high voltages
inside which may cause death if you should
come into contact with live parts. Under
no circumstances should you ever undo or
remove any other covers. Refer servicing
only to suitably qualied professional service
personnel.
Please keep the original packing for possible future
shipment.
English
13
Overview
Shipping contents
Carefully unpack and verify that you have the items below. Some of the items may not be available
depending on your region of purchase. Please check with your place of purchase.
Some of the accessories may vary from region to region.
The warranty card is only supplied in some specic regions. Please consult your dealer for detailed information.
Projector
without lens Installation guide
Anti-Theft screw Lens hole cap
Power cable
VGA cable Wired remote cable
MENU
EXIT
ENTER
1
4
7
0
89
6
3
5
2
Remote
Without AA batteries
English
14
Projector exterior view
Front and upper side view
1
7
6
8
345
2
1. Foot for adjusting projector level
2. IO panel
3. Control panel
4. Slide switch (voltage selection)
5. AC power switch
6. Front IR sensor
7. Lens release button
8. Air intake
Rear and upper side view
10
11
9
9. Air intake
10. Air exhaust
11. Rear IR sensor
English
15
IO panel
3D SYNC OUT
3D SYNC IN
MONITOR OUTCOMPUTER 1
COMPUTER 2
RS-232TRIGGER
WIRED
REMOTE HDBaseT/LAN DVI-D DISPLAYPORT IN OUT HDMI
R/PrG/YB/PbHV
3G-SDI
TRIGGER
HDBaseT/LAN
For connection to RJ45 Cat5/Cat6 Ethernet cable to input uncompressed high-denition video
(HD), control signals.
3D Sync Out
Connection to 3D IR sync signal transmitter.
3D Sync In
Connection to 3D sync signal input.
DVI-D
Connection to DVI-D source.
HDMI
Connection to HDMI source.
DisplayPort
Connection to device or PC featuring DisplayPort.
3G-SDI
Connection to 3G-SDI source.
Computer 1
15-pin VGA port for connection to RGB, component HD source, or PC.
Computer 2 (V, H, B/Pb, G/Y, R/Pr)
Connection to RGB or YPbPr/YCbCr output signal with BNC type input terminal.
Monitor Out
Connection to other display equipment for concurrent playback display.
RS-232
Standard 9-pin D-sub interface for connection to PC control system and projector maintenance.
TRIGGER
3.5mm mini earphone jack, employs 350mA display relay to provide 12(+/-1.5)V output and
short circuit protection.
Wired Remote
Connection to input Niles or Xantech compatible IR repeater system.
Caution
Make sure the port is valid before inserting a wired remote controller. The remote controller may be damaged in
case of an invalid port, e.g. a wired remote controller is connected to trigger output.
English
16
Control panel and functions
POWER
Press to power on/off your projector.
INPUT
Press to select video sources including HDMI, DVI-D, Computer 1, Computer 2, DisplayPort and
HDBaseT.
AUTO SYNC
Press to execute auto signal sync.
ASPECT
Press to switch aspect ratio of current image.
MENU
Press to display OSD menu or return to the upper menu level.
ENTER
Press to select, accept or change settings.
EXIT
Press to exit OSD menu.
CENTER LENS
Press to center the lens and reset its shift, focus and zoom parameters.
Note
The lens memory requires precise lens parameter adjustments. Please re-run the Center Lens function once you install
the lens.
BLANK
Press the button to temporarily interrupt the projection.
LENS SHIFT
Press to move lens up, down, left and right.
FOCUS
Press to adjust focus of projection image.
ZOOM
Press to zoom in and out on projection image. Remote control and functions.
English
17
MENU
EXIT
ENTER
1
4
7
0
89
6
3
5
2
ON
Press to power on projector.
OFF
Press to power off projector.
FOCUS +/-
Press to adjust focus of projection image.
ZOOM +/-
Press to zoom in and out on projection image.
TEST PATTERN
Press to display embedded test pattern. Press continuously
to scroll through available ones. Press MENU key to exit to
projection image.
LENS SHIFT
Press to move lens up, down, left and right.
ENTER
Press to select or accept settings.
MENU
Press to display OSD menu or return to the upper menu
level.
EXIT
Press to exit OSD menu.
AUTO PC
Press to execute auto signal sync.
BLANK
Press the button to temporarily interrupt the projection.
STATUS
Show OSD MENU – Information.
COMPUTER 1
Select COMPUTER 1 input source.
COMPUTER 2
Select COMPUTER 2 input source.
ASPECT
Press continuously to scroll through individual aspect ratio.
HDMI 1
Select HDMI 1 input source.
HDMI 2
Function same as HDMI 1.
DVI
Select DVI input source.
3G-SDI
Select 3G-SDI input source.
DisplayPort
Select DisplayPort input source.
HDBaseT
Select HDBaseT input source.
CLEAR
Not available with this model.
FREEZE
Press to toggle switch between freeze and unfreeze.
ID SET:
Press to set the remote control ID. See "Remote control ID
setting" on page 19 for details.
English
18
Notes on remote controller operation
Some environment factor may hamper the operation of remote controller. If so, point remote
controller at the projector and repeat the operation again.
In case the effective range of the remote controller is shortened or the remote controller stops
functioning, please replace the battery with a new one.
IR signal may be interrupted and rendered useless when the remote controller is exposed to
bright sunlight or fluorescent light. Make sure the installation environment is proper for IR
remote controller.
Remote control operation
Make sure that there is nothing positioned between the remote control and the infrared (IR)
sensors on the projector that might obstruct the IR beam from the remote control reaching the
projector.
The effective range of the remote control is up to 7 meters, and at an angle within 30 degrees
of the IR beam. Always aim straight at the projector, however most screens will also reect the
IR beam to the projector.
Caution:
DO NOT expose your remote controller to high temperatures or moisture or it may function abnormally.
Install remote controller battery
1. To open the battery cover, turn the remote control over to view its back, push on the nger
grip on the cover and slide it up in the direction of the arrow as illustrated. The cover will slide
off.
2. Remove any existing batteries (if necessary) and install two new AA batteries observing the
battery polarities as indicated in the base of the battery compartment. Positive (+) goes to
positive and negative (-) goes to negative.
English
19
3. Ret the cover by aligning it with the case and sliding it back up into position. Stop when it clicks
into place.
1 2 3
Precautions relating to batteries
Do not mix old batteries with new ones, or mix different types of batteries.
Avoid leaving the remote control and batteries in an excessive hot or humid environment like the kitchen,
bathroom, sauna, sunroom, or a closed car.
Dispose of used batteries according to the battery manufacturer’s instructions and local environment regulations
for your region.
If the remote control will not be used for an extended period of time, remove the batteries to avoid damage to
the control from possible battery leakage.
Connecting to the projector
Wired remote control
If the path between the remote control and the projector is obstructed or remote control
operation is disrupted by certain high-frequency fluorescent lights, you can connect to the
projector with M3 stereo mini jack cable to operate the projector.
3D SYNC OUT
3D SYNC IN
MONITOR OUTCOMPUTER 1
COMPUTER 2
RS-232TRIGGER
WIRED
REMOTE HDBaseT/LAN DVI-DDISPLAYPORT IN OUT HDMI
R/PrG/YB/PbHV 3G-SDI
TRIGGER
Note:
The projector enters wired control mode automatically and cannot be controlled by the remote controller’s IR
signal, once the cable terminal of a remote controller is inserted in the projector’s wired control port. To control the
projector with the IR signal of the remote controller again, remove the wire control terminal from the projector.
Remote control ID setting
You can set the remote control ID to control the specic projector.
Please set projector ID (from 01 to 99) by using the OSD menus. After setup different ID, the
remote control will only control the matched projector .
Press ID SET + MENU keys together for 5 seconds, the remote control backlight will ash one
English
20
time, then into the ID Set mode.
Again click ID SET + MENU keys for 5 seconds (backlight will ash 1 time) to release ID SET
Mode.
After into the ID Set Mode, press ID SET key for 3 seconds.
The remote control LED light will ash and backlight will light. In the meantime, press number to
set the remote control ID.
For example, for setting remote control ID to “01”, please press 0 key for 1 second (LED light
will ash 3 times then back light off), then press 1 key for 1 second (LED light ash 3 times then
backlight off).
For setting remote control ID to “19”, please press 1 key for 1 second, then press 9 key for 1
second.
  • Page 1 1
  • Page 2 2
  • Page 3 3
  • Page 4 4
  • Page 5 5
  • Page 6 6
  • Page 7 7
  • Page 8 8
  • Page 9 9
  • Page 10 10
  • Page 11 11
  • Page 12 12
  • Page 13 13
  • Page 14 14
  • Page 15 15
  • Page 16 16
  • Page 17 17
  • Page 18 18
  • Page 19 19
  • Page 20 20
  • Page 21 21
  • Page 22 22
  • Page 23 23
  • Page 24 24
  • Page 25 25
  • Page 26 26
  • Page 27 27
  • Page 28 28
  • Page 29 29
  • Page 30 30
  • Page 31 31
  • Page 32 32
  • Page 33 33
  • Page 34 34
  • Page 35 35
  • Page 36 36
  • Page 37 37
  • Page 38 38
  • Page 39 39
  • Page 40 40
  • Page 41 41
  • Page 42 42
  • Page 43 43
  • Page 44 44
  • Page 45 45
  • Page 46 46
  • Page 47 47
  • Page 48 48
  • Page 49 49
  • Page 50 50
  • Page 51 51
  • Page 52 52
  • Page 53 53
  • Page 54 54
  • Page 55 55
  • Page 56 56
  • Page 57 57
  • Page 58 58
  • Page 59 59
  • Page 60 60
  • Page 61 61
  • Page 62 62
  • Page 63 63
  • Page 64 64
  • Page 65 65
  • Page 66 66
  • Page 67 67
  • Page 68 68
  • Page 69 69
  • Page 70 70
  • Page 71 71
  • Page 72 72
  • Page 73 73
  • Page 74 74
  • Page 75 75
  • Page 76 76
  • Page 77 77
  • Page 78 78
  • Page 79 79
  • Page 80 80
  • Page 81 81
  • Page 82 82
  • Page 83 83
  • Page 84 84
  • Page 85 85
  • Page 86 86
  • Page 87 87
  • Page 88 88
  • Page 89 89

BenQ LU9915 User manual

Category
Data projectors
Type
User manual

Ask a question and I''ll find the answer in the document

Finding information in a document is now easier with AI