Page is loading ...

Revised 23 Dec 05
Revised 23 Dec 05
1. Raise and support the front axle
so that the front tires are off of
the ground. Remove wheels.
2. Measure the tie rod from center
of mounting point to center of
mounting point on each knuckle.
Write this measurement down, you
will use this to help approximate
the new toe-in on reassembly.
3. Remove steering components from
the vehicle; tie rod and drag link.
Take every precaution to make this installation a safe procedure. Make safety
the number one priority with any suspension or lift installation. This kit was
designed for the Dana 30 front axle, models 1992 and newer; and the
2003 + Rubicon front 44.
NOTICE: This is NOT an all-inclusive kit. Prior to installation please have pre-
pared solutions to possible modications not included in the TeraFlex High Steer
System. These modications may include but are not limited to the front sway
bar links/mounting points and the front track bar mount. Included at the end of
these instructions are possible solutions to these issues.
NOTE: The High Steer Kit (HSK) was designed to work with a 1992 and newer
brake caliper mounting design so on older Dana 30 axles (84-91) it will be
necessary to update the caliper, the rotor and possibly the unibearing to the
later design. Factory offset wheels will not clear the HSK arm without using
wheel spacers. A better choice is aftermarket wheels with 3.5 inches or less of
backspacing.
HSK-LCG includes a drop pitman arm.
Installation Guide for the
High Steer System Kit
Part #001813000 (HSK)
Part #001849000 (HSK-LCG)
Tera Manufacturing, Inc.
5251 South Commerce Dr.
Murray, Utah 84107
Phone/801.288.2585
Fax/801.713.2313
www.teraex.biz
INSTALLATION GUIDE
Before Installing the Kit:

Revised 23 Dec 05
Revised 23 Dec 05
sway bar mount.
5. After 500 miles check all bolts
and re torque if necessary.
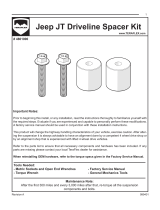
FRONT TRACKBAR MODIFICATIONS:
Using the HSK on a vehicle that still
runs a track bar brings up some issues
that must be resolved:
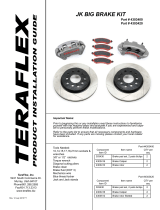
A drop pitman arm is no longer
needed. Moving the knuckle end of
the drag link up higher with the HSK
eliminates the need to drop down the
steering box end of the drag link. Us-
ing a drop pitman arm in this congu-
ration will result in bump steer (Refer
to gure 1).
The shape of the high steering arm
interferes with the factory sway bar
links and link mounts so a new way to
mount the sway bar links on the axles
was developed. These new Sway Bar
Mounts (TeraFlex part number TF990-
SBM L&R) require the use of shorter
sway bar links.
In some cases it might also be neces-
sary to relocate the axle end of the
track bar to minimize the side-to-side
movement of the axle during suspen-
sion cycling.
Guideline 1: If a track bar is used in
the front suspension, the track bar
and drag link must be parallel (Refer
to gure 2).
Guideline 2: With leaf springs or
a triangulated 3 or 4 link front
suspension the tie rod and drag link
must be parallel (Refer to gure 3)
12. Check all bolts and nuts for proper
torque specications, and use
cotter pins where required.
13. Reinstall wheels and lower vehicle
to the ground.
14. After installation of the TeraFlex
High Steer System, the front end
alignment angles must be checked.
Take your Jeep to an alignment
shop that understands 4WD
vehicles and has experience with
their alignment parameters.
NOTE: DO NOT drive the vehicle
until the alignment has been
performed!!
15. After 500 miles check all bolts
and jam nuts, and re torque if
necessary.
Note: Additional Modications that
will be necessary are listed and
detailed next, but are not included
in the HSKT or HSKY.
FRONT SWAY BAR MODIFICATIONS:
The sway bar mounts on the axle
will have to be relocated to clear
the height increase of the drag link.
TeraFlex has developed sway bar
brackets that can accomplish this
modication. (SBM-L, SBM-R). When
the sway bar bracket is relocated a
shorter sway bar link (QD132-4) must
be used.
1. Cut off the stock sway bar mount
at the point where it attaches to
the spring pad bracket.
2. Grind the area smooth to avoid
cutting yourself on the sharp edge,
and paint to prevent rusting.
3. Place the new sway bar mount on
the inner knuckle so that it is
vertical (see last photo), and tack
weld it in place. Double check to
make sure that the mount is in the
right location and then nal weld.
4. Secure the sway bar links to the
PASSENGER SIDE DISASSEMBLY:
Note: For additional detail on these
procedures, refer to the factory Jeep
Service Manual.
4. Remove the 2 brake caliper bolts,
then the caliper and brake rotor.
5. Remove the 3 wheel bearing
bolts, and pull the unibearing/axle
shaft assembly from the vehicle.
Note: If the axle housing starts to
leak, stuff a rag inside the tube to
prevent axle uid from leaking.
6. Remove the top and bottom
ball joint nuts on the knuckle,
and remove the knuckle from the
vehicle.
REASSEMBLY:
7. Reinstall the new TeraFlex High
Steer Knuckle. Torque ball joint
nuts as specied in the Jeep
Service Manual.
8. Install the hub assembly, axle
shaft, and rotor.
9. Install caliper and brake pads.
10. Install the new tie rod and set the
length to the measurement taken
in step 2 above.
11. Install the drag link from knuckle
to pitman arm. Refer to the
attached drawing and be sure to
use a 9/16 at washer under the
castle nut.

Revised 23 Dec 05
Revised 23 Dec 05
High Steer Knuckle
Track Bar Modifications
FIGURE 2.
FIGURE 1.
FIGURE 3.

Revised 23 Dec 05
Revised 23 Dec 05

Revised 23 Dec 05
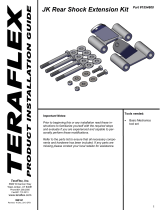
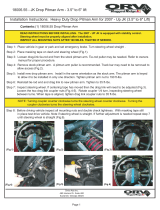
990 Knuckle update 18 April 2005
The 990 High Steer Knuckle from TeraFlex is going through some changes. The original purpose of this
knuckle was to allow a at drag link when installing a TeraFlex LCG suspension system. Since we introduced
the knuckle many of you have found additional applications for this TeraFlex product. The original design
(gure 1) included a much longer steering arm, raised above the stock location. The length of the arm was
intended to allow use of stock locations for the sway bar links. The longer steering arm required the use of a
much longer pitman arm to allow full lock-to-lock steering.
Figure 1
What we found out is virtually all installations require
some modication of the sway bar mounting point,
particularly if a 975 S/T sway bar is installed. In the
latest production run of the 990 knuckle, which will
be shipping starting the rst of April, the steering arm
length has been reduced to allow use of a stock length
pitman arm. When installing the LCG system a regular
TJ drop pitman arm will give the correct drag link angle
(parallel to the tie rod) and when using the High Steer
990 knuckle in tall lifted vehicles a stock pitman arm
will be used (drag link parallel to the track bar).
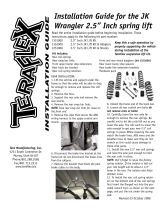
The new 990 knuckle (gure 2) will ship without a
pitman arm. It will include the tapered split sleeves as
in the past to allow placing the drag link end either
in from the top or in from the bottom of the steering
arm, depending on the application. When buying a 990
knuckle be sure to have the correct pitman arm on hand
for your application. TeraFlex will be happy to sell you a
drop pitman arm if needed, and we have a limited supply
of factory pitman arms that we can sell. Remember that a
pitman arm will no longer be automatically supplied with
the knuckle only. Some suspension systems may include a
pitman arm as they have in the past.
HSK-LCG includes a drop pitman arm.
Figure 2
/