Page is loading ...

1
Please read the manual fully before using the appliance and keep the
manual safe for future reference.
Chocolate Fountain

2
Important safeguards Page 3
Appliance components parts Page 4
Before rst use Page 5
Using the correct chocolate Page 5
Using your chocolate fountain Page 6
Enhancing presentaon Page 7
Cleaning Page 7
Troubleshoong Page 8
Electrical informaon Page 9
UK and EU Guarantee Page 9
Disposal of the appliance Page 10
Contact details Page 12
Contents

3
Important safeguards
When using any electrical appliance, basic safety precauons should always be
followed, including:
This appliance can be used by children aged from 8 years and above and
persons with reduced physical, sensory or mental capabilies or lack of
experience and knowledge if they have been given supervision or
instrucon concerning use of the appliance in a safe way and understand
the hazards involved. Children shall not play with the appliance. Cleaning
and user maintenance shall not be made by children unless they are older
than 8 and supervised. Keep the appliance and its cord out of reach of
children less than 8 years.
Always ensure the voltage on the rang label corresponds to the voltage in
your home.
Check the power cord and plug regularly for any damage. If the cord or the
plug is damaged, it must be replaced by a qualied electrician or a service
repair centre. If in doubt please contact our customer service team.
The appliance is intended for domesc use only. Industrial or commercial
use will void the warranty. The supplier cannot be held responsible for
injury or damage if the appliance has been used for anything other than its
intended use.
Incorrect operaon and use can damage the appliance and cause injury to
the user.
Do not use the appliance if it has been dropped or damaged in anyway. If
the unit has been damaged take the unit for examinaon and/ or repair by
an authorised service agent.
Do not immerse or expose the motor assembly, plug or the power cord in
water or any other liquid for any reason.
If the supply cord is damaged, it must be replaced by the manufacturer or
by someone who is suitably qualied to avoid a potenal hazard.
Do not let the cord hang over the edge of a table or counter. Ensure that
the cord is not in a posion where it can be pulled or tripped over
accidentally.
Do not allow the cord to touch hot surfaces and do not place the cord near
hot gas or electric burners or in a heated oven.
Use of an extension cord with this appliance is not recommended. However
if it is necessary to use an extension cord, ensure that the extension cord is
equal to or greater than the power consumpon of the appliance to avoid
overheang of the appliance and extension cord. Do not use any other
appliance on the extension cord. Do not place the extension cord in a

4
posion where it can be pulled on by children or animals or be tripped over.
Always operate the appliance on a smooth, even and stable surface. Do not
place the unit on a hot surface.
Always remove the plug of the appliance safely. Do not pull on the
appliances cord to remove the appliance plug from the electrical socket.
Never handle or operate the appliance with wet hands.
Appliance specic safety instrucons
Do not assemble the auger or tower while the motor is running. Turn the
unit o rst. It is advised to unplug the appliance while assembling pieces.
Never place anything other than the intended ingredients in the base of the
bowl.
Keep hands and foreign objects out of the fountain while it is in operaon.
Check regularly for large chunks of fruit, etc. falling into the base bowl. This
could result in clogging the base of the tower and the chocolate will not ow
properly.
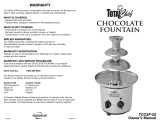
Components appliance parts
Motor Base Tower
Auger

5
Before rst use:
1. Unpack from the box and poly bags.
2. Remove the tower and auger from the base.
3. Using a damp, non-abrasive cloth, wipe the tower, auger and motor base.
4. Stand the motor base on a level surface.
5. Place the auger onto the triangular shaped auger support in the centre of the
motor unit.
6. Place the tower over the auger unl the holes at the base of the tower are
aligned with the supports on the heang basin of the motor base. The tower
should stand sturdy and level.
7. Ensure the feet are adjusted at the base of the motor unl so the Chocolate
Fountain is level.
Using the correct chocolate
Your unit will work with any chocolate. However, the best chocolate to use is pure
Belgian chocolate which is high in cocoa buer which is formulated for chocolate
fountains. This chocolate requires no oil to funcon and is rich and decadent.
You can use a variety of foods, chocolates or sauces with your Chocolate Fountain
to create the avour you desire. An example of food that can be used is:
Milk Chocolate
Dark semi-sweet chocolate
White chocolate
Buerscotch

6
Using your Chocolate Fountain
Now that you have selected your chocolate, follow these instrucons to begin:
1. Place the unit on a stable work surface ensuring it is level. It is important
for the unit to be level to create the desired owing eect.
2. Plug the unit in. Make sure that your unit works by tesng the motor
funcon to see that the auger turns and that the heater works. Once this is
done, turn both o.
3. Melt 680g of chocolate chips or chocolate cut into chunks. Place a bowl
over a pan of boiling water, ensuring the water does not touch the boom
of the bowl. Pour in the chocolate and 3/4 of a cup of oil. Allow the
chocolate to slowly melt unl it is runny and smooth.
Alternavely, melt 680g of chocolate together with 3/4 of a cup of oil in
the microwave in a microwavable bowl. Ensure the power is set to
medium heat as the chocolate may burn if the temperature is too high.
Melt the chocolate unl runny and smooth.
4. Turn the heater knob to the ON posion.
5. Pour melted chocolate into a bowl at the base of the unit. Fill it up to the
rim, turn the motor to the on posion. Watch as the chocolate gets pulled
up and then cascades down the fountains ers.
4. Let the unit ow for 2 minutes. Then turn the motor OFF for 30 seconds to
eliminate any air gaps that could possibly cause the chocolate not to ow
smoothly. Turn the motor back On. If the ow is not smooth, add 1/8 of a
cup of oil to thin the chocolate slightly.
You should now have a nice owing fountain.
Never add hard chips to a fountain while the motor is running, only add
melted, smooth chocolate.
Never add cold liquid to chocolate, as it may cause the ow to stop, only
add warmed uids.
Always check to make sure there are no chunks of food in the base as it
may clog the ow of chocolate.

7
Desired avour Use
Orange chocolate Grand Marnier
Chocolate hazelnut Frangelico
Coee chocolate Kahlua
Mint chocolate Crème de Menthe
Chocolate macaroon Coconut mix
Chocolate liqueur Godiva liqueur
Using a measuring cup, add 1/4 cup of liquor addive (more or less,
depending on your taste).
Note: For best results use 60% cocoa, any higher percentage will require more oil.
Cleaning
1. Before rst use and aer each use, be sure to wash the tower and auger
thoroughly.
2. Make sure the unit is unplugged before cleaning it. Remove the auger and
the tower and soak them in warm, soapy water.
3. Carefully pour out as much remaining chocolate from the base bowl as
possible. Use a damp sponge or cloth to wipe the remainder clean. To clean
the outside of the unit, wipe with a dampened cloth unl clean and dry with
a non-abrasive towel.
Note: Do not immerse the base, as this holds all of the electrical components. Do
not pour excess or leover chocolate down the drain or in the toilet, pour it into
a plasc bag or disposable container before placing it in a dustbin.
Adding avour
You can add certain avours to your chocolate by mixing it with alcohol. Make sure
that prior to mixing, you burn o the alcohol in the liquor by cooling it on the stove.
Bring the alcohol to the boil, which burns o the alcohol but leaves the avour
behind. Next, mix it with your choice of chocolate before adding it to the Chocolate
Fountain.

8
Troubleshoong
Problem Possible Cause/ Remedy
Chocolate is owing but
unevenly
Chocolate is too thick, thin with
vegetable oil.
Unit is not level. Adjust the feet at
the base of the motor unit unl the
Chocolate Fountain is level.
Chocolate is owing unevenly,
but not sheeng
Unit is not level. Level unit so that
chocolate is evenly distributed
around the tower to ensure proper
sheeng. Adjust the feet at the
base of the motor unit unl the
Chocolate Fountain is level.
Flow is intermient,
interrupted, not owing
properly
Check for chunks of food caught in
the bade that may be clogging the
chocolate ow to the base of the
tower, remove any chunks found.
Note: To prolong the life of your Chocolate fountain be sure to follow the cleaning
instrucons aer every use and make sure the tower is ushed, washing the unit to
prevent the chocolate from building up. Never use any abrasive materials on the
base of the unit to maintain the original nish.
Do not add cool or cold liquid, this will stop the ow of the fountain.

9
Electrical informaon
Please note:
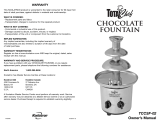
It is extremely important that the wires or cores in the ex are connected to the
correct terminals in the plug. If the colour of the mains lead of the appliance does
not correspond with the coloured markings idenfying the terminals in your plug
proceed as follows:
The Live (Brown) wire
connects to the right-
most live (L) terminal
nearest to the fuse.
The Neutral (Blue) wire
connects to the le-
most neutral (N)
terminal.
The Earth (Green and
Yellow) wire connects
to the central, top most
earthed (E) terminal.
Warning:
If the appliance is double insulated indicated by the double insulated symbol:
it should not have an earth wire or earth connecon.
Plug
The plug must be protected by the correct AMP fuse; this will be indicated on the
case of the plug. Only BSI or ASTA approved fuses should be used. When changing
the fuse always replace it with a fuse that is of the same idencal rang as the
original. If you are unsure about which plug or fuse to use, always refer to a
qualied electrician.
Please note aer replacing the fuse, ensure that the cover is correctly ed back
onto the plug. Never aempt to run the appliance if the plug does not have a cover.

10
If a moulded plug is ed and has to be removed take great care in disposing of the
plug and severed cable, it must be destroyed to prevent it from engaging into a
socket.
If the supply cord is damaged it must be replaced by a service agent or a similarly
qualied person in order to avoid a hazard.
All of our electrical appliances conform to pre-exisng EC Direcves 2006/95/EC
(Low Voltage Direcve) and 2004/108/EC (EMC Direcves).
For further informaon please visit hp://www.esc.org.uk/industry/product-
safety/product-tesng-screening/kitchen-appliances/
UK and EU Guarantee
Your new Andrew James product comes with a 24 month guarantee and a 2 year
xed warranty, eecve from receipt conrmaon. Your receipt or order number is
required as proof of purchase date so it is imperave that you keep it safe. This
guarantee only applies if the item has been used solely for the use intended, and all
instrucons have been followed accordingly. Please note this product is only for
domesc use only and is not for commercial use.
Abuse of your product will invalidate the guarantee. Returned goods can only be
accepted if repackaged properly within the original colour product box, and
presented with the original receipt of sale/order number. This does not aect your
statutory rights.
Returned products must be cleaned and returned to us in as close to delivery
condion as possible.
If your product develops a problem within the rst 12 months of the xed warranty,
we will pay all shipping costs to have it returned to us. Aer 12 months the
customer will be liable for the cost of returning the product to us. We will then pay
to have the repaired/replaced item shipped back to the customer.
If you wish to return your item for a full refund, you have the right to do so within
the rst 7 days. For our returns policy please go to
www.andrewjamesworldwide.com
Customers are responsible for any taxes applied to our products when they are
shipped outside of the EU.

11
All of our prices are inclusive of VAT.
Once a product has been returned to us, we will aim to repair or replace it within 30
days of receipt.
The guarantee does not cover any defect arising from improper use, damage, build-
up of lime scale or repair aempts made by third-pares. Also, the guarantee does
not cover normal wear and tear of individual parts.
Disposal of the appliance
Please note that this Andrew James product is marked with this
symbol:
This means that this product must not be disposed of together with
ordinary household waste, as electrical and electronic waste must be
disposed of separately.
In accordance with the WEEE direcve, every member state must ensure correct
collecon, recovery, handling and recycling of electrical and electronic waste.
Private households in the EU can take used equipment to special recycling staons
free of charge. In certain member states used apparatus can be returned to the
dealer where they were bought on the condion you buy new products. Contact
your retailer, distributor or the municipal authories for further informaon on
what you should do with electrical and electronic waste.

12
Andrew James UK LTD
Unit 1
P C Henderson Premises
Bowburn North Industrial Estate
Bowburn
Co Durham
DH6 5NG
Customer Service / Technical Support- Telephone 0844 335 8464
Customer Service/ Technical Support Email:
customerservices@andrewjamesworldwide.com
Website: www.andrewjamesworldwide.com
/