Page is loading ...

Models: 37010-Series
Conversion Kits
ELECTRIC TOILET BASE KIT
FEATURES
• High Capacity Macerator and Bowl Scavenger Pump
• Flexible Impeller Flush Pump
• Permanent Magnet Type Motor, Fully Enclosed,
with Stainless Steel Shaft
• Complies with USCG 183.410 and ISO 8846
MARINE for Ignition Protection
• Simple Push Button Switch included
• All Corrosion Resistant Materials for Marine Use
SPECIFICATIONS
•5/8" or 3/4" Inlet, 1" Outlet Back Flow Check Valve
in Discharge
•1" x 1-1/2" Hose Adaptor included to adapt to 1-1/2
waste plumbing.
• Thru Flow Approx.1-1/2 Qts. per 5 Seconds of
Operation
VARIATIONS
MODEL NO. DESCRIPTION
37010-0002 Toilet Conversion, 12 Volt DC
37010-0092* Toilet Conversion, 12 Volt EMC
37010-0007 Toilet Conversion, 24 Volt DC
37010-0097* Toilet Conversion, 24 Volt EMC
*This model is Marked and complies with EN50081-1 for
suppression of electro-magnetic interference.
APPLICATION
The Jabsco electric toilet may be installed above or below
the waterline. Flush pump is self-priming with a vertical lift
up to 4 feet; discharge macerator pump can operate
against a vertical head up to 4 feet.
The 37010 series can be used to convert the Raritan PH
or Compact, Wilcox-Crittenden “Head Mate”, Groco HC,
Brydon No. 9127, 9128, or No. 59128 and virtually any
other model marine toilet using the “standard” bowl config-
uration with a 3-3/4" diameter bolt circle, 4 hole pattern in
the base. Check the dimensional drawing to be sure the
bowl will fit the flange dimensions as shown.
The 37010 series includes the complete motorized base
assembly, bowl gasket, four bolts and washers for bowl,
two 5/8" to 3/4" pump port adaptors, 3/4" white hose, 1" to
1-1/2" discharge port adaptor, and momentary control
switch.
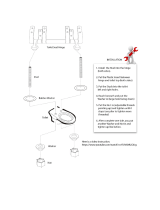
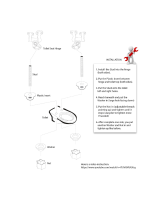
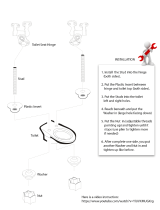
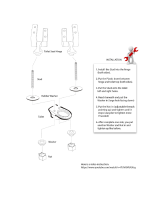
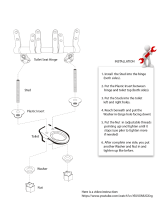
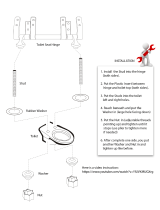
ASSEMBLY
1. Overall height after conversion may increase up to 1"
on some models, check to be sure adequate space is
available if located under seats or bunks.
2. Screw 6mm machine screws with starlock washer
under each head into nuts positioned in the hex recess
on the top of the base to form bowl attachment studs
(see exploded view).
3. Remove complete manual base assembly and mount
bowl on Jabsco motorized base. NOTE: M6 x 50mm
long machine screws supplied are suitable for most
bowls; however some bowl flanges are heavier and
longer machine screws must be used. Place plastic
washers against bowl flange, positioning base for most
convenient hose connection arrangement.
4. Connect pump outlet to rear bowl connection with 3/4"
hose. Install the hose clamp on the pump discharge
port only.
5. Position complete toilet assembly and fasten securely
on flat surface. Be sure not to warp toilet base when
tightening toilet base down.
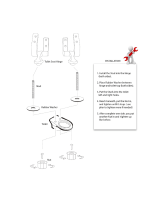
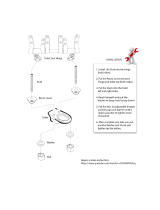
6. Connect existing inlet hose to pump inlet port. A 5/8"
to 3/4" sleeve adaptor is included for fitting to com-
monly used 3/4" inlet hose size. Make sure all con-
nections are airtight and free of sharp bends or restric-
tions.
7. Connect 1" discharge hose to discharge port (1-1/2"
hose when using 1-1/2" discharge adaptor) and make
suitable connection to holding tank or other discharge
system. Avoid sharp bends or restrictions.
8. For installation below the waterline, install a vented
loop in the intake hose and position about 8"above the
waterline at all angles of heel or trim. **A vented loop
should also be used for discharge if connected to a
Models: 37010-Series

thru-hull fitting.
9. For installations above water line, make a loop in dis-
charge line about 8 inches above base of bowl to
retain water in bowl. Some installations may need a
check valve in the intake line to aid primeability of flush
water pump.
10. If thru-hull seacocks cannot be conveniently operated
from toilet location, install suitable shut-off valves for
inlet and discharge connections.
** In some installations when a vented loop is installed in the
intake hose, the flushing pump primeability and flow charac-
teristics are reduced and may adversely affect toilet function.
To restore pump performance, connect a solenoid valve
(Jabsco No. 37068-0000) to the vent air inlet to interrupt the
air supply during the flush cycle.The brass port of the sole-
noid valve (remove plastic filter if attached) should be con-
nected to the vent inlet with 3/16" hose and the solenoid
wired in parallel with the toilet motor. See Diagram 1 for
installation and wiring illustration.
INSTALLATION INSTRUCTIONS
PLUMBING CONNECTIONS: Connect inlet hose using
either 5/8" or 3/4" ID hose (a sleeve is included to adapt
pump inlet from 5/8" to 3/4"). Make sure all inlet connec-
tions are airtight and free of sharp bends or restrictions.
NOTICE: The toilet inlet must not be connected to a
pressurized water system.
Connect 1" or 1-1/2" hose to discharge port (Adaptor
98023-0080 is included to convert discharge port to 1-1/2"
ID hose), and make suitable connection to holding tank or
other discharge system. Avoid sharp bends or restrictions.
If the toilet is, or can be, below waterline at any normal
(including static) attitude of vessel heel and/or trim, a 3/4"
Vented Loop Fitting must be installed in the length of hose
connecting the flushing pump to the inlet seacock. The
Vented Loop Fitting must be positioned so it remains slightly*
above the waterline at all angles of heel and trim.
*Recommended minimum height above waterline is 6".
For above waterline installations, a check valve may have
to be installed in the flush water intake line to ensure rapid
pump priming. To retain water in bowl, make a loop in the
discharge line about 8 inches above base of bowl.
Do not connect the toilet to the vessels
portable water for its source of supply.To do so can result
in contamination of portable water supply. If fresh water is
preferred for flushing, provide a separate fresh water tank
to supply water to the toilet only.
DO NOT CONNECT INLET HOSE TO A PRESSURIZED
PORTION OF THE WATER SYSTEM.
ELECTRICAL CONNECTIONS: Select a location for the
switch and instruction plate, making sure wire leads from
both the toilet and power source can be routed to the
switch.Ensure the panel where installing switch is no more
CAUTION
!
than 1" thick. Drill a 5/8" mounting hole and install switch
and instruction plate. Use stranded copper wire of the cor-
rect size (determined from the electrical specifications
chart) to connect one side of the switch to the positive
power source.
NOTICE: Correct wire size and secure wire connections
are very important.Undersized wire and unsecured or cor-
roded wire connections will cause a reduction in pump per-
formance and possible pump failure.An appropriate size
fuse or equivalent circuit breaker (determined from
electrical specifications chart) must be installed in the
positive power lead within seven inches of the power
source or in the electrical power distribution breaker
/fuse panel. Connect the other side of the switch to the
orange (positive) motor lead. Connect the black (negative)
motor lead to the negative side of the battery or grounded
buss bar.
NOTICE: Correct motor polarity (orange to positive, black to
negative) is important.Reverse polarity can damage motor
and void warranty. Full voltage at the motor is required to
properly operate Jabsco Electric Toilet. The toilet must be
wired in a circuit independent of all other accessories.
OPERATING INSTRUCTIONS
Make sure inlet and outlet seacocks are all open; push
switch button to operate. Operate until bowl is completely
flushed and discharge pump has scavenged water from
bottom of bowl.
The Jabsco electric marine toilet will provide years of
troublefree service if properly used. It will handle waste
and toilet tissue. It will not handle rags, sanitary napkins
or hard solid objects.
Clean toilet with mild non-abrasive cleaners without strong
aromatics.Cleaners having high concentrations of aromatics,
such as pine cleaners and strongly scented de-greaser
concentrates, can cause the pump's impeller to swell and
possibly bind up.
If bowl does not pump out and begins to fill, partially close
inlet valve until bowl is cleared and completely pumped
out.Then operate for a few seconds with both valves open
to clear entire toilet and discharge system. For maximum
safety, when toilet is not in use or vessel is unattended,
close both the inlet and discharge seacocks.
To drain for winter layup, close inlet valve and operate for a
few seconds until all water is pumped out.
DISASSEMBLY
WARNING
!
Flood hazard. Close inlet and outlet
seacocks prior to disassembling toilet.
Failure to do so can result in flooding
which can cause loss of property and life.
ELECTRICAL SPECIFICATIONS
AMP FUSE WIRE SIZE PER FEET OF RUN*
VOLTAGE DRAW SIZE
0'-10' (0 M-3 M) 10'-15' (3 M-4,6 M) 15'-25' (4,6 M-7,6 M) 25'-40' (7,6 M-12,2 M) 40'-60' (12,2 M-18,3 M)
12 Vdc 16 25 #12 (4 mm
2
) #10 (6 mm
2
) #10 (6 mm
2
) #8 (10 mm
2
) #6 (16 mm
2
)
24 Vdc 8 15 #16 (1,5 mm
2
) #14 (2,5 mm
2
) #12 (4 mm
2
) #10 (6 mm
2
) #10 (6 mm
2
)
* Length of run is total distance from power source to product and back to ground.

PARTS LIST
Qty. Part
Key Description Req. Number
1 Motor Cover† 1 43990-0051
2 Clamp 1 18753-0044
3 Hose 1 29035-0001
4 Bowl Installation Hardware 1 18753-0637
4A Hex Head Screw** 4
4B Starlock Washer** 4
4C Hex Nut (two places)** 8
4D Washer, Plastic** 4
4E Washer, Stainless Steel**
4F Nut Cap** 4
5 O-Ring 1 44101-1000
6 Base Assembly** 1 37004-1000
7 Screw Covers (3/kit) 1 37003-0000
8 1-1/2" Adaptor, Discharge Port 1 98023-0080
91" Discharge Port** 1 44107-1000
10 Joker Valve* ** 1 44106-1000
11 Screw** 3 96050-0568
12 Chopper Plate† with Lock Nut 1 37056-1000
13 Macerator Housing † 1 37014-0000
14 Centrifugal Impeller † 1 37006-0000
15 Set Screw † 1 18753-0492
16 O-ring*† 1 43990-0066
17 Screw Short † 2 91009-0096
18 Screw Long † 2 91010-0130
19 Washer, Plastic*† 2 35445-0000
20 Sealing Sleeve † 1 37036-1000
Qty. Part
Key Description Req. Number
21 Wearplate ‡ 1 37018-0000
22 Lock Washer #10, Stainless Kit † 4
23 Screw † 4 91027-0011
24 Gasket*† 1 12558-0000
25 Flexible Impeller*† 1 6303-0003
26 Body † 1 12554-0000
27 Seal & Retainer*† 1 1040-0000
28 Slinger † 1 6342-0000
29 Motors:
Motor - 12 Volt † 1 37064-0000
Motor - 12 Volt EMC † 1 37064-0900
Motor - 24 Volt † 1 37065-0000
Motor - 24 Volt EMC † 1 37065-0900
30 Adaptor 2 93003-0240
31 Switch & Plate 1 37020-0000
Service Kit 37040-0000
Motor/Pump Assy. 12V † 37041-0010
Motor/Pump Assy. 12V EMC † 37041-0910
Motor/Pump Assy. 24V † 37041-0011
Motor/Pump Assy. 24V EMC † 37041-0911
‡ Wearplate #21 includes Shaft Sealing Sleeve #20 and
Pump/Base O-ring #16.
† Parts included in Motor-Pump Assembly.
O
T
H
S
U
P
F
L
U
S
H
T
R
I
C
C
E
L
E
T
O
I
L
E
T
5
6
8
10
12
9
11
18
17
4
13
14
15
16
19
21
22
23
24
25
26
27
28
29
30
2
3
4F
4C
4E
4D
4A
1
31
To
Bowl
Elbow
20
4B
7
4C
EXPLODED VIEW
Disconnect pump inlet and discharge hoses.Remove four
screws, Key No. 23, pull out complete motor, pump and
macerator assembly.Remove macerator housing from base.
Remove discharge port, Key No. 9, and inspect joker
valve. Unscrew chopper plate lock nut, Key No. 12, by
turning counterclockwise, facing plate and remove
chopper.Prevent shaft from turning by inserting a screw-
driver in slot of shaft protruding from rear of motor.
Loosen centrifugal impeller set screw and slide impeller
off motor shaft.
Remove four flathead screws, Keys No. 17 & 18,
wearplate, Key No. 21, shaft sealing sleeve, Key No. 20,
gasket, Key No. 24; then slide pump assembly off motor
shaft. Replace all worn or damaged parts, clean remain-
ing parts.

U.S.A.
Jabsco
1485 Dale Way, P.O.Box 2158
Costa Mesa, CA 92628-2158
Tel:(714) 545-8251
Fax:(714) 957-0609
UNITED KINGDOM
Jabsco
Bingley Road, Hoddesdon
Hertfordshire EN11 OBU
Tel:+44 (0) 1992 450145
Fax:+44 (0) 1992 467132
CANADA
Fluid Products Canada
55 Royal Road
Guelph, Ontario N1H 1T1
Tel:(519) 821 -1900
Fax:(519) 821-2569
JAPAN
NHK Jabsco Company Ltd.
3-21-10, Shin-Yokohama
Kohoku-Ku, Yokohama, 222
Tel: 045-4758906
Fax:045-475-8908
GERMANY
Jabsco GmbH
Oststrasse 28
22844 Norderstedt
Tel:+49-40-53 53 73 -0
Fax:+49-40-53 53 73 -11
© Copyright 2000, ITT Industries Printed in U.S.A. All Rights Reserved Form: 43000-0613 Rev. 8/2000
THE PRODUCTS DESCRIBED HEREIN ARE SUBJECT TO
THE JABSCO ONE YEAR LIMITED WARRANTY, WHICH
IS AVAILABLE FOR YOUR INSPECTION UPON REQUEST.
MOUNTING
BRACKET
VENT TO
ATMOSPHERE
ELECTRICAL
CONNECTIONS
TO VENTED
LOOP
TO
NEGATIVE
TO
POSITIVE
TO
NEGATIVE
PUSH BUTTON
SWITCH
VENTED
LOOP
VIEW A
DISCHARGE TO
HOLDING TANK
INLET
WATER
LINE
VIEW A
DIAGRAM 1
DIMENSIONAL DRAWING
Inches (Millimeters)
MOTOR COVER
REASSEMBLY INSTRUCTIONS
Press seal into body with lip facing impeller; be careful
not to cock seal in bore. Install pump body on motor and
position on register; lubricate impeller bore with pump
grease.Install impeller, gasket and wearplate.Make sure
gasket surfaces are clean and smooth. Tighten
wearplate screws. Slide shaft sealing sleeve onto shaft
and seat in its bore in wearplate. Relocate centrifugal
impeller about 1/8” from wearplate and secure with set
screw. Position macerator housing around centrifugal
impeller then put chopper plate on end of shaft and
secure with lock nut. Install O-ring in O-ring groove in
wearplate surface (a little grease will help hold in place).
Aligning key on top of macerator housing with slot in
base, slide macerator assembly into base.Secure pump
assembly with the four screws.
/