Page is loading ...

1
ELECTRIC TOILET BASE KIT
FEATURES
• HighCapacityMaceratorandBowlScavengerPump
• FlexibleImpellerFlushPump
• PermanentMagnetTypeMotor,FullyEnclosed,
withStainlessSteelShaft
• ComplieswithUSCG183.410andISO8846
MARINEforIgnitionProtection
• SimplePushButtonSwitchincluded
• AllCorrosionResistantMaterialsforMarineUse
SPECIFICATIONS
• 5/8"or3/4"Inlet,1"OutletBackFlowCheckValve
inDischarge
• 1"x1-1/2"HoseAdaptorincludedtoadaptto1-1/2"
wasteplumbing
• ThruFlowApprox.1-1/2Qts.per5Secondsof
Operation
VARIATIONS
MODELNO. DESCRIPTION
37010-0092* ToiletConversion,12VoltEMC
37010-0097* ToiletConversion,24VoltEMC
*This model is Marked and complies with EN50081-1 for
suppression of electro-magnetic interference.
APPLICATION
TheJabscoelectrictoiletmaybeinstalledaboveorbelow
thewaterline.Flushpumpisself-primingwithaverticallift
up to 4 feet; discharge macerator pump can operate
againstaverticalheadupto4feet.
The37010seriescanbeusedtoconverttheRaritanPH
orCompact,Wilcox-Crittenden“HeadMate”,GrocoHC,
Brydon No. 9127,9128,orNo. 59128andvirtuallyany
other model marine toilet using the “standard” bowl
configuration with a 3-3/4" diameter bolt circle, 4 hole
patterninthebase.Checkthedimensionaldrawingtobe
surethebowlwillfittheflangedimensionsasshown.
The37010seriesincludesthecompletemotorizedbase
assembly,bowlgasket,fourboltsandwashersforbowl,
two5/8"to3/4"pumpportadaptors,3/4"whitehose,1"
to1-1/2"dischargeportadaptor,andmomentarycontrol
switch.
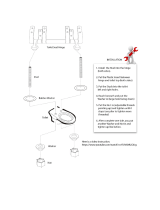
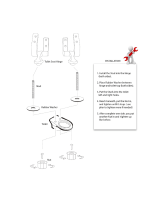
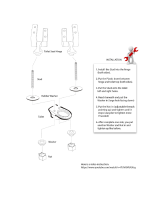
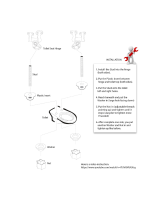
ASSEMBLY
1. Overallheightafterconversionmayincreaseupto1"
onsomemodels,checktobesureadequatespaceis
availableiflocatedunderseatsorbunks.
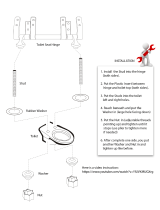
2. Screw 6mm machine screws with starlock washer
under each head into nuts positioned in the hex
recessonthetopofthebasetoformbowlattachment
studs(seeexplodedview).
3. Removecompletemanualbaseassemblyandmount
bowlonJabscomotorizedbase.NOTE:M6x50mm
longmachinescrewssuppliedaresuitableformost
bowls;howeversomebowlflangesareheavierand
longermachinescrewsmustbe used.Place plastic
washers against bowl flange, positioning base for
mostconvenienthoseconnectionarrangement.
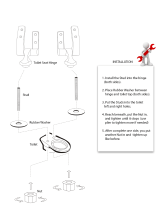
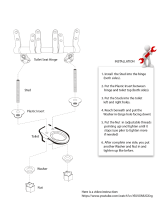
4. Connect pump outlet to rear bowl connection with
3/4" hose. Install the hose clamp on the pump
dischargeportonly.
5. Positioncompletetoiletassemblyandfastensecurely
onflatsurface.Besurenottowarptoiletbasewhen
tighteningtoiletbasedown.
6. Connectexistinginlethosetopumpinletport.A5/8"
to 3/4" sleeve adaptor is included for fitting to
commonly used 3/4" inlet hose size. Make sure all
connectionsareairtightandfreeofsharpbendsor
restrictions.
7. Connect1"dischargehosetodischargeport(1-1/2"
hose when using 1-1/2" discharge adaptor) and
make suitable connection to holding tank or other
dischargesystem.Avoidsharpbendsorrestrictions.
8. For installation below the waterline, install a vented
loopintheintakehoseandpositionabout8"above
thewaterlineatallanglesofheelortrim.**Avented
loopshouldalsobeusedfordischargeifconnected
toathru-hullfitting.
9. For installations above water line, make a loop in
dischargelineabout8inchesabovebaseofbowlto
retainwaterinbowl.Someinstallationsmayneeda
check valve in the intake line to aid primeability of
flushwaterpump.
10. Ifthru-hullseacockscannotbeconvenientlyoperated
fromtoiletlocation,installsuitableshut-offvalvesfor
inletanddischargeconnections.
** In some installations when a vented loop is installed in the
intake hose, the flushing pump primeability and flow
characteristics are reduced and may adversely affect toilet
function. To restore pump performance, connect a solenoid
valve (Jabsco No. 37068-2000) to the vent air inlet to
interrupt the air supply during the flush cycle. Screw the 1/4”
brass connector onto the vented loop and wire the solenoid
in parallel with the toilet motor. See Diagram 1 for installation
and wiring illustration.
Model 37010-Se ries
Conversion Kits

2
INSTALLATION INSTRUCTIONS
PLUMBING CONNECTIONS: Connectinlethoseusing
either5/8"or3/4"IDhose(asleeveisincludedtoadapt
pump inlet from 5/8" to 3/4"). Make sure all inlet
connections are airtight and free of sharp bends or
restrictions.
NOTICE:
Thetoiletinletmustnotbeconnectedtoa
pressurized watersystem.
Connect 1" or 1-1/2" hose to discharge port (Adaptor
98023-0080 is included to convert discharge port to
1-1/2"IDhose),andmakesuitableconnectiontoholding
tank or other discharge system. Avoid sharp bends or
restrictions.
Ifthetoiletis,orcanbe,belowwaterlineatanynormal
(includingstatic)attitudeofvesselheeland/ortrim,a3/4"
VentedLoopFittingmustbeinstalledinthelengthofhose
connecting the flushing pump to the inlet seacock.The
Vented Loop Fitting must be positioned so it remains
slightly* above the waterline at all angles of heel and
trim.
*Recommended minimum height above waterline is 8".
Forabovewaterlineinstallations,acheckvalvemayhave
tobeinstalledintheflushwaterintakelinetoensurerapid
pumppriming.Toretainwaterinbowl,makealoopinthe
dischargelineabout8inchesabovebaseofbowl.
Do not connect the toilet to the vessels
portablewaterforitssourceofsupply.Todosocanresult
incontaminationofportablewatersupply.Iffreshwateris
preferredforflushing,provideaseparatefreshwatertank
tosupplywatertothetoiletonly.
DO NOT CONNECT INLET HOSE TO A PRESSURIZED
PORTION OF THE WATER SYSTEM.
ELECTRICAL CONNECTIONS: Selectalocationforthe
switchandinstructionplate,makingsurewireleadsfrom
both the toilet and power source can be routed to the
switch. Ensure the panel where installing switch is no
morethan1"thick.Drilla5/8"mountingholeandinstall
switchandinstructionplate.Usestrandedcopperwireof
the correct size (determined from the electrical
specificationschart)toconnectonesideoftheswitchto
thepositivepowersource.
NOTICE:Correctwiresizeandsecurewireconnections
are very important. Undersized wire and unsecured or
corrodedwireconnectionswillcauseareductioninpump
performanceandpossiblepumpfailure.An appropriate
size fuse or equivalent circuit breaker (determined
from electrical specifications chart) must be in stalled
in the positive power lead within seven inches of the
power source or in the electrical power distribution
breaker /fuse panel.Connecttheothersideoftheswitch
to the orange (positive) motor lead. Connect the black
(negative)motorleadtothenegativesideofthebattery
orgroundedbussbar.
NOTICE: Correctmotorpolarity(orangetopositive,black
to negative) is important. Reversepolarity can damage
motor and void warranty. Full voltage at the motor is
required to properly operate Jabsco Electric Toilet. The
toiletmust be wired in acircuit independentof allother
accessories.
OPERATING INSTRUCTIONS
Makesure inlet and outlet seacocksare all open; push
switchbuttontooperate.Operateuntilbowliscompletely
flushedanddischargepumphasscavengedwaterfrom
bottomofbowl.
The Jabsco electricmarinetoilet will provide yearsof
troublefreeserviceifproperlyused.Itwillhandlewaste
andtoilettissue.Itwillnothandlerags,sanitarynapkins
orhardsolidobjects.
Clean toilet with mild non-abrasive cleaners without
strongaromatics.Cleanershavinghighconcentrationsof
aromatics, such as pine cleaners and strongly scented
de-greaserconcentrates,cancausethepump'simpeller
toswellandpossiblybindup.
Ifbowldoesnotpumpoutandbeginstofill,partiallyclose
inletvalveuntilbowlisclearedandcompletelypumped
out. Then operate for a few seconds with both valves
open to clear entire toilet and discharge system. For
maximum safety, when toilet is not in use or vessel is
unattended, close both the inlet and discharge
seacocks.
Todrainforwinterlayup,closeinletvalveandoperatefor
afewsecondsuntilallwaterispumpedout.
DISASSEMBLY
DANGER
!
CAUTION
!
WARNING
!
WARNING
Floodhazard.Closeinletandoutletseacockspriorto
disassembling toilet. Failure to do so can result in
floodingwhichcancauselossofpropertyandlife.
Disconnect pump inlet and discharge hoses. Remove
fourscrews,KeyNo.23,pulloutcompletemotor,pump
andmaceratorassembly.Removemaceratorhousingfrom
base.
Remove discharge port, Key No. 9, and inspect joker
valve.Unscrewchopperplatelocknut,KeyNo.12,by
turning counterclockwise, facing plate and remove
chopper. Prevent shaft from turning by inserting a
screwdriver in slot of shaft protruding from rear of
motor.Loosencentrifugalimpellersetscrewandslide
impelleroffmotorshaft.
Remove four flathead screws, Keys No. 17 & 18,
wearplate,KeyNo.21,shaftsealingsleeve,KeyNo.20,
ELECTRICAL SPECIFICATIONS
AMP FUSE WIRE SIZE PER FEET OF RUN*
VOLTAGE DRAW SIZE 0'-10' (0 M-3 M) 10'-15' (3 M-4,6 M) 15'-25' (4,6 M-7,6 M) 25'-40' (7,6 M-12,2 M) 40'-60' (12,2 M-18,3 M)
12Vdc 16 25 #12(4mm
2
) #10(6mm
2
) #10(6mm
2
) #8(10mm
2
) #6(16mm
2
)
24Vdc 8 15 #16(1.5mm
2
) #14(2.5mm
2
) #12(4mm
2
) #10(6mm
2
) #10(6mm
2
)
*Lengthofrunistotaldistancefrompowersourcetoproductandbacktoground.
CAUTION

3
gasket,KeyNo.24;thenslidepumpassemblyoffmotor
shaft. Replace all worn or damaged parts, clean
remainingparts.
REASSEMBLY INSTRUCTIONS
Presssealintobodywithlipfacingimpeller;becareful
nottococksealinbore.Installpumpbodyonmotorand
positiononregister; lubricateimpeller borewithpump
grease. Install impeller, gasket and wearplate. Make
sure gasket surfaces are clean and smooth. Tighten
wearplatescrews.Slideshaftsealingsleeveontoshaft
and seat in its bore inwearplate. Relocatecentrifugal
impellerabout1/8”fromwearplateandsecurewithset
screw. Position macerator housing around centrifugal
impeller then put chopper plate on end of shaft and
securewith locknut. Install O-ring in O-ringgroovein
wearplatesurface(alittlegreasewillhelpholdinplace).
Aligning key on top of macerator housing with slot in
base, slide macerator assembly into base. Secure
pumpassemblywiththefourscrews.
PARTS LIST
Key Description Qty. Part Number
1 Seat,LidandHingeSet 1
CompactToilet 29097-1000
RegularToilet 29127-1000
1A HingeSet(1Pair) 1
CompactToilet 29098-1000
RegularToilet 29098-2000
2 Bowl,CompactSize 1 29096-0000
Bowl,RegularSize 1 29126-0000
3&4 BowlSpud&Intake 1 29048-0000
Elbow&O-ring
5 Clamp 1 18753-0044
6 Hose 1
29035-1001
7 BowlInstallationHardware 1 18753-0637
7A PhillipsHeadScrew** 4
7B Washer,Starlock** 4
7C HexNut**(twoplaces) 4
7D Washer,Plastic** 4
7E WasherStainlesssteel** 8
7F NutCap** 4
8 O-RingBowl/Seal 1 44101-1000
9 BaseAssembly** 1 37004-1000
10 1-1/2"Adaptor,DischargePort 1 98023-0080
11 JokerValve*** 1 44106-1000
12 1"DischargePort** 1 44107-1000
13 Screw** 3 96050-0568
14 ChopperPlate†withLockNut 1 37056-1000
15 MaceratorHousing† 1 37014-0000
16 CentrifugalImpeller† 1 37006-0000
17 SetScrew† 1 18753-0492
18 O-ring*† 1 43990-0066
19 SealingSleeve† 1 37036-1000
20 Screw† 2 91009-0096
21 Screw† 2 91010-0130
22 Washer,Fiber*† 2 35445-0000
23 WearplateKit‡† 1 37018-0000
24 LockWasher#10,StainlessKit† 4
25 Screw† 4 91027-0011
26 Gasket*† 1 12558-0000
27 FlexibleImpeller*† 1 6303-0003
28 Body† 1 12554-0000
29 Seal&Retainer*† 1 1040-0000
Key Description Qty. Part Number
30 Slinger† 1 6342-0000
31 Motors:
Motor-12VoltEMC† 1 37064-0000
Motor-24VoltEMC† 1 37065-0000
32 Adapter 2 93003-0240
33 Switch&Plate 1 37020-0000
34 MotorCover† 1 43990-0051
35 ScrewCover(3each) 1 37003-1000
ServiceKit 37040-0000
Motor/PumpAssy.12VEMC† 37041-0010
Motor/PumpAssy.24VEMC† 37041-0011
* PartsSuppliedwithServiceKit37040-0000.
** Partsincludedwithbase37004-1000.
‡ Wearplate#23includesSealingSleeve#19andPump/
BaseO-ring#18.
† PartsincludedinMotor-PumpAssembly.
O
T
H
S
U
P
F
L
U
S
H
T
R
I
C
C
E
L
E
T
O
I
L
E
T
8
9
10
11
14
12
13
21
20
4
15
16
17
18
22
23
24
25
26
27
28
29
30
31
32
5
6
3
2
7F
7C
7E
7D
7A
34
33
19
1
7B
35
7C
EXPLODED VIEW
TO
BOWL
ELBOW

4
MOTOR COVER
1 (25)
3/4 (9.5) DIA. THRU 3 PLACES
2-5/8
(67)
5
(125)
6
(152)
7-1/8
(181)
2-5/8
(67)
1/4 (5.4)
4 Pica 3-3/4 (95.3) Dia. B.C.
72
(1830)
Wire Leads
3/4
(19)
2 Places
72
(1830)
Wire Leads
3-1/8 (79)
10-1/2
(267)
13-3/8
(340)
7-3/8
(187)
2-1/2
(54)
4
(102)
5-3/8
(137)
3-1/2
(54)
3-7/8
(96)
NOTE: The switch on the side of the
solenoid is inactive and will not affect
operation.
-
+
-
DISCHARGE
TO
NEGATIVE
TO
POSITIVE
TO
NEGATIVE
VENTED LOOP
Heeled
Waterline
Static
VIEW A
SWITCH
INLET
VIEW A
VENT TO
ATMOSPHERE
1/4" BSP
BRASS
CONNECTOR
(Screws on to
Vented Loop)
Use PTFE tape
to seal
connector
onto Vented
Loop
ELECTRICAL
CONNECTIONS
DIMENSIONAL DRAWING
Inches (Millimeters)
Form: 43000-0613-GB Rev. 01/2009
USA
Cape Ann Industrial Park
Gloucester, MA 01930
Tel: (978) 281-0440
Fax: (978) 283-2619
UK
Bingley Road, Hoddesdon
Hertfordshire EN11 0BU
Tel: +44 (0) 1992 450145
Fax: +44 (0) 1992 467132
JAPAN
NHK Jabsco Company Ltd.
3-21-10, Shin-Yokohama
Kohoku-Ku, Yokohama, 222-0033
Tel: +81-045-475-8906
Fax: +81-045-477-1162
ITALY
Jabsco Marine Italia
Via Tommaseo, 6
20059 Vimercate, Milano
Tel: +39 039 685 2323
Fax: +39 039 666 307
GERMANY
Jabsco GmbH
Oststrasse 28
22844 Norderstedt
Tel: +49-40-53 53 73-0
Fax: +49-40-53 53 73-11
Warranty: All products of the company are sold, and all services of the company are offered subject to the company’s warranty and terms of sale, copies of which will be furnished upon request.
Details correct at time of printing. We reserve the right to change
without prior notice.
© Copyright 2009 Registered England No. 81415, registered
Jays Close Viables Estate, Basingstoke, Hants, RG22 4BA
www.jabsco.com
DIAGRAM 1
/