Kodak Scan Station 520 EX User manual
- Category
- Scanner Transparancy Adapters
- Type
- User manual
This manual is also suitable for

Scan Station 500
& Scan Station 520EX
User’s Guide
Eastman Kodak Company
343 State Street
Rochester, NY 14650 U.S.A.
© Kodak, 2008. All rights reserved.
TM: Kodak
A-61627
8F8038A
8F8038A
CYAN
MAGENTA YELLOW BLACKCYAN
8.5 x 11” Folded
GUIDE COVER-KODAK SCANNERS
FONTS
Whitney K Family
SIZE
P/ N SWATCHES
FILE FORMAT
DESIGN/IMPLEMENTATION
DAT E
11.12.08
8F8038A
DE MEYER
4 COLOR PROCESS
ARTWORK NAME
PRINTING INFORMATION
0000-000
ECO
LANGUAGES
ILLUSTRATOR CS3
EN/FR/DE/IT/ES-IN/PT-BR/NL/TR/
CS/ZH-CN/ZH-TW/JA/KO/AR/RU
User’s Guide on Installation CD
Guides de l'utilisateur sur le CD d'installation
Benutzerhandbücher auf der Installations-CD
Guida dell’utente sul CD di installazione
Guías de usuario incluidas en el CD de instalación
Guias do usuário no CD de instalação
Gebruikershandleidingen op installatie-cd
Kurulum CD'sindeki Kullanım Kılavuzları
Uživatelská pøíruèka na instalaèním disku CD

A-61627 November 2008 1-1
Safety
• Place the Kodak Scan Station 500 on a level work surface capable of supporting 13.6 kgs (30 lbs).
• When placing the Scan Station, make sure that the electrical power outlet is located within 1.52 metres (5 feet) of the Scan
Station and is easily accessible.
• Leave sufficient space around the power outlet so it can be easily unplugged in case of an emergency.
• Plug the power cord securely into the outlet. Failure to do so may cause electric shock or fire.
• Only use the power cord that is supplied with the scanner. Using any other power cord may cause electrical shock and/or
damage to the product.
• Do not install the scanner in locations that are subject to dust, humidity or steam. This may cause a fire or electrical shock.
• Do not block ventilation ports. This may cause the scanner to overheat which may result in scanner malfunction or fire.
• Do not use the scanner if it becomes unusually hot, has a strange odor, emits smoke, or makes unfamiliar noises. Stop the
scanner immediately and disconnect the power cord. Contact Kodak Service.
• Do not attempt to disassemble or modify the scanner.
• Do not move the scanner with the power cord and cables connected. This may cause damage to the cord/cables. Disconnect
the power cord before moving the scanner.
• Do not damage, knot, cut or modify the power cord. This may result in fire or electrical shock.
• Do not connect the scanner to an extension cord or multi-plug power strip. Use a dedicated power outlet.
• Material Safety Data Sheets (MSDS) for chemical products are available on the Kodak website at: www.kodak.com/go/msds.
When accessing the MSDSs from the website, you will be required to provide the catalog number of the consumable you
want the Material Safety Data Sheet for. See the section entitled, “Supplies and consumables” later in this guide for supplies
and catalog numbers.
Environmental information
•The Kodak Scan Station 500 is designed to meet worldwide environmental requirements.
• Guidelines are available for the disposal of consumable items that are replaced during maintenance or service; follow local
regulations or contact Kodak locally for more information.
• Disposal of this material may be regulated due to environmental considerations. For disposal or recycling information,
contact your local authorities or, in the USA, visit the Electronics Industry Alliance website: www.eiae.org.
• The product packaging is recyclable.
• Parts are designed for reuse or recycling.
European Union
This symbol indicates that when the last user wishes to discard this product, it must be sent to appropriate facilities
for recovery and recycling. Please contact your local Kodak representative or refer to www.kodak.com/go/recycle
for additional information on the collection and recovery programs available for this product.
Battery Information
This product contains a Lithium Ion button cell battery. This battery can only be removed or replaced by a qualified Service
Engineer.
Acoustic emission
Maschinenlärminformationsverordnung – 3, GSGV
Der arbeitsplatzbezogene Emissionswert beträgt <70 db(A).
[Machine Noise Information Ordinance — 3, GSGV
The operator-position noise emission value is <70 dB(A).]
Power system connection
This product is also designed for Norwegian IT power system with phase-to-phase voltage 230V.
Netzanschluß
Das Gerät ist auch für die Verwendung im norwegischen IT-Stromsystem mit einer Leiterspannung von 230 V geeignet.
Connexion aux systèmes d’alimentation électrique
Ce produit est également conçu pour les systèmes norvégiens d’alimentation électrique informatique, dont la tension par phase
est de 230 V.

1-2 A-61627 November 2008
EMC statements
United States: This equipment has been tested and found to comply with the limits for a Class A digital device pursuant to Part
15 of the FCC rules. These limits are designed to provide reasonable protection against harmful interference when the
equipment is operated in a commercial environment. This equipment generates, uses, and can radiate radio frequency energy
and, if not installed and used in accordance with the instruction manual, may cause harmful interference to radio
communications. Operation of this equipment in a residential area is likely to cause harmful interference in which case the user
will be required to correct the interference at his own expense.
European Union: WARNING: This is a Class A product. In a domestic environment this product may cause radio interference
in which case the user may be required to take adequate measures.
Japan: This is a Class A product based on the standard of the Voluntary Control Council for interference by information
Technology Equipment (VCCI). If this is used in a domestic environment, radio disturbance may arise. When such trouble
occurs, the user may be required to take corrective actions.
Taiwan: WARNING: This is a Class A product. In a domestic environment this product may cause radio interference in which
case the user may be required to take adequate measures.
Peoples Republic of China: WARNING: This is a Class A product. In a domestic environment this product may cause radio
interference in which case the user may be required to take adequate measures.
Korean: Please note that this equipment has obtained EMC registration for commercial use. In the event that it has been
mistakenly sold or purchased, please exchange it for equipment certified for home use.
声明,该产
此为A级产品,在生活环境中品可能会造成无线电干扰。在这种情况下,可能需要
用户对其干扰采取切实可行的措施

INTRODUCTION 1-1
USING THE SCAN STATION: WALK-UP USER 2-1
INSTALLING AND USING THE CONFIGURATION 3-1
ORGANIZER: ADVANCED USER
TROUBLESHOOTING 4-1

A-61627 November 2008 1-1
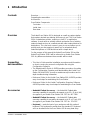
1 Introduction
Contents Overview.........................................................................................1-1
Supporting documentation..............................................................1-1
Accessories.....................................................................................1-1
Scan Station Components ..............................................................1-2
Front view...................................................................................1-2
Inside view..................................................................................1-3
Rear view....................................................................................1-4
Overview The Kodak Scan Station 500 is designed as a walk-up capture station
that requires minimal user training and is easy to use. The Scan Station
500 is a standalone solution, requiring no host PC or application
software. It works with an existing network and makes use of existing
network shared services to communicate with other network devices or
destinations. The color touch screen is easy to use and allows you to
quickly send your documents via email, fax, to networked drives,
networked printers or USB flash drives with a simple touch.
For the purpose of this manual the Kodak Scan Station 500 and the
Kodak Scan Station 520EX will be referred to as Kodak Scan Station
500. Any differences between these models will be noted.
Supporting
documentation
• This User’s Guide provides installation procedures and information
on how to create your personal configuration file using the
Configuration Organizer.
• The Administrator’s Guide, A-61628 provides procedures for setting
up the Configuration Organizer and administrating the Kodak Scan
Station 500 and 520EX; as well as maintenance procedures and in-
depth troubleshooting information.
• Reference Guide, for the Kodak Scan Station 500, A-61629 provides
easy visual steps for maintaining the Scan Station.
• Reference Guide, for the Kodak Configuration Organizer Software,
A-61630 provides easy visual steps for maintaining the Scan Station.
Accessories • Kodak A4 Flatbed Accessory — the Kodak A4 Flatbed adds
scanning capability for exception documents up to 8.5 x 11-inch (A4)
size paper to your Kodak Scan Station 500. CAT No. 867 7288
• Kodak A3 Flatbed Accessory — the Kodak A3 Flatbed adds
scanning capability for exception documents up to 11 x 17-inch (A3)
size paper to your Kodak Scan Station 500. CAT No. 179 6747
• Keyboard — make the best of your workspace with this optional
keyboard. This keyboard is smaller than the standard PC keyboard
and can be attached to the Scan Station 500 for easy data entry.

1-2 A-61627 November 2008
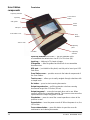
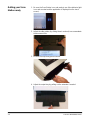
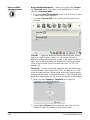
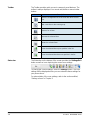
Scan Station
components
Front view
Input tray extender (not shown) — pull this extender out to
accommodate document sizes over 8 1/2 x 11 inches (A4).
Input tray — holds up to 75 she
ets of paper.
Side guides — slide the
guides back and forth to accommodate
document size.
USB port — (not visible in this photo) use this port to insert your USB
flash drive.
Scan Station cover — provides access to the internal components of
the Scan Station.
Touch screen — allows you to easily navigate through selections with
a simple touch.
Go button — press to start scanning documents.
Output tray extension — pull this extension out when scanning
documents longer than 11 inches (28 cm).
Output tray panel — covers the transport when not in use. When
opened, collects the scanned documents. The scanner cover cannot be
opened when the output tray panel is closed.
Stop button — press to cancel the current operation or return to the
previous screen.
Power button — turns the power on and off. When the power is on, the
LED is blue.
Cover release button — press this button to open the cover for
maintenance and clearing documents.
Input tray extender
Input tray
Side guides
USB port
Scan Station cover
Touch screen
Go button Output tray
Stop
Power
Cover release
extender
Output tray
panel
button
button
button

A-61627 November 2008 1-3
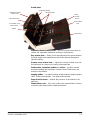
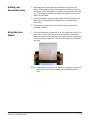
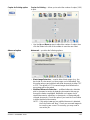
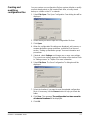
Inside view
Separation module release lever — push the release lever down to
remove the separation module for cleaning or replacement.
Gap release lever — allows you to manually adjust the space between
the feed module and separation module for documents that require
special handling.
Scanner cover release lever — opens the scanner to allow access to
the paper path for cleaning or clearing a document jam.
Feed module, separation module and rollers — provides smooth
document feeding and separation of various sizes, thicknesses and
textures of documents.
Imaging guides — for optimum image quality, keep the imaging guides
clean. There are two guides - one upper and one lower.
Paper Present sensor — detects the presence of documents in the
input tray.
Feed module cover — this cover needs to be removed when cleaning
or replacing the feed module or feed module tires.
Separation module
release lever
Gap release lever
Scan Station cover
release lever
Rollers
Separation module
Imaging guides
Paper
Present
Sensor
Feed module
cover
Feed module

1-4 A-61627 November 2008
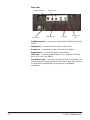
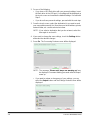
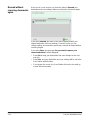
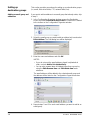
Rear view
Flatbed connector — connects the optional A3/A4 Flatbed to the Scan
Station.
Modem port — connects the fax modem to a phone line.
Power port — connects the power cord to the Scan Station.
Ethernet port — connects the device to the network.
USB ports — connects peripheral devices (i.e., keyboard, USB flash
drive, etc.) to the Scan Station.
Security lock port — connects a security lock to the Scan Station. You
can purchase a standard security lock at an office supply store. Refer to
the instructions provided with the security lock for installation
procedures
Flatbed connector
Power port
Modem port
USB ports
Ethernet port
Security lock
port

A-61627 November 2008 2-1
2 Using the Scan Station: Walk-up User
Contents User types.......................................................................................2-1
Getting your Scan Station ready.....................................................2-2
Getting your documents ready........................................................2-3
Using the Scan Station....................................................................2-3
Getting familiar with the touch screen.............................................2-7
Destination screen ...................................................................2-7
Icon descriptions: Destination screen......................................2-8
Settings screen ........................................................................2-9
Description of Scan Settings.........................................................2-10
Resend without scanning documents again.................................2-20
Using the Search function.............................................................2-21
Using Setting Shortcuts................................................................2-21
User types • If you are someone who is going to use the default settings of the
Scan Station, you are a walk-up user. Scanning is easy but you may
not have access to your personal email address book or custom
scan settings the way an Advanced user does.
•An advanced user is someone who wants to create custom scan
settings using the Kodak Configuration Organizer software, save
these settings to a USB flash drive and take them to the Scan
Station for one touch operation. For more information on using the
Configuration Organizer software to set up custom settings, see
Chapter 3.
All users should review this chapter to get familiar with common Scan
Station preparation and document preparation.

2-2 A-61627 November 2008
Getting your Scan
Station ready
1. Be sure the Scan Station is on and ready to use (blue indicator light
is on and constant and the application is displayed on the touch
screen).
2. Adjust the side guides (by sliding them in and out) to accommodate
the document size.
3. Be sure the output tray panel is down.
4. Adjust the output tray by pulling out the extender if needed.

A-61627 November 2008 2-3
Getting your
documents ready
1. Standard paper size documents feed easily through the Scan
Station. When organizing your documents for scanning, stack the
documents so the lead edges are aligned and centered in the input
tray. This allows the feeder to introduce documents into the Scan
Station one at a time.
2. Remove all staples and paper clips before scanning. Staples and
paper clips on documents may damage the Scan Station and
documents.
3. All inks and correction fluids on the paper must be dry before
scanning is started.
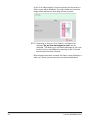
Using the Scan
Station
1. Place the documents you want to scan in the input tray of the Scan
Station. Be sure the front side of your document(s) is positioned
against the input tray and the top of the document(s) is inserted into
the input tray first (see below). Two-sided documents are scanned in
one pass.
NOTE: Depending on how your Scan Station is configured, you may be
required to enter your user name, password and domain to
login.

2-4 A-61627 November 2008
2. Do one of the following:
• If you have a USB flash drive with your personal settings, insert
the flash drive in the USB port. Your settings will be displayed on
the touch screen and override the default settings. Proceed with
Step 5.
• If you do not have personal settings, proceed with the next step.
3. From the touch screen, select the destination(s) you want to send
your scanned document(s) to. More than one email address, printer,
network folder, etc. can be selected at a time.
NOTE: If you select a destination that you do not want, select the
item again to uncheck it.
4. If you want to change the scan settings, touch the Settings button
and make the desired changes.
5. Press Go. The Processing Review screen will be displayed.
NOTE: The message “Please wait, lamps are warming up” may
be displayed. Document feeding proceeds after the lamps
warm up.
• If you want to review or change any of your settings, you can
select the Output button and the Settings Review screen will be
displayed.

A-61627 November 2008 2-5
• Otherwise, select Scan. Depending on how your Scan Station is
configured none, one or all of the following options may be
displayed:
- Custom E-mail Subject: select this option to display the
keyboard and enter a customized E-mail subject line.
- Secure PDF Password: allows you to enter a password
that will be used to encrypt and secure PDF files.
- File Name Prefix: allows you to change the file naming
prefix.
- Add Voice Annotation Attachment: you have the option
of adding an audio message as an attachment to your
scanned document(s) for email, FTP, network folder and
USB flash drive destination types. If you select Add Voice
Annotation Attachment the Audio Attachment Options
screen will be displayed where you can select Record to
record a message, select Review to play the message you
recorded or select Delete to delete the recorded message.
6. Review your list of destinations and check/uncheck additional
destinations if desired, then select Scan.
NOTES:
• If your Scan Station is configured for FAST Scanning, scanning will
start immediately and the Destination Review screen will not be
displayed.
• If you press any button on the screen (including the scroll arrows)
the timer will stop and you will need to press the Done button again.
• If you want to change these settings, cancel the job and go back to
the Destination screen.
• To scan immediately, select the Done button again.
• To stop the scan, select the Cancel button.

2-6 A-61627 November 2008
As the Scan Station begins to feed and process the documents, a
Status screen will be displayed. The page number and a preview
image will be displayed as each page is being scanned.
NOTE: Depending on how your Scan Station is configured, the
message, Do you have more pages to scan? may be
displayed. This allows you to continually add pages to your scan
session until you select No on the message or the 30-second
timeout period has been reached.
When all pages have been scanned, the Status screen will display a
status as it sends your document to each selected destination.

A-61627 November 2008 2-7
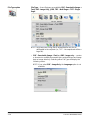
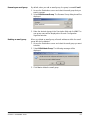
Getting familiar with
the touch screen
The Kodak Scan Station 500 provides a touch screen for easy access
and operation.
When you use the Scan Station, default settings are displayed that
have been configured by your administrator. These settings can be
changed by touching the Settings button on the bottom of the screen. If
you change these settings, they will be enabled only for the current
session.
The touch screen has two main screens. The Settings/Exit button, in
the lower left-hand corner, toggles between the Destination screen
and the Settings screen.
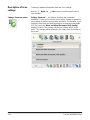
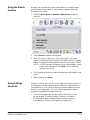
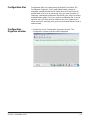
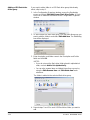
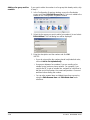
Destination screen The Destination screen displays the available destination types that
have been configured by your administrator. Available destination types
are: Task, Email, My Flash Drive, Network Folder, FTP, Printer, and
Fax. Use the right and left arrows to scroll and display the available
destination group(s).
When you select a destination type, the middle portion of the screen will
be filled in with the defined destinations for that group. For example, if
you select an Email icon, all of the email addresses associated with this
Email group will be displayed. From this list, you can select as many
addresses as desired. If an email address is not in the list, select
Custom. A keyboard will be displayed allowing you to enter the desired
email address(es).
The icons to the right of the Settings button at the bottom of the
Destination screen represent the current scan settings that will be used
the next time a document is scanned. If you want to change any of
these settings (i.e., to send your document in black and white instead of
color), touch the Settings button to go to the Settings screen or select
the desired icon to quickly change that setting.
NOTE: For information about the Search option, see the section
entitled, “Using the Search function” later in this chapter.

2-8 A-61627 November 2008
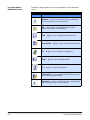
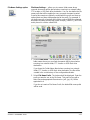
Icon descriptions:
Destination screen
Following is a description of the icons displayed on the Destination
screen.
Destination screen icons
Icon Description
Left arrow — touch to scroll the list to the next destination
group to the left of the current destination.
Task — displays a list of available tasks which group
together scan settings and destinations.
Email — displays a list of available email address(es).
Network folder — displays a list of available network folders.
FTP — displays a list of available FTP addresses.
Printer — displays a list of available printers.
Fax — displays a list of fax destinations.
My flash drive — if you inserted a USB flash drive, touch this
icon to use your desired settings.
Right arrow — touch to scroll the list to the next destination
group to the right of the current destination.

A-61627 November 2008 2-9
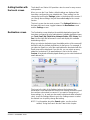
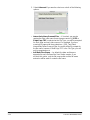
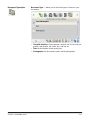
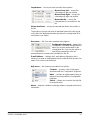
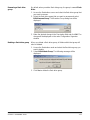
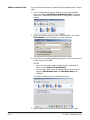
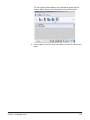
Settings screen The Settings screen displays the icons for the scan settings. When you
select an icon, the values associated with that scan setting will be
displayed in the list. These settings do not need to be changed unless
the document that you are scanning requires something different than
the default.
For a more information about the icons and functionality of the Settings
screen, see the next section.

2-10 A-61627 November 2008
Description of Scan
settings
Following is detailed information about the Scan settings.
Use the Right and Left arrows to scroll through the list of
scan settings.
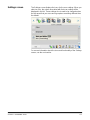
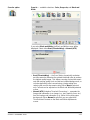
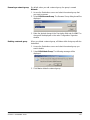
Settings Shortcuts option Settings Shortcuts — six Settings Shortcuts are provided at
installation. These can be used to quickly select a group of commonly
used settings to make scanning faster and easier. For example, if you
frequently scan black and white documents to create text searchable
PDF files, select the Black and White Document (OCR Quality)
Settings Shortcut. This changes all the scan settings with a single
touch. The changes will be reflected in the status bar at the bottom of
the screen.

A-61627 November 2008 2-11
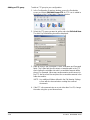
File Name Settings option File Name Settings — allows you to name a folder name where
scanned documents will be placed when scanning to a network folder,
FTP location or USB flash drive destination. You can also define the file
name prefix that will be applied to every scanned document created.
Scanned documents are typically created with this prefix and have an
optional date and time stamp appended to the prefix. For example, if
you define a prefix of receipts and a folder name of 2008, the scanned
document file name will have the format: receipts_20080117_092219.tif
and is placed in a folder called 2008.
1. Select Folder Name. The keyboard will be displayed. Enter the
folder name where your scanned documents will be placed when
scanning to a network folder, FTP location or USB flash drive
destination.
If you leave the Folder Name blank when scanning to a network
folder, FTP location or USB flash drive destination, the file will be
created in the root directory of the configured destination.
2. Select File Name Prefix. The keyboard will be displayed. Enter the
prefix you want to use as the file name. This prefix, along with a
date, time and appropriate file extension (.pdf, .jpg, .tif), will be
appended to it.
If you do not create a File Name Prefix, the default file name prefix
will be used.

2-12 A-61627 November 2008
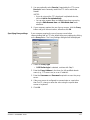
3. Select Advanced if you want to select one or both of the following
options:
• Interactively Name Scanned Files — if checked, you may be
required to enter a file name for each page scanned. If JPEG or
Single Page TIFF is selected as the File Type, you will be prompted
for each page and each side scanned. For example, if you are
scanning 10 pages with these selections: JPEG, Two-Sided,
Interactively Name Scanned Files, the result will be 20 prompts for
the file name; however, if Multi Page TIFF is the File Type, you will
only be prompted once.
• Add Date/Time Stamp — by default, the date and time are
appended to each file name the Scan Station creates. If you
uncheck this option, only the file name prefix and the file name
extension will be used to create the file name.
Page is loading ...
Page is loading ...
Page is loading ...
Page is loading ...
Page is loading ...
Page is loading ...
Page is loading ...
Page is loading ...
Page is loading ...
Page is loading ...
Page is loading ...
Page is loading ...
Page is loading ...
Page is loading ...
Page is loading ...
Page is loading ...
Page is loading ...
Page is loading ...
Page is loading ...
Page is loading ...
Page is loading ...
Page is loading ...
Page is loading ...
Page is loading ...
Page is loading ...
Page is loading ...
Page is loading ...
Page is loading ...
Page is loading ...
Page is loading ...
Page is loading ...
Page is loading ...
Page is loading ...
Page is loading ...
Page is loading ...
Page is loading ...
Page is loading ...
Page is loading ...
Page is loading ...
Page is loading ...
Page is loading ...
-
 1
1
-
 2
2
-
 3
3
-
 4
4
-
 5
5
-
 6
6
-
 7
7
-
 8
8
-
 9
9
-
 10
10
-
 11
11
-
 12
12
-
 13
13
-
 14
14
-
 15
15
-
 16
16
-
 17
17
-
 18
18
-
 19
19
-
 20
20
-
 21
21
-
 22
22
-
 23
23
-
 24
24
-
 25
25
-
 26
26
-
 27
27
-
 28
28
-
 29
29
-
 30
30
-
 31
31
-
 32
32
-
 33
33
-
 34
34
-
 35
35
-
 36
36
-
 37
37
-
 38
38
-
 39
39
-
 40
40
-
 41
41
-
 42
42
-
 43
43
-
 44
44
-
 45
45
-
 46
46
-
 47
47
-
 48
48
-
 49
49
-
 50
50
-
 51
51
-
 52
52
-
 53
53
-
 54
54
-
 55
55
-
 56
56
-
 57
57
-
 58
58
-
 59
59
-
 60
60
-
 61
61


Kodak Scan Station 520 EX User manual
- Category
- Scanner Transparancy Adapters
- Type
- User manual
- This manual is also suitable for
Ask a question and I''ll find the answer in the document
Finding information in a document is now easier with AI
Related papers
-
Kodak Scan Station 500 Reference guide
-
Kodak SCAN STATION 100 Quick Tips
-
-
-
Kodak I2400 Reference guide
-
Kodak Digital Camera User manual
-
-
-
-
Kodak Scan Station 700 User Reference Manual
