Page is loading ...

EN
4
DJI Goggles Racing Edition
DJI Goggles Racing Edition (hereafter abbreviated as “DJI Goggles RE”) are equipped
with high-performance displays and an ultra-low latency video downlink for use with DJI
TM
aircraft, giving you a real-time First Person View (FPV) aerial experience. DJI Goggles RE can
also be used to display HD videos, bringing you a more immersive high-denition viewing
experience. DJI Goggles RE support head tracking, allowing both aircraft and gimbal to be
controlled with head movements for a whole new style of ying. *
Precisely engineered for racing, DJI Goggles RE are compatible with DJI's advanced
OCUSYNC
TM
video transmission module, supporting both analog and 2.4/5.8 GHz dual-band
digital video signal with up to 7 km transmission distance and latency as low as 50 ms. ** DJI
Goggles RE comes with a set of three compatible antennas for different scenarios. The DJI
OcuSync Air System comes equipped with an array of powerful features, such as 1280×960
HD transmission, automatic Frequency-Hopping Spread Spectrum (FHSS) transmission,
and access to up to 19 selectable transmission channels. This module is compatible with a
variety of multi-rotor and xed-wing aircraft.
DJI Goggles RE
1. Touch Panel
2. Headband
3. Charging Status Indicator
4. Micro USB Port
5. Headband Knob
6. Speaker
7. Power Button
8. Battery Level Indicators
9. Back Button
10. Function Button
11. Link Button
12. Linking Status Indicator
13. IPD (Interpupillary
Distance) Knob
14. Lens
15. Proximity Sensor
16. Headband Buckle
17. Heat Vent
18. Micro SD Card Slot
19. 3.5 mm Audio Port
20. HDMI Type-D Port
21. Speaker
22. SMA Antenna Port
* Only some aircraft are supported. Please refer to the User Manual for specic models and operations.
** The DJI Goggles RE can reach their maximum transmission distance (2.4 GHz, FCC) in a wide open area with no
EMI (electromagnetic interference), achieving minimum latency in 480p50 live view mode.
21
22
15
14
18
19
20
17
16
1
2
3
4
5
13
6
7
8
Fn
9
10
11
12

EN
5
3
1
2
4
5
6
7
8
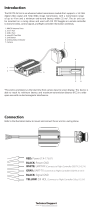
1. Camera Port*
Connects to the DJI OcuSync Camera.
2. S.Bus Port
Connects with the 3-in-1 Cable (Power,
S.Bus, UART), and connects to the
power, flight controller, and OSD port
based on the information below.
RED: Power
BLACK: Power GND
WHITE: UART RX (Connects to OSD TX)
GRAY: UART TX (Connects to OSD RX)
BROWN: Signal GND
YELLOW: S.Bus (Connects to Flight
Controller RX)
3. Micro SD Card Slot
Insert the Micro SD card to store the
recorded video.
* Note that both this port and the camera connector
plug are customized Type-C interfaces, and they are
not compatible with third-party equipment.
4. Antenna Ports (MMCX)
Used to attach the Air Unit antennas.
5. Micro USB Port
Connects to your PC for firmware
updates through DJI ASSISTANT
TM
2.
(When the Air Unit is powered on)
6. PPM Port
Connects to external devices that can
handle PPM signals via the PPM Cable.
Set the corresponding channel in DJI
Goggles RE to control the device remotely
with head movements. (coming soon)
RED: Power
BLACK: Signal GND
WHITE: PPM signal
7. Link Button
Press this button to link the DJI OcuSync
Air Unit with the DJI Goggles RE.
8. Linking Status Indicator
Indicates the linking status of the
DJI OcuSync Air Unit and the DJI
Goggles RE.
Before using this product, please read this manual fully to ensure correct operation.
www.dji.com/dji-goggles-re
DJI OcuSync Air Unit

EN
6
Installation and Wearing
Insert the Headband Buckle into the
slot above the DJI Goggles RE body.
Click
Adjust interpupillary distance.
Flip the DJI Goggles RE body to see outside.
Wear the DJI Goggles RE and
adjust the Headband.

EN
7
Check the Battery Level and Charging
Press once to check the battery level.
Press once, then again and hold to turn on/off.
The Battery is fully charged when the Charging Status Indicator or the Battery
Level Indicators turn off.
Charge time: ~ 4 hours Maximum run-time: ~ 6 hours
Power Outlet
100~240V
USB Charger Micro USB Port
Low HighBattery Level
Module Connections
When using with third-party racing drones, you can choose between either analog or digital
video transmission. Please follow the instructions below for installation and connection.
Skip this section if you plan on using the goggles with a dedicated DJI drone.
Analog Video Transmission
Install the Pagoda antenna (SMA interface) to the SMA Port of DJI Goggles RE directly.
The analog frequency band is 5.650 GHz - 5.925 GHz, of which 5.725 GHz - 5.850 GHz are ISM frequency
bands. You may use these frequencies without permission but please follow local regulatory procedures
when using the other frequency bands.
The Pagoda antenna is an omnidirectional left hand circularly polarized (LHCP) antenna design. It is
recommended to use the Pagoda antenna or other left hand circularly polarized antennas for analog
transmitters to get the best transmission performance.
In a multi-aircraft ying environment, the adjacent frequency interval should be higher than 25 MHz to avoid
the live view of your DJI Goggles RE being affected by a nearby frequency.

EN
8
Digital Video Transmission
In addition to install the Pagoda antenna
(SMA interface) to the SMA Port of the
DJI Goggles RE, you will also need to
install the DJI OcuSync Air System on a
third-party racing drone to work with the
goggles. Refer to the illustration below to
mount and connect the modules onto your
aircraft.
Antenna Description
Pagoda Antenna
5.8 GHz single frequency circular polarization omnidirectional,
small size, recommended for racing. Do not use this antenna
when using the 2.4 GHz frequency band.
Cylindrical Antenna
Dual-frequency circular polarization omnidirectional, providing a
smooth video transmission experience.
Dipole Antenna
Dual-frequency linear polarization omnidirectional, suitable for
close-up ight.
After familiarizing yourself with the digital video transmission, you can connect the trainer
port of a third-party remote controller and the audio port on the DJI Goggles RE through
the trainer cable to transmit the control signal to the racing drone.
The S.Bus Port and the PPM Port on the Air Unit are only used when transmitting the remote control signal.
These ports don’t need to be connected if video downlink is used only.
There are up to 19 channels (5.8 GHz: 12 channels, 2.4 GHz: 7 channels) for digital video transmission, and
each bandwidth is 10 MHz. You can select the transmission channel manually to avoid interference from
other devices.
Please be aware that the Air Unit may become very hot during, or after operation. DO NOT touch it before it
has cooled down sufciently.
Please avoid using the Air Unit for an extended time when there is no external cooling equipment.
Otherwise, it might get overheated and enter into overheat protection mode. Wait for the module to cool
down and then you can restart it. It is recommended to have an external fan installed to dissipate heat.
Place the two antennas on the Air Unit vertically and parallel to each other at least 30 mm apart. Please
note that you should avoid placing the antennas level with any type of conductor. Also, make sure to keep
the bottom of the antenna at least 25 mm away from potential conductors like cables, carbon ber frames,
batteries, and metals, etc.
If you are only using the Air Unit to transmit the downstream video signal, DO NOT use the same frequency
band as the upstream control signal to avoid interference.
3-in-1 Cable (Power, S.Bus, UART)
RED: Power (9-16.8 V) WHITE: UART RX (Connects to OSD TX, 0-3.3 V)
BLACK: Power GND GRAY: UART TX (Connects to OSD RX, 0-3.3 V)
BROWN: Signal GND YELLOW: S.Bus (Connects to Flight Controller RX, 0-3.3 V)
DJI OcuSync Camera
Devices that support PPM
signals (e.g. actuator)
PPM Cable
RED: Power (5 V)
BLACK: Signal GND
WHITE: PPM signal (0-5 V)
Antennas

EN
9
Activation and Connection
If you do not have a MAVIC
TM
series aircraft, please download the latest DJI Assistant 2 to
activate them.*
When the DJI OcuSync Air Unit is powered on, connect it to your PC and run DJI
Assistant 2 to activate it.*
Micro USB cable
** Prepare an OTG cable
and connect it to the
Micro USB port of the
remote controller.
Live view only.
INSPIRE
TM
2
PHANTOM
TM
4 Series
SPARK
TM
**
HDMI cable
INSPIRE Series
PHANTOM 4 PRO
+
PHANTOM 4 ADVANCED
+
Activate with
DJI GO
TM
4
App
Please update the app rst.
DJI Assistant 2 can also be
used for activation.
Activate with
DJI Assistant 2
Download: www.dji.com/dji-goggles-re
DJI Assistant 2 supports Windows 7 (or
later) or OS X 10.11 (or later).
Connect DJI Goggles RE to your
PC with Micro USB cable, then run
DJI Assistant 2 to activate.
OCUSYNC
Press the Link Buttons
on the Mavic aircraft and
DJI Goggles RE, or enter
Tools > Settings > Linking
Settings to connect.
MAVIC Series
HDMI cable
Video Play
Device
The following the steps show how to link the goggles with third-party racing drones:
Analog Video Transmission
Power on the DJI Goggles RE, swipe downward with two ngers on the touch panel to
enter the shortcut menu and select Racing Drone (Analog)> Frequency Scanning to
search for the frequency you need.
Digital Video Transmission
1. Power on the DJI OcuSync Air Unit and press the link button on the air unit with an
appropriate tool when the linking status indicator is solid green. The indicator will turn
solid red when the air unit is waiting for linking.
2. Power on the DJI Goggles RE, then directly press the link button with an appropriate tool
in the main menu, or just swipe downward with two ngers on the touch panel to enter the
shortcut menu and select Racing Drone (Digital) > Linking Settings.
3. Make sure the distance between the googles and the Air Unit is within 2 m. Both the two
linking status indicators will turn solid green when successfully linked, and the video will
display normally.
* Ensure to update both the DJI Goggles RE and the Air Unit to the latest version after activation for the best
performance.
Ensure all devices are powered on and that the aircraft is linked with the remote
controller. Make sure both are updated to their latest rmware versions.

EN
10
Controls
Single Finger Touch /
5D Button*
●
Swipe to scroll on the menu
●
Tap to conrm
Two Fingers Touch
●
Swipe forward/backward to unlock/
lock the touch panel
●
Swipe upward/downward to exit/enter
the shortcut menu
Only supports:
Mavic Series
Spark
Phantom 4 Series
Inspire 2
Somatic Control
DJI Goggles RE
support head tracking,
allowing aircraft
and gimbal to be
controlled using head
movements. Multi
Intelligent Flight Modes
are also supported.
Function Button / C1 Button*
DJI aircraft: Press to display the cursor,
then swipe forward/backward with one
nger to zoom in or zoom out. Move your
head then tap the touch panel to dene the
focus point.
Other aircraft: Press to start/stop video
recording (digital video transmission only).
Back Button / C2 Button*
Press to return to the previous
menu, or exit the current
Intelligent Flight Mode.
* When connected to Mavic series aircraft, the 5D, C1, and C2 buttons on the remote
controller will be used to control the DJI Goggles RE, and their original functions will
be disabled.
Fn
Specications
DJI Goggles RE
Weight (Typical) DJI Goggles RE Body: 502 g; Headband: 500 g
Dimensions DJI Goggles RE Body: 195 × 155 × 110 mm
Headband (folded): 255 × 205 × 92 mm
Screen Size 5-inch × 2
Screen Resolution 3840 × 1080 (single screen: 1920 × 1080)
Communication Frequency 2.4 GHz / 5.8 GHz
Transmitter Power (EIRP) 2.4 GHz: 25.5 dBm (FCC); 18.5 dBm (CE); 19 dBm (SRRC)
5.8 GHz: 25.5 dBm (FCC); 12.5 dBm (CE); 18.5 dBm (SRRC)
Live View Modes 1080p30, 720p60, 720p30
Video Format MP4 (H.264)
Supported Video Play Format MP4, MOV, MKV (Video format: H264;
Audio format: AAC-LC, AAC-HE, AC-3, DTS, MP3)
Battery Capacity 9440 mAh
Operating Temperature Range 32° to 104° F (0° to 40° C)
Charger Input: 100-240 VAC, 50 / 60 Hz, 0.5 A
Output: 5 V
3 A / 9V 2A / 12 V 1.5 A

EN
11
DJI is a trademark of DJI.
Copyright © 2017 DJI All Rights Reserved.
The content is subject to change.
Download the latest version from
www.dji.com/dji-goggles-re
DJI OcuSync Air System
Weight Air Unit: 43.7 g; Camera (cable included): 18.2 g
Pagoda Antenna: 9.4 g; Cylindrical Antenna: 9.4 g;
Dipole Antenna: 4.2 g
Dimensions Air Unit: 72 × 33 × 14 mm
Camera: 29.4 × 28.2 × 22.6 mm
Communication Frequency 2.4 GHz / 5.8 GHz
Transmitter Power (EIRP) 2.4 GHz: 22.5 dBm (FCC); 18.5 dBm (CE); 19 dBm (SRRC)
5.8 GHz: 25.5 dBm (FCC); 12.5 dBm (CE); 25.5 dBm (SRRC)
Live View Modes and Min. Latency 960p50: 70 ms; 720p60: 60 ms; 480p50: 50 ms
Max. Transmission Distance 2.4 GHz: 7 km (FCC); 4 km (CE); 4 km (SRRC)
5.8 GHz: 4 km (FCC); 0.7 km (CE); 4 km (SRRC)
Recommended Frequency Band FCC: 5.8 GHz; CE: 2.4 GHz; SRRC: 5.8 GHz
Video Format MP4 (MPEG4)
I/O Interface S.Bus, Micro USB, PPM, UART, MMCX, Micro SD card slot
Supported Flight Control System F3, F4, KISS, NAZE
Supported Remote Controller X9D (Frsky), DEVO 10 (Walkera), T8FG (Futaba),
T14SG (Futaba), WTF09sll (WFLY), AT9S (RadioLink)
Operating Temperature Range 32° to 104° F (0° to 40° C)
Input Power 9-16.8 V (3S-4S)
Camera Sensor: 1/3'' CMOS; Effective pixels: 1.2M
Lens: 2.65 mm, f/2.0
Lens Group: 6G + IR
Shutter: Global shutter
ISO: 100 - 3200
FOV: 148° (D); 111° (H); 79.5° (V)

DJI incorporates HDMI
TM
technology.
The terms HDMI and HDMI High-Definition Multimedia
Interface, and the HDMI Logo are trademarks or registered
trademarks of HDMI Licensing LLC in the United States and
other countries.
If you have any questions about this document, please contact DJI by
sending a message to [email protected].
Printed in China.
YC.BZ.SS000128.01
DJI Support
DJI
技术支持
DJI
技術支援
DJI
고객지원
DJI Support
Servicio de asistencia de DJI
Service client DJI
Assistenza DJI
DJI-ondersteuning
Suporte DJI
http://www.dji.com/support
/