Page is loading ...

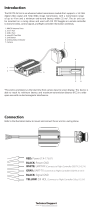
Connection
RED: Power (7.4-26.4 V)
BLACK: Power GND
WHITE: UART-RX (Connects to Flight Controller OSD TX, 0-3.3 V)
GRAY: UART-TX (Connects to Flight Controller OSD RX, 0-3.3 V)
BLACK: Signal GND
YELLOW: DJI HDL (Connects to Flight Controller S.Bus, 0-3.3 V)
Introduction
①
②③
④⑤
① IPEX Po Antenna
③ Type-C Po
⑤ Button
② Camera
④ LED
The RUNCAM LINK Digital FPV Air Unit is an advanced video transmission module that
suppos a 5.8 GHz digital video signal and 1280 x 720 60fps image transmission, with a
transmission range of up to 4 km and a minimum end-to-end latency within 32 ms*. The air
unit can be mounted on a racing drone and used with DJI FPV Goggles or a remote
controller to transmit video, control signals, and ight controller information wirelessly.
* The end-to-end latency is the total time from camera input to screen display. The device
is able to reach its minimum latency and maximum transmission distance (FCC) in a wide
open area with no electromagnetic inteerence
Refer to the illustration below to mount and connect the air unit to a racing drone.
1. An electric soldering iron and soldering tin are required for connection. Make sure that
there are no sho circuits or open circuits when soldering the cables.
2. There are up to eight channels for the air unit depending on the region (FCC: eight,
CE/SRRC: four, MIC: three). Each channel has a bandwidth of 20 MHz. The public channel
is 8,which is the default channel when the equipment is powered on. The channel can be
changed manually to avoid inteerence from other devices.
3. The air unit may become hot during or after operation. DO NOT touch the air unit
before it cools down.
4. DO NOT use the air unit for an extended period when the temperature is high or there
is poor ventilation. Otherwise, the air unit may overheat and enter lowpower mode which
will aect its peormance. If the air unit enters low-power mode, resta it or wait for it
to cool down and it will automatically return to normal.
When powered on, connect the air unit to your computer and run DJI ASSISTANTTM 2
for activation.Download DJI Assistant 2 at https://www.dji.com/fpv/downloads
Activation
The air unit suppo three linking methods: A, B, and A+B (Must link A before B).
Linking
A
B
1. Power on the air unit and the DJI FPV Remote Controller.
2. Press the link button on the air unit, and then press the record button, C button, and
right dial on the remote controller simultaneously.*
3. Both the linking status indicators turn solid green when successfully linked.
* When ready to link, the devices will give the following indication:Air unit: the linking
status indicator turns solid red.Goggles: the goggles beep continually.Remote controller:
the remote controller beeps continually and the status indicator blinks blue.
1. Power on the air unit and the DJI FPV Goggles.
2. Press the link button on the air unit and the goggles.*
3. The linking status indicator of the air unit turns solid green. The goggles stop beeping
when successfully linked and the video display is normal.
RunCam link Wasp
Dimensions
25.5mm
29mm
13.0mm
20mm
RunCam
Wasp Manual
/