Page is loading ...

CPD-12422
User’s Guide
User’s Guide

A
B
.
flash
timer light
front view
shutter
button
lens
camera dial
neck strap
holder
diopter dial
USB port
video/audio
out port
AC adapter
port
hot shoe
camera
dial
POWER
button
shutter button
image quality
button
flash
button
self timer
button
top view
viewfinder

viewfinder
LCD screen
back view
MENU
button
neck strap
holder
microphone
status display
panel
speaker
photo
capture light
zoom
controls
camera control
buttons
camera status
light
bottom view
battery cover lock
tripod
socket
battery cover
print button

A
B
IMPORTANT NOTICE
DISCLAIMER OF WARRANTY
Epson America makes no representations or warranties, either express or
implied, by or with respect to anything in this manual, and shall not be liable for
any implied warranties of merchantability and fitness for a particular purpose or
for any indirect, special, or consequential damages. Some states do not allow the
exclusion of incidental or consequential damages, so this exclusion may not
apply to you.
COPYRIGHT NOTICE
All rights reserved. No part of this publication may be reproduced, stored in a
retrieval system, or transmitted, in any form or by any means, electronic,
mechanical, photocopying, recording, or otherwise, without the prior written
permission of Epson America, Inc. No patent liability is assumed with respect to
the use of information contained herein. Nor is any liability assumed for damages
resulting from the use of the information contained herein. Further, this
publication and features described herein are subject to change without notice.
TRADEMARKS
EPSON and EPSON Stylus are registered trademarks and PRINT Image
Matching is a trademark of SEIKO EPSON CORPORATION.
PhotoPC is a registered trademark and HyPict and BorderFree are trademarks of
Epson America, Inc.
Image Expert and Camio are trademarks of Sierra Imaging, Inc. in the United
States and other countries and are used under license.
CompactFlash is a trademark of SanDisk Corporation and has been licensed to
CFA (CompactFlash Association).
General notice: Other product names used herein are for identification purposes
only and may be trademarks of their respective owners. EPSON disclaims any
and all rights in those marks.
A NOTE CONCERNING RESPONSIBLE USE OF
COPYRIGHTED MATERIALS
Digital cameras and scanners, like photocopiers and conventional cameras, can
be misused by improper copying of copyrighted material. While some countries’
laws permit limited copying in certain circumstances, those circumstances may
not be as broad as some people assume. EPSON encourages each user to be
responsible and respectful of the copyright laws when using digital cameras and
scanners.
Copyright © 2001 by Epson America, Inc. CPD-12422
Long Beach, California, USA 4/01
Printed on recycled paper.

xiii
A
B
Contents
Introduction
Software Intro-2
Optional Accessories Intro-3
Using Your Documentation Intro-3
Section 1: Using Your Camera and
Taking Pictures
1 Setting Up Your Camera
Unpacking Your PhotoPC 3100Z 1-1
Installing Batteries 1-2
Battery Options 1-3
Attaching the Neck Strap 1-4
Attaching the Lens Cap 1-5
Using the Camera Case 1-6
Using the Camera Dial and Turning On
the Camera 1-7
Setting the Date and Time 1-8
Formatting Your CompactFlash Memory Card 1-9
Choosing Your User Mode 1-10
Removing a CompactFlash Memory Card 1-11
Installing a CompactFlash Memory Card 1-12
2 Taking Pictures
Taking Pictures With the Viewfinder 2-1
Taking Pictures With the LCD Screen 2-3
Playing Back Images from the View Menu 2-6
Setting Resolution 2-7
Standard JPEG 2-7
Fine JPEG 2-7
Super Fine JPEG 2-7
HyPict JPEG 2-7
Uncompressed Tiff 2-8
Setting the Image Compression 2-9

xiv
A
B
Using the Flash 2-9
Auto 2-10
Forced Flash 2-10
Flash Off 2-10
Red-eye Reduction 2-10
Slow Synchronized Flash 2-10
Selecting Color or Black and White Mode 2-11
Taking Pictures With the Timer 2-12
Using Programmed Subject Settings 2-13
Enabling the Confirmation Screen 2-14
Adding Sound to Pictures 2-14
Using Instant Playback and Delete 2-16
Reading the Status Display Panel 2-17
Checking the Battery 2-17
Checking the Picture Counter 2-18
Checking Other Status Information 2-18
3 Capturing Video Clips and Special Shots
Recording Video Clips 3-1
Continuous Shooting 3-3
Continuous Shooting Using the Timer 3-4
Interval Shooting 3-5
4 Framing, Focusing, and Zooming
Using Digital Zoom 4-1
Enabling Digital Zoom 4-2
Taking Digital Zoom Pictures 4-2
Taking Close-Ups With Macro Mode 4-4
Adjusting the Focus Manually 4-5
Capturing Panoramas 4-6
5 Adjusting Exposure and Color Settings
Adjusting Exposure 5-2
Changing the Automatic Exposure Value 5-2
Setting Shutter Speed and Aperture 5-4
Using Aperture Priority Settings 5-5
Using Shutter Priority Settings 5-6
Adjusting the Sensitivity Setting 5-7
Adjusting the White Balance Setting 5-8
Setting the Custom White Balance 5-10
Changing the Metering Method 5-11
Exposure and Color Tips 5-12

xv
A
B
6 Playing Back Photos
Playing Back Pictures One by One 6-2
Playing Back Multiple Pictures 6-2
Locking and Unlocking Photos 6-3
Deleting Pictures 6-3
Deleting the Currently Displayed Picture 6-4
Deleting All Pictures 6-4
Adding Audio Recordings 6-5
Playing Back Audio Recordings 6-6
Deleting Audio Recordings 6-6
Magnifying a Picture 6-7
Playing Back Video Clips 6-8
Deleting a Video Clip 6-10
Viewing Picture Information 6-10
Playing Your Pictures as a Slide Show 6-11
7 Adjusting Camera Settings
Setting the Time and Date 7-1
Setting the Auto Power Off Time 7-2
Turning Camera Sounds On or Off 7-3
Setting the Camera Volume 7-4
Setting the Language 7-4
Adjusting the LCD Brightness 7-5
Adjusting the Viewfinder Focus 7-5
8 Selecting Images for Printing
About the DPOF Standard 8-2
About PRINT Image Matching 8-2
Selecting Photos to Print 8-2
Deselecting All Photos 8-3
Adjusting Photos for Printing 8-3
Enabling an Index Print 8-4
Section 2: Using Your Camera With
Your Computer or Video Device
9 Installing Software and Connecting
Installing the USB Storage Driver 9-2
Installing the Driver in Windows 98 9-2
Installing the Driver in Mac OS 8.6
or Mac OS 8.5.1 9-3
Installing Camera Software 9-3
Installing in Windows 9-3
Installing on a Macintosh 9-5
Connecting the Camera to Your Computer 9-6
Installing Your Windows 98 USB Driver 9-7
Reading Your Image Expert User’s Guide 9-9

xvi
A
B
10 Getting Photos Into Your Computer
Copying Files Directly From Your Memory Card 10-1
Transferring Files With Image Expert 10-3
What To Do if You See an Error Message 10-6
11 Getting Your Photos Into Documents
Importing Images Into Documents 11-2
Getting Images With Copy and Paste 11-3
Using Drag and Drop From an Album
(Windows Only) 11-4
Getting Images With the Camio Viewer
(Windows) 11-5
Dragging and Dropping a Picture Into
a Document 11-7
Transferring Images Before Placing Them 11-7
Sharing Your Photos on the Internet 11-8
Additional Tips for Importing 11-8
Importing Video Clips 11-8
Importing Photos Into Web Pages 11-8
12 Printing Your Photos
Printing a Single Photo 12-1
Printing Photos from an Album 12-3
Printing Size Guidelines 12-4
13 Stitching Panoramas
Importing and Aligning Pictures in Windows 13-1
Importing and Aligning Pictures On a Macintosh 13-3
Stitching a Big Plane Panorama 13-3
Stitching a Cylinder Panorama 13-5
Viewing and Printing Panoramas 13-6
14 Presenting Your Photos
Uploading Images to the Camera 14-1
Converting Files in Windows 14-2
Converting Files on a Macintosh 14-4
Uploading Converted Files 14-6
Converting Presentations 14-7
Capturing Windows Screens 14-7
Capturing Macintosh Screens 14-9
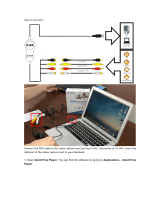
Connecting the Camera to a Video Device 14-10
Setting the Broadcast Signal System 14-10
Connecting the Camera 14-11

xvii
A
B
Section 3: Troubleshooting and
Reference
A Maintenance and Troubleshooting
Caring for the Camera A-1
Handling the Camera A-1
Cleaning the Camera A-2
Storing the Camera A-2
Solving Camera Problems A-3
Solving Connection and Software Problems A-7
Solving Picture Problems A-11
Where To Get Help A-15
EPSON Accessories A-16
Software Licensing A-16
B Optional Accessories
Using the Optional AC Adapter B-2
Using a Tripod B-4
Attaching an Optional Converter Lens or Filter B-4
Attaching an Optional Flash B-5
Using a PC Card Adapter B-6
Installing the PC Card Adapter B-7
Transferring Photos With the Adapter B-7
Photo Printers B-8
C Specifications
Camera C-1
CompactFlash Memory Card C-5
Optional NiMH Battery Charger C-5
Optional NiMH Batteries C-6
Optional Universal AC Adapter C-6
Minimum System Requirements C-7
Windows Systems C-7
Macintosh Systems C-7
DNotices
Safety Instructions D-1
Declaration of Conformity D-3
FCC Compliance Statement D-4
Warranty D-5
Index

Introduction 1
A
B
our new EPSON
®
PhotoPC
®
3100Z is an ultra-high
Y
resolution, three megapixel, USB digital camera with
3
×
optical zoom. It includes three different user modes with
varied levels of control: a manual mode for experienced
photographers, a programmed mode for specific shots and
time savings, and a fully automatic point-and-shoot mode
for no-fuss photography.
The PhotoPC 3100Z comes with a built-in microphone and
speaker that let you add and play back voice messages. You
can also capture full-motion video with digital zooming and
sound. Your camera puts you in control of all your shots with
exposure, flash, white balance, metering, and focus settings.
Introduction

Introduction 2
A
B
The PhotoPC 3100Z captures 2048
×
1536-pixel resolution
images in 24-bit color, using a 3.34 megapixel CCD sensor.
With EPSON’s HyPict
™
image enhancement technology,
the images can be interpolated to 2544
×
1904 pixels
(4.8 megapixels) right inside the camera. You can also
capture uncompressed Tiff images for excellent detail.
Your PhotoPC 3100Z comes with cables, neck strap, soft
case, lens cap, lens adapter, and a 16MB CompactFlash
™
memory card. It also includes a CD-ROM with software and
utilities for downloading, uploading, editing, organizing,
stitching, and printing your pictures.
Software
The PhotoPC 3100Z software suite includes the following
Windows
®
and Macintosh
®
applications:
◗
USB storage driver for transferring your pictures
◗
Sierra Imaging Image Expert
™
software for transferring,
organizing, editing, and printing your pictures. Also
includes QuickTime
™
and Adobe
®
Acrobat
®
Reader
◗
EPSON File Converter for converting files (including
presentation slides) into a file format that you can
upload into your camera
◗
Panorama Stitcher for stitching and printing your
panoramic images

Introduction 3
A
B
Optional Accessories
EPSON offers these accessories for the PhotoPC 3100Z:
◗
Universal AC adapter (part number B867081) for use
with any standard (100 to 240 V) electrical outlet
◗
Universal NiMH Power Pak, which includes batteries
and charger (part number B818172)
◗
NiMH rechargeable batteries (part number B818113)
Your camera is also compatible with a range of options that
can enhance your shots and store more images. You can
attach an optional flash to the camera’s hot shoe for portrait
photos or photos in places that are dimly lit. The camera’s
lens adapter allows you to add optional lenses and filters for
specialized shots. You can also obtain additional
CompactFlash memory cards (Type I) and PC card adapters
made by leading suppliers, such as Lexar Media,
™
Delkin Devices,
™
and SanDisk.
®
Using Your Documentation
Your EPSON PhotoPC 3100Z documentation gives you all
the information you need to use your camera and software.
◗
Your Quick Reference Guide is a handy, portable guide
that explains basic settings and how to take pictures.
◗
You can find instructions for using Image Expert in your
electronic Image Expert User’s Guide. (See Chapter 9 for
details on reading the electronic guide.)
◗
This User’s Guide includes most of the information
you’ll need and is divided into the following sections:
Using Your Camera
and Taking Pictures
Explains setting up your camera,
taking pictures and video clips, and
playing back pictures and video clips.
Using Your Camera
With Your
Computer
or Video Device
Tells you how to connect your camera
to your computer, download photos,
upload photos, present photos, stitch
photos, and print photos.
Troubleshooting
and Reference
Gives you important reference
information, including troubleshooting,
safety, and maintenance information.
Index There is an index at the end of the
book.

-1
A
B
Using Your Camera
.
This section includes information about using your EPSON PhotoPC 3100Z to take and play back pictures, adjust
camera settings, and capture video clips. It also explains how to use the camera to set up PRINT Image Matching
™
and Digital Print Order Format (DPOF) files for printing. The following chapters are included in this section:
1 Setting Up Your Camera
2 Taking Pictures
3 Capturing Video Clips and Special Shots
4 Framing, Focusing, and Zooming
5 Adjusting Exposure and Color Settings
6 Playing Back Photos
7 Adjusting Camera Settings
8 Selecting Images for Printing
When you’re ready to load your photos into your computer; or if you want to use your camera with your TV or other
video device; or to stitch your photos into a panorama or print them, see the next section, “Using Your Camera With
Your Computer or Video Device.”
Using Your Camera and Taking Pictures

Setting Up Your Camera 1-1
A
B
Using Your Camera
.
efore you can start using your PhotoPC 3100Z, you
B
need to install the batteries, format your memory card,
and prepare the camera.
Sections in this Chapter:
Unpacking Your PhotoPC 3100Z . . . . . . . . . . . . . . . . . . . 1-1
Installing Batteries . . . . . . . . . . . . . . . . . . . . . . . . . . . . . . 1-2
Attaching the Neck Strap . . . . . . . . . . . . . . . . . . . . . . . . . 1-4
Attaching the Lens Cap . . . . . . . . . . . . . . . . . . . . . . . . . . 1-5
Using the Camera Case . . . . . . . . . . . . . . . . . . . . . . . . . . 1-6
Using the Camera Dial and Turning On the Camera . . . . 1-7
Setting the Date and Time . . . . . . . . . . . . . . . . . . . . . . . . 1-8
Formatting Your CompactFlash Memory Card. . . . . . . . . 1-9
Choosing Your User Mode. . . . . . . . . . . . . . . . . . . . . . . 1-10
Removing a CompactFlash Memory Card . . . . . . . . . . . 1-11
Installing a CompactFlash Memory Card . . . . . . . . . . . . 1-12
1
Unpacking Your PhotoPC 3100Z
Make sure you have all the items shown below.
software
CompactFlash card
(16MB, installed in
camera)
video cable
USB cable
lens adapter
neck strap
lens cap strap
lens cap
soft case
camera
batteries
Setting Up Your Camera

Setting Up Your Camera 1-2
Installing Batteries
Before you install (or remove) batteries, make sure the
camera is turned off.
1
Hold the camera upside down.
2
Press and hold down the battery cover lock
and slide the
cover out to open it.
3
Insert four batteries into the compartment, positioning
the + and
−
ends as shown below.
4
Lower the battery cover and slide it in, as shown below.
When the battery power is almost out, a low battery icon
appears on the camera’s display panel. Be sure to replace
all four batteries at the same time.
battery cover
lock

Setting Up Your Camera 1-3
Battery Options
The PhotoPC 3100Z camera includes 4 AA alkaline
batteries. It can accept the following battery types:
◗
Rechargeable AA NiMH batteries (highly
recommended; to order the Universal NiMH Power
Pak, see page B-2)
◗
Rechargeable AA NiCad batteries
◗
Single-use AA lithium batteries (longer life, Energizer
®
recommended)
◗
Single-use AA alkaline batteries (short term use only,
Duracell
®
Ultra recommended)
WARNING
To avoid the danger of fire or explosion, do not mix different
types of batteries. Do not allow the battery contacts to touch
metal objects such as coins or keys, which could short out the
battery. Read all safety instructions before using batteries.
Follow these safety instructions when handling batteries:
◗
Do not use manganese batteries.
◗
Do not mix different types of batteries; this can cause fire
or explosion.
◗
Replace all four batteries at the same time. Do not mix
old and new batteries.
◗
Do not drop, puncture, disassemble, or mutilate
batteries. Do not get them wet or expose them to fire.
◗
When the camera is not used for long periods of time,
remove the batteries and store them at a low
temperature in a dry location. Store away from the reach
of children.
◗
To avoid fire or electric shock, do not use batteries that
are leaking or damaged in any way.
◗
If battery acid gets in your eyes or on your skin,
immediately rinse the area with water and seek medical
treatment. If a battery is swallowed, seek medical
treatment immediately.
◗
Dispose of used batteries according to the
manufacturer’s instructions and in compliance with all
applicable laws. Contact your local government agency
for information about battery recycling and disposal.
◗
Battery life varies depending on the battery type, the
manufacturer, and other factors.

Setting Up Your Camera 1-4
Attaching the Neck Strap
Your camera includes a neck strap that attaches to the camera
to make it easier to carry.
WARNING
To avoid damaging the camera or other objects, or injuring
people, do not swing the camera about. Keep the strap away
from children. Do not pull or tighten the strap too firmly while
wearing it around your hand or neck; this can cause serious injury.
To attach the neck strap:
1
Unscrew the screw sleeve on the triangular fastener at
one end of the strap
2
Attach the fastener to one side of the camera by passing
it through the eyelet.
3
Tighten the screw sleeve on the fastener as shown below
to close it.

Setting Up Your Camera 1-5
4
After securing the fastener, turn it so that the screw
sleeve is covered by the strap, as shown below.
5
Repeat steps 1 through 4 to attach the other end of the
strap to the other side of the camera.
Attaching the Lens Cap
To secure the lens cap to the camera:
1
Pass the end of the string with the shorter loop through
the eyelet on the edge of the lens cap.
2
Then, pass the end of the string with the longer loop
through the shorter loop.
3
Pull the end of the string with the longer loop all the
way through.

Setting Up Your Camera 1-6
4
Pass the end of the string with the longer loop through
the neck strap’s triangular fastener.
5
Gently pull the lens cap through the string’s longer loop
until the string is securely attached to the camera.
6
Push the lens cap onto the camera. It should snap into
place.
To remove the lens cap, press in the lens cap release tabs
on the sides as you pull the cap off of the camera.
Using the Camera Case
Place the camera in the case upright, with the front of the
camera facing the front of the camera case. Secure the top of
the case with the velcro flap. Place the camera case strap over
the neck strap and close the snap to secure the case to the
neck strap.
camera case
strap
neck
strap

Setting Up Your Camera 1-7
Using the Camera Dial and Turning
On the Camera
The camera dial has six settings: three for taking pictures
and three for performing other functions, such as setting up
your camera or playing photos back on the LCD screen.
To turn on the camera, remove the lens
cap, then press the
POWER
button in
the center of the dial. (Press it again to
turn the camera off.)
Camera dial settings include the following:
Use this setting for video clip capture, continuous
shooting, interval shooting, and panorama stitching.
See Chapter 3 for details.
Use this setting to take photos with the LCD screen.
See page 2-3 for details.
Use this setting to take photos with the optical
viewfinder. See page 2-1 for details.
Use this setting to play back and delete photos and
video clips, and add audio recordings to your
photos. See Chapter 6 for details.
Use this setting whenever you are connecting your
camera to the computer. Also use it for PRINT
Image Matching and DPOF. See Chapter 8 for
details.
Use this setting to set up or view information about
your camera on the Setup screen. See Chapter 1 and
Chapter 7 for information.
camera dial
POWER button
/