Page is loading ...

Copyright 2009 DB Industries, Inc.
User InstrUctIon ManUal
saflok
®
toggle anchor
This manual is intended to meet the Manufacturer’s Instructions as
required by ANSI Z359.1 and should be used as part of an employee
training program as required by OSHA.
User Instruction Manual for:
Saok
®
Toggle Anchor
(Model Number: 2100101)
Form No. 5903001 Rev. A
WarnIng: This product is part of a personal fall arrest, restraint,
work positioning, personnel riding, or rescue system. The user must
follow the manufacturer’s instructions for each component of the
system. These instructions must be provided to the user of this
equipment. The user must read and understand these instructions
before using this equipment. Manufacturer’s instructions must be
followed for proper use and maintenance of this equipment. Alterations
or misuse of this equipment, or failure to follow these instructions,
may result in serious injury or death.
IMportant: If you have questions on the use, care, or suitability of
this equipment for your application contact Capital Safety.
IMportant: Record the product identication information from the ID
label in the Inspection and Maintenance Log in Section 9.0 of this manual.
descrIptIon
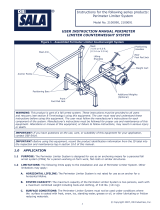
TheSaok
®
Toggle Anchor
(Figure 1) is a reusable anchor
point for horizontal, vertical,
or overhead applications.
The Toggle Anchor is
designed for use in precast
concrete, precast hollow-
core concrete, or a steel
ange.Afterinsertion
through a 3/4 in. (19.05 mm)
mounting hole, the Toggle
rotates perpendicular to the
mounting hole to secure the
Toggle Anchor. Squeezing the
Swivel Ring and Hole Plug
together compresses the
Spring and rotates the Toggle
for immediate removal from
the mounting hole.
Figure 1 - Saok
®
Toggle Anchor
A Swivel Ring
B Label
C Red Warning
Tube
D Main Cable
E Activator
Cable
F Hole Plug
G Toggle
H Spring
I Retaining Ring
A
B
C
D
E
F
G
H
I

2
Figure 2 - Applications
Anchorage
SRL
SaflokToggle
Anchorage
Connector
Anchorage
Anchorage
SaflokToggle
Anchorage Connector
Restraint Lanyard
SaflokToggle
Anchorage Connector
Restraint
Fall Arrest
Work Positioning
Personnel Riding
Anchorage
Anchorage
SaflokToggle
Anchorage
Connector
Suspension
Line
SaflokToggle
Anchorage Connector
Back-up
Fall Arrest
System
Seat Board
Back-up
Fall Arrest
System
Restraint Lanyard
Anchorage
SaflokToggle
Anchorage Connector
1.0 applIcatIons
1.1 PURPOSE: TheSaok
®
Toggle Anchor is designed for use as an
anchorageattachmentpointforapersonalfallarrestsystem,work
positioning system, personnel riding system, or rescue system.
See Figure 2 for application illustrations.
A. PERSONAL FALL ARREST: The Toggle Anchor is used as a
component of a personal fall arrest system to protect the user
in the event of a fall. Personal fall arrest systems typically
include a full body harness and a connecting subsystem
(energy absorbing lanyard). Maximum permissible free fall is 6
feet.
B. RESTRAINT: The Toggle Anchor is used as a component of
a restraint system to prevent the user from reaching a fall
hazard. Restraint systems typically include a full body harness
and a lanyard or restraint line. No vertical free fall is permitted.

3
C. WORK POSITIONING: The Toggle Anchor is used as a
componentofaworkpositioningsystemtosupporttheuserat
aworkposition.Workpositioningsystemstypicallyincludea
fullbodyharness,positioninglanyard,andaback-uppersonal
fall arrest system. Maximum permissible free fall is 2 feet.
D. PERSONNEL RIDING: The Toggle Anchor is used as a
component of a personnel riding system to suspend or
transport the user vertically. Personnel riding systems typically
include a full body harness, boatswains’s chair or seat board,
andaback-uppersonalfallarrestsystem.Noverticalfreefall
is permitted.
E. RESCUE: The Toggle Anchor is used as a component of a
rescue system. Rescue systems are configured depending on
the type of rescue. No vertical free fall is permitted.
1.2 LIMITATIONS: The following application limitations must be
recognized and considered before using this product:
A. CAPACITY: The Toggle Anchor is designed for use by persons
with a combined weight (clothing, tools, etc.) of no more than
310 lbs. No more than one personal protective system may be
connected at one time.
note: For emergency rescues it may be acceptable to
connect more than one system if the anchorage will support
the anticipated loads.
B. FREE FALL: Personal fall arrest systems used with this
equipment must be rigged to limit the free fall to 6 feet (ANSI
Z359.1). See the personal fall arrest system manufacturer’s
instructions for more information. Restraint systems must be
riggedsothatnoverticalfreefallispossible.Workpositioning
systems must be rigged so that free fall is limited to 2 feet
or less. Personnel riding systems must be rigged so that no
vertical free fall is possible. Rescue systems must be rigged so
that no vertical free fall is possible.
C. FALL CLEARANCE: There must be sufficient clearance below
theusertoarrestafallbeforetheuserstrikesthegroundor
other obstruction. The clearance required is dependent on the
following factors:
Deceleration •
Distance
Movement of Harness •
Attachment Element
Free Fall •
Distance
Elevation of D-Ring Anchorage •
Connector
WorkerHeight• Connecting Subsystem Length•
See the personal fall arrest system manufacturer’s instructions
for more information.

4
D. SWING FALLS: Swing falls occur
when the anchorage point is not
directly above the point where a
fall occurs. See Figure 3. The force
ofstrikinganobjectinaswingfall
maycauseseriousinjuryordeath.
Minimizeswingfallsbyworking
as close to the anchorage point as
possible. Do not permit a swing fall
ifinjurycouldoccur.Swingfallswill
significantly increase the clearance
required when a self retracting lifeline
or other variable length connecting
subsystem is used.
Figure 3 - Swing Falls
E. ENVIRONMENTAL HAZARDS: Use of this equipment in
areas with environmental hazards may require additional
precautionstopreventinjurytotheuserordamagetothe
equipment. Hazards may include, but are not limited to: heat,
chemicals, corrosive environments, high voltage power lines,
gases, moving machinery, and sharp edges. Contact DBI-SALA
if you have questions about using this equipment where
environmental hazards exist.
F. TRAINING: This equipment must be installed and used by
persons trained in its correct application and use. See section
4.0.
1.3 APPLICABLE STANDARDS: Refer to national standards including;
ANSI Z359 (.0, .1, .2, .3, and .4) fall protection standards,
ANSI A10.32, and local, state, and federal (OSHA) requirements
governing occupational safety for additional information regarding
personal fall arrest systems and associated components.
2.0 sYsteM reQUIreMents
2.1 COMPATIBILITY OF COMPONENTS: DBI-SALA equipment
is designed for use with DBI-SALA approved components and
subsystems only. Substitutions or replacements made with non-
approvedcomponentsorsubsystemsmayjeopardizecompatibility
of equipment and may effect the safety and reliability of the
complete system.
2.2 COMPATIBILITY OF CONNECTORS: Connectors are considered
to be compatible with connecting elements when they have been
designedtoworktogetherinsuchawaythattheirsizesand
shapes do not cause their gate mechanisms to inadvertently open
regardlessofhowtheybecomeoriented.Connectors(hooks,
carabiners, and D-rings) must be capable of supporting at least
5,000lbs.(22kN).Connectorsmustbecompatiblewiththe
anchorage or other system components. See Section 3.8 for
additional information on anchorage connections. Do not use
equipment that is not compatible. Non-compatible connectors

5
may unintentionally disengage (see Figure 4). Connectors must be
compatibleinsize,shape,andstrength.Self-lockingsnaphooks
and carabiners are required by ANSI Z359.1 and OSHA.
Figure 4 - Unintentional Disengagement (Rollout)
Iftheconnectingelementtowhichasnaphook(shown)orcarabiner
attaches is undersized or irregular in shape, a situation could occur
where the connecting element applies a force to the gate of the snap
hookorcarabiner.Thisforcemaycausethegate(ofeitheraself-
lockingoranon-lockingsnaphook)toopen,allowingthesnaphookor
carabiner to disengage from the connecting point.
Small ring or
other non-
compatibly
shaped element
1.Force is applied to the
snaphook.
2. The gate presses
against the
connecting ring.
3. The gate opens
allowing the snap
hooktoslipoff.
2.3 MAKING CONNECTIONS:Useonlyself-lockingsnaphooksand
carabiners with this equipment. Only use connectors that are
suitable to each application. Ensure all connections are compatible
in size, shape and strength. Do not use equipment that is not
compatible.Ensureallconnectorsarefullyclosedandlocked.
DBI-SALAconnectors(snaphooksandcarabiners)aredesignedto
beusedonlyasspeciedineachproduct’suser’sinstructions.See
Figure5forinappropriateconnections.DBI-SALAsnaphooksand
carabiners should not be connected:
A. To a D-ring to which another connector is attached.
B. In a manner that would result in a load on the gate.
note: Other than 3,600 lb. (16 kN) gated hooks, large throat opening snap
hooks should not be connected to standard size D-rings or similar objects
which will result in a load on the gate if the hook or D-ring twists or rotates.
Large throat snap hooks are designed for use on xed structural elements
such as rebar or cross members that are not shaped in a way that can
capture the gate of the hook.

6
Figure 5 - Inappropriate Connections
C. In a false engagement, where features that protrude from the
snaphookorcarabinercatchontheanchorandwithoutvisual
conrmationseemstobefullyengagedtotheanchorpoint.
D. To each other.
E. Directlytowebbingorropelanyardortie-back(unlessthe
manufacturer’s instructions for both the lanyard and connector
specicallyallowsuchaconnection).
F. Toanyobjectwhichisshapedordimensionedsuchthatthe
snaphookorcarabinerwillnotcloseandlock,orthatroll-out
could occur.
2.4 PERSONAL FALL ARREST SYSTEM: Personal fall arrest systems
used with this equipment must meet applicable state, federal,
OSHA, and ANSI requirements. A full body harness must be
worn when this equipment is used as a component of a personal
fall arrest system. As required by OSHA, the personal fall arrest
system must be capable of arresting the user’s fall with a
maximum arresting force of 1,800 lbs., and limit the free fall to 6
feet or less. If the maximum free fall distance must be exceeded,
the employer must document, based on test data, that the
maximum arresting force will not be exceeded, and the personal
fall arrest system will function properly.
When a free fall greater than 6 feet, and up to a maximum of
12 feet is possible, DBI-SALA recommends using a personal fall
arrest system incorporating a DBI-SALA Force2 Energy Absorbing
Lanyard. DBI-SALA has performed testing using the Force2
Energy Absorbing Lanyard in free falls up to 12 feet to ensure
the maximum arresting force does not exceed 1,800 lbs., and the

7
system functions properly. The results of these tests are listed in
the user instruction manual provided with Force2 Energy Absorbing
Lanyards.
2.5 RESTRAINT SYSTEM: Restraint systems used with this equipment
must meet state, federal, OSHA, and ANSI requirements.
2.6 ANCHORAGE STRENGTH: The anchorage strength required
is dependent on the application type. The following are the
requirements of ANSI Z359.1 for these application types:
A. Fall Arrest: Anchorages selected for fall arrest systems shall
have a strength capable of sustaining static loads applied in
the directions permitted by the system of at least:
5,000lbs.(22.2kN)fornon-certiedanchorages1.
Twotimesthemaximumarrestingforceforcertied2.
anchorages.
When more than one fall arrest system is attached to an
anchorage, the strengths set forth in (1) and (2) above shall
be multiplied by the number of systems attached to the
anchorage.
B. Restraint: Anchorages selected for restraint and travel
restraint systems shall have a strength capable of sustaining
static loads applied in the directions permitted by the system
of at least:
1,000lbs.(4.5kN)fornon-certiedanchorages1.
Twotimestheforeseeableforceforcertiedanchorages.2.
When more than one restraint and travel restraint system
is attached to an anchorage, the strengths set forth in (1)
and (2) above shall be multiplied by the number of systems
attached to the anchorage.
C. Work Positioning:Anchoragesselectedforworkpositioning
systems shall have a strength capable of sustaining static
loads applied in the directions permitted by the system of at
least:
3,000lbs.(13.3kN)fornon-certiedanchorages1.
Twotimestheforeseeableforceforcertiedanchorages.2.
Whenmorethanoneworkpositioningsystemisattachedto
an anchorage, the strengths previously set forth in (1) and (2)
shall be multiplied by the number of systems attached to the
anchorage.
D. Rescue: Anchorages selected for rescue systems shall have
a strength capable of sustaining static loads applied in the

8
directions permitted by the system of at least:
3,000lbs.(13.3kN)fornon-certiedanchorages1.
Fivetimestheforeseeableforceforcertiedanchorages.2.
Whenmorethanoneworkpositioningsystemisattachedto
an anchorage, the strengths previously set forth in (1) and (2)
shall be multiplied by the number of systems attached to the
anchorage.
E. PERSONNEL RIDING: The structure to which the Concrete
Wedge Anchor is attached must sustain static loads applied in
the directions permitted by the personnel riding system of at
least 2,500 lbs. When more than one personnel riding system
is attached to an anchorage, the strengths stated above must
be multiplied by the number of personnel riding systems
attached to the anchorage.
WarnIng: Use of the Toggle Anchor for an application that does not
meet the anchorage strength requirements stated in this section may
result in serious injury or death.
3.0 InstallatIon and Use
WarnIng: Do not alter or intentionally misuse this equipment.
Consult Capital Safety when using this equipment in combination with
components or subsystems other than those described in this manual.
Some subsystem and component combinations may interfere with the
operation of this equipment. Use caution when using this equipment
around moving machinery, electrical hazards, chemical hazards, sharp
edges, and abrasive surfaces.
WarnIng: Consult your doctor if there is any reason to doubt your tness
to safely absorb the shock from a fall arrest or suspension. Age and tness
seriously affect a worker’s ability to withstand falls. Pregnant women or
minors must not use DBI-SALA equipment unless in an emergency situation.
3.1 BEFORE EACH USE: Before each use of this equipment, carefully
inspect it to assure that it is in serviceable condition. Refer to
section 5.0 for inspection details. Do not use if inspection reveals
an unsafe condition.
3.2 PLANNING: Planyoursystembeforestartingyourwork.Take
into consideration factors that affect your safety before, during,
and after a fall. The following list gives some important points to
consider:
A. ANCHORAGE: Select an anchorage capable of supporting the
loadsspeciedinSection2.6.
B. SHARP EDGES:Avoidworkingwheresystemcomponents
may be in contact with or abrade against sharp edges. If
workingaroundsharpedgesisunavoidable,provideprotection

9
by using a heavy pad over the exposed sharp edge.
C. AFTER A FALL: Componentssubjectedtotheforcesof
arresting a fall must be removed from service and destroyed.
D. RESCUE: The employer must have a rescue plan in place prior
to the use of this equipment. The rescue plan must provide for
aquicksaferescue.
3.3 INSTALLATION REqUIREMENTS: To ensure safe effective
installation,theSaok
®
Toggle Anchor should only be anchored in
Precast Hollow Core Concrete, Precast Concrete, or a Steel Flange.
See Figure 6 for minimum material requirements:
IMportant: The Toggle Anchor should not be used in hollow
block, grout, stone, wood, or other substrates. Do not use in wet
or uncured concrete. The Toggle Anchor should never be pulled
at an angle greater than 90 degrees.
Figure 6 - Toggle Anchor Installation
Precast Hollow Core Concrete
A B C
Material & Location Requirements:
Compressive
Strength:
5,000 psi
(34.5 MPa)
Minimum Slab
Thickness (X):
6 inches
(15.24 cm)
Wall Thickness
(Y):
1.5 to 4.0 inches
(3.81 to 10.16 cm)
Anchor Hole
Minimum Edge/
Corner Spacing:
6 inches
(15.24 cm)
Precast Concrete
A B C
Material & Location Requirements:
Compressive
Strength:
5,000 psi
(34.5 MPa)
Thickness: 1.5 to 4.0 inches
(3.81 to 10.16 cm)
Anchor Hole
Minimum Edge/
Corner Spacing:
6 inches
(15.24 cm)
Steel Flange
A B C
Material & Location Requirements:
Thickness: 0.25 to 4.0 inches
(0.64 to 10.16 cm)
Anchor Hole
Minimum Edge/
Corner Spacing:
1 inch
(2.54 cm)

10
3.4 INSTALLATION:ToensureeffectiveinstallationoftheSaok
®
ToggleAnchor,alwaysobservetherequirementsdenedin
Section 3.3 and Figure 6. Perform the following steps to install the
ToggleAnchor.RefertoFigure1forcomponentidentication:
IMportant: If the Toggle Anchor will be secured in an existing
hole, always inspect the hole for deformation, correct material
thickness, and correct hole diameter prior to installation.
Step 1. Markthemountingholelocationfortheanchor.Observe
thematerialandlocationrequirementsdenedin
Figure 1.
IMportant: For Precast Hollow Core Concrete, the
mounting hole should be centered in the core hollow.
See Figure 6.
Step 2. Drill a 3/4” (19.05 mm) diameter hole through the
mountingmaterialatthelocationmarkedinStep1.
note: A Rotary Hammer Drill and industrial grade
Rotary Hammer Drill Bit are recommended for drilling
Precast Concrete.
WarnIng: Before drilling holes, inspect the hole
location to prevent drilling into power transmission
cables or other live utilities.
Step 3. Install the Toggle Anchor in the mounting hole as
follows:
With your thumb inserted through the Swivel Ring (1A) A.
andtwoforengersundertheHolePlug(1F),squeeze
the Spring (1H) until the Hole Plug is fully retracted.
Insert the Toggle Anchor through the mounting hole B.
and release the Hole Plug. The Hole Plug should seat
in the inside wall of the mounting hole (Figure 7).
Pull the Swivel Ring to ensure the Toggle (1G) is C.
activated and the Toggle Anchor is secured in the
mounting hole.
WarnIng: Always inspect the Activator Cable and
Red Warning Tube after installation (see Figure 8).
If the top of the Activator Cable (8A) is positioned
adjacent to the Red Warning Tube (8B), the Toggle
has not ipped into the secure position. If the Toggle
is not secured; repeat Steps 3A thru 3C, but push
down on the top of the Activator Cable after releasing
the Hole Plug to help the toggle ip into the secure
poistion

11
Figure 7 - Hole Plug
Seating
A
B
A Hole Plug B Slab Section
with Mounting Hole
Figure 8 - Red Warning Tube
B
A
B
A
Toggle is
Secure
Toggle is
Not Secure
A Top of Activator Cable B Red Warning Tube
3.5 REMOVAL: To release the Toggle Anchor, push the Swivel Ring
(1A) toward the Release Plug (1F) to compress the Spring (1H)
and then pull the Hole Plug out of the mounting hole.
3.6 REUSE: The Toggle Anchor may be reused if it has not been
subjectedtoafallforce.
3.7 DISPOSAL:DisposeoftheToggleAnchorifithasbeensubjected
to fall force or inspection (see Section 5) reveals an unsafe or
defective condition. Before disposing of the Toggle Anchor, cut the
Main Cable to eliminate the possibility of inadvertent reuse.
3.8 CONNECTIONS:WhenusingahooktoconnecttotheSaok
®
Toggle Anchor, ensure roll-out cannot occur. Roll-out occurs when
interferencebetweenthehookandmatingconnectorcausesthe
hookgatetounintentionallyopenandrelease.Self-lockingsnap
hooksandcarabinersshouldbeusedtoreducethepossibilityof
roll-out.Donotusehooksorconnectorsthatwillnotcompletely
closeovertheattachmentobject.Seesubsystemmanufacturer’s
instructions for information on connecting to the Toggle Anchor.
4.0 traInIng
4.1 It is the responsibility of the user to assure they are familiar with
these instructions, and are trained in the correct care and use
of this equipment. Users must also be aware of the operating
characteristics, application limits, and the consequences of
improper use of this equipment.
IMportant: Training must be conducted without exposing the
trainee to a fall hazard. Training should be repeated on a periodic
basis.

12
5.0 InspectIon
Toensuresafe,efcientoperation,theToggleAnchorshouldbe
inspectedattheintervalsdenedinSection5.1.SeeSection5.2for
inspection procedures.
5.1 FREqUENCY:
Before Each Use: • Visually inspect the Toggle Anchor per steps
listed in Sections 5.2 and 5.3.
Annually: • A formal inspection of the Toggle Anchor and its
connection to the structure must be performed at least annually
by a competent person other than the user. The frequency
of formal inspections should be based on conditions of use
or exposure. See sections 5.2 and 5.3. Record the inspection
results in the inspection and maintenance log in section 9.0.
IMportant: Extreme working conditions (harsh environment,
prolonged use, etc.) may require increasing the frequency of inspections.
5.2 INSPECTION STEPS:PertheintervalsdenedinSection5.1,
inspect the Toggle Anchor as follows. (Refer to Figure 1 for
componentidentication):
Step 1. MakesuretheToggleAnchorisstraightandisoperating
smoothly.
Step 2. MakesuretheSwivelRing(1A)swivelsfreelyandthe
Retaining Ring (1I) is secure.
Step 3. MakesurethelabelisattachedtotheToggleAnchorand
is legible (see Section 8).
Step 4. MakesuretheMainCable(1D)andActivatorCables(1E)
arenotfrayed,kinked,ordamaged.
Step 5. Makesuremetalcomponentsarenotdamagedor
excessively corroded.
Step 6. MakesuretheToggle(1G),HolePlug(1F),andActivatorCable
(1E) operate smoothly and no metal burrs are present. Ensure the
Swivel Ring (1A) and Toggle do not exhibit any deformities.
Step 7. Inspect the position of the top of the Activator Cable
relative to the Red Warning Tube (see Figure 8). When
the Toggle Anchor is secured (Toggle open), the top of
the Activator Cable (7A) should be positioned below
the Red Warning Tube (7B). When the Toggle Anchor is
released (Toggle closed), the top of the Activator Cable
(7A)shouldbeadjacenttotheRedWarningTube(7B).
note: Record the inspection date and results in the Inspection
and Maintenance Log (see Section 9.0).
5.3 DEFECTS: If inspection reveals a defective condition, remove the
Toggle Anchor from service and dispose in the manner described in
Section 3.7.

13
5.4 PRODUCT LIFE:ThefunctionallifeoftheSaok
®
Toggle Anchor
isdeterminedbyworkconditionsandmaintenance.Aslongasthe
product passes inspection criteria, it may remain in service.
6.0 MaIntenance
6.1 CLEANING: After each use, blow off the Toggle Anchor with
compressed air. Keep the anchor free of grease, oils, and dirt.
6.2 STORAGE: Store the Toggle Anchor in a clean dry environment.
Avoidareaswherechemicalvaporsmayexist.Donotpileobjects
on top of the anchor. Thoroughly inspect the Toggle Anchor after
extended storage.
7.0 specIfIcatIons
7.1 MATERIALS:
Swivel Ring: Forged Steel
Main Cable: Galvanized 7 x 19 Wire Rope
Hole Plug: Aluminum
Toggle: Stainless Steel
Activator Cable: Galvanized Steel
Breaking Strength: 5,000lbs.(22kN)
Compliance: OSHA, ANSI Z359.1
7.2 DIMENSIONS: See Figure 9 for physical dimensions of the
Toggle Anchor.
Figure 9 - Physical Dimensions
Ø 2.2 in.
(Ø 5.6 cm)
Ø 3.0 in.
(Ø 7.6 cm)
Ø 0.74 in.
(Ø 1.9 cm)
Ø 0.7 in. (Ø 1.9 cm)
10.0 in.
(25.4 cm)
1.2 in. (3.0 cm)
10.0 in.
(25.4 cm)
1.5 in.
(3.8 cm)
2.0 in.
(5.1 cm)

14
8.0 laBelIng
The following label should be securely attached to the Toggle Anchor:
Front Back

15
9.0 InspectIon and MaIntenance log
SERIAL NUMBER: __________________________________________
MODEL NUMBER: ___________________________________________
DATE PURCHASED: ______________DATE FIRST USED: __________
INSPECTION
DATE
INSPECTION
ITEMS NOTED
CORRECTIVE
ACTION
MAINTENANCE
PERFORMED
Approved By:
Approved By:
Approved By:
Approved By:
Approved By:
Approved By:
Approved By:
Approved By:
Approved By:
Approved By:
Approved By:
Approved By:
Approved By:
Approved By:

WARRANTY
Equipment offered by DBI-SALA is warranted against factory defects
inworkmanshipandmaterialsforaperiodoftwoyearsfromdateof
installation or use by the owner, provided that this period shall not ex-
ceed two years from date of shipment. Upon notice in writing, DBI-SALA
will promptly repair or replace all defective items. DBI-SALA reserves
the right to elect to have any defective item returned to its plant for
inspectionbeforemakingarepairorreplacement.Thiswarrantydoes
not cover equipment damages resulting from abuse, damage in transit,
or other damage beyond the control of DBI-SALA. This warranty ap-
plies only to the original purchaser and is the only one applicable to our
products, and is in lieu of all other warranties, expressed or implied.
CSG USA
3833 Sala Way
Red Wing, MN 55066-5005
Toll Free: 800.328.6146
Phone: 651.388.8282
Fax: 651.388.5065
solutions@capitalsafety.com
CSG Canada Ltd.
260 Export Boulevard
Mississauga, Ontario L5S 1Y9
Toll Free: 800.387.7484
Phone: 905.795.9333
Fax: 905.795.8777
sales.ca@capitalsafety.com
www.capitalsafety.com
Certificate No. FM 39709
ISO
9001
/