Page is loading ...

Version: 1.0 Date: Feb,14, 2022
DAY & NIGHT SHADES INSTALLATION
INSTALLATION VON TAG- UND NACHT- JALOUSIEN
1 2 3 5 6 7 8 9 10
12 13
68928
P510-15
Remote:P510-15

1 2 3 5 6 7 8 9 10
12 13
CONTENTS
Preparation and Accessories
Inside Mount
3
2
1
Outside Mount
4-8
9-14
15-16
17
18-28
29-30
32-33
Remote and Battery
Alexa&Google home
Motor Programming
Motor Reset and Re-pair
Battery Version
Hardwired Version
FAQ
3
2
1
4-8
9-14
15-16
17
18-28
29-30
32-33
3
2
1
4-8
9-14
15-16
17
18-28
29-30
32-33
KATALOG
Batterie-Version
Stecker-Version
Innenmontage
Außenmontage
Fernbedienung und Battrien
Alexa&Google home
Motor-Programmierung
FAQ
Motor-Reset und Re-pair
Vorbereitung und Zubehör

5m
PREPARATION
VORBEREITUNG
1 2 3 5 6 7 8 9 10
12 13
v
ACCESSORIES
ZUBEHÖR
1.4”(35mm)
1”(24mm)
1.7”(44mm)
I----------------I
I-----------------I
1.2”(29mm)
1.2”(29mm)
0.6”(15mm)
I------------I
b x n f x n s x n
*
Drilling hole size
0.2”(6mm)
*
Größe des Bohrlochs
0.2”(6mm)
(6mm)

1 2 3 5 6 7 8 9 10
12 13
Reset Button
Reset-Button
Signal Receiver
Signal-Empfänger
Charging Connector
Ladestecker
jx 1
1.4”
(36mm)
I-----------I
1.3”
(34mm)
I----------I
d x 2
r x 1
79”(2m)
j j
j
Volle Ladung
Full charge
Battery Version Batterie-Version
USB Charger
Not included
USB-Ladegerät
Nicht enthalten
Solar Panel (Optional)
Solarpanel (optional)
5V2A
1. Please full charge the motor for more than 10 hours before the rst use.
2. After fully charged, shade can be used for 2-3 months depending on the frequency of usage.
1.
Bitte laden Sie den Motor vor dem ersten Gebrauch mehr als 10 Stunden lang voll auf.
2. Nach vollständiger Aufladung kann der Schirm je nach Nutzungshäufigkeit 2-3 Monate lang verwendet werden.
1.
2.
Charging
Ladeloch

1 2 3 5 6 7 8 9 10
12 13
Reset Button
Reset-Button
Signal Receiver
Signal-Empfänger
Charging Connector
Ladestecker
g
Hardwired Version Stecker-Version
2.7”(68mm)
0.7”(17mm)
1”(27mm)
I----------------------------I
I--------I
I-------I
59.8”(1520mm)
gx 1 zx 1
z

01.
02.
1 2 3 5
46 7 8 9 10
12 13
d
j
s
INSIDE MOUNT
INNENMONTAGE
I-----------I
2.95”(75mm) The depth of the window frame is at least 2.95”(75mm) if you install the
battery behind the valance.
Die Tiefe des Fensterrahmens beträgt mindestens 2.95" (75 mm), wenn Sie die
Batterie hinter dem Gehäuse installieren.
INSTALLATION FOR BATTERY MOTOR(OPTIONAL)
Installationsmethode für Batterieversion (OPTIONAL)
Hardwired Version Stecker-Version

04.
03.
127mm
127mm
5
5
5127mm 5127mm
1 2 3 5 6 7 8 9 10
12 13
b
f
f
b
b
b
f
f

06.
05.
1 2 3 5 6 7 8 9 10
12 13
KA!
b b
b b

07.
1 2 3 5 6 7 8 9 10
12 13
Battery installation behind the valance.
Installation der Batterie hinter dem Gehäuse.
The blind has been prograqmmed already, please use directly.
Das Rollo ist bereits programmiert, bitte verwenden Sie es direkt.
If the window depth is less than 2.95", you can install the battery to the front of valance
with (a) or on the wall with (b).
Wenn Ihr Fensterrahmen weniger als 2.95”(75mm) tief ist, kann die Batterie an
der Vorderseite des Gehäuses montiert oder an der Wand befestigt werden.
ab

1 2 3 5 6 7 8 9 10
12 13
g
01.
03.
INSTALLATION FOR HARDWIRED MOTOR
INSTALLATIONSMETHODE FÜR STECKERVERSION (OPTIONAL)
v
z
02.
v

01.
5127mm 5127mm
1 2 3 5 6 7 8 9 10
12 13
b
b
b
OUTSIDE MOUNT
AUßENMONTAGE
INSTALLATION FOR BATTERY MOTOR(OPTIONAL)
Installationsmethode für Batterieversion (OPTIONAL)

02.
1 2 3 5 6 7 8 9 10
12 13
bb

--------
--------
--------
--------
03.
04.
11
b
b
b
f f
b
ff
------------

05.
06.
1 2 3 5 6 7 8 9 10
12 13 15 16 17 18 19 20 21 22 23 24
25 26 27 28 29 30
b
KA!
b

07.
1 2 3 5 6 7 8 9 10
12 13
Install the battery on the wall.
Batterie an der Wand montiert
Install the battery in front of valance.
Batterie auf der Vorderseite des Gehäuses montiert
The blind has been prograqmmed already, please use directly.
Das Rollo ist bereits programmiert, bitte verwenden Sie es direkt.
15 16 17 18 19 20 21 22 23 24
25 26 27 28 29 30

1 2 3 5 6 7 8 9 10
12 13 15
14 16 17 18 19 20 21 22 23 24
25 26 27 28 29 30
INSTALLATION FOR HARDWIRED MOTOR
INSTALLATIONSMETHODE FÜR STECKERVERSION (OPTIONAL)
g
01.
03.
v
z
02.
v

1 2 3 5 6 7 8 9 10
12 13
Now you can control the blind via remote!
Jetzt können Sie die Rollos per Fernbedienung steuern!
Megnetic Holder
Megnetic-Halter
15 16 17 18 19 20 21 22 23 24
25 26 27 28 29
BATTERY INSTALLATION
INSTALLATION DER BATTERIE
P510-15
P2
P2
M
CR2450
LITHIUM BATTERY
3V
CR2450(3V)
Lithuim Cell
CR2450
3V
sc
x2
30
INSTALL THE BATTERY
DIE BATTERIE INSTALLIEREN

1 2 3 5 6 7 8 9 10
12 13
P510-15
- - Kanal- Channel + Channel+ Kanal+
ObenUp
StoppenStop
UntenDown
Channel "0" : Group Control.
Kanal "0" : Gruppe Kontrolle.
:
Control up to 15 blinds separately
Bis zu 15 Rollos separat steuern
15 16 17 18 19 20 21 22 23 24
25 26 27 28 29 30
BACKRÜCKSEITE
P2
P2
M
CR2450
LITHIUM BATTERY
3V
P2 P2
M
CR2450
LITHIUM BATTERY
3V
Setting Button
Einstellung Button

1 2 3 5 6 7 8 9 10
12 13 15 16 17 18 19 20 21 22 23 24
25 26 27 28 29 30
The RF battery motor needs a hub (sold separately) to connect with Alexa or Google.
It works with most popular hub in market, such as BOND, Broadlink.
Der RF-Batteriemotor benötigt einen Hub (separat erhältlich), um sich mit Alexa oder Google zu verbinden.
Es funktioniert mit den meisten gängigen Hubs auf dem Markt, wie z.B. BOND, Broadlink.
or
Alexa
HUB
Google Home
Please refer to hub instruction
Bitte beachten Sie die HUB-Anleitung
Hardwired Version
Stecker-Version
Battery Version
Batterie-Version
To connect Alexa and Google home, please download App according to
the instructions on the envelope.
For the instruction of smart operation, please scan the QR code on the
envelope to watch the explanation video.
*Make sure your phone is connected to Wi-Fi.
Um Alexa und Google Home zu verbinden, laden Sie bitte die App gemäß den
Anweisungen auf dem Umschlag herunter.
Für die Anleitung zum Smart-Betrieb scannen Sie bitte den QR-Code auf dem
Umschlag, um das Erklärungsvideo anzusehen.
*Stellen Sie sicher, dass Ihr Handy mit Wi-Fi verbunden ist.
AlexaGoogle
*

1 2 3 5 6 7 8 9 10
12 13
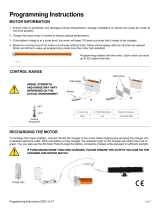
ADJUSTING LIMIT POSITION
WIE MAN DIE POSITION DER JALOUSIEN EINSTELLT
Press and hold the “^” +“v” button for 5s
Drücken und halten “^” +“v” 5s
1
2
Press and hold the button for 3s
Drücken und halten 3s
3
4
Shade jogs X1
Das Rollo joggt X1
x1
x1
Shade jogs X1
Das Rollo joggt X1
x1
x1
15 16 17 18 19 20 21 22 23 24
25 26 27 28 29 30
Run the shade to desired position
bleiben, wo Sie wollen
or or
/