Page is loading ...

1. Your Aquarium
3. Tank Placement
Rinse materials in running water; aquarium,
gravel, stones, plasc plants and other deco-
raons, etc. Place gravel in a colander or
new bucket and rinse under running tap wa-
ter unl water runs clear. Never clean aquar-
ium, decoraons, or lter with household
soaps as they can harm your sh.
Read This Secon before operang this unit.
For Household Use Only. Conrm your tank
has not been damaged during shipping
before you start the setup process. Com-
pletely install aquarium before operang. The
LED unit is powered by 3 AAA baeries or by
a 5V Power Adapter, neither are included in
this kit. To avoid the unit plug or receptacle
from geng wet, posion the tank and stand
to one side of a wall mounted receptacle to
prevent water from dripping onto it. A “Drip
Loop” should be
made as shown at le
Use of a GFCI rated
outlet or circuit is
recommended.
Gravel and Decoraons are not
included with this aquarium kit.
Aquarium Kit Model:
AP360-3FFP
Children under the age of 13 should be
supervised by an adult with the setup,
maintenance and sh care
AQUARIUM
INSTRUCTIONS
FOR USE
For Household Use Only
KEEP THESE INSTRUCTIONS FOR
FUTURE REFERENCE
4. Rinsing Gravel and Decor
ISZ-361-GN COPYRIGHT 2018
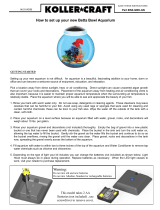
1. Fish Tank
2. Full Hood
3. LED Light
4. Internal Filter
5.Whisper XS Filter
Cartridge
5. Baery Requirements
2. Important Instrucons
DRIP LOOP
WARNING:
1. Do not mix old and new baeries.
2. Do not mix Alkaline, Standard or Rechargea-
ble Baeries.
3. LED light uses 3 AAA baeries.
TIMER SELECTION SWITCH with
3 sengs you can select:
Connuous On *
2 Hour Duraon (2H)
4 Hour Duraon (4H
Note – Baery Posion and
Posive / Negave Orientaon
*It is recommended to use this seng
sparingly in order to conserve baery
power unless using USB connector or
oponal 5V Power Adapter AQ51000 .
To turn on LED light press the blue buon
switch on top of the light. Connue to
press the blue buon unl
desired color is located.
7 colors to choose from;
amber, aqua, blue, green,
purple, red and white.
USB Micro-B cord enables
LED light to operate without
baeries. Insert Micro-B-
USB plug into back of LED light port and
opposite end of cord into computer or
into USB power supply .
Oponal (not included)
Power Supply 5V 1A
(model AQ51000) availa-
ble at online retailers.
People of all ages enjoy looking at aquariums.
Aside from the belief that an aquarium is
beauful, many also believe having an aquar-
ium can be relaxing, rewarding and a great
conversaon piece all at the same me. You
will have many enjoyable hours with your
new aquarium and sh.
Included in your Aquarium Kit
6. LED Light Set Up
Leave enough space in back of the
aquarium to allow easy access to the lter
and various electrical cords from the
electrical equipment.
Good places for your aquarium
On a table or aquarium stand that’s
capable of bearing the weight of your lled
aquarium.
Places to avoid
Near direct sources of sunlight (e.g. win-
dows), unwanted algae growth may occur.
Near direct sources of heat or air condi-
oning (e.g. radiator, forced air vent).
Dray areas.
Around sources of noise (e.g. stereo
speakers, TV).
Do not place aquarium on any surface
that can be damaged by water or where
water can come in contact with other
electrical appliances.

7. Adding Water
Fill the aquarium with water to within
two inches of the top of the tank.
8. Seng Up Power Filter
10. Adding Fish
9. Installing Power Filter
Room
Temperature
Perform a 25% water change monthly,
more frequently if necessary depending on
number of sh and amount of daily feed-
ings, using a vacuum gravel siphon to
thoroughly remove uneaten food and
waste buildup.
Replace Tetra Whisper XS lter cartridge®
every 3 to 4 weeks, depending on the
number of sh and amount of daily
feedings, to keep lter running eciently.
Test pH, ammonia and nitrite weekly using
Tetra EasyStrips® Test Strips. Performing
these tests will allow you to monitor the
water quality of your aquarium. If readings
are not in the preferred range, perform a
paral water change.
Locate and remove the adjustable
mounng bracket from the box. Place
mounng bracket at 90° and align one
of the adjustment holes onto the
mounng post, rotang it upwards unl
hanger is vercal.
PLACE HANGER AT 90
DEGREES ON POST
ROTATE HOOK
VERTICAL, INSERT
POWER CORD INTO
HOLDER AT TOP OF
BRACKET
Float the bag with your sh on the
surface of the aquarium for 15 minutes.
Open the bag containing your new sh,
taking care that the bag does not collapse,
and add a lile aquarium water every two
minutes directly to bag.
Connue this process for 10 minutes, al-
lowing the bag to ll with water.
Take bag with sh to sink and gently scoop
sh out with a net or pour bag of water
into net. Then place sh into aquarium.
Do not add water from sh bag in order to
prevent introducon of possible disease or
parasites from store water.
Heater and Thermometer
not included, must be
purchased separately
Install lter inside the aquarium, hanging
the lter onto the aquarium rim. The
water level of the lled aquarium should
be at the top of the line on the front of
the lter. To raise or lower the lter
adjust the hanger by rotang the hanger
90º, removing it, and replacing it onto an
alternate alignment hole.
Select proper sized heater appropriate for
your aquarium size. Read and follow the
heater’s instrucons. Check with your retailer
for recommended heater sengs. Adjust
heater sengs as directed and conrm water
temperature with thermometer. Always use a
power strip with surge protector to safeguard
your electrical equipment.
12. Oponal Heater
11. Ongoing Maintenance
Treat the water with Tetra Aquasafe© to
remove chlorine and chloramines from
tap water that can be harmful to your
sh.
Allow me for the water in your aquari-
um to reach room temperature.
Some states do not allow the exclusion or limitaon
of incidental or consequenal damages, or limitaon
on how long an implied warranty lasts, so the above
limitaons or exclusions may not apply to you. This
warranty gives you the legal rights, which vary from
state to state.
LIMITED WARRANTY
WARRANTY HELP
REPLACEMENT PARTS
OR
TECH SUPPORT
CONTACT
(800) 545-1344
Manufactured by KOLLER PRODUCTS
Shawnee, KS 66218 USA
KOLLER PRODUCTS LLC warrants this aquari-
um product to be free from defects in material and
workmanship under normal use and service and
according to the provisions as specified in the
accompanying assembly and operating instruc-
tions, for a period of 1 year from date of purchase.
This warranty does not cover and KOLLER
PRODUCTS LLC is not liable for the cost of repair
or replacement of parts which have been subject
to misuse, negligence, accident, improper
installation, damage during shipment or handling,
normal deterioration due to wear and exposure or
defects caused by unauthorized parts or
modification.
UNDER NO CIRCUMSTANCES WILL
KOLLER PRODUCTS LLC BE LIABLE FOR
ACCIDENTAL OR CONSEQUENTIAL DAM-
AGES, INCLUDING BUT NOT LIMITED TO
LOSS OF PROPERTY OR EQUIPMENT.
/