Page is loading ...

TR161028
ASSEMBLY INSTRUCTIONS
UltraHD® Workcenter
48 in W X 24 in D X 65.5 in H
(1.21 m x 60.9 cm x 1.66 m)
LED work light included
(Model No. 20276)
Reference page 7 for special care and
maintenance of stainless steel

Small Drawer
Top Cantilever Shelf
No. Qty. No. Qty.
#1 1PC #20-5 2PCS
#2-C 1PC #44 1PC
#3-B 1PC #46-1 TOP CANTILEVER SHELF BACK PANEL 1PC
#3-C 1PC #46-2 TOP CANTILEVER SHELF BASE PANEL 1PC
#5-B 2PCS #46-3 TOP CANTILEVER SHELF LEFT PANEL 1PC
#6 4PCS #46-4 TOP CANTILEVER SHELF RIGHT PANEL 1PC
#18 2PCS #47 "L" BRACKET 8PCS
#18-1 TOP CANTILEVER SHELF MAT 1PC #48-1 SMALL DRAWER MIDDLE SUPPORT 1PC
#19-2 DRAWER BASE PANEL 2PCS #48-2 SMALL DRAWER LEFT SUPPORT 1PC
#20-1 SMALL DRAWER FRONT PANEL 2PCS #48-3 SMALL DRAWER RIGHT SUPPORT 1PC
#20-3 SMALL DRAWER LEFT PANEL 2PCS #49 PEGBOARD LONG SUPPORT BAR 2PCS
#20-4 SMALL DRAWER RIGHT PANEL 2PCS
LEVELING FOOT
DRAWER MAT
BOTTOM PEGBOARD PANEL
Parts
Parts
LEG PIECE
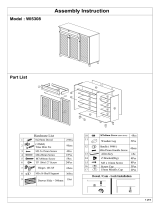
PARTS LIST (pg 1 of 8)
Please check the parts carefully according to the parts list. If you are missing any parts, please contact our
customer service department (please refer to page 8 of 8).
STAINLESS STEEL TOP
TOP PEGBOARD PANEL
BOTTOM CROSSBAR
SMALL DRAWER BACK PANEL
LED LAMP

No. Qty. No. Qty.
#15 46PCS #100 4PCS
#21 1PC #101 4PCS
#25 1PC #102 4PCS
#27-B 10PCS #103 4PCS
#40 10PCS #104 2PCS
#41 29PCS #105 2PCS
#45 1PC #106 2PCS
#50 56PCS #107 1PCS
#51 4PCS
SCREW DRIVER
1/2" CURVED
Parts
SCREW F (M4 x 8L)
SCREW E(M8 x 18L)
SCREW I (M6 x 15L)
PARTS LIST (pg 2 of 8)
Please check the parts carefully according to the parts list. If you are missing any parts, please contact our
customer service department (please refer to page 8 of 8).
1" STRAIGHT
1.5" STRAIGHT
WRENCH
WASHER
Parts
SCREW B (M4 x 8L)
1" CURVED
STUD SCREW J
2" DOUBLE PRONG
4" CURVED DOUBLE PRONG
2" PLIER HOLDER
2" MULTI-TOOL HOLDER
POWER STRIP W. USB PORTS
#15
#50
#27-B
#40
#41
#51
#21
#25
#45
#100
#101
#102
#103
#104
#105
#106
#107
M8X20 pcs

Step 1.
Step 2.
NOTE:
Step 3.
NOTE:
ASSEMBLY INSTRUCTIONS (pg 3 of 8)
*NOTE: We recommend TWO people to assemble the workbench.
Install (#5-B) Leg Piece.
A: Open the package, and put the parts aside. Then, attach the (#47) "L" Bracket to the (#5-B) Leg Piece, use (#50)
Screw I to tighten. Repeat Step A to install (#47) "L" Brackets to another one (#5-B) Leg Piece.
Note: Tighten the all the screws after the (#47) Brackets are flush with the (#5-B) Leg Piece.
Install (#3-B) Bottom Cross Bar and (#6) Leveling Feet.
Attach the (#3-B) Bottom Cross Bar to the back of (#5-B)
Leg Piece, line up the screw holes, use (#40) Screw E with
(#27-B) Washer and (#25) Wrench to tighten.
After installing (#5-B) Leg Pieces, attach (#6) Leveling Feet
to (#5-B) Leg Pieces, use (#25) Wrench to tighten.
TIP: A magnetic screwdriver is included for your convenience. If a power screwdriver is used, keep on a low torque
setting.
Upturn the workbench once you finish this step.
Do not fully tighten the screws. This will help you make
any adjustments for alignment.
B: Attach the (#5-B) Leg Pieces to the back of the (#1) Stainless Steel Top, line up the screw holes, use (#50) Screw I and
(#21) Screwdriver to tighten.
Note: Assemble the workcenter on top of the cardboard packaging to help avoid scratching the stainless steel top.
Install (#48-1) Small Drawer Middle Support, (#48-2)
Small Drawer Left Support, (#48-3) Small Drawer Right
Support.
Attach the (#48-1) Small Drawer Middle Support to the
back of (#1) Stainless Steel Top Back, line up the screw
holes, use (#50) Screw I and (#21) Screwdriver to tighten.
Repeat this step to install (#48-2) Small Drawer Left
Support and (#48-3) Small Drawer Right Support.
A
B
Back

Step 4.
Step 5.
Step 6. Install (#46) Top Cantilever Shelf .
Step 7.
Install Assembled (#46) Top Cantilever Shelf to
workbench.
Attach assembled (#46) Top Cantilever Shelf to (#2-C) Top
Pegboard Panel and (#49) Pegboard Long Support Bars, line up
the screw holes, use (#41) Screw F to tighten. Use (#15) Screw B
to fasten the (#2-C) Top Pegboard and (#46) Top cantilever Shelf.
NOTE: Do not fully tighten the screws. This will help you make
any adjustments for alignment later.
ASSEMBLY INSTRUCTIONS (pg 4 of 8)
*NOTE: We recommend TWO people to assemble the workbench.
A). Attach the (#46-3) Top Cantilever Shelf Left Panel and the
(#46-4) Top Cantilever Shelf Right Panel to (#46-2) Top Cantilever
Shelf Base Panel. Use (#41) F screws to tighten.
NOTE: Do not fully tighten the screws. This will help you make
any adjustments for alignment later.
B). Make sure to slide the back panel underneath the edge of
(#46-2) Top Cantilever Shelf Base Panel. Use (#41) F screws to
tighten.
Install (#49) Pegboard Long Support Bar.
Attach (#49) Pegboard Long Support Bar to the back of the
workbench, line up the screw holes, use (#40) Screw E with (#27-
B) Washer to tighten.
NOTE: Do not fully tighten the screws. This will help you make
any adjustments to alignment later.
Install (#3-C) Bottom Pegboard Panel and (#2-C) Top
Pegboard Panel.
Attach (#3-C) Bottom Pegboard Panel along the back top edge of
workbench and against (#49) Pegboard Long Support Bar, line
up the screw holes, use (#41) Screw F and (#21) Screwdriver to
tighten. Use (#15) Screw B to fasten the (#2-C) & (#3-C) Top &
Bottom Pegboard.
NOTE: Do not fully tighten the screws. This will help you make
any adjustments to alignment later.
Attach (#2-C) Top Pegboard Panel to the top of (#3-C) Bottom
Pegboard Panel and (#49) Pegboard Long Support Bar, line up
the screw holes, use (#41) Screw F and (#21) Screwdriver to
tighten.
A
B

Step 8.
Step 9.
Step 10.
Note:
ASSEMBLY INSTRUCTIONS (pg 5 of 8)
*NOTE: We recommend TWO people to assemble the workbench.
Install (#20-3 & #20-4) Left & Right Small Drawer Side
Panels.
Each Drawer's maximum loading capacity is 40 lbs.
Fit and attach the (#20-3 & #20-4) Left & Right Small
Drawer Side Panels to the (#20-1) Small Drawer Front Panel.
Make sure the (#20-3 & #20-4) Left & Right Small Drawer
Side Panels are placed in all the way making contact with
the rear of the (#20-1) Small Drawer Front Panel. Line up
the screw holes and use (#15) Screw B to tighten.
Install (#19-2) Drawer Base Panel.
From above, fit and attach (#19-2) Drawer Base Panel
between the (#20-3 & #20-4) Left & Right Small Drawer Side
Panels and into the back of the (#20-1) Drawer Front Panel.
Line up the screw holes and use (#15) Screw B to tighten.
NOTE: Do not fully tighten the screws. Once you adjust all
the parts in position, tighten all screws.
Install (#20-5) Small Drawer Back Panel.
Attach the (#20-5) Small Drawer Back Panel to the rest of
the assembled drawer. Line up the screw holes and use
(#15) Screws B to tighten.
Repeat Steps 8-10 to assemble another drawer.

Step 11.
Insert Drawers.
WARNING:
NOTE:
Step 12.
Place (#18) Drawer Mats .
Step 13. Install (#44) LED Lamp.
ASSEMBLY INSTRUCTIONS (pg 6 of 8)
*NOTE: We recommend TWO people to assemble the workbench.
After sliding in the two Drawers, place (#18)
Drawer Mats inside the drawers or you can place
the (#18) Drawer Mats inside the drawers before
you slide them in.
Make sure the power cord goes through Rubber
Grommet of (#2-C) Top Pegboard Panel. Attach
(#44) LED Lamp under the assembled (#46) Top
Cantilever Shelf. Line up the screw holes, use
(#15) Screw B to tighten. Then place the (#18-1)
Top Cantilever Mat in place.
Pull out the drawer sliders and inner ball bearing
track completely. Then attach and fit the Drawer
to the inner track of the sliders and slide drawers
in.
Pull out the Ball Bearing track towards you.
Once you insert the drawers, tighten the screws
for (#48-1) Small Drawer Middle Support, (#48-
2) Small Drawer Left Support and (#48-3) Small
Drawer Right Support.
Pull the ball bearing
track towards you.

Step 14. Place (#45) Power Strip.
Step 15.
Stainless Steel Maintenance:
ASSEMBLY INSTRUCTIONS (pg 7 of 8)
*NOTE: We recommend TWO people to assemble the workbench.
Insert and screw (#51) Stud Screw J to (#3-C)
Bottom Pegboard Panel, then, hook (#45) Power
Strip on and make sure the power cord goes
through Rubber Grommet of (#3-C) Bottom
Pegboard Panel.
NOTE: You can position (#45) Power Strip on the
left or right side of the (#3-C) Bottom Pegboard
Panel.
Place (#100), (#101), (#102), (#103), #104),
(#105), (#106), (#107) Hooks to Pegboard as
you desire.
These parts have an UltraGuard® fingerprint resistant finish. Do not use traditional stainless steel
cleaners on this unit. Lightly wipe off once a month with clean warm water and a soft cloth
(preferably a micro fiber cloth). This is the safest formula to prevent new stains from appearing over
time and manage unwanted fingerprints or grease marks. Remember to always wipe in the direction
of the surface grain (NEVER ACROSS) and always use a lint-free cloth. Once the surface is
clean,thoroughly wipe dry with a soft absorbent cloth.
[!] CAUTION: Potential Shock or Fire Hazard. This unit is
not intended for use in wet or potentially wet locations,
such as showers, saunas, under or near fishtanks, sinks,
etc.

customer service department at:
***Please visit our website or call and inquire about our additional UltraHD Line***
Torrance, CA 90501
Model No. 16236
UltraHD Storage Cabinet
Model No. 20204
UltraHD 6-Drawer Rolling Cabinet
UltraHD Line
Fax: (310) 533-3899
E-mail: support@sevilleclassics.com
Website & Online Store: www.sevilleclassics.com
USA
*If you are missing any parts, have any questions, or need additional assistance in assembly,
CONTACT INFORMATION (pg 8 of 8)
Telephone: (800) 323-5565 within USA
Hours: 9:00am - 4:30pm (Pacific Standard Time)
please contact our bilingual (English/Spanish)
Seville Classics, Inc.
19401 South Harborgate Way

Model No. 20217
UltraHD Trash Bin
Model No. 20255
UltraHD Tool Box
Model No. 20230
UltraHD Wall Cabinet
Model No. 20262
UltraHD Rolling Workbench
UltraHD Line
Model No. 16221
UltraHD Locker Gear Cabinet
Model No. 20206
UltraHD Workbench
/