Page is loading ...

TR150922
ASSEMBLY INSTRUCTIONS
UltraHD Wall Cabinet (Model No. 20209B)
(24in. W X 12in. D X 28in. H)
(60.96cm W X 30.48cm D X 71.12cm H)
Reference page 9 for special care and
maintenance of stainless steel

For Door Handle at LEFT Side
For Door Handle at RIGHT Side
(pg 1 of 9)
#8
#55
#5
#4
#3
#23#2
#7
#41
#15
#34
#6
#2
#1
#1
#2
#6
#23
#34
#41
#7
#2 #15
#3
#4
#5
#55
#8

(#5) BOTTOM BACK PANEL x 1 PC
(#6) MIDDLE SHELF x 1 PC
(#7) LEFT / RIGHT DOOR x 1 PC
(#8) WALL-HANGING BRACKET x 2 PCS
PARTS LIST
(pg 2 of 9)
Please check the parts carefully according to the parts list. If you are missing any parts, please contact our
customer service department (please refer to page 9 of 9).
(#3) RIGHT PANEL x 1 PC
(#4) UPPER BACK PANEL x 1 PC
(#1) LEFT PANEL x 1 PC
(#2) TOP / BOTTOM PANEL (Both panels are same) x 2 PCS

(#34) HOOK x 4 PCS
(#41) SCREW F (M4 x 8L) x 32 PCS
(#55) SCREW M (M6 x 50L) x 8 PCS
(#15) SCREW B (M4 x 8L) x 9 PCS
PARTS LIST
(pg 3 of 9)
Please check the parts carefully according to the parts list. If you are missing any parts, please contact our
customer service department (please refer to page 9 of 9).
(#23) MAGNET x 2 PC
(#21-A) SCREW DRIVER x 1 PC
(#22) KEY x 2 PCS

TIP:
Step 1:
a.
b.
Step 2: Install Bottom Panel (#2).
ASSEMBLY INSTRUCTIONS
(pg 4 of 9)
UltraHD Wall Cabinet (Model No. 20209B)
A magnetic screwdriver is included for your
convenience. If a power screwdriver is used,
keep on a low torque setting.
Attach the Left Panel (#1) to the Top Panel (#2) as
the left picture shows. Line up screw holes and
tighten them using Screw Driver (#21-A) and Screw F
(#41).
Attach Bottom Panel (#2) between the Left Panel
(#1) and Right Panel (#3) as the left side picture
shows. Line up screw holes and tighten them using
Screw Driver (#21-A) and Screw F (#41).
Install the Left Panel (#1) onto the Top Panel (#2)
the same way.
Install the Right Panel (#3) onto the Top Panel (#2).
Attach the Right Panel (#3) to the Top Panel (#2) as
the left picture shows. Line up screw holes and
tighten them using Screw Driver (#21-A) and Screw F
(#41).
#2
#41
#3
#41
#21-A
#2
Front
Back
#2
#41
#1
Back
Front

Step 3:
Step 4: Fasten the Magnet (#23).
Note: Decide the door opening direction.
(2)
Step 5:
Install the Middle shelf (#6).
Note:
ASSEMBLY INSTRUCTIONS
(pg 5 of 9)
UltraHD Wall Cabinet (Model No. 20209B)
First place the Bottom Back Panel (#5) onto the
Left Panel (#1), Right Panel (#3) and Bottom
Panel (#2) as the left picture shows. Now place
the Upper Back Panel (#4) onto the Left Panel
(#1), Right Panel (#3) and Top Panel (#2). Line
up screw holes and tighten them using Screw
Driver (#21-A) and Screw F (#41).
a. Decide the height for the Middle Shelf
(#6),place the Hooks (#34) into the hook slots
and push down.
(1)
Upright the unit like left picture shows (1) if you
decide to have door opening at left side. Fasten
Magnet (#23) to the Left Panel (#1) using Screw
Driver (#21-A) and Screw B (#15).
Upright the unit like left picture shows (2) if you
decide to have door opening at right side.
Fasten Magnet (#23) to the Right Panel (#3)
using Screw Driver (#21-A) and Screw B (#15).
Install the Bottom Back Panel (#5) and Upper
Back Panel (#4).
The Middle Shelf (#6) needs the 4 hooks at each
corner for support. When placing the hooks,
make sure they are at the same height.
b. Place the Middle Shelf (#6) into the cabinet
and push down onto the Hooks (#34).
#6
#34
#1
#3
Top
Bottom
#4
#5
#41
#23
#15
#3
#23
#15
#1

(1)
(2)
(1)
(2)
Step 6: Install the Door (#7).
Step 7: Complete Assembled Cabinet.
a. Left Side Door (1)
b. Right Side Door (2)
ASSEMBLY INSTRUCTIONS
(pg 6 of 9)
UltraHD Wall Cabinet (Model No. 20209B)
Attach the Door (#7) to the unit. Line up screw
holes and tighten them using Screw Driver
(#21-A) and Screw B (#15).
#15
#7
#7
#15

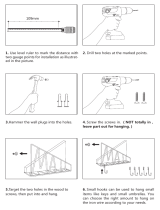
C. Locate the 2nd stud 16” from either side of the 1st stud location.
Note: The distance between two studs is normally 16” (center to center).
A. Decide where to hang the Wall Cabinet.
B. Start from one side of desired location to find the 1st stud location for installing the Wall-Hanging Brackets (#8). Use a stud
finder to locate the stud and use a pencil to mark the center of the stud.
ASSEMBLY INSTRUCTIONS
(pg 7 of 9)
UltraHD Wall Cabinet (Model No. 20209B)
Use the Installation Guide on pages 7 and 8 to secure the two Wall-Hanging Brackets (#8) to the wall. Lift the wall cabinet up and
hook its tongues (located on the back panels) over the Wall-Hanging Brackets. Assure all tongues hook securely over both Wall-
Hanging Brackets. Please refer to the pictures on pages 8 and 9.
Installation Guide for the WALL HANGING BRACKET
of the UltraHD Wall Cabinet (Model No. 20209B)
Note: We recommend that the cabinet be hung such that the bottom of the cabinet rests approx. 63" above the floor.
Recommended
Height from
Floor
63"
#8
#8
FLOOR
DOOR
??
63"
63"

Note: The shop drawing shows the actual size of the Wall Cabinet (28” by
24”) and indicates the locations of the holes on the Wall-Hanging
Brackets. You may also want to temporarily tape the drawing to the wall
for marking the locations of the screws. Use a small nail to penetrate the
shop drawing and mark the eight points to fasten the Wall-Hanging
Bracket. After marking locations, pre-drill a small hole (1/8" diameter) at
each of the eight hole locations.
E. Use Screw M (#55) to fasten Wall-Hanging Brackets (#8). Hang the unit
on the Wall-Hanging Brackets (#8) as following pictures show.
ASSEMBLY INSTRUCTIONS
(pg 8 of 9)
UltraHD Wall Cabinet (Model No. 20209B)
*Drill a small hole (1/8" diameter) at both stud locations to assure that
the hanging anchor is secured.
D. To find the rest of the screw holes to fasten the Wall-Hanging Brackets,
please refer to the accompanying shop drawing. Place the shop drawing
on the wall and align the holes in the drawing with those already drilled in
the wall.
Hang Wall Cabinet Wall-Hanging Brackets

将
左
Telephone: (800) 323-5565 within USA
Hours: 9:00am - 4:30pm (Pacific Standard Time)
Fax: (310) 533-3899
E-mail: support@sevilleclassics.com
Website & Online Store: www.sevilleclassics.com
***Please visit our website or call and inquire about our additional UltraHD Line***
ASSEMBLY INSTRUCTIONS
(pg 9 of 9)
UltraHD Wall Cabinet (Model No. 20209B)
*If you are missing any parts, have any questions or need additional assistance with assembly, please
contact our bilingual (English & Spanish) Customer Service Department at:
Back Panel View of Wall Cabinet shows 6 flat hooks
that allow the Cabinet to hang on two Wallhanging
Brackets.
Close-up view of how the Wall-Hanging Brackets fit with the
6 flat hooks on the back of the cabinet.
Stainless Steel Maintenance:
These parts have an UltraGuard™ fingerprint resistant finish. Do not use traditional stainless steel cleaners on this
unit. Lightly wipe off once a month with clean warm water and a soft cloth (preferably a micro fiber cloth). This is the
safest formula to prevent new stains from appearing over time and manage unwanted fingerprints or grease marks.
Remember to always wipe in the direction of the surface grain (NEVER ACROSS) and always use a lint-free cloth. Once
the surface is clean, thoroughly wipe dry with a soft absorbent cloth.
Seville Classics Inc.
19401 South Harborgate Way
Torrance, CA 90501
USA

UltraHD Line
Model No. 20204
UltraHD 6-Drawer Rolling Cabinet
Model No. 20206
UltraHD Workbench
Model No. 20205
UltraHD Rolling Cabinet
Model No. 16238
UltraHD Mega Storage Cabinet
Model No. 16236
UltraHD Storage Cabinet

Model No. 20215
UltraHD Trash Bin
Model No. 20255
UltraHD Tool Box
UltraHD Line
Model No. 20238
UltraHD Rolling Cabinet
Model No. 20262
UltraHD Rolling Workbench
Model No. 20267
UltraHD Stainless Steel Workcenter
/