Page is loading ...

COPYRIGHT NOTICE
© 2013 Triton. All Rights Reserved. TRITON logo is a
registered trademark of Triton Systems of Delaware.
Corporate Headquarters:
21405 B Street
Long Beach, MS. 39560
Phone: (800) 259-6672
FaX: (228) 868-9445
Model rl1600
autoMated teller MaCHine
installation Manual
TDN07103-00186-01January8,2013

2
rl1600 installation Manual
DOCUMENTUPDATES
Jan19,2009Original
Feb20,2009AddedshimkittoCabinetInstallationsection
Mar12,2009Changedpackingdescriptions,pg.17.
Apr1,2009Drawingeditpg.24.
Mar15,2010Updatetopperinstallationinstructionsonpg.13&21
Jan82013Updateddecalareadimensions

3
rl1600 installation Manual
WHat’s in tHis installation Guide
ThisInstallationGuideprovidesinformationforthephysicalinstallationoftheRL1600ATM.Itcontains
requirementsforsitepreparation,electricalspecications,andcabinetaccessibilitythatcomplywithall
relevantcodes,lawsandregulations.TheInstallationGuideisdividedintothefollowingsections:
site CoMplianCe.Statesthecustomersresponsibilitiesforensuringallrelevantregulationsareadhered
toforinstallingATMs.
atM environMental preCautions CHeCklist. Describes the general environmental precautions
considered when installing theATM.To help ensure proper operation of theATM, ensure the
environmentalcriterialistedinthischecklistaremet.
diMensions.Describesphysicaldimensionsforthecabinet(s),controlpanelcomponents,andsignage.
- Physicaldimensions.
- Serviceareadimensions.
- Customeraccessdimensions
installation. Describesanchoringthecabinetusingstandard(steel)ortheoptionalchemicalanchors.
(Anchors provided separately)
Dispensing Mechanism Installation.TheMinimechdispensingmechanismisfactoryinstalled.
appendix a.SoftwareLicenseAgreement/Compliance/Emissionsstatements
appendix B. ATMInstallationforAccessibilityguidelines.
poWer and CoMMuniCation. Showscableaccessarea,powerrequirements,andpowering-uptheunit.
introduCtion
TheTritonRL1600isalobbyterminaldesignedforindooruseonly.Thefollowingsectionsprovidethe
requirementsforinstallingtheRL1600foryourparticularsitelocation.Toassistyouinpreparingyour
site,achecklistisprovidedofvariousstepsthatshouldbecarriedout prior tothearrivaloftheATM.

4
rl1600 installation Manual
Contents
site CoMplianCe .........................................................................................................4
environMental preCautions .....................................................................................5
teMPerature / Power / rF InterFerence requIreMentS .........................................................................6
diMensions ...................................................................................................................7
Front VIew / cuStoMer acceSS DIMenSIonS ...........................................................................................8
SerVIce area DIMenSIonS .......................................................................................................................9
sHalloW CaBinet (Business Hours)
SIDe VIewS ..............................................................................................................................................10
MID toPPerS ..........................................................................................................................................12
CaBinet anCHor “Footprint” ............................................................................................................ 12
CaBinet installation ................................................................................................13
tooLS requIreD .....................................................................................................................................14
unPackIng the unIt ...............................................................................................................................14
Mark / DrILL MountIng hoLeS ..............................................................................................................16
InStaLLIng StanDarD anchorS / BoLt atM ...........................................................................................17
InStaLL cheMIcaL anchorS / BoLt atM ...............................................................................................18
route poWer / CoMMuniCation CaBles ...................................................................21
route / connect caBLeS .......................................................................................................................22
appendix a - soFtWare liCense aGreeMent / CoMplianCe/eMissions stateMents
appendix B - atM installation For aCCessiBility

5
rl1600 installation Manual
ThisdocumentcontainstheinformationnecessaryforthepreparationandinstallationofanRL1600Triton
ATM.It’simportantthatthesitecomplieswiththerequirementsspeciedinthisdocument.Inaddition,
electricalwiringandmechanicalsystemsmustalsocomplywithallrelevantlawsandregulations.
Thesitemustbepreparedbythecustomerorhisagentwhoisfullyconversantwiththerequirementsof
installingATMequipment.Theresponsibilityforensuringthatthesiteispreparedincompliancewiththis
documentremainswiththecustomer.
Forinformationandguidanceonly,alistisprovidedingeneraltermsofthosemattersforwhichthecus-
tomerisresponsible.Thelistisnotintendedtobecomprehensiveandinnowaymodies,alters,orlimits
theresponsibilityofthecustomerforallaspectsofadequatesitepreparation.
1. Locationoftheequipmentandsitepreparation.
2. Sitewiring(power,communication).Ensureaccesswillnotbehinderedbycabinetplacement.
3. Locationofotherequipmentthatmaycauseelectrical,electromagneticorheatinducedinterfer-
ence.
4. Makebuildingalterationstomeetwiringandothersiterequirements.
5. Installallcommunicationcables,walljacks,andassociatedhardware.
6. Provideandinstallnecessarypowerdistributionboxes,conduits,andgrounds.
7. Ensureallapplicablecodes,regulations,andlaws(electrical,building,safety)areadheredto.
8. Ensuretheenvironmentalrequirementsofthisunitaremet.
9. InstalltheunitataheightwhichmeetstheADA/DDA/CSAaccessibilityregulationsforthestate/
countryinstalled.RefertoAppendixB.
site CoMplianCe
SITE PREPARATION CHECKLIST
Select site and design a floor plan
Ensure environmental conditions met
Establish contractor and vendor schedules
Check communication line requirements
Plan installation accessory needs
Check floor plan and make necessary
alterations
Install electrical requirements
Prepare site for communication needs
Plan operator training (optional)
Install communication lines and test
Ensure installation accessories are available

6
rl1600 installation Manual
tHis paGe intentionally leFt Blank

7
rl1600 installation Manual
environMental preCaution CHeCklist

8
rl1600 installation Manual
When installing an ATM, some general environmental and power pre-
cautions need to be considered. Evaluate the location where the ATM
will be installed. To help ensure proper operation of the ATM, ensure the
environmental criteria listed in this checklist are met.
teMperature / HuMidity
1. The ATM will operate over a range of tem-
peratures and humidity. Generally, these
parameters must fall within the following
ranges:
Temperature
• 10°Cto40°C
• 50°Fto104°F
Relative Humidity
• 20%to80%
• (Non-Condensing)
aC poWer requireMents
2. Ensure the following AC power requirements
are met:
Current (Max)
• 2.2A@115VRMSat60Hz
• 1.1A@230VRMSat50Hz
Voltage
• 90-136VRMS@50/60Hz
• 198-257VRMS@50/60Hz
Power Consumption (Idle)
• 0.6A@115VACat60Hz
• 0.3A@230VACat50Hz
Power Consumption (Max Load)
• 250Watts@120VAC
• 250Watts@240VAC
dediCated telepHone
3. Ensure the following telephone-line require-
ments are met:
Dedicated line.The telephone line servicing the
ATMwillnotbea“party”lineoranyothershared
typeconnection.
Proximity to Interference Sources.The t e l e -
phonelinemustnotbeincloseproximityto“noisy”
devicesthatcouldinduceinterferenceintotheATM
communicationschannel. See the next section for
additionalinformationon“interferencesources.”
rF interFerenCe
4. Ensure there are no devices near the termi-
nal that may cause RF interference, such as:
TVs
Coolers
Securitydevices
Neonsigns
Deviceswithcompressorsormotors.
* IMPORTANT *
ACpowerfortheterminalshouldcomefrom
adedicatedsourcewithanisolatedground.
Dedicated source.TheATMACpowerfeedwillbe
adedicatedline,towhichnootherelectricaldevices
areconnected.TheATMpowerlinewillbewiredfor
asingle“duplex”-styleoutletandconnecteddirectly
totheACservicepanel.(Noextensioncords)
Isolated Ground.Anequipmentgroundingconduc-
torthatisinsulatedfromtheconduitorracewayand
allothergroundingpointsthroughoutitsentirelength.
Theonlypointsof electrical connection will be at
theduplexoutletandservicepanelendsoftheline.
Surge~50A@230V

9
rl1600 installation Manual
diMensions

10
rl1600 installation Manual
pHysiCal diMensions
Front View
Dimensions listed comply with US Federal ADA
Guidelines. For USA installations, check for
additional guidance. For non-USA installa-
tions, check regulations relating to the country
of install.
Note:
Dimensions shown in inches and [millimeters]
Customer Access Dimensions
Feature Height
1 Top Function Key
45"
[1144 mm]
2
#5 Key
(Main Keypad)
36"
[914 mm]
3 Card Reader
38 - 15/16"
[988 mm]
4 Receipt Printer
38 - 5/8"
[982 mm)
5 Bill Tray
25 - 3/16"
[640 mm]

11
rl1600 installation Manual
serviCe area diMensions
2” [51] clearance around
cabinet sides and rear

12
rl1600 installation Manual
Side Views
pHysiCal diMensions
(sHalloW CaBinet - Business Hours)

13
rl1600 installation Manual
Mid Topper
pHysiCal diMensions
(sHalloW CaBinet - Business Hours)
Refer to the Triton web site to obtain 07102-00043 topper
installation instructions.

14
rl1600 installation Manual
CaBinet “Footprint”
Anchor “footprint” - Shallow cabinet (Business)
F
r
o
n
t
deCal area

15
rl1600 installation Manual
CaBinet installation

16
rl1600 installation Manual
CaBinet installation
Thefollowingprocedureappliestoinstallingthecabinetassemblyusingeitherstandard(P/N06200-00066)
orchemical(06200-00060)anchorkits.Theanchorkitsare notsuppliedwiththeunit,butareavailable
fromTriton.Ashimkit(P/N02322-00038)forlevelingtheunitisavailablefromTriton,andis highly
recommended.Anunlevelcabinetmaycausethedoortonotcloseproperly.
1. Carefullyinspecttheshippingcontainerforanydamageandreportanydamageimmediatelytothe
shippingcompany.RefertothewarrantyinformationintheUserorServicemanual(asapplicable)for
informationaboutreportingshippingdamage.
2. RemovetheATMcabinetfromthecartonbycuttingthestrapsandremovingthetopofthebox.
3. Removethepackingmaterialfrominsideofthebox.
4. RemovethesilverkeyfromthewhiteplasticbagattachedtotheATMwrapping.
* iMportant *
Model RL1600TM is designed for INDOOR use only!
unpaCk atM
Tools Required
Torque wrench, adjustable to at least 60 foot pounds,
adjustable crescent wrench, or ratchet wrench
Center punch (or equivalent) for marking drill points
Hammer 3/4" (19 mm) socket Large flat screwdriver
Bubble level 7/16" socket / box wrench Safety goggles
Hearing protection
1/4" (6 mm) , 1/2" (12 mm),
and 9/16" (15 mm) carbide-
tipped masonry drill bits - at
least 6" long
3/4" heavy -duty electric
drill (rotary/hammer)
Back support belt Portable vacuum cleaner Wire brush
Standard Anchor Kit
1/2" flat washers
1/2" x 4-1/4" sleeve-type
anchor bolts
1/2" nuts
Chemical Anchor Kit
Hex nuts and
washers
Chemical anchor capsules
Threaded chisel-point
rods

17
rl1600 installation Manual
5. RemovetheremainderoftheboxfromtheATMifnecessary.
6. RemovethewrappingfromtheATM.
7. Usethesilverkeytounlockboththecontrolpanelandthefascia
door(whichconcealsthelockingmechanism)onthefrontof
thecabinet.Openthefasciadoor.
8. Liftthehandleunderthebillchutetoopenthefrontenclosure
door.Ifthedoorislocked,seethesidebaronthispageforhelp
inunlockingtheelectronicormechanicallock,ifapplicable..
9. Removethepackingmaterialfrominsidethevaultenclosure.
Next, carefully remove the dispensing mechanism shipping
containerfortheMiniMechifrequired.Inspectthecontainer
and dispenser and report any damage to Triton. Set the
mechanismaside.Thismaybeinstalledinlatersteps.
10. The accessory box is shipped inside the cabinet enclosure.
Openandinspectthecontents.Checkthecontentsagainstthe
enclosedpackinglistandreportanymissingpartstoTriton.
UNLOCKING
COMBINATION LOCKS
Mechanical Lock. Therearetwo
marksonthedialring.Theindex
markatthetopofthedialisused
foropeningthelock.Arevolution
iscountedeachtimetheselected
numberisalignedwiththeopen-
ingindex.
Locks are shipped on a factory
setting of ‘50’. To unlock, turn
thedialtotheleft(counterclock-
wise) FOUR (4) turns, stopping
on‘50’.Thenturnthedialtothe
right(clockwise)untiltheboltis
retracted.
Electronic Lock.Thecombina-
tionofthelockispresetto1-2-3-
4-5-6.Tounlock,enterthepreset
combinationandcheckforproper
operation. After each keypress,
thelockwill‘beep’.Afterthenal
digithasbeenentered,thelockwill
beep twice, and the open period
begins.Whenavalidcombination
hasbeenentered,theoperatorwill
haveapproximately 3 secondsto
openthelock.Toopenthelock,
turntheouterringofthedialclock-
wise.Afterthelockisopened,the
vaultdoormaybeopened.
**WARNING**
DO NOT APPLY POWER TO THIS
TERMINAL UNTIL THE INSTALLA-
TION IS COMPLETE!!

18
rl1600 installation Manual
CONCRETE STRENGTH
Theoorattheinstallationloca-
tion should consist of commer-
cial-grade concrete measuring
atleast2000 psiincompression
strength.The full effectiveness of
the mounting anchors depends
upon meeting this specication!
Checkwiththecontractor/builder
or owner of the installation to
verify that this requirement can
besatised.
SELECTING THE
INSTALLATION LOCATION
Choosingtherightlocationforyour
ATM is very important. Security
concerns suggest a location that
isawayfromanydoororexternal
access point. Ideally, the terminal
should be mounted as close to a
backwallaspossible.Formarketing
reasons,however,itmaybedesir-
abletolocatetheterminalnearthe
frontwhereyourcustomerscaneas-
ilylocateit.Whereveryoudecideto
locatetheterminal,besuretofollow
the recommended procedures for
bothmountingtheterminalandfor
removingcashwhentheunitwill
beunattended.
Markthelocationofthecabinetmountingholesontheconcrete
oor.Thisisaccomplishedasdescribedbelow:
1. MovetheATMtothelocationwhereitwillbeinstalled.
Openthecabinetvaultdooratleast90°toimproveaccess.
Locate the ve (5) anchor-bolt holes in thebottom of the
cabinet(eachcornerandcenter).Useafelt-tippenorother
markertocarefullymarkthecenterofeachofthefourcorner
holeson theoor;thesemarks willserveasguides forthe
anchorboltholesthatwillbedrilledinthenextstep.Move
theATMasidetoprovideclearaccesstothemountinghole
marks.Centerpuncheachmarktohelpalignthedrillbit.
2. Usea1/4”[6mm]diametercarbide-tippedmasonrybittodrill
fourpilotholesatthedrillingpointsmarkedintheprevious
step.Drillthepilotholesapproximately1/2”[12mm]deep
intotheoor.Theseholeswillhelpguidethemasonrybitthat
willbeusedtodrilltheanchor-boltholesinthenextstep.
3. Standard anchors:Usea1/2” [13mm]diametercarbide-
tippedmasonrybittodrillfourholesatleast2-3/4” [70mm]
deepintotheoor.Besuretotakeintoaccountthedepthof
anyoorcovering,suchastileorvinylwhengaugingthedepth
oftheanchorholes.Make sure the holes are drilled at least
2- 3/4” [70mm] into the concrete oor.
3a. Chemical anchors:Usea9/16” [15mm]diametercarbide-
tippedmasonrybittodrillfourholesatleast4-1/2” [115mm]
deepintotheoor.Besuretotakeintoaccountthedepthof
anyoorcovering,suchastileorvinylwhengaugingthedepth
oftheanchorholes.Make sure the holes are drilled at least
4- 1/2-inches [115mm] into the concrete oor.
TOOL USE/SAFETY
ObserveALLsafetyprecautionsfor
operating hand and power tools!
Weareyeandearprotectionwhile
operatingtheelectricdrill!
Mark/Drill Mounting Holes
4. Hole Diameter: Ensuretheholesdrilledarenottoolarge
indiameter.Testttheanchorboltsbyhand.Theyshould
requirehammering,NOT NOW,andnotfallintothehole.
Itseasiertodrilltheholeslargernowifnecessary,thanhave
tomovethecabinetandredrilllaterbecausetheyaretoobig.
DO NOTbetemptedtoinstalltheanchorsnow.ItisVERY
difculttopositiontheterminalontotheanchorsbecauseof
theweight.

19
rl1600 installation Manual
5. Useaportablevacuumcleanertoremoveanydustordebristhatmayhavefallenintotheholesduring
thedrillingprocess.
Drill anchor holes Blow or vacuum out dust/debris.
Install Standard Anchors
Bolt ATM to Floor
1. Ensurethemountinglocationisfreeofalldebristhatmightcausethecabinettonotbelevel.
2 MovetheATMintopositionformountingbyaligningthebaseoverthefourholesdrilledintheprevious
procedure.
3 Placeananchorboltthroughthecabinetbaseandintooneofthemountingholes.Useaballpeen
hammertotaptheboltcompletelyintothehole.
IMPORTANT: If the anchor bolt “falls” into the hole without needing to be tapped in, the hole is
too large! The mounting-hole pattern will have to be moved and redrilled using smaller holes as
necessary to achieve a snug t.
Place anchor bolts in mounting holes. Tap anchor bolts into mounting holes.

20
rl1600 installation Manual
4. Placeaatwasherontheanchorboltfollowedbya1/2”(13mm)nut.Donottightenfully,allowfor
leveling.
5. RepeatSteps2and3fortheremaininganchorbolts.
6. Ensurethecabinetisaslevelaspossiblegiventheoorconditions.Useabubbleleveltoverifythis.If
abubble-levelisnotavailable,thecabinetcanbe“rocked”gentlyfromfront-to-backandside-to-side
tochecktheneedforleveling.Addshimsunderthecabinetaroundthemountingboltstolevel.
7. Useatorquewrenchand3/4”[19mm]sockettotighteneachnuttoatorquesettingof60 foot-pounds
(required to establish the maximum pull-out strength of the anchors). Ifa torquewrench isnot
available,usearatchetwrenchand3/4”[19mm]sockettotightenthenutsthree full turns beyond
hand tight.DoNotovertighten.
8. OncethenutsaretightenedasspeciedinStep7,install a second nut on each bolt, to act as a jam
nut, and tighten down rmly.
Install Chemical Anchors
Bolt ATM to Floor
1. MovetheATMintopositionformountingbyaligningthebaseoverthefourholesdrilledintheprevious
procedure.Ensuretheareaisfreeofalldebriswhichmightcausethecabinetnottobelevel.
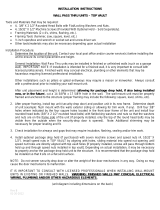
2. BeginbyinsertingaChemStudcapsuleintooneofthemountingholes.Eitherendofthecapsulemay
beinsertedrst.
3. Placeawasherandanut(inthatorder)ontoachiselpointrod.Threadthenutontotherod,leaving3
to4threadsexposed.
4. Threadtherodcouplerontothethreadedroduntilitistightagainstthenut.Thethreadedrodused
shouldbefreeofdirt,grease,oilorotherforeignmaterial.
5. Selectthedriveunit,insertitintoarotaryhammerdrillandengagethecouplingtobeused.
Insert Chem Stud capsule in mounting hole.
Prepare chisel point anchor rod.
Add washer and nut.
/


![Feniex IndustriesFeniex S-5018 Titan 30W Siren/Speaker [Made in USA] [110dB] ATV/UTV Motorcycle Compact All-in-One](http://vs1.manuzoid.com/store/data/000919340_2-42d66b717a08a0f6bbaf7643f8dacbd3-160x210.png)