Audibax Wall 12 User manual

Category
Car audio amplifiers
Type
User manual
Wall 12
Please read the manual before using the product
Por favor, lea el manual antes de usar el producto
MANUAL
DE USUARIO
USER´S
MANUAL
3
Wall 12
CONNECTIONS / CONEXIONES:
Protect your environment. Recycle packing material whenever possible.
Proteja su entorno. Recicle el material de embalaje siempre que sea posible.
Do not throw a faulty into normal household waste but bring it to a special
collection point. A large part of it can be recycled.
No arroje un producto defectuoso a la basura doméstica normal, llévelo a un
punto de recogida especial. Una gran parte de ella puede ser reciclada.
1. Strip off½inch (12.7mm) of insulation
from each end of the amplifier/receiver
and speaker wires.
2. Insert the amplifier/receiver’s + and -
speakers output wires into the volume
control’s. INPUT + (positive) and -
(negative) terminals, then tighten the
screws.
3. Insert the speaker's+ and - wire ends
into the volume control's OUTPUT+ and -
terminals, and then tighten the screws.
1. Retire ½ pulgada (12,7 mm) de
aislamiento de cada extremo del
amplificador/receptor y los cables del
altavoz.
2. Inserte los cables de salida de los
altavoces + y - del amplificador/receptor
en los controles de volumen. ENTRADA +
(positivo) y - (negativo) terminales, luego
apriete los tornillos.
3. Inserte los extremos de los cables + y - del
parlante en los terminales OUTPUT + y - del
control de volumen y luego apriete los
tornillos.
Operation / Operación:
Do not attempt to make any repairs yourself. This would invalid your warranty. Do not make
any change to the unit. This would also invalid your warranty. The warranty is not applicable
in case of accidents or damages caused by inappropriate use or disrespect of the warning
contained in this manual. AUDIBAX cannot be held responsible for personal injuries caused
by a disrespect of the safety recommendation and warnings. This is also applicable to all
damages in whatever form.
No intente hacer ninguna reparación usted mismo. Esto invalidaría su garantía. No realice
ningún cambio en la unidad. Esto también invalidaría su garantía. La garantía no es
aplicable en caso de accidentes o daños causados por un uso inadecuado o por no
respetar las advertencias contenidas en este manual. AUDIBAX no se hace responsable de
los daños personales causados por el incumplimiento de las recomendaciones y
advertencias de seguridad. Esto también es aplicable a todos los daños en cualquier
forma.
Set the amplifier/receiver’s volume
control to minimum by turning it fully
counterclockwise. Then turn on the
amplifier /receiver and set its volume
control slightly above the normal listening
level.
To increase or decrease the remote
speaker's volume.
Ajuste el control de volumen del
amplificador/receptor al mínimo girándolo
completamente en el sentido contrario a
las agujas del reloj. Luego encienda el
amplificador/receptor y ajuste su control
de volumen ligeramente por encima del
nivel de escucha normal.
Para aumentar o disminuir el volumen del
altavoz remoto.
Wall 12 MANUAL
DE USUARIO
USER´S
MANUAL
1 2
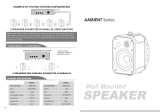
Basic Connections / Conexiones básicas
SPECIFICATION / ESPECIFICACIONES
Speaker / Altavoz Amplifier/Receiver
Amplificador/Receptor
SAFETY INSTRUCTIONS / INSTRUCCIONES DE SEGURIDAD
• Caution:
This volume control is limited to a
maximum of 12 watts RMS/20 watts
maximum, per channel.
• Mounting the Volume Control:
The volume control is designed to be
mounted in a standard electrical wall
box. Select a location that is:
- Within reach of the speaker wires
- Easy to reach for using the volume
control
• Important:
- Over-Tightening the screws might
damage the wall plate.
- Some electrical wall boxes are a
non-standard size. Be sure that you
measure the wall box before you mount
the volume control.
• Notes:
- The speaker wire needed to make the
connection is available at specialized
stores. This volume control can be used
with up to 14- gauge wire.
- Measure the distance from the speaker
to the ampIifier. For distance of 50 feet or
less, use 18- gauge speaker wire or
ordinary lamp cord. For distances greater
than 50 feet, use heavier 16-gauge wire.
• Caution:
Letting stray wire ends touch an adjacent
terminal, the mounting brackets or
screws, or the metal sides of the electrical
box could cause a short circuit or
damage a speaker.
• Precaución:
Este control de volumen está limitado a un
máximo de 12 vatios RMS/20 vatios máximo
por canal.
• Montaje del control de volumen:
El control de volumen está diseñado para
montarse en una caja de pared eléctrica
estándar. Seleccione una ubicación que
sea:
- Al alcance de los cables de los altavoces
- Fácil de alcanzar para usar el control de
volumen
• Importante:
- Si aprieta demasiado los tornillos, podría
dañar la placa de pared.
- Algunas cajas eléctricas de pared tienen
un tamaño no estándar. Asegúrese de
medir la caja de pared antes de montar el
control de volumen.
• Notas:
- El cable de altavoz necesario para realizar
la conexión está disponible en tiendas
especializadas. Este control de volumen se
puede utilizar con un cable de calibre 14
como máximo.
- Mida la distancia desde el altavoz hasta
el amplificador. Para una distancia de 15
metros o menos, use un cable de altavoz
de calibre 18 o un cable de lámpara
normal. Para distancias superiores a 15
metros, use un cable de calibre 16 más
pesado.
• Precaución:
Dejar que los extremos sueltos de los cables
toquen un terminal adyacente, los soportes
o tornillos de montaje, o los lados metálicos
de la caja eléctrica podría provocar un
cortocircuito o dañar un altavoz
Model / Modelo Wall 12
Power Max. / Potencia máx. 12W
Switch Type / Tipo de interruptor Rotary Switch, 11 Steps / Interruptor
giratorio, 11 pasos
Install Depth (mm) / Profundidad
de instalación (mm)
42.5mm
Dimension (WxHxD)mm) /
Dimensiones (An. x Al. x Pr.) (mm)
86x93x66mm
  • Page 1 1
  • Page 2 2

Audibax Wall 12 User manual

Category
Car audio amplifiers
Type
User manual

Ask a question and I''ll find the answer in the document

Finding information in a document is now easier with AI

in other languages