Page is loading ...

SM-
SM-SM-
SM-50737
5073750737
50737-A
-A-A
-A
INSTRUCTION
INSTRUCTIONINSTRUCTION
INSTRUCTION MANUAL
MANUALMANUAL
MANUAL
Pilot operated 2
Pilot operated 2Pilot operated 2
Pilot operated 2-
--
-port solenoid
port solenoidport solenoid
port solenoid
valve for compressed air
valve for compressed airvalve for compressed air
valve for compressed air
EXA
EXAEXA
EXA Series
Series Series
Series
Please
PleasePlease
Please
read
readread
read
this
thisthis
this
instruction
instructioninstruction
instruction
manual
manualmanual
manual
carefully
carefullycarefully
carefully
b
bb
be-
e-e-
e-
fore
forefore
fore
using
usingusing
using
this
thisthis
this
product,
product,product,
product,
particularly
particularlyparticularly
particularly
the
thethe
the
section
sectionsection
section
describing
describingdescribing
describing
safety
safetysafety
safety.
..
.
Retain
RetainRetain
Retain
this
thisthis
this
instruction
instructioninstruction
instruction
manua
manuamanua
manual
ll
l
with
withwith
with
the
thethe
the
product
productproduct
product
for
forfor
for
further
furtherfurther
further
consultation
consultationconsultation
consultation
whenever
wheneverwhenever
whenever
necessary
necessarynecessary
necessary.
..
.
Ver.1

SM-
SM-SM-
SM-50737
5073750737
50737-A
-A-A
-A
―1―
Safety precautions
When designing and manufacturing a device using CKD products, the manufacturer is obli-
gated to manufacture a safe product by confirming safety of the system comprising the follow-
ing items:
Device mechanism
Pneumatic or water control circuit
Electric control that controls the above
It is important to select, use, handle, and maintain the product appropriately to ensure that the
CKD product is used safely.
Observe warnings and precautions to ensure device safety.
Check that device safety is ensured, and manufacture a safe device.
1
11
1.
..
.This product is designed and manufactured as a general industrial machine part.
This product is designed and manufactured as a general industrial machine part. This product is designed and manufactured as a general industrial machine part.
This product is designed and manufactured as a general industrial machine part.
It must be handled by someone having sufficient knowledge and experience.
It must be handled by someone having sufficient knowledge and experience. It must be handled by someone having sufficient knowledge and experience.
It must be handled by someone having sufficient knowledge and experience.
2
22
2.
..
.Use this product within its specifications.
Use this product within its specifications.Use this product within its specifications.
Use this product within its specifications.
This product cannot be used beyond its specifications. Additionally, the product must not be
modified or machined.
This product is intended for use in general industrial devices and parts. Use beyond such
conditions is not considered. Consult with CKD for details when using the product beyond
the unique specification range, outdoors, or in the following conditions or environments. In
any case, measures for safety shall be provided when the vavle malfunctions.
① Use for special applications requiring safety including nuclear energy, railroad, aviation,
ship, vehicle, medical equipment, equipment or applications coming into contact with
beverage or food, amusement equipment, emergency shutoff circuits, press machine,
brake circuits, or for safeguard.
② Use for applications where life or assets could be adversely affected, and special safety
measures are required.
3
33
3.
..
.Observe corporate standards and regulations, etc., related to the safety of device
Observe corporate standards and regulations, etc., related to the safety of device Observe corporate standards and regulations, etc., related to the safety of device
Observe corporate standards and regulations, etc., related to the safety of device
design and control, etc.
design and control, etc.design and control, etc.
design and control, etc.
ISO4414, JIS B 8370 (pneumatic system rules)
JFPS2008 (principles for pneumatic cylinder selection and use)
Including High Pressure Gas Maintenance Law, Occupational Safety and Sanitation Laws,
other safety rules, standards and regulations, etc.
4
44
4.
..
.Do not handle, pipe, or remove devices before confirming safety.
Do not handle, pipe, or remove devices before confirming safety.Do not handle, pipe, or remove devices before confirming safety.
Do not handle, pipe, or remove devices before confirming safety.
① Inspect and service the machine and devices after confirming safety of the entire system
related to this product.
② Note that there may be hot or charged sections even after operation is stopped.
③ When inspecting or servicing the device, turn off the energy source (air supply or water
supply), and turn off power to the facility. Release any compressed air from the system,
and pay enough attention to possible water leakage and leakage of electricity.
④ When starting or restarting a machine or device that incorporates pneumatic components,
make sure that system safety, such as pop-out prevention measures, is secured.
5
55
5.
..
.Observe warnings and cautions on the pages below to prevent accidents.
Observe warnings and cautions on the pages below to prevent accidents.Observe warnings and cautions on the pages below to prevent accidents.
Observe warnings and cautions on the pages below to prevent accidents.
WARNING
WARNINGWARNING
WARNING

SM-
SM-SM-
SM-50737
5073750737
50737-A
-A-A
-A
―2―
■
■■
■The safety cautions are ranked as "DANGER", "WARNING" and "CAUTION" in
The safety cautions are ranked as "DANGER", "WARNING" and "CAUTION" in The safety cautions are ranked as "DANGER", "WARNING" and "CAUTION" in
The safety cautions are ranked as "DANGER", "WARNING" and "CAUTION" in
this section.
this section.this section.
this section.
:
::
:When a dangerous situation may occur if handling is mistaken
leading to fatal or serious injuries, or when there is a high degree
of emergency to a warning.
:
::
:When a dangerous situation may occur if handling is mistaken
leading to fatal or serious injuries.
:
::
:When a dangerous situation may occur if handling is mistaken
leading to minor injuries or physical damage.
Note that some items described as "CAUTION" may lead to serious results depending
on the situation. In any case, important information that must be observed is ex-
plained.
Precautions with regard to guarantee
Precautions with regard to guaranteePrecautions with regard to guarantee
Precautions with regard to guarantee
Guarantee period
Guarantee periodGuarantee period
Guarantee period
The guarantee period of our product shall be one (1) year after it is delivered to the place speci-
fied by the customer.
Guarantee coverage
Guarantee coverageGuarantee coverage
Guarantee coverage
If any failure for which CKD CORPORATION is recognized to be responsible occurs within the
above warranty period, a substitute or necessary replacement parts shall be provided free of
charge, or the product shall be repaired free of charge at the plant of CKD CORPORATION.
However, the guarantee excludes following cases:
① Defects resulting from operation under conditions beyond those stated in the catalogue or
specifications.
② Failure resulting from malfunction of the equipment and/or machine manufactured by
other companies.
③ Failure resulting from wrong use of the product.
④ Failure resulting from modification or repairing that CKD CORPORATION is not involved
in.
⑤ Failure resulting from causes that could not be foreseen by the technology available at the
time of delivery.
⑥ Failure resulting from disaster that CKD is not responsible of.
Guarantee stated here covers only the delivered products. Any other damage resulting from
failure of the delivered products is not covered by this guarantee.
Confirmation of product compatibility
Confirmation of product compatibilityConfirmation of product compatibility
Confirmation of product compatibility
Our customer shall be responsible of confirming compatibility of our product used in our cus-
tomer’s system, machinery or device.
DANGER
DANGERDANGER
DANGER
WARNING
WARNINGWARNING
WARNING
CAUTION
CAUTIONCAUTION
CAUTION

SM-
SM-SM-
SM-50737
5073750737
50737-A
-A-A
-A
―3―
【
【【
【
Contents
ContentsContents
Contents
】
】】
】
1
11
1.
..
.Unpacking
UnpackingUnpacking
Unpacking
………………4
2
22
2.
..
.Installation
InstallationInstallation
Installation
2.1 Conditions for installation ………………4
2.2 Installation ………………5
2.3 Piping ………………6-7
2.4 Wiring ………………8-10
3
33
3.
..
.Pre
PrePre
Pre-
--
-operation (post
operation (postoperation (post
operation (post-
--
-installation) check
installation) checkinstallation) check
installation) check
3.1 Appearance check ………………11
3.2 Leakage check ………………11
3.3 Electrical check ………………11
4
44
4.
..
.Instructions for proper use
Instructions for proper useInstructions for proper use
Instructions for proper use
4.1 About air quality ………………12
4.2 About surge absorber ………………13-14
4.3 About pressure differential ………………14-15
4.4 Other usage precautions ………………16
4.5 About disassembly
………………16
5
55
5.
..
.Maintenance
MaintenanceMaintenance
Maintenance
5.1 Maintenance and inspection ………………16
5.2 Parts for maintenance ………………16
6
66
6.
..
.Troubleshooting
TroubleshootingTroubleshooting
Troubleshooting
………………17
7
77
7.
..
.Product specification and model number display
Product specification and model number displayProduct specification and model number display
Product specification and model number display
7.1 Product specification ………………18
7.2 Model number display ………………19
8
88
8.
..
.Internal construction
Internal constructionInternal construction
Internal construction
………………20
9
99
9.
..
.Operation explained
Operation explainedOperation explained
Operation explained
………………21

SM-
SM-SM-
SM-50737
5073750737
50737-A
-A-A
-A
―4―
1. Unpacking
Do not take off the packing bag until just before piping.
Otherwise, foreign matter enters the valve from ports and
cause malfunction or bad operation.
(1) Check that the model No. shown on the Label of the product is the same with what you or-
dered.
(2) Check that the product has no external damages.
(3) When storing the product, keep the product inside the packing box to prevent the intrusion of
foreign matter to the valve. Take out the valve when piping.
2. Installation
Contact CKD if the product is to be used beyond specifica-
tions, or in special applications.
2.1 Conditions for installation
a) Do not splash liquid such as water or lubricating oil.
Otherwise, liquid splashed on the valve causes electric leakage
and coil burn. Protection Rating for the DIN Terminal Box
type is equivalent to IPX5. However, we do not guarantee
protection against continuous pouring of water. Protective
measure shall be taken such as covering, or valve installation
inside a panel
Protective measure shall be taken against welding spatter.
b) The coil generates heat.
If the product is to be installed inside a control panel, or if en-
ergizing time is long, provide ventilation measures. Tempera-
ture around the product will be high.
c) The product can not be used in a corrosive or solvent envi-
ronment.
Do not use this product under corrosive gas and corrosive sol-
vent (such as sulfur dioxide) environments.
d) Vibration and shock
Use this product free from vibration and shock.
e) Avoid humid environments, since condensation may occur
with change in temperature.
f) The product cannot be used in an explosive gas atmosphere.
In such atmosphere, use our explosion-proof valve.
g) Use the product away from radiant heat.
(1) Provide appropriate measures to prevent the product from freezing at cold places.
(2) The product cannot be used outdoors. Protective measure shall be taken such as covering, or
valve installation inside a panel.
(3) Do not wash the product with water or solvents. Do not paint the product. Resin material
used in the product may break down.
CAUTION
CAUTIONCAUTION
CAUTION
WARNING
WARNINGWARNING
WARNING
CAUTION
CAUTIONCAUTION
CAUTION

SM-
SM-SM-
SM-50737
5073750737
50737-A
-A-A
-A
―5―
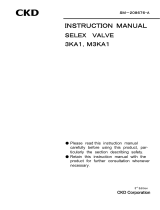
Holes to fix the product
Diameter: 6 mm, penetrated
(two places)
Holes for screws
Diameter: 2.6 mm
Depth: 6 mm
2.2 Installation
Do not fix the product by the piping (tube).
・Fix the Main Body firmly.
(1) Provide enough space around the product to enable installing, detaching, maintenance, and
piping work.
(2) Install the product so that there is no tension to the lead wire and DIN terminal box.
(3) How to fix the product
① For product types without a Fitting Plate
Fix the product by screwing two self-tapping screws (nominal diameter 3 mm) into the two
holes (diameter 2.6 mm, depth 6 mm) at the bottom side of the Main Body (refer to below).
Please provide the self-tapping screws.
・Decide the screw length according to the following:
Screw length L (mm) =
Thickness of the plate the valve is fixed on: T(mm) + hole depth: 6 (mm)
The valve may fail to be fixed firmly if screw length is longer than that calculated by the
equation above.
Screw tightening torque varies according to the screw used; decide the appropriate torque
for the screw used.
The material used for the Main Body is PBT-G30.
② For product types with a Fitting Plate
Fix the product by making use of the two 6 mm diameter throughholes on the Fitting Plate
(refer to below).
Please provide appropriate means to fix the product.
CAUTION
CAUTIONCAUTION
CAUTION

SM-
SM-SM-
SM-50737
5073750737
50737-A
-A-A
-A
―6―
2.3 Piping
Before using the product, confirm that the tubes are inserted
firmly into the push-in fitting until they hit the end, and
that the tubes do not come off.
・Otherwise, the tube will come off and hop wildly when pres-
sure is applied, resulting in accidents.
a) Perform piping so that connection at the fitting will not come
off when movement, vibration, or tension is applied on that
portion.
b) When supplying compressed air after piping is finished, be
sure to confirm that there are no air leaks at all joint por-
tions.
c) When piping is finished and compressed air is to be flown,
supply pressure gradually.
・Otherwise, piping connection will come off and tube will
hop wildly, resulting in accidents.
d) Removal of foreign matter
Foreign matter in the fluid causes malfunction and leakage.
Attach a filter 5 µm or finer just before the pneumatic cir-
cuit.
e) Primary side piping
Do not restrict flow at the primary side. It may cause mal-
function triggered by pressure drop when multiple valves
operate at the same time.
(1) Flushing
Before piping, flush the tubes, valves, and related equipments to remove foreign matter.
(2) About piping connection
① Applicable tube
Use our tubes for push-in fitting type solenoid valves.
Soft nylon (F-1500 series)
Urethane (U-9500 series)
② Use fire-resistant tubes where welding spatter flies in all directions.
(3) About commercially available tubes
Note the outer diameter tolerance, thickness, and hardness of the tube if you decide to use
commercially available tubes.
Use urethane tube with 93°or more hardness (rubber hardness tester).
Tubes that fail to meet the diameter tolerance and hardness allowed will have poor chuck-
ing performance. Tubes may come off or be difficult to insert in that case.
<Tube dimensions>
Inner diameter mm
Outer di-
ameter mm
Nylon Urethane
φ6 φ4 φ4
φ8 φ5.7 φ5
φ10 φ7.2 φ6.5
φ12 φ8.9 φ8
Outer diameter tolerance allowed
Soft or hard nylon ±0.1mm
Urethane φ6 +0.1mm
-0.15mm
Urethane φ8, φ10, φ12 +0.1mm
-0.2mm
WARNING
WARNINGWARNING
WARNING
CAUTION
CAUTIONCAUTION
CAUTION

SM-
SM-SM-
SM-50737
5073750737
50737-A
-A-A
-A
―7―
(4) Tube bending radius
Tube bending shall be over the minimum bending radius. Otherwise, tubes may come off or
leak.
Minimum bending radius mm
Tube diameter Nylon Urethane
φ6 20 20
φ8 30 30
φ10 40 40
φ12 55 50
(5) Cutting the tube
Use a tube knife, and cut the tube perpendicular to the tube axis. If the cut surface is
slanted, air will leak from the slanted cut surface when it is inserted.
(6) State of tube connection
Provide a linear portion, length more than the tube outer diameter, from the tip of the
fitting. Do not bend the tube excessively at the fitting entry.
Do not apply torsion, tension, and moment forces to the fitting and the tube.
Otherwise, tubes may come off, and may break.
Provide measures to prevent tubes from wearing out and being damaged.
(7) Flow direction
Match the fluid flow direction with the arrow shown on the side of the product.
(8) How to attach and detach the tube
① How to attach
Cut the tube perpendicular to the tube axis.
Insert the tube firmly until it hits the end.
After inserting, pull the tube lightly to check whether the tube is chucked properly.
② How to detach
Pull the tube while depressing the push ring to detach the tube.
Body push
-
in fi
t
ting portion
Body push
-
in fi
t
ting portion

SM-
SM-SM-
SM-50737
5073750737
50737-A
-A-A
-A
―8―
2.4 Wiring
Read this instruction manual thoroughly and understand the
contents before wiring the product.
・You need to understand the structure and the operation prin-
ciple of the solenoid valve. You additionally need knowledge to
secure safety.
Be sure to shut off the power before wiring. There is a risk of
electric shock.
Confirm the alternating or direct current type of the power
source before energizing.
To prevent unintended operation caused by electric leakage
of other control components, confirm electric leakage.
・When using a control circuit such as a programmable con-
troller, the solenoid valve may operate without intention
because of the electric leakage from the control components.
When using this product, keep the electric leakage from
other components below the value shown in the table below.
Rated voltage Electric leakage
AC100V 2.0 mA or less
DC12V 1.5 mA or less
DC24V 1.8 mA or less
(1) How to wire the lead wire
This product uses lead wires as shown in the table below.
When pressure bonding (crimping), crimp under proper crimping conditions, and insulate
properly.
Electric connec-
tion symbol Contents Conductor size
Condutor
cross-sectional area
Insulator
outer diameter
Blank Grommet lead wire
AWG#24 Equivalent to 0.22 φ1.42
Electric
leakage
Solenoid valve
Contact
C
R
Programmable
controller side
CR circuit
WARNING
WARNINGWARNING
WARNING
CAUTI
CAUTICAUTI
CAUTI
ON
ONON
ON
CAUTION
CAUTIONCAUTION
CAUTION

SM-
SM-SM-
SM-50737
5073750737
50737-A
-A-A
-A
―9―
(2) Wiring the DIN terminal box type
<1> Disassembly
Loosen Screw ①, and pull Cover ② in the direction of Screw ① to detach the DIN terminal box
from Coil Assembly ⑫. Pull Screw ① out of Cover ②.
There is a notch ⑨ (beside the GDSN mark) at the bottom side of Gland ③. Inserting and pry-
ing a small screwdriver between Cover ② and Gland ③ will detach Gland ③ from Cover ②
(refer to figure 1).
Do not apply excessive force when inserting and prying. Otherwise, the Gland may break.
Detach Cable Gland ④ and take off Washer ⑤ and Rubber Packing ⑥.
Figure 2 Exploded view of the
DIN terminal box
Figure 1 DIN terminal box
notch
Notch
This part may break if ex-
cessive force is applied.

SM-
SM-SM-
SM-50737
5073750737
50737-A
-A-A
-A
―10―
<2> Connection
1) Preparation
・Applicable outer diameter dimension for cable ⑦ is VCTF (two or three cores) (φ3.5 to 7)
defined in JIS C3306.
・Cable sheath peeling length is 10 mm.
・Both stranded wire and single wire can be connected.
・Do not connect stranded and soldered wire.
・If you use crimping sleeve ⑩ at the tip of the stranded wire,
use H0.5/6 (0.3~0.5 mm
2
) or H0.75/6 (0.75 mm
2
) made by
Weidmueller Japan Co.,Ltd.
or equivalent. Please provide the crimping sleeve.
2) Connection
・Pass Cable Gland ④, Washer ⑤, and Rubber Packing ⑥ through Cable ⑦. Insert the Cable
into Cover ②.
・Connect the wire onto terminal 1 and 2. There is no polarity.
・Recommended tightening torque is 0.2 to 0.25 Nm.
3) Assembly
Set the wire-connected Gland ③ into Cover ② (insert the gland until you hear a snap sound).
You can set the gland in four directions (refer to figure 3).
Insert Rubber Packing ⑥ and Washer ⑤ in that order into the cable entrance of Cover ②.
Tighten Cable Gland ④ onto Cover ② firmly.
Note: Reference tightening torque of the Cable Gland is 1.0 to 1.5 Nm.
Pull the cable, and confirm that it does not come off.
Insert Gasket ⑧ between the bottom portion of Gland ③ and the plug of Coil Assembly ⑫.
Attach the DIN terminal box. Insert Screw ① over Cover ②, and tighten the Screw.
Note: Recommended screw tightening torque is 0.2 to 0.25 Nm.
Figu
re 3 Attaching direction of the DIN te
r
minal box

SM-
SM-SM-
SM-50737
5073750737
50737-A
-A-A
-A
―11
―
3. Pre-operation (post-installation) check
3.1 Appearance check
(1) Confirm that the valve is fixed firmly.
(2) Confirm that the piping is done properly.
3.2 Leakage check
(1) When piping is finished and air is to be flown, supply pressure gradually.
If the piping is improper, the tube will come off and hop wildly when pressure is applied,
resulting in accidents.
(2) Confirm leakage at the connection part by applying pressure to the fluid.
We recommend leakage check by the following method:
・ Supply compressed air (0.1-0.3MPa)
・ Apply soap water to the portion to check for leakage
・ Bubbles will appear if there is any leakage.
3.3 Electrical check
Cut off the electricity.
Check while taking serious care to avoid electric shock.
(1) Check the supply voltage.
Voltage variation shall be within 10 % of the rated voltage.
Use beyond the allowed variation range will cause malfunction or damage to the coil.
(2) Check insulation resistance
Check the insulation resistance between dead metal parts (such as screws) and uninsu-
lated live parts (such as the tip of the lead wire) that are assembled to the product.
Confirm that insulation resistance is over 10 MΩ at DC500V megger.
Stop the flow of the fluid (shut the supply).
Discharge the fluid inside the product.
Cut off the electricity.
WARNING
WARNINGWARNING
WARNING
WARNING
WARNINGWARNING
WARNING

SM-
SM-SM-
SM-50737
5073750737
50737-A
-A-A
-A
―12―
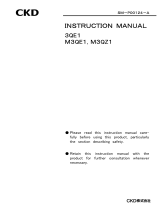
① ② ③ ④ ⑤ ⑥ ⑦ ⑧ ⑨
① Compressor ② Aftercooler
③ Surge tank ④ Main line filter
⑤ Refrigerated air dryer ⑥ Filter
⑦ Oil mist filter ⑧ Regulator
⑨ This product
4. Instructions for proper use
4.1 About air quality
a) Do not supply fluids other than compressed air.
b) Use clean compressed air that is free of corrosive gas.
c) Ozone density within the compressed air shall not be
greater than 0.1 ppm.
Otherwise, the valve may malfunction or leak.
d) Compressed air contains large amounts of drain, oxidized
oil, tar, foreign matter, and piping rust. They may be-
come the cause of valve failure such as malfunction or
short service life.
(1) Required air quality and recommended pneumatic circuit
・ Use this product under air quality described below.
JIS B 8392-1:2003 Compressed air purity class: 2.6.3
推奨空気圧回路は以下のとおりです。
(2) Compressed air contains large amounts of drain (water, oxidized oil, tar, foreign matter).
Drain causes malfunction to pneumatic equipments. Improve air quality by the following
methods: Dehumidify using an aftercoolor or a dryer; Remove foreign matter using an air
filter; Remove tar using an air filter for tar removal.
(3) Use dry compressed air that will not generate waterdrops (drain) inside the piping.
Otherwise, drain enters the product air flow path and clogs the flow path for a moment,
resulting in malfunction.
(4) Use compressed air that is free of contaminants such as compresser oil, tar, and carbon.
Otherwise, contaminants such as compressor oil, tar, and carbon enters the product and
cause malfunction.
(5) Use compressed air that is free of solid foreign matter.
Otherwise, solid foreign matter in the compressed air enters the product and cause
malfunction and leakage.
(6) Install a pneumatic filter just before the solenoid valve.
CAUTION
CAUTIONCAUTION
CAUTION

SM-
SM-SM-
SM-50737
5073750737
50737-A
-A-A
-A
―13―
4.2 About surge absorber
The surge absorber attached to the solenoid valve protects the out-
put contact by which the solenoid valve is driven.
The surge absorber cannot protect other peripheral equipment; other
peripheral equipment may be affected by the surge (break, malfunc-
tion). Additionally, the surge absorber may absorb surge caused by
other equipment, resulting in breakage such as burnout.
Note the following:
a) A surge absorber suppresses solenoid valve surge voltage, which can
reach several hundred volts, to a value that contact outputs can
withstand. Depending on the output circuit, however, the perform-
ance of the surge absorber may be insufficient to protect other
equipment; surge may break or malfunction other equipment.
Determine whether the surge suppressor performance meet your
needs beforehand; check the clamping voltage of the solenoid valve
surge suppressor, withstanding voltage and circuit structure of out-
put equipment, and degree of return time delay.
Provide separate measures against surge if needed. Surge absorber
attached to this solenoid valve can suppress the reverse voltage
surge at OFF to the following value:
Rated voltage Reverse voltage surge when OFF
DC12V Around 27 V
DC24V Around 47 V
b) When the output unit is NPN type, voltage shown in the table above
added to surge voltage from the source voltage may be applied to the
output transistor; install a contact protecting circuit in this case.
<Example of output transistor protective circuit insta
l
lation 1>
Programmable
contro
l
ler side
Solenoid valve
side
<Example of output transistor protective circuit insta
l
lation
2
>
Programmable
contro
l
ler side
Solenoid valve
side
CAUTION
CAUTIONCAUTION
CAUTION

SM-
SM-SM-
SM-50737
5073750737
50737-A
-A-A
-A
―14―
c)
If other solenoid valves or equipment is connected parallel to a sole-
noid valve, reverse voltage surge generated at OFF is applied to
those valves and equipment. Even for a DC24V solenoid valve with
a surge absorber, surge voltage will reach several tens of negative
volts. This reverse polar voltage may break or malfunction other
parallel-connected equipment. Do not parallel connect equipment
vulnerable to reverse polar voltage (e.g. LED indicator).
Additionally, if multiple valves that are connected parallel are en-
ergized at the same time, surge generated by other valves will be
absorbed by the surge absorber attached in a solenoid valve. De-
pending on the current, the surge may burn the surge absorber.
Also, when energizing multiple solenoid valves (each with surge ab-
sorber) in parallel, surge current concentrates to the surge absorber
having the lowest clamping voltage, similarly burning that surge
absorber.
Clamping voltage varies among surge absorbers even for a same so-
lenoid valve model number. So, surge absorbers may burn for the
worst conditions.
Avoid parallel connecting solenoid valves, and activating the valves
at once.
d) Surge absorbers attached to solenoid valves generally form a short
circuit if they are burned due to excessive voltage or excessive cur-
rent. So, a large amount of current flows when the valve is energized
after the surge absorber is burned. In worst cases, that may result
in breakage or fire of output circuits and solenoid valves.
Do not continue energizing broken solenoid valves.
Additionally, provide an overcurrent protection circuit in the power
supply or driving circuit. Or, use power supply or equipment with
overcurrent protection, so that a large current does not flow con-
tinuously.
4.3 About pressure differential
a) Make sure to set pressure differential between the primary and sec-
ondary sides at and above 0.01 MPa when the valve is open for the
following cases (if pressure differential is below 0.01MPa, the dia-
phragm vibrates and cause early breakage):
・When the secondary side is restricted (e.g. nozzle is attached)
・When multiple valves that are piped parallel are opened at the
same time (decrease in supply pressure decreases pressure dif-
ferential between the primary and secondary sides)
・If pressure differential between the primary and secondary
sides cannot be at and above 0.01 MPa, or if pressure differen-
tial cannot be confirmed, we recommend using our pilot air ex-
ternal exhaust type.
(1) If flow is restricted at the supply piping side, shortage in pressure differential at valve opera-
tion destabilizes operation. Use proper supply piping size so flow is not restricted.
(2) If a regulator and a solenoid valve are directly connected, they may enter into resonance with
each other and cause chattering.
CAUTION
CAUTIONCAUTION
CAUTION
CAUTION
CAUTIONCAUTION
CAUTION

SM-
SM-SM-
SM-50737
5073750737
50737-A
-A-A
-A
―15―
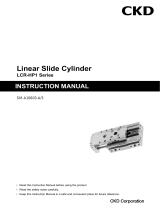
(3) This product is a pilot operated solenoid valve which uses pressure difference between the
valve primary and secondary sides to open and close the valve. Therefore, pressure differ-
ence (⊿P=P1-P2) not less than 0.01 MPa is needed to keep the valve open for sure. If ⊿P is
short, diaphragm in the valve may vibrate and result in early breakage.
Pressure difference ⊿P is determined by valve flow rate Q; the larger the flow rate Q, the larger
the pressure difference ⊿P. Figure below shows the reference flow rate value required to keep
the pressure difference not less than ⊿P=0.01 MPa when the valve is open. Using the figure be-
low, confirm that there is enough pressure difference ⊿P for your intended usage flow rate.
Notes below lists examples when pressure difference ⊿P and flow rate Q cannot be main-
tained.
・ When flow rate is restricted at the valve primary or secondary side. Such case includes
the use of throttles, nozzles, or long piping.
・ When air supply capacity is short (including use of regulators with short capacity, use of
throttles, or use of long piping).
・ When other equipment that share a common air supply (such as from a common regula-
tor) consumes large amounts of air at all time or temporarily.
・ When air supply pressure fluctuates, resulting in flow rate change and decrease.
・ When multiple valves open at the same time.
If flow rate cannot be maintained to keep the pressure difference not less than 0.01 MPa, or
if flow rate cannot be confirmed, we recommend using our pilot air external exhaust type.
Flow rate Q (L/min)
P1: Solenoid valve primary side pressure when valve opens (MPa)
Required flow rate

SM-
SM-SM-
SM-50737
5073750737
50737-A
-A-A
-A
―
16
―
4.4 Other usage precautions
a) Do not touch the coil portions or AC voltage rectification
stack portions when energized or immediately after en-
ergizing, since those portions generate heat.
b) When carrying the product, hold the main body.
・
Do not carry the product by the lead wire, or by the cable
attached to the DIN terminal box. Otherwise, the wire
may break or have bad continuity.
c) Do not apply back pressure
(
pressurizing from the secon-
dary side
)
to the product.
・
Otherwise, the product may malfunction or break.
(1) About instantaneous leakage
Note that pilot operated 2 port valves may open and leak instantaneously at closed posi-
tion when pressure is suddenly applied (e.g. when compressor starts).
(2) Depending on your usage, valve operation may become unstable if the valve is left aban-
doned for around a month. Be sure to use the product after trial run.
(3) If energizing time length is short, ON-OFF operation may fail to follow. Be sure to use the
product after perform trial run under work conditions.
(4) If any abnormalities occur, refer to “6. Troubleshooting”.
4.5 About disassembly
Do not disassemble the product.
Otherwise, valve performance may degrade.
・
Disassembled and reassembled products will not be
guaranteed(excluding DIN terminal box connection
portion).
5. Maintenance
Shut off the power supply and release the fluid and pres-
sure before performing maintenance work.
5.1 Maintenance and inspection
Regularly inspect the product to ensure optimum performance. The product should be in-
spected every half year.
Refer to “3. Pre-operation check” for contents of inspection.
5.2 Parts for maintenance
We do not provide maintenance parts.
Please contact CKD or your nearest agent if the product shows abnormalities such as leak or
malfunction while use.
CAUTION
CAUTIONCAUTION
CAUTION
CAUTION
CAUTIONCAUTION
CAUTION
WARNING
WARNINGWARNING
WARNING

SM-
SM-SM-
SM-50737
5073750737
50737-A
-A-A
-A
―
17
―
6. Troubleshooting
If the product fails to operate as intended, check according to the following table.
State of failure Cause Countermeasure
Valve is not energized Confirm wiring and fuse, then ener-
gize the valve.
Voltage applied is lower than the
allowable voltage range.
Confirm the power supply, and apply
rated voltage.
Applied fluid pressure is beyond
the specified range. Set pressure within specified range.
Foreign matter clogs the flow path.
Replace the product.
Foreign matter is clogged at the
actuator portion. Replace the product.
Valve does not open
Diaphragm is damaged. Replace the product.
Electricity is not shut off.
Check for leak of electricity. Modify
the circuit so electricity is completely
shut off.
Applied fluid pressure is beyond
the specified range. Set pressure within specified range.
Foreign matter is stuck on the
valve seat. Replace the product.
Foreign matter is clogged at the
actuator portion. Replace the product.
Valve does not close
Diaphragm is damaged. Replace the product.
Diaphragm is damaged or de-
formed. Replace the product.
Gasket is damaged or deformed. Replace the product.
External leakage
Tube is not inserted properly.
Wrong tube size.
Insert the tube properly. Insert tube
that matches the valve port.
Applied fluid pressure is beyond
the specified range. Set pressure within specified range.
Valve seat on the body is worn out
or has flaw. Replace the product.
Sealing side of the Diaphragm is
worn out or has flaw. Replace the product.
Internal leakage
Foreign matter is stuck on the
valve seat. Replace the product.
Please contact CKD or your nearest agent for any unclear points.

SM-
SM-SM-
SM-50737
5073750737
50737-A
-A-A
-A
―
18
―
7.
Product specification and model number display
7.1 Product specification
Model EXA
1.Valve structure Pilot operated 2 port solenoid valve, normally closed
2.Withstanding pressure (wa-
ter) 1.05 MPa
Fluid Compressed air
(JIS B 8392-1:2003 Compressed air purity class:2.6.3)
Fluid tempera-
ture 0 to 55 ℃ (no freezing)
Max. working
pressure 0.7 MPa (external exhaust type: 0.3 MPa)
Working pres-
sure differential 0.01 to 0.7 MPa (external exhaust type: 0.01 to 0.3 MPa)
Internal leakage
2 cm
3
/min or less
3 .
Fluid
specifica-
tions
External leakage
2 cm
3
/min or less
Duty cycle Continuous
Voltage DC24V, DC12V, AC100V (voltage variation shall be within ±10
%)
Power consump-
tion 0.6 W (DC)
Apparent power 1 VA (AC)
Insulation resis-
tance 10 MΩ or more at DC500V
Withstand volt-
age
There shall be no abnormality after applying AC1000V
(commercial frequency) for 1 minute
Insulation Thermal class B JIS C 4003
4.Electrical
specifica-
tions
Increase in coil
temperature
50 K or less at rated voltage and at ambient temperature 20 to
30 ℃.
Ambient tempera-
ture
-5 to 55 ℃(no freezing)
Ambient humid-
ity 85 % or less
Mounting pos-
ture Not restricted
5 . Usage
conditions
Ambient atmos-
phere
Atmosphere shall not be corrosive nor explosive
Places free from liquids such as water, oil, and welding spatter
Places free from radiant heat
Port φ6
Push-in joint
φ8
Push-in joint
φ10
Push-in joint
φ12
Push-in joint
C value
(dm
3
/(s/bar)) 1.6 3.0 3.3 3.6
Lead
wire type
56 57 68 69
6.Shape
Mass
DIN type
76 77 88 89
7.Note Protection rating
Lead wire type: IPX0 DIN type: IPX5

SM-
SM-SM-
SM-50737
5073750737
50737-A
-A-A
-A
―
19
―
7.2 Model number display
EXA-□□-□□□□-□
①Code for applicable tube outer diameter
Code Tube outer diameter
C6 φ6
C8 φ8
C10 φ10
C12 φ12
②Code for sealing material
Code Sealing material
0 (zero) H-NBR internal exhaust type
H H-NBR internal exhaust type, oil prohibit type (notes 1)
1 H-NBR external exhaust type (notes 2)
(Notes 2) “Oil prohibit” is a type that has its parts washed and assembled under the fol-
lowing conditions:
(1-1) Parts to be washed: Parts that come in contact with the fluid air in the flow
path (excluding parts that degrade if washed).
(1-2) Cleaning solution: Industrial alcohol or fluorine-based cleaning solution
(1-3) Assembling facility: Normal assembling and inspection facilities
(Notes 3) Please confirm the pressure specifications.
③ Code for coil option
Code Coil option
2C Lead wire (without lamp and surge absorber)
2G DIN terminal box (Pg 7), without lamp
2GS DIN terminal box (Pg 7), without lamp, with surge absorber
2H DIN terminal box (Pg 7), with lamp (built in the terminal box)
2HS DIN terminal box (Pg 7), with lamp and surge absorber (built in the
terminal box)
2KS DIN terminal box (Pg 7), with lamp and surge absorber (built in the
terminal box), with M12 connector cable
④ Code for other options
Code Option
No code No option
B With fitting plate
⑤ Code for voltage
Code Voltage
1 AC100V
3 DC24V
4 DC12V
① ② ③ ④ ⑤
⑤Code for voltage
④Code for other options
③Code for coil option
②Code for sealing material
①Code for applicable tube
outer diameter
/