Page is loading ...

Suitable Substrates
All substrates listed below must be properly prepared and meet certain requirements. There may be other
exceptions and special conditions (as noted below) for these substrates to be suitable for the glue down
installation system.
• Concrete – dry and smooth on all grade levels
– Tiles can be installed over a painted concrete floor.
• Suspended wood subfloors with approved wood underlayments – must have minimum of 18˝ well-
ventilated crawl space underneath including:
– Properly prepared OSB
– Lauan Plywood: Use only Type 1 lauan exterior grade “BB” or “CC” for underlayment. The use of
lesser grades of lauan plywood is unacceptable and may cause severe problems when used as an
underlayment, including discoloration, indentation, loss of bond and delamination.
NOTE: The use of lauan plywood and other extremely porous wood underlayments will reduce the flash and
working time of adhesives. It is best to apply an acrylic-based primer-sealer to any porous substrate prior to
installing sheet vinyl. A manufacturer’s certification of lauan grade must accompany any claim involving the
use of a lauan underlayment.
• Single-layer, fully-adhered, existing resilient floors – must not be foam-backed or cushion-backed
• Ceramic tile, Terrazzo, Marble
• Polymeric Poured (seamless) Floors
DO NOT INSTALL OVER
• Existing resilient tile floors that are below grade
• Existing cushion-backed vinyl flooring
• Carpet
• Hardwood flooring installed directly over concrete
• Existing floating floors
• Particleboard 40lb. density or waferboard
Job Conditions/Preparations
• Resilient flooring should only be installed in temperature-controlled environments. It is necessary to
maintain a constant temperature before, during and after the installation. Therefore, the permanent or
temporary HVAC system must be in operation before the installation of resilient flooring. Portable heaters
are not recommended as they may not heat the room and subfloor sufficiently. Kerosene heaters should
never be used.
• All substrates must be structurally sound, dry, clean, flat, and smooth with minimal deflection. Substrates
must be free from excessive moisture or alkali. Remove dirt, paint, varnish, wax, oils, solvents and other
foreign matter, and contaminates.
- Subfloors must be flat within 3/16˝ in 10´ or 1/8˝ in 6´
- For concrete substrates moisture testing should be conducted and moisture vapor emissions.
Acceptable levels are determined by the adhesive being used. Check adhesive label for limitations.
• High spots on the substrate should be leveled and low areas filled with appropriate underlayments.
• Do not use products containing petroleum, solvents or citrus oils to prepare substrates as they can cause
staining and expansion of the new flooring.
• For renovation or remodel work, remove any existing adhesive residue so that 100% of the overall area of
the original substrate is exposed.
• Ceramic tile floors, ceramic and marble grout joints, and irregularities in concrete should be filled and
leveled using a cementitious patch to fill and smooth any embossing in the old floor.
• The area to receive resilient flooring materials and adhesives should be maintained at a minimum 65°F
(18.3°C) for 48 hours before, during, and 48 hours after installation. Maintain minimum temperatures of
55°F (12.8°C) thereafter.
• Radiant heated substrates must not exceed a maximum surface temperature of 85°F (29°C).
• The subfloor panels must have a smooth, sanded face and show no swelling of edges or surface due to
exposure to weather conditions or construction traffic.“
• There are numerous products available for use as floor fills, patches, self-leveling underlayments, and
trowelable underlayments. They include proprietary blends of compounds such as portland cement,
calcium aluminates, and gypsum-based products. These are recommended by their manufacturers for
smoothing rough or uneven subfloors, enhancing acoustical and fire characteristics of structures or as
substrates to receive floor covering for otherwise unsuitable subfloor conditions. If the subfloor surface
appears to be dusty then apply a primer to the surface.
SAFETY AND CLEAN UP
Wet adhesive should be cleaned up immediately with soap and water on a clean cloth. Dried adhesive may
require the use of a solvent-based adhesive cleaner.
Installation Preparation
Remove baseboard, quarter-round moldings, wall base, appliances and furniture from room. After
preparation work, sweep and vacuum the entire work area to remove all dust and debris.
Whenever possible, plan the layout so that the joints in the planks do not fall on top of joints or seams in the
existing substrate. The end joints of the planks should be staggered a minimum of 6˝ apart. Do not install
over expansion joints.
Determine which direction the plank will run. Find the center of each of the end walls (the walls
perpendicular to the long dimension of the planks and place a pencil mark on the floor. Connect these points
by striking a chalk line down the center of the room. Do a dry layout of planks from the center line to the
THANK YOU FOR CHOOSING AHF PRODUCTS FLOORING
If properly installed and cared for, your new flooring will be easy to maintain and and will look great for
years to come. These directions are based on industry standards and best practices. Failure to follow these
installation instructions may result in damage to the flooring and void the floor’s warranty.
• For complete warranty information call 1-866-243-2726 or go to www.ahfproducts.com.
• For technical or installation questions, or to request a Safety Data Sheet, please call 1-866-243-2726 or
visit www.floorexpert.com our technical website.
• For general questions or comments, please visit us at www.ahfproducts.com or call 1-866-243-2726.
1
WARNING:
EXISTING IN-PLACE RESILIENT FLOOR COVERING AND ASPHALTIC
ADHESIVES. DO NOT SAND, DRY SWEEP, DRY SCRAPE, DRILL, SAW, BEADBLAST, OR
MECHANICALLY CHIP OR PULVERIZE EXISTING RESILIENT FLOORING, BACKING, LINING
FELT, ASPHALTIC “CUTBACK” ADHESIVE, OR OTHER ADHESIVE.
These existing in-place products may contain asbestos fibers and/or crystalline silica. Avoid creating
dust. Inhalation of such dust is a cancer and respiratory tract hazard. Smoking by individuals exposed
to asbestos fibers greatly increases the risk of serious bodily harm. Unless positively certain that the
existing in-place product is a non-asbestos-containing material, you must presume it contains asbestos.
Regulations may require that the material be tested to determine asbestos content and may govern
removal and disposal of material.
Visit rfci.com to see the current edition of the Resilient Floor Covering Institute (RFCI) publication
Recommended Work Practices for Removal of Resilient Floor Coverings for instructions on removing all
resilient floor covering structures or contact your retailer.
AHF floor coverings and adhesives do NOT contain asbestos.
Adhesive Trowel Set-in-Wet Dry-to-Touch Comments
S-295 1/32˝ deep; 1/16˝
wide; 1/32˝ apart
U-notch
N/A Dry to Touch Foot Traffic: 24 Hours
Heavy Rolling Loads:
72 Hours
S-319 Short nap paint
roller
N/A Dry to Touch Foot Traffic:
Immediately
Heavy Rolling Loads:
Immediately
Flip Spray
Adhesive
N/A N/A Dry to Touch
Approximately
30 minutes (tacky
to touch with no
transfer to fingers)
Foot Traffic:
Immediately
Heavy Rolling Loads:
24 Hours
S-1000* 1/32˝ deep; 1/16˝
wide; 1/32˝ apart
U-notch
Set in Wet
Approximately
10-20 minutes
N/A Foot Traffic:
Immediately
Heavy Rolling Loads:
8 Hours
* Note: When installing LVT in areas subject to direct sunlight, topical moisture, temperature
fluctuations, S-1000 adhesive must be used.
Do not wash or scrub the new flooring for at least 5 days after the installation. This will allow the
tile to become “seated” in the adhesive and prevent excess moisture and cleaning agents from
interfering with the adhesive bond.
Installation:
Location: All grade levels
Fitting: All Methods
Tools:
Tape measure, chalk line, utility knife, pencil, straight edge, vacuum or broom optional tile cutter or cutting
shear. Subfloor prep supplies. Recommended adhesives.
Keys to Successful Glue Down Installation
• Most installations will need approximately a 10% cutting allowance added to the square footage of the
room.
• Proper conditioning of the job site is necessary. Flooring planks should not be exposed to sudden changes
in temperature.
• Store, transport and handle the flooring planks in a manner to prevent any distortions. Distortions will not
disappear over time. Store cartons flat, never on edge. Ensure that the flooring planks are lying flat during
installation.
• Installations of carpet, metal strips and other transition moldings should not pinch the flooring against the
subfloor and should allow for some slight movement wherever practical.
• Protect the floor from heavy-rolling loads, other trades, and movement of appliances by using sheets of
plywood or similar.
RESIDENTIAL DRY BACK LVT INSTALLATION INSTRUCTIONS

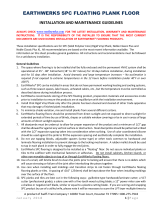
wall running parallel to the long direction of the planks to determine the width of the last row of planks (refer
to Figure 1).
CENTER
OF ROOM
Figure 1. Dry layout to determine width of border plank.
Avoid having border pieces less than half with width of the planks. If you find the border planks will be less
than 1/2 the width of the plank, the center starting line should be shifted a distance equal to 1/2 the plank
width. This will “balance” the room and provide for a larger cut piece at the wall.
NOTE: The subfloor must be thoroughly free from dust and debris. If the subfloor is dusty this may affect the
product performance.
NOTE: Stagger end joints by 6˝. Cut pieces at the ends of rows should be 8˝ long or longer.
PROCEDURE – S-295 Flooring Adhesive
1. Apply S-295 Flooring Adhesive at the starting area, ensuring the area can be covered within the working
time of the adhesive. Be sure not to apply adhesive too far ahead of your work area. It is important to use
the correct trowel notching. Inspect and replace worn trowels frequently. Follow adhesive open time and
working time recommendations on the adhesive label.
2. Allow enough time for the adhesive to dry until tacky with no transfer to the finger (dry to-touch) before
placing the material into it. This normally takes 30 minutes or more, depending on temperature and
humidity. After the adhesive has reached this condition, there is at least one hour working time in which to
install and roll the flooring.
NOTE: Allowing proper open time will help to minimize knee marks, roller marks and trapped blisters. The
amount of open time will vary according to job conditions— temperature, humidity, air flow and type of
substrate.
3. Roll Thoroughly. Starting at the center and working toward the edges, roll in two directions using 100
lb. roller. Use a hand roller in confined areas where the large floor roller will not reach, such as under toe
kicks. Give special attention to cleaning adhesive residue from the joint areas. Clean excess adhesive from
the surface of the flooring using a clean, white cloth dampened with detergent and water. Mineral spirits
will remove dried adhesive residue.
4. The planks may be walked on immediately; however, the floor should not be exposed to heavy rolling load
traffic for 72 hours after the installation. Use pieces of hardboard or underlayment panels to protect the
floor when moving heavy furniture and appliances back into the room.
PROCEDURE – S-319 Roll Strong Adhesive
1. A clean substrate is extremely important with the use of S-319 Roll Strong Adhesive. Thoroughly sweep
and vacuum the substrate first. Damp mop to remove any remaining dust or debris. Extra attention to
substrate preparation is essential for a successful installation. Failure to thoroughly clean the substrate
may result in telegraphing of debris.
2. Bond testing prior to the installation will help identify the appropriate application rate, open and working
time, and any potential bonding problems to the substrate or flooring. To determine the accurate coverage
rate, measure and chalk line the substrate into grids (using the appropriate square feet of area for the
adhesive application) and apply adhesive onto each measured grid area.
3. A roll-on application method is recommended with a medium nap (3/8˝ nap) roller to achieve a smooth,
even, full-spread coating. Spread rate and drying time of the adhesive will depend on the porosity and
texture of the substrates and the ambient temperature and relative humidity. KEEP PAINT ROLLER WET!!
Do not apply pressure to the roller, allow it to freely roll over the substrate. ADHESIVE COVERAGE MUST
NOT EXCEED 400 ft2/gal. Overly absorbent or rough substrates will require two coats. Once the coating
has dried, it must be kept clean and apart from any contact with other surfaces until ready to begin the
bonding process. Do not spread more adhesive than can be covered in 4 hours.
4. Allow the adhesive to dry completely with no transfer to fingers when lightly touched. Open time will vary
depending on the adhesive coverage, substrate porosity and the ambient conditions.
NOTE: Allowing proper open time will help to minimize knee marks, roller marks and trapped blisters. The
amount of open time will vary according to job conditions— temperature, humidity, air flow and type of
substrate.
5. Once the S-319 Roll Strong adhesive has become dry-to-touch, install the plank as recommended
above, carefully aligning each plank with the chalk lines or adjacent row. Planks can be repositioned
as necessary prior to applying pressure. After completion of the installation, roll the entire floor in both
directions with 100 lb. roller to achieve a full contact bond. Use a hand roller in confined areas where the
large floor roller will not reach, such as under toe kicks. Note: After the flooring has been rolled or pressed
into place, repositioning is not possible. Normal traffic and rolling loads may be allowed as soon as the
installation, finishing and clean-up are complete.
PROCEDURE – S-1000 Adhesive
1. Apply S-1000 Adhesive at the starting area, ensuring this area can be covered within the working time
of the adhesive. Be sure not to apply adhesive too far ahead of your work area. It is important to use the
correct trowel notching. Inspect and replace worn trowels frequently. Follow adhesive open time and
working time recommendations on the adhesive label.
2. Install the flooring into the wet adhesive after 10-20 minutes of open time. After this time, there is
approximately 45 minutes working time in which to install and roll the flooring. Install the plank as
recommended above, carefully aligning each plank with the chalk lines or adjacent row.
NOTE: Allowing proper open time will help to minimize knee marks, roller marks and trapped blisters. The
amount of open time will vary according to job conditions— temperature, humidity, air flow and type of
substrate.
2
Armstrong Flooring™ and the Armstrong Flooring™ logo are under license from AWI Licensing,
LLC. All other trademarks are owned by AHF, LLC, or its subsidiaries or affiliates. © 2023 AHF, LLC.
AHF Products, 3840 Hempland Road, Mountville, PA 17554
WF-1369-1123
3. Roll Thoroughly. Starting at the center and working toward the edges, roll in two directions using 100
lb. roller. Use a hand roller in confined areas where the large floor roller will not reach, such as under toe
kicks. Give special attention to cleaning adhesive residue from the joint areas. Clean excess adhesive from
the surface of the flooring using a clean, white cloth dampened with detergent and water. Mineral spirits
will remove dried adhesive residue.
4. The planks may be walked on immediately; however, the floor should not be exposed to heavy rolling load
traffic for 8 hours after the installation. Use pieces of hardboard or underlayment panels to protect the
floor when moving heavy furniture and appliances back into the room.
PROCEDURE – Flip Spray Adhesive
1. A clean substrate is extremely important with the use of Flip Spray Adhesive. Thoroughly sweep and
vacuum the substrate first. Damp mop to remove any remaining dust or debris. Extra attention to
substrate preparation is essential for a successful installation. Failure to thoroughly clean the substrate
may result in telegraphing of debris.
2. Bond testing prior to the installation will help identify the appropriate application rate, open and working
time, and any potential bonding problems to the substrate or flooring. To determine the accurate coverage
rate, measure and chalk line the substrate into grids (using the appropriate square feet of area for the
adhesive application) and spray the entire bottle of adhesive onto each measured grid area.
3. Shake the bottle well before each use. Point bottle downward and press the side of the nozzle tip as
you slowly walk back and forth, overlapping the spray pattern for an even spray coverage. Do not use a
sweeping motion as this may cause uneven coverage. Clean up any larger drops that may occur. Refer
to the provided spray patterns for proper application. The spray patterns for tile and sheet are different.
Over-application may cause adhesive telegraphing.
4. Allow the adhesive to dry completely with no transfer to fingers when lightly touched. Open time will vary
depending on the adhesive coverage, substrate porosity and the ambient conditions.
5. Working time for the adhesive should not exceed 4 hours.
6. Install the plank as recommended above, carefully aligning each plank with the chalk lines or adjacent
row.
7. Roll Thoroughly. Starting at the center and working toward the edges, roll in two directions using 100
lb. roller. Use a hand roller in confined areas where the large floor roller will not reach, such as under toe
kicks. Give special attention to cleaning adhesive residue from the joint areas. Clean excess adhesive from
the surface of the flooring using a clean, white cloth dampened with detergent and water. Mineral spirits
will remove dried adhesive residue.
The planks may be walked on immediately; however, the floor should not be exposed to heavy rolling load
traffic for 24 hours after the installation. Use pieces of hardboard or underlayment panels to protect the floor
when moving heavy furniture and appliances back into the room.
SAFETY AND CLEAN UP:
• Wet adhesive overspray or drips should be cleaned up immediately with soap and water on a clean cloth.
Dried adhesive may require the use of a solvent adhesive cleaner. Between uses, clean the spray tip
immediately with a clean wet cloth to prevent accumulation of dried adhesive.
• Flip Spray Adhesive: Between uses, clean the spray tip immediately with a clean wet cloth to prevent
accumulation of dried adhesive. Empty aluminum spray cans should be relieved of excess pressure and
recycled or disposed of in accordance with local requirements. Do not expose to temperatures exceeding
115° F. Prolonged exposure to heat or direct sun may cause container to burst.
Precautions for All Installation Methods
• When moving appliances or heavy furniture, lay a plywood panel on the floor and “walk” the item across it.
This protects the floor from scuffing and tears.
• Use floor protectors on furniture to reduce indentation. The heavier the item, the wider the floor protector
needed.
/