Page is loading ...

EARTHWERKS SPC FLOATING PLANK FLOOR
INSTALLATION AND MAINTENANCE GUIDELINES
A product of Swiff-Train Company ▪ 10850 Train Court, Houston TX 77095 ▪ 800-275-7943
J a n u a r y 2018 1 | P a g e
ALWAYS CHECK www.earthwerks.com FOR THE LATEST INSTALLATION, WARRANTY AND MAINTENANCE
INSTRUCTIONS. IT IS THE RESPONSIBILITY OF THE INSTALLER TO ENSURE THAT THE MOST CURRENT
DOCUMENTS ARE USED DURING INSTALLATION OF EARTHWERKS® FLOORING PRODUCTS.
These installation specifications are for SPC (Solid Polymer Core) Rigid Vinyl Plank, Noble Classic Plus and
Noble Classic Plus XL. All recommendations are based on the most recent information available. The
information on this sheet provides general guidelines. All instructions and recommendations must be followed
for a satisfactory installation.
General Guidelines
1. The space where flooring is to be installed shall be fully enclosed and the permanent HVAC system shall be
operational at 55° - 80° Fahrenheit (18 to 26 Celsius) for 10 days before installation, during installation
and for 10 days after installation. Avoid dramatic and large temperature increases – No acclimation is
required if not exposed to extreme temperatures in the 12 hours before installation (under 40°F or over
100°F).
2. EarthWerks® SPC can be installed in areas that do not have permanent working heating and cooling systems,
such as three season spaces, lake houses, unheated cabins, etc., but the temperature must be controlled as
described above during installation process.
3. EarthWerks recommends storing of the SPC floating product, preparation materials and accessories onsite
prior to installation to ensure the products are at equilibrium with the installation environment.
4. Install Click Rigid Vinyl Plank only after the jobsite has been cleaned and cleared of other trade apparatus
that may damage a finished plank installation.
5. To minimize shade variation, mix and install planks from several different cartons.
6. EarthWerks floating floors should be protected from direct sunlight and not exposed to direct sunlight for
extended periods of time by use of blinds, drapes or suitable window coverings or be in use in areas of large
amounts of direct sunlight exposure.
7. All doorjambs must be undercut to allow for proper expansion of the product and a minimum of 1/2” gap
shall be allowed for against any vertical surface or obstruction. Steel doorjambs should be patterned scribed
with the 1/2” expansion spacing taken into consideration when scribing. Use of color coordinated silicone
should be used against the jamb to fill the expansion spacing and aesthetically complete the installation.
8. Do not use tapping blocks, adjustable spacers (screw type) or other tools common to hardwood and
laminate flooring installation to prevent damage to the locking mechanism. A rubber mallet should be used
to tap in each plank in order to fully engage the end joints.
9. EarthWerks SPC flooring is designed to be installed as a “floating” floor. Do not secure individual planks or
tiles to the subfloor with mechanical fasteners or adhesives. Do not install cabinets, kitchen islands or
other non-movable objects on top of or through EarthWerks floating floors.
10. Use of a small, soft bristle brush to clean the joints prior to locking will ensure that there is no debris which
will cause stressing or failure of the joint after interlocking the pieces together.
11. Use care when installing wall moldings and transition strips to not fasten through EarthWerks floating
flooring planks or tiles. A spacing of .010” (.254mm) shall be kept above the floor when installing moldings
over the surface of the floor.
12. SPC planks and tiles are best cut in the following ways: guillotine-type hardwood/laminate cutter; a VCT
cutter (professional grade); a sabre saw with a fine-tooth wood cutting blade; a 12” power miter saw with
a shallow or negative kerf blade, similar or equal to a plastics cutting blade. If you are scoring and snapping
SPC product by use of a utility knife, please note it will be necessary to score the LVT layer multiple times to

EARTHWERKS SPC FLOATING PLANK FLOOR
INSTALLATION AND MAINTENANCE GUIDELINES
A product of Swiff-Train Company ▪ 10850 Train Court, Houston TX 77095 ▪ 800-275-7943
J a n u a r y 2018 2 | P a g e
ensure a good break and then shave the backing of the piece to make it smooth and even. This method
may also cause the backing to crack or break off in areas close to the score line which will require using a
new plank.
** Improper storage or acclimation of floating vinyl flooring may result in gapping, or buckling of joints which
are difficult to engage properly. Improper locking of the mechanism may cause one or more of the following
conditions in your flooring: joints to be distressed resulting in a ‘peaked’ appearance; delamination due to
ledging; separation of joints from extreme environmental temperature changes; cupping or side joint failures.
SUBFLOOR INFORMATION
Approved Substrates
All substrates regardless of composition must be smooth and flat to within 3/16” (4.76mm) in 10 feet or
achieve an “F32” rating by use of mechanical grinding/sanding or suitable Portland cement based
patch/level compound.
Above, on or below grade concrete without hydrostatic pressure, excess moisture or alkalinity; must be
fully cured and dry, free from curing compounds, sealers, etc.
Above or on grade lightweight concrete, properly prepared and without hydrostatic pressure, excess
moisture or alkalinity
Above or on grade Gypsum concrete surfaces, properly prepared and sealed, and without hydrostatic
pressure, excess moisture or alkalinity
APA registered underlayment, sanded face exterior grade with minimum rating of C-C plugged face
APA registered exterior grade plywood sanded face with ratings as follows: APA A-B, A-C, B-B, B-C, C-C
plugged face
APA Approved / Rated OSB panels, minimum 23/32” thickness, properly installed. It is recommended to
fully sand the surface of the OSB panels to ensure smooth, even seams and reduce the surface ridges on
the panels. Contact Technical Support for guidelines.
Properly prepared and well bonded existing resilient floor covering, single layer only
Cement Terrazzo, ceramic tile, marble – must be properly prepared.
Certain metal floors – contact EarthWerks Technical support for assistance.
Old adhesive residue that has been properly prepared.
Radiant heated floors where heat does not exceed 85F (29C)
The following are not approved substrates for installing EarthWerks SPC flooring: Rolled or panel-type foam,
rubber, cork or other compressible underlayments not recommended by EarthWerks rubber, cork or asphalt
tiles; textured or cushion backed resilient flooring; “Sleeper” floor systems or plywood floors that have been
installed directly over a concrete slab; lauan and mahogany-type plywood panels; Masonite™ or other
hardboard or fiber based underlayment; CCA (pressure treated), oil treated or other coated plywood; CDX or
other plywood with knots or open defects; underlayment made of pine or other soft woods; hardwood flooring;
laminate flooring; paint, wax, oil, grease, residual adhesive, mold, mildew, and other foreign materials that
might prevent floating planks and tiles from natural movement; other uneven or unstable substrates.
Substrate Preparation
Although EarthWerks SPC flooring is not susceptible to damage from moisture, excessive subfloor moisture is an
ideal breeding ground for mold, mildew and fungus-all of which can contribute to an unhealthy indoor living
environment. If excess moisture is found in the substrate proper remediation steps should be taken prior to
installation.

EARTHWERKS SPC FLOATING PLANK FLOOR
INSTALLATION AND MAINTENANCE GUIDELINES
A product of Swiff-Train Company ▪ 10850 Train Court, Houston TX 77095 ▪ 800-275-7943
J a n u a r y 2018 3 | P a g e
All substrates must be properly prepared and tested according to the following guidelines.
1. Concrete Subfloors
a. Concrete substrates should be properly prepared according to the latest revision of ASTM F710,
Preparing Concrete Floors to Receive Resilient Flooring.
b. All concrete substrates, regardless of grade or age of slab, must be properly tested using one of the
methods outlined below for warranty to apply. Acceptable test method is the ASTM F 2170 and ASTM
F1869. Testing shall be conducted according to the relevant ASTM documentation and instructions of
the manufacturer of the testing equipment. Consult Technical support for RH values greater than 85%
or MVER 5 lbs./1,000 sqft./24 hrs.
c. Concrete Alkalinity / pH Test shall be conducted in accordance with ASTM standards. Acceptable level
of pH in the substrate is between 7 and 10.
d. New concrete slabs must be thoroughly dry (at least six weeks) and completely cured. The final
responsibility for determining if the concrete is dry enough for installation of the flooring lies with the
floor covering installer. Although Click Rigid Vinyl Plank is not susceptible to damage from moisture,
excessive subfloor moisture is an ideal breeding ground for mold, mildew and fungus. The limited
warranties do not cover discoloration from mold or from flooding, leaking plumbing or appliances,
water entering through sliding glass doors or similar conditions.
2. Wood Subfloors
a. All wood substrates should be prepared according to the latest revision of ASTM F1482 Installation and
Preparation of Panel Type Underlayments to Receive Resilient Flooring.
b. Wood panel subfloor construction shall be a minimum of 1” in total thickness.
c. Panels designed as suitable underlayment shall be at a minimum ¼” in thickness, dimensionally stable,
fully sanded face to eliminate grain texture or show through, and have a written manufacturer’s
warranty and installation instructions. Panels shall be installed according to manufacturer’s instructions
regarding stapling pattern, sanding and filling of joints, and acclimation to installed environment.
Where not specified consult ASTM 1482 or the relevant document from the American Plywood
Association.
3. Gypsum and Lightweight Cellular Concrete Substrates shall be per ASTM F2419 or F2471 respectively.
Contact EarthWerks Technical Services at 800-275-7943 Option 2 or techdept@earthwerks.com for
instructions over gypsum and lightweight concrete substrates.
4. Existing resilient flooring must be single layer only, thoroughly stripped of all wax, floor finish, dirt and other
contaminants. Be firmly bonded to the substrate, flat and smooth with no curling edges or loose seams.
Must not be of a cushion back, loose-lay, or perimeter bonded floor.
5. Adhesive residue shall be properly prepared by hand scraping, mechanical scraping or grinding be used as a
primary means of removing old adhesive residue. Adhesive residues shall only be scraped by hand to
remove any loose patches, trowel ridges and puddles so that only a thin residue layer remains. Residues
shall be properly covered using a Portland based patching compound properly mixed with the
manufacturer’s recommended latex/acrylic additive. Do not use chemical adhesive removers.
6. Ceramic, porcelain, marble and granite tiles are suitable and must be properly bonded with intact grout
joints and free of cracks or loose tiles. Surface of tile and grout joints should be free from sealers, coatings,
dirt and contaminants. Properly prepare the surface of tiles by grinding any high areas and using a suitable
Portland-based leveling compound and primer to fill in all low areas.

EARTHWERKS SPC FLOATING PLANK FLOOR
INSTALLATION AND MAINTENANCE GUIDELINES
A product of Swiff-Train Company ▪ 10850 Train Court, Houston TX 77095 ▪ 800-275-7943
J a n u a r y 2018 4 | P a g e
7. For any subfloors or substrates not listed please contact EarthWerks Technical Services. Any surface
deemed unsuitable should be covered with an approved ¼” wood underlayment or suitable Portland-based
cement leveler or patching compound. Always follow the manufacturer’s recommended practices when
covering an existing substrate.
Installation and Layout
Plank Layout
EarthWerks SPC product is designed to be installed as a “floating” floor. Do not secure the planks to the
subfloor. Always undercut all doorjambs. Do not install cabinets or kitchen islands on top of SPC. Use care
when installing wall moldings and transition strips to not fasten through the SPC floating planks.
Layout
a. Install flooring perpendicular to direct sunlight sources, including large windows, doors, etc.
b. It is important to balance the layout of the plank format. Proper planning and layout will prevent narrow
piece widths at wall junctures. Determine layout to prevent planks having less than half the width or
very short length pieces.
c. A 5/16” spacing along all walls and all vertical surfaces must be allowed for when determining your
starting plank width. On runs of flooring longer than 100 feet (30 meters) control joints with a suitable
T-molding are recommended to be installed with a minimum of 5/16” (8mm) gap between the sides of
the t-molding.
d. For areas with varied or inconsistent temperatures from other installed areas, utilization of t-moldings
between these area/rooms is recommended. A minimum of 5/16” gap is to be allowed on either side
of the installed track where moldings are used; this will allow the installed areas to freely expand and
contract during the extreme temperature fluctuations.
e. Dry lay a section of plank from the center line to one wall to determine that the pattern is centered and
fit. Border cuts should be measured and should not be less than half the width of a plank. If the cut
row falls under these conditions, adjust the first row at the center line to make the centerline match the
centerline of the row of planks.
2. Installing EarthWerks Floating vinyl flooring
Use of several 5/16” spacer blocks along the first wall will ensure the proper spacing is achieved and that
floor does not ‘walk’ back towards the wall during installation.
a. Determine if the starter row will need to cut from the Layout instructions above. It will be necessary to
cut off the unsupported tongue on full planks on the edges placed against the wall so that a clean, solid
edge is toward the wall.
b. Starting in the farthest left, upper corner of the room position the first piece so that both the head
and side seam groove is exposed. This requires installing the product from left to right in the room.
WARNING!
DO NOT SAND, DRY SWEEP, BEADBLAST, SHOTBLAST OR USE ANY OTHER MECHANICAL MEANS TO
PULVERIZE EXISTING TILE FLOORING, BACKING, LINING FELT, ASPHALTIC “CUT-BACK” OR ANY
OTHER ADHESIVES. THESE PRODUCTS MAY CONTAIN ASBESTOS FIBERS AND/OR CRYSTALLINE
SILICA. AVOID CREATING DUST. INHALATION OF SUCH DUST IS A CANCER AND RESPIRATORY TRACT
HAZARD. SMOKING BY INDIVIDUALS EXPOSED TO ASBESTOS FIBERS GREATLY INCREASES THE RISK
OF SERIOUS BODILY HARM. UNLESS POSITIVELY CERTAIN THAT THE PRODUCT IS A NON-ASBESTOS
CONTAINING MATERIAL, YOU MUST PRESUME IT CONTAINS ASBESTOS. REGULATIONS MAY
REQUIRE THAT THE MATERIAL BE TESTED TO DETERMINE ASBESTOS CONTENT.

EARTHWERKS SPC FLOATING PLANK FLOOR
INSTALLATION AND MAINTENANCE GUIDELINES
A product of Swiff-Train Company ▪ 10850 Train Court, Houston TX 77095 ▪ 800-275-7943
J a n u a r y 2018 5 | P a g e
c. Install the second piece by lining the end joints and pressing straight down firmly and fully engage
with a white rubber mallet. Be careful not to bend the corner of the piece. Maintain an expansion gap
of approximately 5/16" from the wall. Continue this row until the last piece is installed; utilize the cut
off for starting the next row.
d. Cut the last piece in the first row to fit approximately 5/16" short of the end wall. Use the cutoff of this
plank to start the next row, if it is a minimum of 8”. Install the first piece in the second row by
inserting the long side tongue into the groove of the piece in the first row. This is best done with a low
angle (20 to 30) of the plank.
e. If the starting wall is out of square, it will be necessary to scribe the first row to match the wall,
allowing the opposite side of the row to present a true square base for the rest of the floor. When the
first row is complete, you must have a straight, even base established.
f. To start the second row, cut a plank that is at least 6” shorter than the first plank the first row. (You
may use the left over from the last plank in the first row.) Then install this first plank by inserting the
long side tongue into the groove of the plank in the first row. Line up the first plank of the second row
so the outside end is even with the outside end of the first plank on the first row.
g. Install the second piece in the second row by locking the long side of the second row plank on the
plank on the first row by inserting the tongue of the second plank into the groove on the first plank
while holding the plank at a low (~ 30) angle from the floor. Press the second plank down flat and
the tongue will lock firmly into place when tapped with a rubber mallet. You should feel the tongue
lock into the groove and have a smooth, even joint line.
h. After locking in place, lay the remaining planks in the row by first locking the long side in place and
then tapping the end of the plank downward to firmly lock into place at the end.
i. Continue installing pieces along the wall in the second row remembering it is critical to keep these two
rows straight and square, as they are the “foundation” for the rest of the installation. Check for
squareness and straightness often.
j. Continue installing pieces, being certain to maintain a random appearance and offset end seams by at
least 6”. Maintain a 5/16" expansion gap at all fixed vertical surfaces. Check to be certain all pieces
are fully engaged; if slight gapping is noticed, the gap can be tapped closed using a scrap of flooring as
a tapping block with a mallet. When fitting under door casings, etc, the flexibility and low angle of
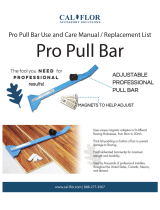
connection of Click Rigid Vinyl Plank becomes evident. If necessary, a flat pull bar or "last board puller"
may be used to assist in locking the planks.
k. When fitting around obstacles or into irregular spaces, EarthWerks SPC product can be cut easily and
cleanly using a circular saw or reciprocating jigsaw. It is often beneficial to make a cardboard template
of the area and transfer this pattern to the plank.
l. Protect all exposed edges of the Click Rigid Vinyl Plank by installing wall molding and/or transition
strips. Use caution to prevent the fasteners from securing the planks to the subfloor.
After Installation
1. Be sure planks are set, flat and have tight edges.
2. In the event that the planks must be removed, first lift the entire row at an angle to disengage from adjoined
planks on the long end. Then, starting at the end, gently slide the planks horizontally to disengage on the
short side. Do not angle, lift and pull the planks on the short side as this will cause breakage of the locking
mechanism.
3. In the event that the SPC plank flooring is not the last portion of the construction project, the floor must be
protected from construction traffic and damage. Utilize a reinforced fiber protective board or a heavy kraft
paper (min. 60 lbs.) and cover the floor.

EARTHWERKS SPC FLOATING PLANK FLOOR
INSTALLATION AND MAINTENANCE GUIDELINES
A product of Swiff-Train Company ▪ 10850 Train Court, Houston TX 77095 ▪ 800-275-7943
J a n u a r y 2018 6 | P a g e
4. Initial maintenance can be performed immediately after installation of the SPC floating flooring. Cleaning
utilizing a neutral pH cleaning solution and mop is recommended. White, green or blue abrasive pads can
be used to remove heavier deposits. Rinse the floor thoroughly and allow to air dry. Do not overwater the
flooring.
m. Daily and weekly maintenance by sweeping, vacuum or dust mopping the floor as needed to remove
dust loose dirt and grit. In high traffic areas this may be a daily or twice daily procedure. Use only
vacuums that do not have bristle beater bars or metal heads.
n. Clean liquid spills immediately to prevent the possibility of stains, slips or falls.
o. Damp mop the floor as needed to remove dirt and stains. Use a neutral pH cleaner and a white, green
or blue pad if needed to remove ground in dirt. Soft white bristle brushes can also be used on flooring
with embossed surfaces.
5. Preventative steps
a. Use mats at all entry areas to keep dirt, sand and water off of the floor. Clean the mats on a regular
basis. If mats are placed directly on top of the EarthWerks floating floor, be sure the mats have a non-
staining back. Rubber mats are not recommended over EarthWerks flooring products.
b. Furniture shall have protective glides of at least 1” in diameter to minimize indentations or scratching
to the surface of the floor. Do not use narrow chair glides! Felt pads are also excellent protection for
the floor for furniture that will be frequently moved directly across the floor.
c. Do not move heavy furniture, appliances or fixtures directly across the floor. Use protective boards or
appropriate furniture movers designed for use over hard surface flooring.
d. Protect the floor from direct sunlight by using appropriate window coverings.
e. Areas with caster chairs must have protective mats under the chairs. Use chair mats at desks to protect
the floor from damage due to chair legs or casters. Periodically clean caster wheels and check for wheels
that may be broken or no longer rotating. Replace damaged wheels immediately.
f. Avoid use of metal or razor scrapers to remove dirt, residues or other marks from flooring. This will
damage the protective wear layer of the vinyl flooring.
These instructions are general guidelines for the proper procedures for installing and maintaining this flooring
product. For any applications not listed or detailed instructions on Installation and Maintenance, please
contact:
EarthWerks® Technical Service
800-275-7943 Option 2
techdept@earthwerks.com

EARTHWERKS SPC FLOATING PLANK FLOOR
INSTALLATION AND MAINTENANCE GUIDELINES
A product of Swiff-Train Company ▪ 10850 Train Court, Houston TX 77095 ▪ 800-275-7943
J a n u a r y 2018 7 | P a g e
Reference Documents
The latest versions of all listed Standards, Guides and Work Practices shall be used in all cases.
ASTM F 710 Standard Practice for preparing Concrete floors to receive resilient flooring
ASTM F 1482 Standard Practice for Installation and Preparation of Panel Type Underlayment’s to Receive
Resilient Flooring
ASTM F1869 Standard Test Method for Measuring Moisture Vapor Emission Rate of Concrete Subfloor Using
Anhydrous Calcium Chloride
ASTM F 2170 Standard Test Method for Determining Relative Humidity in Concrete Floor Slabs using In Situ
Probes
ASTM F2419 Standard Practice for Installation of Thick Poured Gypsum Concrete Underlayments and
Preparation of the Surface to Receive Resilient Flooring
ASTM F2471 Standard Practice for Installation of Thick Poured Lightweight Cellular Concrete
Underlayments and Preparation of the Surface to Receive Resilient Flooring
ASTM F2659 Standard Guide for Preliminary Evaluation of Comparative Moisture Condition of Concrete,
Gypsum Cement and Other Floor Slabs and Screeds Using a Non-Destructive Electronic
Moisture Meter
ASTM F2678 Standard Practice for Preparing Panel Underlayments, Thick Poured Gypsum Concrete
Underlayments, Thick Poured Lightweight Cellular Concrete Underlayments, and Concrete
Subfloors with Underlayment Patching Compounds to Receive Resilient Flooring
ACI 302 Guide for Concrete Floor and Slab Construction
RFCI Recommended Work Practices for Removal of Resilient Floor Coverings
APA American Plywood Association
CANPLY Canadian Plywood Association
/