Page is loading ...

1
Luxury Vinyl Flooring
Unidrop Click Lock Tile Installation
072020
PRODUCT DESCRIPTION
GRADE LEVELS
INSTALLATION METHOD
Flexible Luxury Vinyl Flooring
Above, On and Below
Unidrop Click Lock
Luxury Vinyl Flooring — Unidrop Click Lock Tile Installation
Tools Required for Installation
• Tape Measure
• Utility Knife
• Eye Protection
• Gloves
• Square Ruler
• Chalk Line
• Scrap Piece of LVT
Acceptable Underlayment
Mohawk Luxury Vinyl Click products can be installed directly over most existing floor coverings, except carpet,
laminate, floating floors systems and cushioned vinyl flooring.
• Wood
Can be installed over virtually any sound wood underlayments or subfloors. Always fasten underlayment in
accordance with the manufacturer’s recommendations. For glue down applications to accommodate
special needs (e.g. steps, ramps, landings, etc.), Mohawk recommends underlament grade products
warranted by the manufacturer. Any failure of the underlayment or flooring as a result of the underlayment
is NOT the responsibility of Mohawk.
• Concrete
Moisture levels of concrete slabs before, during and after installation must be 8 lbs. or less per 1,000
square feet per 24 hours using an anhydrous calcium chloride test according to ASTM F1869 and pH must
be between 5.0 and 9.0; or, if using ASTM F2170 in-situ probes, readings should be less than 90% RH
(relative humidity). In some instances, to accommodate special needs, it may be necessary to adhere the
LVT to steps, ramps, landings. Refer to the Mohawk LVT Glue Down instructions if adhering is necessary.
• Radiant Heat Systems
Radiant heat systems must be approved by the manufacturer for use in resilient vinyl flooring applications.
The subfloor temperature should not exceed 85°F (29°C), and the system should be turned off 24 hours
prior to and after installation.
Storage and Handling
No product acclimation is required if the product temperature is between 45°F and 115°F (7°C and 46°C). Room
temperature conditions must be controlled between 45°F and 115°F (7°C and 46°C) 48 hours before, during and 48
hours after installations. Cartons should be evenly stacked no more than five high on a flat surface and away from
any heating/cooling ducts or direct sunlight.

2
Luxury Vinyl Flooring
Unidrop Click Lock Tile Installation
072020
Subfloor and Wall/Door Preparation
NOTE: Do not install cabinets on top of floating LVT. The surface beneath the floor must be sufficiently prepared
in advance to guarantee a successful installation of the flooring.
• Fill any low spots in the subfloor greater than 3/16 inch in a 10-foot span with a Portland cement leveling
compound.
• Ceramic tile and embossed flooring will require skim coating with a Portland based patch to avoid
bottom-up pattern telegraphing.
• Remove any existing floor molding. Removal of wall baseboards is optional as quarter round can be
installed to avoid baseboard removal.
• Undercut doorjamb so the 1/4 inch expansion space is maintained, allowing the LVT to slip under
doorjamb and case molding.
• Sweep the subfloor clean. The floor must also be free of all contaminants.
Warranty Exclusions
Warranty exclusions apply with respect to rolling loads. In areas with frequent or heavy rolling loads, click products
can be glued down to help reduce the risk of joint separation from rolling load traffic; however, our warranty
excludes any problems associated with rolling loads.
Installation Preparation and Tips
It is the installer’s responsibility to inspect the flooring prior to installation to ensure that there are no visual defects.
Do not install flooring with visible defects. If visible defects are present, contact your retailer immediately.
• Floor must be clean, smooth, flat and dry before installation.
• Check the tongue and groove to ensure it is free of debris or damage.
• To achieve maximum appearance, mix planks from two to three cartons from the same production lot.
• Mohawk LVT click products allow you to choose your own starting position and direction, working one plank or
tile at a time.
• Walls are not always straight. Snap a chalk line for your first row to follow.
• Maintain a 1/4 inch (1/2 cm) expansion space around all walls. Quarter round or baseboard molding will cover
this expansion space. IMPORTANT: Maintain the 1/4 inch space around cabinets, pipes, toilet flanges and any
obstacle in the floor.
• For plank installation, stagger the end joints a minimum of 6 inches. For tile installation, stagger the end joints a
minimum of 3 inches.
NOTE: Do not install four corners together, as this will not provide a stable installation.

3
Luxury Vinyl Flooring
Unidrop Click Lock Tile Installation
072020
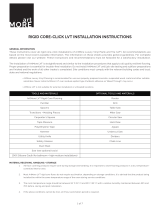
Click Installation
• To click the length joint of the plank/tile together, place long sides together, lifting slightly to engage lock.
Rotate downward, clicking together for a tight fit.
• To click the end joint of the plank/tile together, click the short side of the plank/tile vertically into the previous
one by pressing it by hand. Lay a piece of scrap material flat on top of the joint and tap with a rubber mallet to
ensure a fully compressed, tight fit. Avoid hitting the flooring directly with the rubber mallet. Direct hits with a
rubber mallet could cause damage.
• To properly seal the joint, use a small scrap of plank/tile to tap along the entire length of plank/tile. Lock the
scrap piece—groove to tongue or tongue to groove—to the plank/tile requiring tightening and lightly tap the
edge of the scrap. This will bring the tile edges tight together. Do not use a tapping block.
• Cut the plank/tile by scoring through the top wear layer with a utility knife, then snapping the plank/tile across
the score. Install adjoining rows as you did the first, one piece at a time. Holding the plank/tile at a slight angle,
place it against the profile in the first row. Rotate the plank/tile down to secure the length, ensuring there are no
gaps along the joint.
• The adjoining planks/tiles are aligned by sliding the long joint into position, shifting it to properly match the
end joint against the previous plank/ tile. Repeat until you reach the final row of material.
• The final row of planks/tiles, will usually need to be cut. Recommended method: lay a panel on top of the last
row installed. Lay another plank/ tile against the edge of the wall. Mark the plank/tile underneath. Cut the
plank/tile through the wear layer and snap along the score. Install the last row, leaving ample expansion space.
Diagram 1
Molding and Transitions
For molding and transition strips, provide a 1/4 inch gap to allow expansion and contraction of the subfloor. Ensure
moldings and transition strips will not pinch the flooring.
Treads, Risers and Ramps
Glue down method is required on all treads, risers and wheelchair ramps, using MVONE Adhesive. Apply the
adhesive following the manufacturer’s instructions. Install the riser after installing the tread. Install stair nose
moldings afterward to protect the edge of the LVT.

4
Luxury Vinyl Flooring
Unidrop Click Lock Tile Installation
072020
Plank Replacement
Should one of the planks/tiles become damaged and need to be replaced, follow these simple instructions:
1. Score top of damaged plank/tile with a utility knife. Make two triangle cuts near the end joint and then connect
the points with one long cut in the middle of the plank/tile. (See diagram below.)
2. Use an awl or screwdriver to tap down through plank/tile on scored triangle cut points.
3. Lift and remove damaged tile.
4. With the pattern side facing up on the new replacement plank/tile, trim off the short lip on the tongue side and
the groove on the compression joint side, making it flush with the edge of the plank/tile. Be careful not to
damage the finish surface of the tile.
5. Cut several pieces of acrylic double-sided tape made for vinyl floors and slide under the edges of the existing
floor on the two edges where the replacement plank/tile will have its lips cut off. Tape should face sticky side
up; leave the paper on the side facing the floor.
6. Using Mohawk M7 Universal Seam Sealant or approved secondary alternative, run a small bead of sealer on the
groove edge of the panel of the existing floor where the replacement plank/tile will rest.
NOTE: The long tongue of the replacement plank/tile and the uncut compression fit end joint will not
need tape or seam adhesive as you will be using the plank’s/tile’s locking mechanism.
7. Install replacement plank/tile by angling the long groove of the replacement panel under and over the tongue
of the floor panel until the finish edge of the replacement panel is tight against the finish edge of the floor
panel, and the compression end joint is lined up. Rotate down, locking the length tongue joint then pressing
the end joint with your thumb or palm of your hand to lock into place.
GROVE ON
COMPRESSION
JOINT SIDE
SCORE TILE AS SHOWN
Short lip on tongue side

5
Luxury Vinyl Flooring
Unidrop Click Lock Tile Installation
072020
8. Wipe any excess sealer that comes to the surface of the tiles with a damp cloth and follow with a dry cloth to
ensure all sealer is removed from tile surface.
9. Keep foot traffic off the replaced plank/tile for 24 hours.
*Mohawk will not be held responsible for problems that may arise from approved secondary alternative seam
sealers. Please contact the approved secondary alternative seam sealer’s manufacturer with issues.

6
Mohawk Luxury Vinyl Flooring
Dry Back Tile Installation
072020
Mohawk Luxury Vinyl Flooring Dry Back Tile Installation
Tools Required for Installation
• Tape Measure
• Chalk Line
• 100 lb. Roller
• Utility Knife
• Square Ruler
Acceptable Underlayment
• Wood
Wood underlayment panels require a double layer construction and must be underlayment grade as
specified and warranted by the manufacturer. Always fasten underlayment panels in accordance with the
manufacturer’s recommendations. Any failure of the underlayment or Mohawk flooring as a result of the
underlayment is NOT the responsibility of Mohawk. Any porous wood underlayment must be primed.
Mohawk does not recommend installing resilient flooring over wood flooring or subfloors applied directly
over concrete or sleeper-construction floors.
• Concrete
All concrete underlayments require moisture testing.
Suspended:
An acceptable suspended floor is a concrete substrate with a minimum of 18” (460mm) of
well-ventilated air space beneath it. Mohawk recommends that a moisture vapor barrier be placed on the
ground below the air space.
On-Grade:
An acceptable on-grade floor is a concrete substrate in direct surface contact with the ground at
the surrounding ground level. The concrete slab should be protected from moisture penetration and
incorporate a proven moisture vapor barrier.
Below-Grade:
An acceptable below-grade floor is a concrete substrate partially or completely in contact
with the ground below the average surrounding ground level. The concrete slab should be protected from
moisture penetration and incorporate a proven moisture vapor barrier.
• VCT
Well bonded; on and above grade; in absence of waxes or sealers
• Ceramic
Well bonded and properly prepared
• Terrazzo
Well bonded and properly prepared
Self-leveling and patching compounds
Latex fortified Portland cement based only
• Resilient
One layer; well bonded; non-cushioned
• Radiant heating system
Not to exceed 85°F (29°C); approved by the manufacturer for use with vinyl flooring

7
Mohawk Luxury Vinyl Flooring
Dry Back Tile Installation
072020
Unacceptable Surfaces
• Cushion backed vinyl
• Laminate
• Interflex and any perimeter bonded products
• Carpet
• Cork
• Any floating floor system
*Mohawk will not warrant or accept responsibility of any kind for flooring failures related to the use of unacceptable
substrates and surfaces.
Storage and Handling
Acclimate the flooring for a minimum of 48 hours before installation in the area where it will be installed. Conditions
between 65°F and 85°F (18°C and 29°C) are required before, during and after installation. Cartons should be evenly
stacked no more than five high on a flat surface and away from any heating/cooling ducts or direct sunlight.
Floor Preparation
Floor must be clean, smooth, flat and dry. Remove all foreign substances, such as wax, grease, dirt, construction
marks and contaminants, and any substance or chemical that would interfere with a good bond. Avoid using
sweeping compounds. Do not install over substrates that have been chemically cleaned. Wood subfloor or
underlayment must be flat, not to exceed variation of 1/4 inch in 10 feet (1/2 cm in 3 m).
The flatness of concrete subfloors must meet or exceed the requirements of ACI FF25. Fill all holes and cracks with a
latex fortified Portland cement based patching compound.
Mohawk recommends priming extremely porous floors with Mohawk PrimeCoat Acrylic Latex Primer to prevent over
absorption of adhesives, for dust containment, and to insure a better bond of the adhesive to the subfloor or
underlayment.
Suitability: Regardless of the type of concrete or cement-like material used as a base for Mohawk LVT glue down
products, the responsibility for its use or suitability rests with that product’s manufacturer or specifier and not with
Mohawk.
Moisture Testing: It is the responsibility of the flooring contractor and the installer to test all concrete substrates,
both old and new, for moisture transmission using the Calcium Chloride Moisture Test according to ASTM F1869.
Moisture vapor transmission should not exceed the recommended levels of 8 lbs. or less per 1,000 sq. ft. in 24
hours. This test should be performed and documented prior to installation. Also test for relative humidity in concrete
floor slabs using in-situ probes, which should be no more than 90% RH per ASTM F2170 before, during and after
installation.
These acceptable moisture readings are only applicable when using MVONE for Luxury Vinyl Tile & Plank adhesive.

8
Mohawk Luxury Vinyl Flooring
Dry Back Tile Installation
072020
pH LEVELS: pH levels on concrete substrates must be between 7 and 10.
Inspection of flooring material prior to installation is required. Any defects should be immediately reported to the
retail store from which the flooring was purchased before installation. Mohawk will not be responsible for labor costs
to repair or replace material with defects that were apparent be fore or noticed at the end of an installation.
NOTE: If removal of existing resilient floor covering is required, follow all recommended Resilient Floor Covering
Institute (RFCI) work practices at www.rfci.com.
Mohawk only recommends the use of Portland cement based products as a satisfactory patching or leveling
compound for the installation of all Mohawk flooring products. Common uses include:
• Leveling substrates
• Filling grooves in existing resilient floor,
ceramic tile or VCT
• Filling holes
• Leveling non-water-soluble adhesives
• Filling cracks
• Filling saw cuts and/or construction joints
Do not fill actual expansion joints or other moving joints with elastomeric fillers that are designed to absorb
movement in concrete slabs. Cementitious underlayment, patches and resilient flooring installed across true
expansion joints will often buckle or crack when the slabs move. Usually architects will specify expansion joint covers
for use with various floor coverings.
WARNING: For installation over old resilient floor coverings or when considering removing existing resilient floors,
please be advised that these products may possibly contain asbestos fibers or crystalline silica. Please follow all
recommended Resilient Floor Covering Institute (RFCI) work practices at www.rfci.com.
Cutting: Tiles and planks may be cut with a small tile cutter or scored with a utility knife and snapped.

9
Mohawk Luxury Vinyl Flooring
Dry Back Tile Installation
072020
Glue Down Installation
When using planks/tiles from two or more cartons, check to be sure all pattern and lot numbers are the same to
ensure proper color match. On larger installations, open several cartons and mix them as they are installed to help
blend any slight shade differences from one carton to the next.
Products with directional arrows on the back should be installed with the arrows all pointing in the same direction
unless you are installing custom layouts.
Before installing the material, plan the layout so plank/tile joints fall at least 6 inches (15 cm) away from subfloor and
underlayment joints. Find the center point in the room. Divide the room into equal quadrants by marking two
perpendicular lines on the subfloor intersecting at the center point. Depending on your layout, you may also start
your row along a wall. Since walls are not always straight, snap a chalk line. Do not install over expansion joints.
Step 1
Apply MVONE for LVT/Plank adhesive with the recommended trowel and allow to dry to the touch before installing
floor. Don’t install in wet adhesive. Only spread as much adhesive as you can cover within two hours, depending on
temperature and humidity.
Step 2
Install all planks/tiles with directional arrows pointing in the same direction. Install the field area first.
Step 3
Apply adhesive as noted in Step 1 to the remaining portion of the room. Allow adhesive to dry and complete the
installation.
Step 4
Roll the installed flooring in four directions within 30 minutes after completing installation using a 100 lb. (45 kg)
roller (minimum). Use a hand roller under toe kicks and other hard to reach areas. Immediately remove any excess
adhesive from the surface of the flooring using a clean white cloth dampened with a neutral detergent and water.
NOTE: Drying time will vary depending on substrate porosity and ambient temperature and humidity.
PRECAUTIONS: Planks/tiles may be walked on immediately; however, the floor should be protected with plywood
when moving heavy furniture and appliances back into the room.
DO NOT wash or scrub the new flooring for at least 5 days after the installation. This will allow planks/tiles to
properly seat in the adhesive and prevent excess moisture from interfering with the adhesive bond.
/