Page is loading ...

15mm Damaged Fences (46” length)
B15-WF-101
Please read these instructions fully before starting construction.
PVA or equivalent glue will be required to stick sections together.
Sand paper can be used to gently clean any joints.
A sharp modelling knife will be required to remove sections from the sprue. Please use knives with due care and remember
to cut away from yourself at all times.
During the construction of this model, you may find it convenient to use pegs / elastic bands to hold pieces in place while
you allow glue to dry.
A full-colour copy of these instructions can be found on our website: www.blotz.co.uk
Damaged Fences (B15-WF-101)
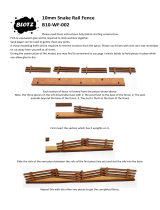
For each fence remove one base, one set of rails and
one planked piece from the sprue.
Glue the rails to the base using the lugs/holes
provided (see above) with the etched detail facing to
the edge closest to the rails.
Then stick the planked section to the rails (and base)
as shown above. Repeat for each fence section.
The gateway is formed from the pieces shown
above.
Stick the gate to the base, with the etched detail facing
the edge closets to the gate.
Glue the plank sections to the gate’s rails (and base)
as shown above.
/