Atdec VF-WD Installation guide
- Category
- Flat panel wall mounts
- Type
- Installation guide
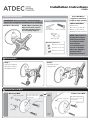
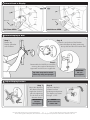
Atdec VF-WD is a wall mount designed for flat-panel monitors, supporting a maximum weight of 17.5 lbs. It offers tilt adjustment and can rotate the display between landscape and portrait orientations. The mount is compatible with 75x75mm and 100x100mm VESA patterns, making it suitable for a wide range of monitors. The package includes all necessary hardware for installation on either masonry or timber stud walls.
Atdec VF-WD is a wall mount designed for flat-panel monitors, supporting a maximum weight of 17.5 lbs. It offers tilt adjustment and can rotate the display between landscape and portrait orientations. The mount is compatible with 75x75mm and 100x100mm VESA patterns, making it suitable for a wide range of monitors. The package includes all necessary hardware for installation on either masonry or timber stud walls.


-
 1
1
-
 2
2


Atdec VF-WD Installation guide
- Category
- Flat panel wall mounts
- Type
- Installation guide
Atdec VF-WD is a wall mount designed for flat-panel monitors, supporting a maximum weight of 17.5 lbs. It offers tilt adjustment and can rotate the display between landscape and portrait orientations. The mount is compatible with 75x75mm and 100x100mm VESA patterns, making it suitable for a wide range of monitors. The package includes all necessary hardware for installation on either masonry or timber stud walls.
Ask a question and I''ll find the answer in the document
Finding information in a document is now easier with AI
Related papers
-
Atdec VF-WD Specification
-
Atdec SYSTEMA SW6S Installation Instructions Manual
-
Atdec AF-WD-P Installation guide
-
Atdec AF-WD Installation guide
-
Atdec SD-WD Installation guide
-
-
-
-
-
Atdec TH-2050-VFM Specification
Other documents
-
 Adtec Systema SW35S Installation guide
-
Stovax Loft Wall Mounted Gas Stoves Installation guide
-
Focal Point Oregon Fanflue User manual
-
Ryobi CSD 42 LS Datasheet
-
Paragon FOCUS RS 18 Owner's manual
-
-
B&D Firmadoor Series Installation Instructions Manual
-
-
-
