i-PRO i-PRO WV-QDC501 Dome Cover User manual

Category
Security camera accessories
Type
User manual

i-PRO i-PRO WV-QDC501 Dome Cover: Enhance Your Surveillance System with Durability and Clarity

The i-PRO i-PRO WV-QDC501 Dome Cover is an essential accessory designed to protect and enhance the performance of your compatible i-PRO camera. Constructed with robust PC resin and waterproof rubber, this dome cover withstands harsh weather conditions, ensuring uninterrupted surveillance. Choose between the clear WV-QDC501C model for optimal image quality or the WV-QDC501G with a smoke finish for added privacy.

Preface
This product is the clear type dome cover. <WV-QDC501C>
This product is the smoke type dome cover (approx. 45 % of transmittance). <WV-
QDC501G>
The latest information about the supported cameras <Control No.: C0501>.
Specifications
Ambient operating temperature: –50 °C to +60 °C {–58 °F to 140 °F}
Dimensions:
ø226 mm × 67 mm (H)
{ø8-29/32 inches × 2-21/32 inches (H)}
Mass: Approx. 246 g {0.542 lbs}
Finish: PC resin Clear <WV-QDC501C>
Smoke <WV-QDC501G>
Precaution for installation
Screw tightening
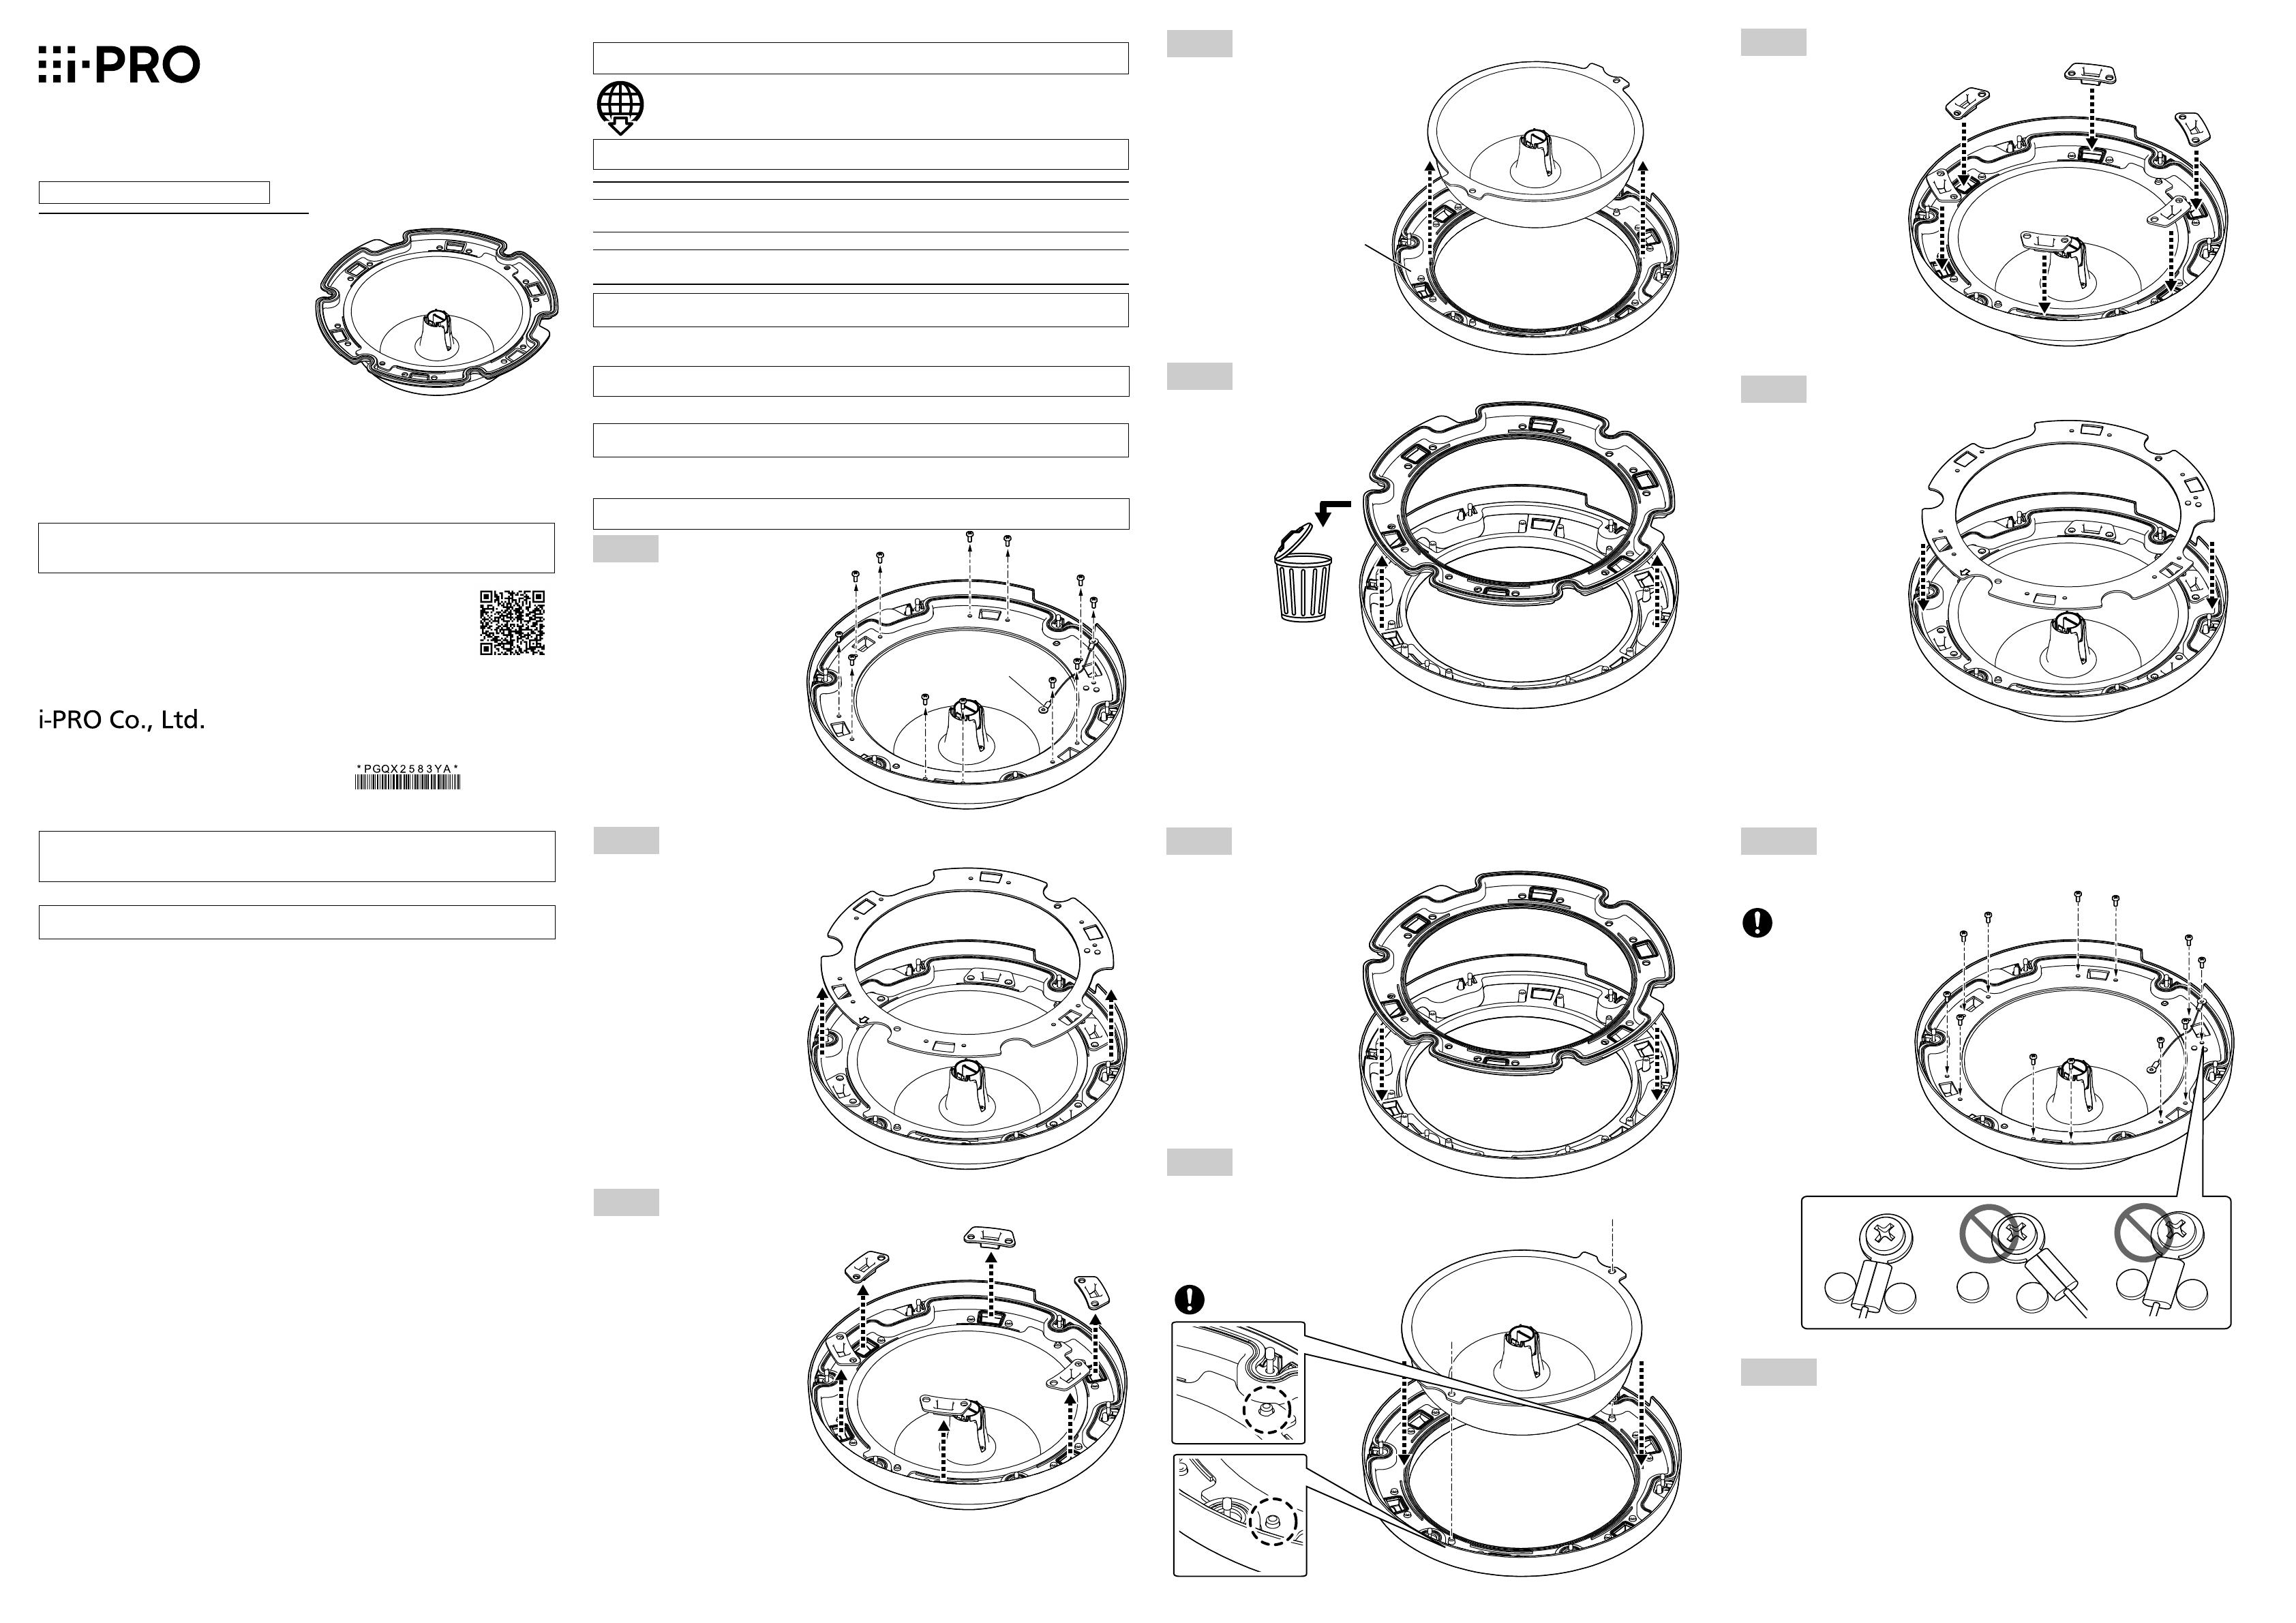
Do not use an impact driver. Use of an impact driver may damage the screws or cause tightening excessively.
Standard accessories
Operating Instructions (this document) .........1 pc. Waterproof rubber .......................................1 pc.
Preparation
Remove the enclosure and installed auxiliary wire from the camera by following the Installation Guide
of the camera.
Caution:
Before attempting to connect or operate this product, please read these instructions
carefully.
Precautions
Do not use this product except with suitable cameras.
Failure to observe this may cause a drop resulting in injury or accidents.
Refer installation work or dome cover replacement to the dealer.
Installation work requires technique and experiences.
Failure to observe this may cause fire, electric shock, injury, or damage to the product.
Be sure to consult the dealer.
The screws and bolts must be tightened to the specified torque.
Failure to observe this may cause a drop resulting in injury or accidents.
When using this product, also read the “Precautions” described in the operating instruc-
tions for the camera to be attached.
i-PRO Co., Ltd. assumes no responsibility for injuries or property damage resulting
from failures arising out of improper installation or operation inconsistent with this
documentation.
Step 3
Remove the IR LED covers.
Step 11
Attach the enclosure and installed auxiliary wire to the camera by following the
Installation Guide of the camera.
Step 4
Remove the dome cover.
Step 10
Attach the installed auxiliary wire, then tighten the screws diagonally in the
order of , , .
0.78 N·m
{0.58 lbf·ft}
Step 2
Remove the dome cover holding plate.
Installation
Step 1
Remove the screws (12 places) and
the installed auxiliary wire.
Installed auxiliary wire
Step 7
Attach the new dome cover
Be careful not to
overlap unsuitably.
Remove the protection film covering outside the new dome cover.
Keep the removed protection film until using it upon the installation.
(Handle the new dome cover with care not to scratch inside and outside.)
Attach the protection film removed in step 7 back to the outside the dome cover.
Remove the protection film of the dome cover after completing the installation.
Before attempting to connect or install this product, please read these instructions carefully and
save this manual for future use.
The external appearance and other parts shown in this manual may differ from the actual
product within the scope that will not interfere with normal use due to improvement of the
product.
Read also the installation guide of the camera to be used.
Waterproof rubber
Step 8
Attach the IR LED covers.
Step 9
Attach the dome cover holding plate.
Step 5
Remove the waterproof rubber.
Step 6
Attach the waterproof rubber (accessory).
Operating Instructions
Included Installation Instructions
Dome Cover
Model No. WV-QDC501
"<Control No.: C****>" used in these documents should be used to search for information
on our technical information website (https://i-pro.com/global/en/surveillance/training-
support/support/technical-information) and will guide you to the right information.
© i-PRO Co., Ltd. 2022
Cs0322-1023
Printed in China
https://www.i-pro.com/
商品概要
本製品はクリアタイプのドームカバーです。 <WV-QDC501C>
本製品はスモークタイプのドームカバーです(透過率 約45%)。 <WV-QDC501G>
取り付け可能なカメラの最新情報
<管理番号:C0501>)
仕様
使用温度範囲 −50 ℃〜+60 ℃
寸法 φ 226 mm x 67 mm(H)
質量 約246 g
仕上げ PC樹脂 クリ <WV-QDC501C>
スモーク <WV-QDC501G>
設置上のお願い
■取付ねじの締め付けについて
インパクトドライバーは使用しないでください。ねじが破損したり締め付けすぎたりします。
付属品をご確認ください
取扱説明書(本書) ������������������������������������������1冊 防水ラバー ������������������������������������������������������1個
警告
■ 専用のカメラ以外には取り付けない
(落下によるけがや事故の原因となります。
■ 工事またはドームカバー交換は販売店に依頼する
(工事には技術と経験が必要です。火災、感電、けが、器物損壊の原因とな
ります。
⇒ 必ず販売店に依頼してください。
■ねじやボルトは指定されたトルクで締め付ける
(落下や事故の原因す。
本製品をご使用の際は、取り付けるカメラの取扱説明書に記載された「安全上のご注意」と
あわせてお読みください。
取扱説明書
工事説明付き
ドームカバー
品番 WV-QDC501
安全上の注意 必ずお守りください
■お守りいただく内容を次の図記号で説明しています。(次は図記号の例です)
人への危害、財産の損害を防止するため、必ずお守りいただくことを説明しています。
■誤った使い方をしたときに生じる危害や損害の程度を区分して、説明しています。
「死亡や重傷を負うおそれがある内容」です。
警告
してはいけない内容で
す。
実行しなければならない内容
です。
このたびは、弊社製品をお買い上げいただき、まことにありがとうございます。
取扱説明書をよくお読みのうえ、正しく安全にお使いください。
ご使用前に「安全上のご注意」を必ずお読みください。
この取扱説明書は大切に保存してください。
製品の改良などにより、ご使用上影響のない範囲で、記載されている外観などが実際の製
品と異なる場合があります。
ご使用のカメラの取扱説明書とあわせてお読みください。
取扱説明書に記載されていない方法や、指定の部品を使用しない方法で施工されたことによ
り事故や損害が生じたときには、当社では責任を負えません。また、その施工が原因で故障
が生じた場合は、製品保証の対象外となります。
i-PRO製品の「お問い合わせ」については、以下の弊社サポートウェブサイト
を参照してください。
https://i-pro�com/jp/ja/support_portal
「日本エア」でお使いの場合す。日本以外でお使いの場合のサー
たし
取扱説明書に記載されている「<管理番号:Cxxxx>」は、以下の弊社技術情
報ウェブサイト内で該当する情報を検索する際に使用する番号です。
https://i-pro�com/jp/ja/support_portal/technical_information
https://www.i-pro.com/
Step 4
ドームカバーを取り外します。
Step 11
カメラの「取扱説明書設置編」に従って、設置補助ワイヤーとエンクロージャー
をカメラに取り付けます。
0�78 Nm
{8�0 kgfcm}
Step 10
設置補助ワイヤーを取り付け、①②③の順に対角方向でねじを締めます。
Step 7ではがした保護フィルムを、ドームカバーの表面に再度はりつけてください。
設置後、保フィルムをはがしてください。
Step 7
新しいドームカバーを取り付けます。
新しいドームカバーの外側に付いている保護フィルムをはがしてください。
はがした護フィルムは取り付けますので管してください
ドームカバーの外側内側に傷が入らないように
取り扱いに意してくださ
乗り上
ように 注 意 す
Step 8
IRLEDカバーを取り付けます。
水ラバ
Step 9
ドームカバー固定金具を取り付けます。
Step 5
ラバを取り外します。
Step 6
防水ラバー(付属品)を取り付けます。
前準備
カメラの「取扱説明書 設置編」に従って、エンクロージャーと設置補助ワイヤーを取り外します。
Step 2
ドームカバー固定金具を取り外します。
Step 3
IRLEDカバーを取り外します。
設置する
Step 1
ねじ(12か所)を緩めて外し、
設置補助ワイヤーを外します。
設置補助ワイヤー
注意:
取扱説明書をお読みのえ、安全にお使いださい。
  • Page 1 1
  • Page 2 2

i-PRO i-PRO WV-QDC501 Dome Cover User manual

Category
Security camera accessories
Type
User manual

i-PRO i-PRO WV-QDC501 Dome Cover: Enhance Your Surveillance System with Durability and Clarity

The i-PRO i-PRO WV-QDC501 Dome Cover is an essential accessory designed to protect and enhance the performance of your compatible i-PRO camera. Constructed with robust PC resin and waterproof rubber, this dome cover withstands harsh weather conditions, ensuring uninterrupted surveillance. Choose between the clear WV-QDC501C model for optimal image quality or the WV-QDC501G with a smoke finish for added privacy.

Ask a question and I''ll find the answer in the document

Finding information in a document is now easier with AI