
INSTALLATIONGUIDE
AXISQ60Series
AXISQ6042-EPTZDomeNetworkCamera
AXISQ6044-EPTZDomeNetworkCamera
AXISQ6045-EPTZDomeNetworkCamera
ENGLISH
FRANÇAIS
DEUTSCH
ITALIANO
ESPANÕL
ò
ò
¨
¨
¾
¾

LegalConsiderations
Videosurveillancecanberegulatedbylawsthatvaryfrom
countrytocountry.Checkthelawsinyourlocalregion
beforeusingthisproductforsurveillancepurposes.
Thisproductincludesone(1)H.264decoderlicense.To
purchasefurtherlicenses,contactyourreseller.
Liability
Everycarehasbeentakeninthepreparationofthis
document.PleaseinformyourlocalAxisofceofany
inaccuraciesoromissions.AxisCommunicationsABcannot
beheldresponsibleforanytechnicalortypographicalerrors
andreservestherighttomakechangestotheproductand
manualswithoutpriornotice.AxisCommunicationsAB
makesnowarrantyofanykindwithregardtothematerial
containedwithinthisdocument,including,butnotlimited
to,theimpliedwarrantiesofmerchantabilityandtnessfor
aparticularpurpose.AxisCommunicationsABshallnot
beliablenorresponsibleforincidentalorconsequential
damagesinconnectionwiththefurnishing,performance
oruseofthismaterial.Thisproductisonlytobeusedfor
itsintendedpurpose.
IntellectualPropertyRights
AxisABhasintellectualpropertyrightsrelatingto
technologyembodiedintheproductdescribedinthis
document.Inparticular,andwithoutlimitation,these
intellectualpropertyrightsmayincludeoneormoreofthe
patentslistedathttp://www.axis.com/patent.htmandone
ormoreadditionalpatentsorpendingpatentapplications
intheUSandothercountries.
Thisproductcontainslicensedthird-partysoftware.See
themenuitem“About”intheproduct’suserinterfacefor
moreinformation.
ThisproductcontainssourcecodecopyrightApple
Computer,Inc.,underthetermsofApplePublicSource
License2.0(seehttp://www.opensource.apple.com/apsl).
Thesourcecodeisavailablefrom
http://developer.apple.com/darwin/projects/bonjour/
EquipmentModications
Thisequipmentmustbeinstalledandusedin
strictaccordancewiththeinstructionsgiveninthe
userdocumentation.Thisequipmentcontainsno
user-serviceablecomponents.Unauthorizedequipment
changesormodicationswillinvalidateallapplicable
regulatorycerticationsandapprovals.
TrademarkAcknowledgments
AXISCOMMUNICATIONS,AXIS,ETRAX,ARTPECandVAPIX
areregisteredtrademarksortrademarkapplicationsofAxis
ABinvariousjurisdictions.Allothercompanynamesand
productsaretrademarksorregisteredtrademarksoftheir
respectivecompanies.
Apple,Boa,Apache,Bonjour,Ethernet,InternetExplorer,
Linux,Microsoft,Mozilla,Real,SMPTE,QuickTime,UNIX,
Windows,WindowsVistaandWWWareregistered
trademarksoftherespectiveholders.Javaandall
Java-basedtrademarksandlogosaretrademarksor
registeredtrademarksofOracleand/oritsafliates.
UPnP
TM
isacerticationmarkoftheUPnP
TM
Implementers
Corporation.
SD,SDHCandSDXCaretrademarksorregisteredtrademarks
ofSD-3C,LLCintheUnitedStates,othercountriesorboth.
Also,miniSD,microSD,miniSDHC,microSDHC,microSDXC
arealltrademarksorregisteredtrademarksofSD-3C,LLC
intheUnitedStates,othercountriesorboth.
Support
Shouldyourequireanytechnicalassistance,pleasecontact
yourAxisreseller.Ifyourquestionscannotbeanswered
immediately,yourresellerwillforwardyourqueriesthrough
theappropriatechannelstoensurearapidresponse.Ifyou
areconnectedtotheInternet,youcan:
•downloaduserdocumentationandsoftwareupdates
•ndanswerstoresolvedproblemsintheFAQdatabase.
Searchbyproduct,category,orphrase
•reportproblemstoAxissupportstaffbylogginginto
yourprivatesupportarea
•chatwithAxissupportstaff(selectedcountriesonly)
•visitAxisSupportatwww.axis.com/techsup/
LearnMore!
VisitAxislearningcenterwww.axis.com/academy/for
usefultrainings,webinars,tutorialsandguides.
RegulatoryInformation
Europe
ThisproductcomplieswiththeapplicableCEmarking
directivesandharmonizedstandards:
•ElectromagneticCompatibility(EMC)Directive
2004/108/EC.SeeElectromagneticCompatibility
(EMC),onpage2.
•LowVoltage(LVD)Directive2006/95/EC.SeeSafety,
onpage3.
•RestrictionsofHazardousSubstances(RoHS)Directive
2011/65/EU.SeeDisposalandRecycling,onpage3.
Acopyoftheoriginaldeclarationofconformitymaybe
obtainedfromAxisCommunicationsAB.SeeContact
Information,onpage3.
ElectromagneticCompatibility(EMC)
Thisequipmenthasbeendesignedandtestedtofulll
applicablestandardsfor:
•Radiofrequencyemissionwheninstalledaccordingto
theinstructionsandusedinitsintendedenvironment.
•Immunitytoelectricalandelectromagneticphenomena
wheninstalledaccordingtotheinstructionsandused
initsintendedenvironment.
USA
Thisequipmenthasbeentestedusingashieldednetwork
cable(STP)andfoundtocomplywiththelimitsfora
ClassAdigitaldevice,pursuanttopart15oftheFCCRules.
Theselimitsaredesignedtoprovidereasonableprotection
againstharmfulinterferencewhentheequipmentis
operatedinacommercialenvironment.Thisequipment
generates,uses,andcanradiateradiofrequencyenergy
and,ifnotinstalledandusedinaccordancewiththe
instructionmanual,maycauseharmfulinterferenceto
radiocommunications.Operationofthisequipmentin
aresidentialareaislikelytocauseharmfulinterference
inwhichcasetheuserwillberequiredtocorrectthe
interferenceathisownexpense.
Canada
ThisClassAdigitalapparatuscomplieswithCanadian
ICES-003.
Europe
ThisdigitalequipmentfulllstherequirementsforRF
emissionaccordingtotheClassAlimitofEN55022.
Notice!ThisisaClassAproduct.Inadomesticenvironment
thisproductmaycauseRFinterference,inwhichcasethe
usermayberequiredtotakeadequatemeasures.
Thisproductfulllstherequirementsforemissionsand
immunityaccordingtoEN50121-4andIEC62236-4railway
applications.

Thisproductfulllstherequirementsforimmunity
accordingtoEN61000-6-1residential,commercialand
light-industrialenvironments.
Thisproductfulllstherequirementsforimmunity
accordingtoEN61000-6-2industrialenvironments.
Thisproductfulllstherequirementsforimmunity
accordingtoEN55024ofceandcommercialenvironments
Australia/NewZealand
ThisdigitalequipmentfulllstherequirementsforRF
emissionaccordingtotheClassAlimitofAS/NZSCISPR22.
Notice!ThisisaClassAproduct.Inadomesticenvironment
thisproductmaycauseRFinterference,inwhichcasethe
usermayberequiredtotakeadequatemeasures.
Japan
この装置は、クラスA情報技術装置です。この装
置を家庭環境で使用すると電波妨害を引き起こす
ことがあります。この場合には使用者が適切な対
策を講ずるよう要求されることがあります。
Korea
이기기는업무용(A급)전자파적합기기로서판매
자또는사용자는이점을주의하시기바라며,가
정외의지역에서사용하는것을목적으로합니다.
Safety
ThisproductcomplieswithIEC/EN/UL60950-1and
IEC/EN/UL60950-22,SafetyofInformationTechnology
Equipment.
Thepowersupplyusedwiththisproductshallfulll
therequirementsforSafetyExtraLowVoltage
(SELV)andLimitedPowerSource(LPS)accordingto
IEC/EN/UL60950-1.
DisposalandRecycling
Whenthisproducthasreachedtheendofitsusefullife,
disposeofitaccordingtolocalrawsandregulations.For
informationaboutyournearestdesignatedcollectionpoint,
contactyourlocalauthorityresponsibleforwastedisposal.
Inaccordancewithlocallegislation,penaltiesmaybe
applicableforincorrectdisposalofthiswaste.
Europe
Thissymbolmeansthattheproductshallnotbe
disposedoftogetherwithhouseholdorcommercialwaste.
Directive2012/19/EUonwasteelectricalandelectronic
equipment(WEEE)isapplicableintheEuropeanUnion
memberstates.Topreventpotentialharmtohumanhealth
andtheenvironment,theproductmustbedisposedofin
anapprovedandenvironmentallysaferecyclingprocess.
Forinformationaboutyournearestdesignatedcollection
point,contactyourlocalauthorityresponsibleforwaste
disposal.Businessesshouldcontacttheproductsupplierfor
informationabouthowtodisposeofthisproductcorrectly.
Thisproductcomplieswiththerequirementsof
Directive2011/65/EUontherestrictionoftheuseof
certainhazardoussubstancesinelectricalandelectronic
equipment(RoHS).
China
Thisproductcomplieswiththerequirementsofthe
legislativeactAdministrationontheControlofPollution
CausedbyElectronicInformationProducts(ACPEIP).
ContactInformation
AxisCommunicationsAB
Emdalavägen14
22369Lund
Sweden
Tel:+46462721800
Fax:+4646136130
www.axis.com
Page is loading ...

AXISQ60Series
SafetyInformation
ReadthroughthisInstallationGuidecarefullybeforeinstallingtheproduct.KeeptheInstallation
Guideforfuturereference.
HazardLevels
DANGER
Indicatesahazardoussituationwhich,ifnotavoided,willresultin
deathorseriousinjury.
WARNING
Indicatesahazardoussituationwhich,ifnotavoided,couldresult
indeathorseriousinjury.
CAUTION
Indicatesahazardoussituationwhich,ifnotavoided,couldresult
inminorormoderateinjury.
NOTICE NOTICE
NOTICE
Indicatesasituationwhich,ifnotavoided,couldresultindamage
toproperty.
OtherMessageLevels
ImportantIndicatessignicantinformationwhichisessentialfortheproduct
tofunctioncorrectly.
NoteIndicatesusefulinformationwhichhelpsingettingthemostout
oftheproduct.
5
ENGLISH

AXISQ60Series
SafetyInstructions
WARNING
•TheAxisproductshallbeinstalledbyatrainedprofessional.
NOTICE NOTICE
NOTICE
•TheAxisproductshallbeusedincompliancewithlocallawsandregulations.
•StoretheAxisproductinadryandventilatedenvironment.
•AvoidexposingtheAxisproducttoshocksorheavypressure.
•Donotinstalltheproductonunstablebrackets,surfacesorwalls.
•UseonlyapplicabletoolswheninstallingtheAxisproduct.Excessiveforcecouldcause
damagetotheproduct.
•Donotusechemicals,causticagents,oraerosolcleaners.Useacleanclothdampened
withpurewaterforcleaning.
•Useonlyaccessoriesthatcomplywithtechnicalspecicationoftheproduct.Thesecanbe
providedbyAxisorathirdparty.
•UseonlysparepartsprovidedbyorrecommendedbyAxis.
•Donotattempttorepairtheproductbyyourself.ContactAxissupportoryourAxis
resellerforservicematters
Transportation
NOTICE NOTICE
NOTICE
•WhentransportingtheAxisproduct,usetheoriginalpackagingorequivalenttoprevent
damagetotheproduct.
Battery
TheAxisproductusesa3.0VCR2032lithiumbatteryasthepowersupplyforitsinternalreal-time
clock(RTC).Undernormalconditionsthisbatterywilllastforaminimumofveyears.
LowbatterypoweraffectstheoperationoftheRTC,causingittoresetateverypower-up.Alog
messagewillappearwhenthebatteryneedsreplacing.
Thebatteryshouldnotbereplacedunlessrequired,butifthebatterydoesneedreplacing,contact
Axissupportatwww.axis.com/techsup/forassistance.
6

AXISQ60Series
WARNING
•Riskofexplosionifthebatteryisincorrectlyreplaced.
•ReplaceonlywithanidenticalbatteryorabatterywhichisrecommendedbyAxis.
•Disposeofusedbatteriesaccordingtolocalregulationsorthebatterymanufacturer's
instructions.
DomeCover
NOTICE NOTICE
NOTICE
•Becarefulnottoscratch,damageorleavengerprintsonthedomecoverbecausethis
coulddecreaseimagequality.Ifpossible,keeptheprotectiveplasticonthedomecover
untiltheinstallationiscomplete.
•Donotcleanadomecoverthatlookscleantotheeyeandneverpolishthesurface.
Excessivecleaningcoulddamagethesurface.
•Forgeneralcleaningofthedomecoveritisrecommendedtouseanon-abrasive,
solvent-freeneutralsoapordetergentmixedwithpurewaterandasoft,cleancloth.Rinse
wellwithpurelukewarmwater.Drywithasoft,cleanclothtopreventwaterspotting.
•Neveruseharshdetergents,gasoline,benzeneoracetoneetc.andavoidcleaningthe
domecoverindirectsunlightoratelevatedtemperatures.
7
ENGLISH
Page is loading ...

AXISQ60Series
InstallationGuide
ThisInstallationGuideprovidesinstructionsforinstallingAXISQ6042-E/Q6044-E/Q6045-EPTZ
DomeNetworkCameraonyournetwork.Forotheraspectsofusingtheproduct,seetheUser
Manualavailableatwww.axis.com
InstallationSteps
1.Makesurethepackagecontents,toolsandothermaterialsnecessaryfortheinstallation
areinorder.Seepage9.
2.Studythehardwareoverview.Seepage10.
3.Studythespecications.Seepage13.
4.Installthehardware.Seepage14.
5.Accesstheproduct.Seepage18.
PackageContents
•AXISQ6042-E/Q6044-E/Q6045-EPTZDomeNetworkCamera
•Cleardomecover(premounted)
•Sunshield,includingscrewsT20(3x)
•RJ45Push-pullConnector(IP66)
•AXIST8124HighPoEMidspan1-port(LPS)
•InstallationandManagementSoftwareCD
•Printedmaterials
-InstallationGuide(thisdocument)
-Extraserialnumberlabel(2x)
-AVHSAuthenticationkey
RecommendedTools
•TorxscrewdriverT20
•TorxscrewdriverT30
•PhillipsscrewdriverPH2–ifreplacingthedomecover
•Cableshoepliers
•Diagonalpliers
9
ENGLISH

AXISQ60Series
OptionalAccessories
•AXIST91AMountingAccessories
•Smokeddomecover
•RJ45IP66-ratedCablewithPremountedConnector(CAT6)5m
•AXIST8310VideoSurveillanceControlBoard
•AXIST90AIlluminators
•InstallationDisplay
•Midspan
Forinformationaboutavailableaccessories,seewww.axis.com
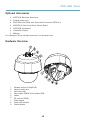
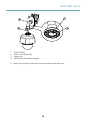
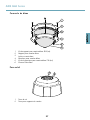
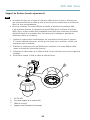
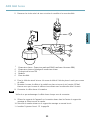
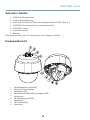
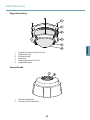
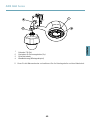
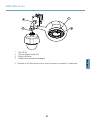
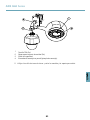
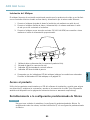
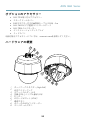
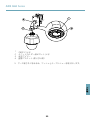
HardwareOverview
1
2
3
4
5
6
8
7
9
1
Networkconnector(HighPoE)
2
Hookforsafetywire
3
Unitholder(3x)
4
Partnumber(P/N)&Serialnumber(S/N)
5
Heater
6
SDcardslot(SDHC)
7
Powerbutton
8
StatusLEDindicator
9
Controlbutton
10

AXISQ60Series
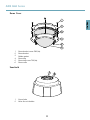
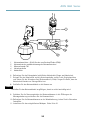
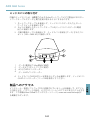
DomeCover
1
2
3
4
5
6
1
DomebracketscrewPH2(4x)
2
Domebracket
3
Rubbergasket
4
Domering
5
DomeringscrewT30(4x)
6
Domecover
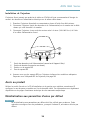
Sunshield
2
1
1
Screwholes
2
Holesforunitholders
11
ENGLISH

AXISQ60Series
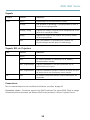
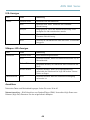
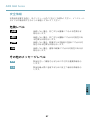
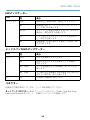
LEDIndicators
LED
Color
Indication
Unlit
Connectionandnormaloperation
Amber
Steadyduringstartup.Flashesduringrmwareupgrade.
Amber/redFlashesamber/redifnetworkconnectionisunavailable
orlost.
RedFlashesredforrmwareupgradefailure.
Status
GreenShowssteadygreenfor10secondsfornormaloperation
afterrestart.
MidspanLEDIndicators
LED
Color
Indication
UnlitNocameraconnected.
GreenSteadywhencameraconnected,normaloperation.
Green,ashingSlowashwhenovercurrentorshortcircuitcondition
ontheport.
Port
Green,ashing
Fastashwheninputvoltageisoutofrangeorother
internalerror.
ACGreenSteadywhenACpowerinputconnected.
Connectors
Forspecicationsandoperatingconditions,seepage13.
Networkconnector-RJ45Push-pullConnector(IP66).SupportsHighPoweroverEthernet(High
PoE).Usethesuppliedmidspan.
NOTICE NOTICE
NOTICE
•Theproductshallbeconnectedusingashieldednetworkcable(STP).Allcablesconnecting
theproducttothemidspanshallbeshielded(STP)andintendedfortheirspecicuse.
Makesurethatthemidspanisproperlygrounded.Forinformationaboutregulatory
requirements,seeRegulatoryInformation,onpage2.
•TocomplywiththeIP66-rateddesignofthecameraandmaintaintheIP66protection,
thesuppliedRJ45Push-pullConnector(IP66)shallbeused.Alternatively,usetheRJ45
IP66-ratedcablewithpremountedconnectorwhichisavailablefromyourAxisreseller.
Donotremovetheplasticnetworkconnectorshieldfromthecamera.
12

AXISQ60Series
SDcardslot-Astandardorhigh-capacitySDcard(notincluded)canbeusedforlocalrecording
withremovablestorage.
NOTICE NOTICE
NOTICE
Topreventcorruptionofrecordings,theSDcardshouldbeunmountedbeforeremoval.To
unmount,gotoSetup>SystemOptions>Storage>SDCardandclickUnmount.
Controlbutton-Thecontrolbuttonisusedfor:
•Resettingtheproducttofactorydefaultsettings.Seepage18.
•ConnectingtoanAXISVideoHostingSystemserviceorAXISInternetDynamic
DNSService.Formoreinformationabouttheseservices,seetheUserManual.
Powerbutton-Pressandholdthepowerbuttontotemporarilypowertheproductwhenthedome
coverisremoved.Thepowerbuttonisalsousedwiththecontrolbuttontoresetthecamerato
factorydefaultsettings.Seepage18.
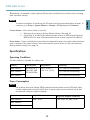
Specications
OperatingConditions
TheAxisproductisintendedforoutdooruse.
Product
Classication
TemperatureHumidity
AXISQ6042-E
10–100%RH(condensing)
AXISQ6044-E
10–100%RH(condensing)
AXISQ6045-E
IEC60721-4-3
Class3K3,3M3
IEC60529IP66
-40°Cto50°C
(-40°Fto122°F)
10–100%RH(condensing)
PowerConsumption
NOTICE NOTICE
NOTICE
UseaSafetyExtraLowVoltage(SELV)compliantlimitedpowersource(LPS)witheither
aratedoutputpowerlimitedto≤100Woraratedoutputcurrentlimitedto≤5A.Axis
recommendsusingthesuppliedmidspan.
ProductHighPoE
HighPoEMidspan(supplied)
AXISQ6042-E
AXISQ6044-E
AXISQ6045-E
Max.60W
100–240VAC,max.60W
13
ENGLISH

AXISQ60Series
InstalltheHardware
NOTICE NOTICE
NOTICE
•TheAXISproductshallbeconnectedusingashieldednetworkcable(STP).Allcables
connectingtheproducttothemidspanshallbeshielded(STP)andintendedfortheir
specicuse.Makesurethatthemidspanisproperlygrounded.Forinformationabout
regulatoryrequirements,seeRegulatoryInformation,onpage2.
•Mounttheproductwiththedomecoverfacingdownward.
•Becarefulnottoscratch,damageorleavengerprintsonthedomecoverbecausethis
coulddecreaseimagequality.Ifpossible,keeptheprotectiveplasticonthedomecover
untiltheinstallationiscomplete.
TheAxisproductcanbeinstalledwiththecablesroutedthroughoralongthewallorroof.
Readalltheinstructionsbeforeinstallingtheproduct.Someinstallationstepswouldbenetfrom
beingcompletedtogetherbecausetheyrequireremovalofthedomecover.
Ahardwareinstallationcanincludethefollowing:
•Theproductissuppliedwithacleardomecover(premounted).Asmokeddomecoveris
availableasanaccessory.Toreplacethedomecover,seepage14.
•AstandardorhighcapacitySDcard(notincluded)canbeusedtostorerecordingslocally
intheproduct.ToinstallanSDcard,seepage15.
•ToinstalltheproductusingacompatiblebracketfromAXIST91AMountingAccessories
(soldseparately),seepage15.
•Toinstallthesuppliedmidspan,seepage18.
AttachtheSunshield
Attachingthesunshieldisoptional.ThesunshieldprotectsthecameraagainstUVlightandhelps
keepthetemperatureinsidethecameradown.
1.Slidethesunshieldovertheunitholdersonthecameraunit.
2.Securethesunshieldusingthesuppliedscrews(T20).
ReplacetheDomeCover
Replacingthedomecoverisonlynecessaryifyouwanttouseasmokeddomecoverorifthe
domecoverisscratchedordamaged.Smokeddomecoversandsparecleardomecoverscanbe
purchasedfromyourAxisreseller.
1.Loosenthedomeringscrewsandremovethedomecover.
2.Removethedomebracketscrewsandremovethedomebracketandthedomecover
fromthedomering.
14

AXISQ60Series
3.Makesuretherubbergasketisttedcorrectlyonthedomecover.
4.Alignthebulgeonthedomecoverwithoneofthelogotypesonthedomering.
5.Attachthedomebracketandthedomecovertothedomeringandtightenthescrews
(torque1.2Nm).
6.ToinstallanSDcard(notincluded),seeInstallanSDCard,onpage15.
7.Toattachthedomecovertothetopcover,alignthebulgeonthedomecoverwiththe
heateronthecameraunitandtightenthescrews(torque1.5Nm).
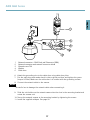
InstallanSDCard
ItisoptionaltoinstallastandardorhighcapacitySDcard(notincluded),whichcanbeusedfor
localrecordingwithremovablestorage.
1.Loosenthedomeringscrewsandremovethedomecover.
2.InsertanSDcard(notincluded)intotheSDcardslot.
4.Toattachthedomecovertothetopcover,alignthebulgeonthedomecoverwiththe
heateronthecameraunitandtightenthescrews(torque1.5Nm).
NOTICE NOTICE
NOTICE
Topreventcorruptionofrecordings,theSDcardshouldbeunmountedbeforeitisejected.
Tounmount,gotoSetup>SystemOptions>Storage>SDCardandclickUnmount.
BracketMount(soldseparately)
NOTICE NOTICE
NOTICE
•Theproductshallbegroundedusingagroundingwire.Makesurebothendsofthe
groundingwireareincontactwiththeirrespectivegroundingsurfaces.
•TocomplywiththeIP66-rateddesignofthecameraandmaintaintheIP66protection,
thesuppliedRJ45Push-pullConnector(IP66)shallbeused.Alternatively,usetheRJ45
IP66-ratedcablewithpremountedconnectorwhichisavailablefromyourAxisreseller.
Donotremovetheplasticnetworkconnectorshieldfromthecamera.
1.Installtheselectedbracketaccordingtotheinstructionssuppliedwiththebracket.If
drillingisrequired,makesuretousedrillbits,screwsandplugsthatareappropriatefor
thematerial.
2.ConnectsuppliedRJ45Push-pullConnector(IP66)tothenetworkcableaccordingtothe
instructionssuppliedwiththeconnector.
3.Routethenetworkcableandagroundingwirethroughtheholesinthemountingbracket.
4.Securethecamerausingthesuppliedsafetywire.
15
ENGLISH

AXISQ60Series
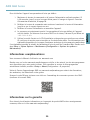
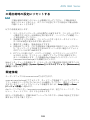
1
2
3
4
1
ScrewT30(3x)
2
Slotforunitholder(3x)
3
Safetywire
4
Wallbracket(mountingexample)
5.Loosenthegroundingscrewandremovethewasherandcableshoe.
16

AXISQ60Series
3
4
2
1
5
1
Networkconnector–RJ45Push-pullConnector(IP66)
2
Networkconnectorandnetworkconnectorshield
3
GroundscrewT20
4
Washer
5
Cableshoe
6.Attachthegroundingwiretothecableshoeusingcableshoepliers.
7.Putthecableshoeandwasherbackintheiroriginalpositionsandtightenthescrew
(torque0.5Nm).Makesurethecableshoeisincontactwiththegroundingsurface.
8.Connectthenetworkcabletothecamera.
NOTICE NOTICE
NOTICE
Becarefulnottodamagethenetworkcablewhenconnectingit.
9.Slidetheunitholdersonthenetworkcameraintotheslotsinthemountingbracketand
rotatethecameraunit.
10.Securethenetworkcameratothemountingbracketbytighteningthescrews.
11.Installthesuppliedmidspan.Seepage18.
17
ENGLISH

AXISQ60Series
InstalltheMidspan
ThesuppliedmidspanenablesAxisnetworkvideoproductswithhighpowerconsumptiontoreceive
dataandpoweroverthesamenetworkcable.
1.Connectthemidspan(datain)tothenetworkswitchusinganetworkcable.
2.Connectthemidspan(dataandpowerout)tothecamerausingthenetworkcablethat
hasbeenconnectedtothecamera.
3.Connectthemidspantoagrounded(earthed)mainspoweroutlet(100–240VAC)using
thesuppliedpowercable.
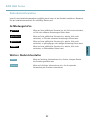
1
2
3
4
1
Dataandpowerout(connecttoAxisproduct)
2
Datain(connecttonetwork)
3
ACinputLEDindicator
4
PortLEDindicator
4.MakesurethattheLEDsonthemidspanindicatethecorrectconditions.SeeMidspan
LEDIndicators,onpage12.
AccesstheProduct
UsethetoolsprovidedontheInstallationandManagementSoftwareCDtoassignanIPaddress,
setthepasswordandaccessthevideostream.Thisinformationisalsoavailablefromthesupport
pagesonwww.axis.com/techsup/
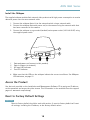
ResettoFactoryDefaultSettings
Important
Resettofactorydefaultshouldbeusedwithcaution.Aresettofactorydefaultwillreset
allsettings,includingtheIPaddress,tothefactorydefaultvalues.
18

AXISQ60Series
Note
TheinstallationandmanagementsoftwaretoolsareavailableontheCDsuppliedwiththe
productandfromthesupportpagesonwww.axis.com/techsup
Toresettheproducttothefactorydefaultsettings:
1.Pressandholdthecontrolbuttonandthepowerbuttonforabout15–30secondsuntil
thestatusLEDindicatorashesamber.SeeHardwareOverview,onpage10.
2.Releasethecontrolbuttonbutcontinuetoholddownthepowerbuttonuntilthestatus
LEDindicatorturnsgreen.
3.Releasethepowerbuttonandassembletheproduct.
4.Theprocessisnowcomplete.Theproducthasbeenresettothefactorydefaultsettings.
IfnoDHCPserverisavailableonthenetwork,thedefaultIPaddressis192.168.0.90
5.Usingtheinstallationandmanagementsoftwaretools,assignanIPaddress,setthe
passwordandaccessthevideostream.
Itisalsopossibletoresetparameterstofactorydefaultviathewebinterface.GotoSetup
>SystemOptions>Maintenance.
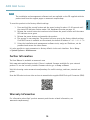
FurtherInformation
TheUserManualisavailableatwww.axis.com
Visitwww.axis.com/techsuptocheckifthereisupdatedrmwareavailableforyournetwork
product.Toseethecurrentlyinstalledrmwareversion,gotoSetup>About.
VisitAxislearningcenterwww.axis.com/academyforusefultrainings,webinars,tutorialsand
guides.
ScantheQRcodetoviewavideoonhowtoassemblethesuppliedRJ45Push-pullConnector(IP66).
WarrantyInformation
ForinformationaboutAxis’productwarrantyandtheretorelatedinformation,see
www.axis.com/warranty/
19
ENGLISH
Page is loading ...
Page is loading ...
Page is loading ...
Page is loading ...
Page is loading ...
Page is loading ...
Page is loading ...
Page is loading ...
Page is loading ...
Page is loading ...
Page is loading ...
Page is loading ...
Page is loading ...
Page is loading ...
Page is loading ...
Page is loading ...
Page is loading ...
Page is loading ...
Page is loading ...
Page is loading ...
Page is loading ...
Page is loading ...
Page is loading ...
Page is loading ...
Page is loading ...
Page is loading ...
Page is loading ...
Page is loading ...
Page is loading ...
Page is loading ...
Page is loading ...
Page is loading ...
Page is loading ...
Page is loading ...
Page is loading ...
Page is loading ...
Page is loading ...
Page is loading ...
Page is loading ...
Page is loading ...
Page is loading ...
Page is loading ...
Page is loading ...
Page is loading ...
Page is loading ...
Page is loading ...
Page is loading ...
Page is loading ...
Page is loading ...
Page is loading ...
Page is loading ...
Page is loading ...
Page is loading ...
Page is loading ...
Page is loading ...
Page is loading ...
Page is loading ...
Page is loading ...
Page is loading ...
Page is loading ...
Page is loading ...
Page is loading ...
Page is loading ...
Page is loading ...
Page is loading ...
Page is loading ...
Page is loading ...
Page is loading ...
Page is loading ...
Page is loading ...
Page is loading ...
Page is loading ...
Page is loading ...
Page is loading ...
Page is loading ...
Page is loading ...
Page is loading ...
Page is loading ...
Page is loading ...
Page is loading ...
Page is loading ...
Page is loading ...
Page is loading ...

AXISQ60Series
保 保
保
証 証
証
Axisの製品保証と関連情報については、
www .axis.com/warranty
をご覧ください。
103
ò
ò
¨
¨
¾
¾

InstallationGuide
Ver.M1.5
AXISQ60SeriesDate:October2013
©AxisCommunicationsAB,2013
PartNo.53514
-
 1
1
-
 2
2
-
 3
3
-
 4
4
-
 5
5
-
 6
6
-
 7
7
-
 8
8
-
 9
9
-
 10
10
-
 11
11
-
 12
12
-
 13
13
-
 14
14
-
 15
15
-
 16
16
-
 17
17
-
 18
18
-
 19
19
-
 20
20
-
 21
21
-
 22
22
-
 23
23
-
 24
24
-
 25
25
-
 26
26
-
 27
27
-
 28
28
-
 29
29
-
 30
30
-
 31
31
-
 32
32
-
 33
33
-
 34
34
-
 35
35
-
 36
36
-
 37
37
-
 38
38
-
 39
39
-
 40
40
-
 41
41
-
 42
42
-
 43
43
-
 44
44
-
 45
45
-
 46
46
-
 47
47
-
 48
48
-
 49
49
-
 50
50
-
 51
51
-
 52
52
-
 53
53
-
 54
54
-
 55
55
-
 56
56
-
 57
57
-
 58
58
-
 59
59
-
 60
60
-
 61
61
-
 62
62
-
 63
63
-
 64
64
-
 65
65
-
 66
66
-
 67
67
-
 68
68
-
 69
69
-
 70
70
-
 71
71
-
 72
72
-
 73
73
-
 74
74
-
 75
75
-
 76
76
-
 77
77
-
 78
78
-
 79
79
-
 80
80
-
 81
81
-
 82
82
-
 83
83
-
 84
84
-
 85
85
-
 86
86
-
 87
87
-
 88
88
-
 89
89
-
 90
90
-
 91
91
-
 92
92
-
 93
93
-
 94
94
-
 95
95
-
 96
96
-
 97
97
-
 98
98
-
 99
99
-
 100
100
-
 101
101
-
 102
102
-
 103
103
-
 104
104


Ask a question and I''ll find the answer in the document
Finding information in a document is now easier with AI
in other languages
Related papers
-
Axis Communications M5014-V User manual
-
Axis Communications Q6044-E User manual
-
Axis Communications axis p54 ptz dome network camera series User manual
-
Axis Communications Q6045-E MK II User manual
-
Axis Communications 215 PTZ-E User manual
-
-
-
-
-