Novell Client Login Extension 3.7 User guide
- Category
- Software
- Type
- User guide
This manual is also suitable for
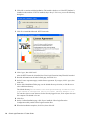
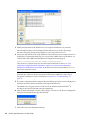
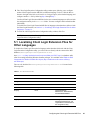
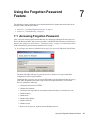
Novell CLIENT LOGIN EXTENSION 3.7 - ADMINISTRATION facilitates password self-service by adding a link to the Novell and Microsoft GINA login clients. When users click the Forgot Password link in their login client, the Client Login Extension launches a restricted browser to access the Password Self-Service feature on the login clients. This feature assists in reducing help desk calls from people who forget their passwords.
Novell CLIENT LOGIN EXTENSION 3.7 - ADMINISTRATION facilitates password self-service by adding a link to the Novell and Microsoft GINA login clients. When users click the Forgot Password link in their login client, the Client Login Extension launches a restricted browser to access the Password Self-Service feature on the login clients. This feature assists in reducing help desk calls from people who forget their passwords.


-
 1
1
-
 2
2
-
 3
3
-
 4
4
-
 5
5
-
 6
6
-
 7
7
-
 8
8
-
 9
9
-
 10
10
-
 11
11
-
 12
12
-
 13
13
-
 14
14
-
 15
15
-
 16
16
-
 17
17
-
 18
18
-
 19
19
-
 20
20
-
 21
21
-
 22
22
-
 23
23
-
 24
24
-
 25
25
-
 26
26
-
 27
27
-
 28
28
-
 29
29
-
 30
30
-
 31
31
-
 32
32


Novell Client Login Extension 3.7 User guide
- Category
- Software
- Type
- User guide
- This manual is also suitable for
Novell CLIENT LOGIN EXTENSION 3.7 - ADMINISTRATION facilitates password self-service by adding a link to the Novell and Microsoft GINA login clients. When users click the Forgot Password link in their login client, the Client Login Extension launches a restricted browser to access the Password Self-Service feature on the login clients. This feature assists in reducing help desk calls from people who forget their passwords.
Ask a question and I''ll find the answer in the document
Finding information in a document is now easier with AI
Related papers
-
Novell SecureLogin 6.1 SP1 User guide
-
-
-
-
-
-
-
-
-