Page is loading ...

Watts Hydro-Force™ Foodservice Plumbing
Products Installation Instructions
Watts Hydro-Force™ Los Productos
De Servicios De Alimentos De Plomería
Instrucciones Para Su Instalación
SCAN FOR MORE INFO
Watts Hydro-Force™ Foodservice Produits
De Plomberie Instructions D’installation

Foodservice Plumbing Products Installation Instructions
For additional information on replacement parts
please visit our website: foodservice.watts.com
PRE-RINSE REPLACEMENT HOSE WITH GRIP
MODEL LFPRH-GXX
™
1
/2" WATER SUPPLY
LINE/NIPPLE
DOUBLE PANTRY
FAUCET BODY
TIGHTEN LOCKNUT
AGAINST DECK
WASHER
LOCKNUT
YOKE
3
/8"
TAILPIECE
SINGLE PANTRY
FAUCET
BODY
SINK/BACKSPLASH
TIGHTEN
FLANGE AGAINST
SINK/BACKSPLASH
1
/2" WATER SUPPLY
LINE/NIPPLE
WASHER
FLANGE
DECK MOUNT
TIGHTEN
COUPLING NUT
FAUCET
BODY
TIGHTEN FLANGE
AGAINST DECK
1
/2" WATER
SUPPLY LINE/
NIPPLE
MOUNTING KIT INCLUDES:
Rubber Washer, Steel Washers,
Flange, Nipple and Locknut
WALL MOUNT
*SHOWN WITH OPTIONAL 90˚
MOUNTING KIT NO. LFFRMK-W
FAUCET
BODY
SINK/BACKSPLASH
WASHER
1
/2" WATER SUPPLY
LINE/90˚ NIPPLE
MTG. KIT*
TIGHTEN FLANGE
AGAINST SINK/
BACKSPLASH
TIGHTEN
COUPLING
NUT
1
2
FLANGE
GENERAL INSTRUCTIONS:
Most faucets are supplied with mounting hardware, including ½" nipples. For installation
instructions, we will assume that hot and cold water supplies end in ½" nipples. We
recommend using a 1
1
/4" hole in the deck or backsplash to accommodate the ½"
supply nipples. For added convenience it is suggested that Hydro-Force Mounting Kit
(LFFRMK-W) be utilized with the LLP-WS8B-AF12 Series xtures. Refer to instructions.
1. Turn off water supply at main source.
2. Hand-tighten all parts prior to tightening with wrench.
3. Do not force parts together.
4. All plated surfaces should be handled with care; avoid scratching with tools.
5. Use Teon tape or pipe joint compound when making threaded connections
to water supply lines.
ASSEMBLE COUPLING TO SINK DECK
Apply Teon tape or pipe joint compound to the supply line nipples. Place
nipple through holes in deck. Assemble ange of each coupling to one
nipple, then the other. Thread ange loosely against wall or backsplash.
ASSEMBLE FAUCET TO COUPLINGS
Carefully orient, mount and hand-tighten the faucet to the two couplings.
Be sure to include the washers provided. Use wrench to tighten ange
against wall or backsplash. Maintain alignment of faucet to sink while
tightening. Now wrench-tighten couplings to faucet body, then tighten
ange against sink/backsplash.
Hydro-Force is available exclusively from:
Dormont Manufacturing
Export, PA 15632
Tel: (800) 367-6668
foodservice.watts.com
REPLACEMENT CARTRIDGE
HOT VALVE ASSEMBLY
MODEL LFFRRV-H
REPLACEMENT CARTRIDGE
COLD VALVE ASSEMBLY
MODEL LFFRRV-C
AVAILABLE PARTS INCLUDE:
PRE-RINSE BUTTON
VALVE ASSEMBLY
MODEL LFPRSH-BV
PROTECTION FOR LIFE
WARNING
!
Read this Manual BEFORE using this equipment.
Failure to read and follow all safety and use information can result in death,
serious personal injury, property damage, or damage to the equipment.
Keep this Manual for future reference.

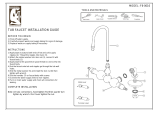
Typical Mounting Instructions For Workboard Faucets
For additional information on replacements parts,
please visit our website: foodservice.watts.com
GENERAL INSTRUCTIONS:
Most faucets are supplied with mounting hardware,
including ½" nipples. For installation instructions, we
will assume that hot and cold water supplies end in ½"
nipples. We recommend using a 1
1
/4" hole in the deck
or backsplash to accommodate the ½" supply nipples.
1. Turn off water supply at main source.
2. Hand-tighten all parts prior to tightening with wrench.
3. Do not force parts together.
4. All plated surfaces should be handled with care;
avoid scratching with tools.
5. Dimensions shown are for reference only and not to
be used for pre-plumbing.
6. Use teon tape or pipe joint compound when making
threaded connections to water supply lines.
INSTALLATION INSTRUCTIONS:
1. Rigid Spout: Thread into opening on faucet body and
tighten spout into body. Swivel Spout: Push swivel
spout into threaded opening on faucet body and tighten
spout nut to body.
2. Using plumber’s putty, run a thick bead of putty on the
underside of faucet body around perimeter and shanks.
3. Deck Mount: Insert faucet body into mounting holes in
deck. Back Splash: Insert faucet body into backsplash.
4. Using mounting kit provided, tighten faucet shanks to
deck or backsplash and scrape excess putty away
from body. Install mounting hardware in the following
order: rubber washer, metal lock washer, lock nut.
5. Connect water supply line to faucet shanks.
6. Turn on water supply and check for leaks.
FAUCET BODY
1/2” NPSM
MOUNTING KIT:
WASHER
LOCKING WASHER
LOCKING NUT
SPOUT NUT
MOUNTING KIT:
WASHER
LOCKING WASHER
LOCKING NUT
1/2” NPSM COUPLING NUT & SEAL
FOR 1/2” RIGID OR FLEXIBLE RISER
SPOUT NUT
FAUCET BODY
WARNING
!
Read this Manual BEFORE using this equipment.
Failure to read and follow all safety and use information can result in death,
serious personal injury, property damage, or damage to the equipment.
Keep this Manual for future reference.

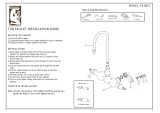
Typical Mounting Instructions For Pre-Rinse Assembly
1A. PRE-RINSE ASSEMBLY
WITH ADD-ON FAUCET
a. Turn off the water supply at
the source.
b. Apply pipe joint compound or
teon tape to threads on end of
short riser pipe attached to
add-on faucet. Thread riser
pipe into faucet body and tighten.
c. Apply pipe joint compound or
teon tape to threads on both
ends of riser pipe.Thread riser
pipe into add-on faucet body
and hand tighten.
1. PRE-RINSE ASSEMBLY
LESS ADD-ON FAUCET
a. Turn off the water supply at
the source.
b. Apply pipe joint compound or
teon tape to threads on both
ends of riser pipe. Thread
riser pipe into faucet body
and hand tighten.
RISER
PIPE
TEFLON TAPE
OR PIPE JOINT
COMPOUND
FAUCET BODY
2. ASSEMBLE SPRAY
HEAD HOOK TO RISER
Spread (open) clamp section
of hook so that it will slide
over riser without marking
nish of riser. Orient spray
head hook with hook facing
up and assemble to riser.
Place approximately one half
downlength of riser.
Do not tighten at this time.
RISER PIPE
CLAMP
SPRAY HEAD
HOOK
RISER
PIPE
ADD-ON
FAUCET
SHORT
RISER PIPE
FAUCET BODY
4. ASSEMBLE PRE-RINSE WITH GOOSENECK SPRING
a. Assemble spring retainer to riser pipe and tighten with wrench. This will also tighten riser pipe on faucet body.
b. Assemble hose to spring retainer. Ensure O-ring is in place inside of hose coupling prior to assembly.
(Refer to drawing #1 below). Additional O-rings are provided for future use. Tighten securely.
c. Assemble large coil spring over hose and onto spring retainer. IMPORTANT: Spring must be assembled
vertically with large curve of spring to the top.
d. Assemble spray head ring over spray head grip, and assemble spray head assembly to hose.
Tighten with wrench; ensure O-ring is in place prior to assembling. (Refer to drawing #2 below).
Note: Realign spray head hook on riser and tighten. Tighten all wall bracket screws.
Turn on water and check for leaks.
3. ASSEMBLE WALL BRACKET
Model No. PRA-WB
Determine correct length of support
rod from wall to riser pipe. Cut
rod to approximate size. Afx wall
bracket base securely to wall. Install
compression nut and bracket ferrule
and tighten securely.
NOTE: WALL BRACKET SHOULD BE LOCATED TOWARD TOP OF
RISER PIPE– AS CLOSE AS POSSIBLE TO SPRING RETAINER.
WALL
BRACKET BASE
COMPRESSION
NUT
FERRULE
SUPPORT
ROD
SPRING
RETAINER
RISER PIPE
CAUTION! MANUFACTURER RECOMMENDS THE
USE OF WALL BRACKET ASSEMBLY TO SECURE
RISER PIPE ON ALL PRE-RINSE ASSEMBLIES.
POSITIVE SEAL
O-RING
CONSTRUCTION
ELIMINATES NEED
FOR WASHERS
SPRING
RETAINER
STRAIN
RELIEF
SPRING
HOSE
COUPLING
LARGE COIL
SPRING
HOSE
SPRAY
HEAD RING
SPRAY HEAD
GRIP
BE SURE O-RING IS INSTALLED
FOR PROPER PERFORMANCE
(Extra O-rings are provided)
HOSE
COUPLING
GRIP
#1
#2
Dormont warrants to Buyer that Watts Hydro-Force™ commercial
foodservice products (the “Product”) will be free from defects in
material and workmanship for a period of two years from the date
of delivery to the Buyer. For items not manufactured by Dormont,
the only warranty extended is that of the manufacturer, if any. In the
event of defects within the warranty period, Dormont will replace the
Product or other items at Dormont’s expense (excluding labor and
freight charges).
To qualify for the warranty remedy stated above, you must obtain
return authorization from Dormont and return the defective Product
or other items in accordance with Dormont’s shipping instructions.
All defective returns shall be subject to Dormont’s inspection and
approval. This Product and any other items must be installed by
individuals trained and certified as professionals with respect to such
installation, and be installed, used, repaired and maintained by Buyer
in accordance with local codes or regulations, and standards set by
NSF. Any failure to observe these requirements shall void this Limited
Warranty. The Product and other items are warranted in conjunction
with the original installation or connection only. Buyer shall not assign
its rights under this Limited Warranty and any attempted assignment
shall render this warranty, but not any disclaimers or limitations, void.
THE WARRANTY SET FORTH HEREIN IS GIVEN EXPRESSLY AND IS
THE ONLY WARRANTY GIVEN BY DORMONT WITH RESPECT TO THE
PRODUCT. DORMONT MAKES NO OTHER WARRANTIES, EXPRESS
OR IMPLIED. DORMONT HEREBY SPECIFICALLY DISCLAIMS ALL
OTHER WARRANTIES, EXPRESS OR IMPLIED, INCLUDING BUT NOT
LIMITED TO THE IMPLIED WARRANTIES OF MERCHANTABILITY
AND FITNESS FOR A PARTICULAR PURPOSE.
The remedy described in the first paragraph of this Limited Warranty
shall constitute the sole and exclusive remedy for breach of warranty,
and Dormont shall not be responsible for any incidental, special or
consequential damages, including without limitation, lost profits or
the cost of repairing or replacing other property which is damaged if
the Product or other items do not work properly, other costs resulting
from labor charges, delays, vandalism, negligence, fouling caused by
foreign material, damage from adverse conditions, chemicals, or any
other circumstances over which Dormont has no control. This warranty
shall be invalidated by any abuse, misuse, misapplication, improper
installation, improper maintenance, alteration or repair of the Product
or items, damage caused by shipping or conformity of the Product to
local codes or regulations not previously made known to Dormont, or
other occurrences or conditions other than normal use .
Some States do not allow limitations on how long an implied warranty
lasts, and some States do not allow the exclusion or limitation of
incidental or consequential damages. Therefore the above limitations
may not apply to you. This Limited Warranty gives you specific legal
rights, and you may have other rights that vary from State to State.
You should consult applicable state laws to determine your rights.
SO FAR AS IS CONSISTENT WITH APPLICABLE STATE LAW, ANY
IMPLIED WARRANTIES THAT MAY NOT BE DISCLAIMED, INCLUDING
THE IMPLIED WARRANTIES OF MERCHANTABILITY AND FITNESS
FOR A PARTICULAR PURPOSE, ARE LIMITED IN DURATION TO ONE
YEAR FROM THE DATE OF ORIGINAL SHIPMENT.
LIMITED WARRANTY
WRONG
DIRECTION
CORRECT
DIRECTION
IOM-Hydro-Force 1810 © 2018 Watts
USA: T: (800) 367-6668 • F: (724) 733-4808 • foodservice.watts.com
Canada: T: (905) 332-4090 • F: (905) 332-7068 • foodservice.watts.com

IOM-Hydro-Force 1810 © 2018 Watts
USA: T: (800) 367-6668 • F: (724) 733-4808 • foodservice.watts.com
Canada: T: (905) 332-4090 • F: (905) 332-7068 • foodservice.watts.com
/