
GH GL 4-4.5 (GH GL40-4.5)
................................................ .............................................
EN GAS COOKER USER MANUAL

Electrolux. Thinking of you.
Share more of our thinking at www.electrolux.com
CONTENTS
Safety information 2
Safety instructions 3
Product description 6
Before first use 7
Hob - Daily Use 7
Oven - Daily Use 9
Hob - Helpful hints and tips 10
Oven - Helpful hints and tips 11
Cooking tables 12
Hob - Care and cleaning 16
Oven - Care and cleaning 17
What to do if… 20
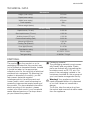
Technical data 21
Disposal 21
Garantie, Garanzia, Guarantee 22
Subject to change without notice.
SAFETY INFORMATION
Before the installation and use of the appliance, carefully read
the supplied instructions. The manufacturer is not responsible
if an incorrect installation and use causes injuries and dam-
ages. Always keep the instructions with the appliance for fu-
ture reference.
CHILDREN AND VULNERABLE PEOPLE SAFETY
Warning! Risk of suffocation, injury or permanent disability.
• This appliance can be used by children aged from 8 years
and above and persons with reduced physical, sensory or
mental capabilities or lack of experience and knowledge if
they are supervised by an adult or a person who is responsi-
ble for their safety.
• Do not let children play with the appliance.
• Keep all packaging away from children.
• Keep children and pets away from the appliance when it op-
erates or when it cools down. Accessible parts are hot.
• If the appliance has a child safety device, we recommend
that you activate it.
• Cleaning and user maintenance shall not be made by chil-
dren without supervision.
GENERAL SAFETY
• The appliance and its accessible parts become hot during
use. Do not touch the heating elements.
2 electrolux

• Do not operate the appliance by means of an external timer
or separate remote-control system.
• Unattended cooking on a hob with fat or oil can be danger-
ous and may result in fire.
• Never try to extinguish a fire with water, but switch off the
appliance and then cover flame e.g. with a lid or a fire blan-
ket.
• Do not store items on the cooking surfaces.
• Do not use a steam cleaner to clean the appliance.
• Metallic objects such as knives, forks, spoons and lids
should not be placed on the hob surface since they can get
hot.
• Do not use harsh abrasive cleaners or sharp metal scrapers
to clean the glass door since they can scratch the surface,
which may result in shattering of the glass.
• To remove the shelf supports first pull the front of the shelf
support and then the rear end away from the side walls. In-
stall the shelf supports in the opposite sequence.
SAFETY INSTRUCTIONS
This appliance is suitable for the following
markets:
CH
INSTALLATION
Warning! Only a qualified person must
install this appliance.
• Remove all the packaging.
• Do not install or use a damaged appli-
ance.
• Obey the installation instruction supplied
with the appliance.
• Always be careful when you move the
appliance because it is heavy. Always
wear safety gloves.
• Do not pull the appliance by the handle.
• Keep the minimum distance from the
other appliances and units.
• Make sure that the appliance is installed
below and adjacent safe structures.
• The sides of the appliance must stay ad-
jacent to appliances or to units with the
same height.
• Do not install the appliance on a platform.
• Do not install the appliance adjacent to a
door or under a window. This prevents
hot cookware to fall from the appliance
when the door or the window is opened.
Electrical connection
Warning! Risk of fire and electrical
shock.
• All electrical connections should be made
by a qualified electrician.
• The appliance must be earthed.
• Make sure that the electrical information
on the rating plate agrees with the power
supply. If not, contact an electrician.
• Always use a correctly installed shock-
proof socket.
• Do not use multi-plug adapters and ex-
tension cables.
• Make sure not to cause damage to the
mains plug and to the mains cable. Con-
tact the Service or an electrician to
change a damaged mains cable.
electrolux 3

• Do not let mains cables to come in touch
with the appliance door, specially when
the door is hot.
• The shock protection of live and insulated
parts must be fastened in such a way
that it cannot be removed without tools.
• Connect the mains plug to the mains
socket only at the end of the installation.
Make sure that there is access to the
mains plug after the installation.
• If the mains socket is loose, do not con-
nect the mains plug.
• Do not pull the mains cable to disconnect
the appliance. Always pull the mains
plug.
• Use only correct isolation devices: line
protecting cut-outs, fuses (screw type
fuses removed from the holder), earth
leakage trips and contactors.
• The electrical installation must have an
isolation device which lets you discon-
nect the appliance from the mains at all
poles. The isolation device must have a
contact opening width of minimum 3
mm.
Gas connection
• All gas connections should be made by a
qualified person.
• Make sure that there is air circulation
around the appliance.
• The information about the gas supply is
on the rating plate.
• This appliance is not connected to a de-
vice, which evacuates the products of
combustion. Make sure to connect the
appliance according to current installation
regulations. Pay attention to require-
ments regarding adequate ventilation.
USE
Warning! Risk of injury, burns or
electric shock.
• Use this appliance in a household envi-
ronment.
• Do not change the specification of this
appliance.
• Make sure that the ventilation openings
are not blocked.
• Do not let the appliance stay unattended
during operation.
• Deactivate the appliance after each use.
• Internally the appliance becomes hot
when in operation. Do not touch the
heating elements that are in the appli-
ance. Always use oven gloves to remove
or put in oven accessories or ovenware.
• Be careful, when you open the appliance
door while the appliance is in operation.
Hot air can release.
• Do not operate the appliance with wet
hands or when it has contact with water.
• Do not apply pressure on the open door.
• Always keep the appliance door closed
when the appliance is in operation.
• Do not put cutlery or saucepan lids on
the cooking zones. They become hot.
• Set the cooking zone to “off” after use.
• Do not use the appliance as a work sur-
face or as a storage surface.
• Provide good ventilation in the room
where the appliance is installed.
• Use only stable cookware with the cor-
rect shape and diameter larger than the
dimensions of the burners.
• Make sure the flame does not go out
when you quickly turn the knob from the
maximum to the minimum position.
• Make sure pots are centrally positioned
on the rings and do not stick out over
edges of the cooking surface.
• Use only the accessories supplied with
the appliance.
• Do not install a flame diffuser on the
burner.
Warning! Risk of fire or explosion.
• Fats and oil when heated can release
flammable vapours. Keep flames or heat-
ed objects away from fats and oils when
you cook with them.
• The vapours that very hot oil releases can
cause spontaneous combustion.
• Used oil, that can contain food remnants,
can cause fire at a lower temperature
than oil used for the first time.
• Do not put flammable products or items
that are wet with flammable products in,
near or on the appliance.
• Do not let sparks or open flames to come
in contact with the appliance when you
open the door.
• Open the appliance door carefully. The
use of ingredients with alcohol can cause
a mixture of alcohol and air.
4 electrolux

Warning! Risk of damage to the
appliance.
• To prevent damage or discoloration to
the enamel:
– do not put ovenware or other objects
in the appliance directly on the bottom.
– do not put aluminium foil directly on
the bottom of the appliance.
– do not put water directly into the hot
appliance.
– do not keep moist dishes and food in
the appliance after you finish the cook-
ing.
– be careful when you remove or install
the accessories.
• Discoloration of the enamel has no effect
on the performance of the appliance. It is
not a defect in the sense of the warranty
law.
• Use a deep baking tray for moist cakes.
Fruit juices cause stains that can be per-
manent.
• Do not keep hot cookware on the control
panel.
• Do not let cookware to boil dry.
• Be careful not to let objects or cookware
fall on the appliance. The surface can be
damaged.
• Do not activate the cooking zones with
empty cookware or without cookware.
• Do not put aluminium foil on the appli-
ance.
• Cookware made of cast iron, aluminium
or with a damaged bottom can cause
scratches on the glass ceramic. Always
lift these objects up when you have to
move them on the cooking surface.
• Provide good ventilation in the room
where the appliance is installed.
• Make sure that the ventilation openings
are not blocked.
• Use only stable cookware with the cor-
rect shape and diameter larger than the
dimensions of the burners. There is a risk
of overheating and rupture of the glass
plate (if applicable).
• Make sure the flame does not go out
when you quickly turn the knob from the
maximum to the minimum position.
• Make sure pots are centrally positioned
on the rings and do not stick out over
edges of the cooking surface.
• Use only the accessories supplied with
the appliance.
• Do not install a flame diffuser on the
burner.
CARE AND CLEANING
Warning! Risk of injury, fire or damage
to the appliance.
• Before maintenance, deactivate the ap-
pliance and disconnect the mains plug
from the mains socket.
• Make sure the appliance is cold. There is
the risk that the glass panels can break.
• Replace immediately the door glass pan-
els when they are damaged. Contact the
Service.
• Be careful when you remove the door
from the appliance. The door is heavy!
• Clean regularly the appliance to prevent
the deterioration of the surface material.
• Remaining fat or food in the appliance
can cause fire.
• Clean the appliance with a moist soft
cloth. Only use neutral detergents. Do
not use abrasive products, abrasive
cleaning pads, solvents or metal objects.
• If you use an oven spray, obey the safety
instructions on the packaging.
• Do not clean the catalytic enamel (if ap-
plicable) with any kind of detergent.
• Do not clean the burners in the dish-
washer.
INTERNAL LIGHT
• The type of light bulb or halogen lamp
used for this appliance, is only for house-
hold appliances. Do not use it for house
lighting.
Warning! Risk of electrical shock.
• Before replacing the lamp, disconnect
the appliance from the power supply.
• Only use lamps with the same specifica-
tions.
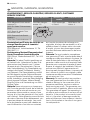
DISPOSAL
Warning! Risk of injury or suffocation.
• Contact your municipal authority for infor-
mation on how to discard the appliance
correctly.
electrolux 5

• Disconnect the appliance from the mains
supply.
• Cut off the mains cable and discard it.
• Flat the external gas pipes.
• Remove the door catch to prevent chil-
dren and pets to get closed in the appli-
ance
SERVICE
• Contact the Service to repair the appli-
ance. We recommend only the use of
original spare parts.
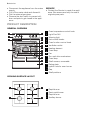
PRODUCT DESCRIPTION
GENERAL OVERVIEW
4
5
6
8
9
10
7
11
14
15
16
1
2
3
5
4
3
2
1
13
12
1
Oven temperature control knob
2
Light/Fan/Grill
3
Warning light
4
Hob control knobs
5
Oven function control knob
6
Ventilation outlet
7
Heating element
8
Oven lamp
9
Fan
10
Turn spit drive mechanism
11
Oven lamp
12
Shelf runners, removable
13
Rating plate
14
Ignition hole for oven burner
15
Flap
16
Shelf positions
COOKING SURFACE LAYOUT
3
1
41
2
1
Rapid burner
2
Semi-rapid burner
3
Rapid burner
4
Auxiliary burner
6 electrolux

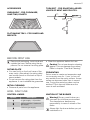
ACCESSORIES
OVEN SHELF - FOR COOKWARE,
CAKE TINS, ROASTS.
FLAT BAKING TRAY - FOR CAKES AND
BISCUITS.
TURN SPIT - FOR ROASTING LARGER
JOINTS OF MEAT AND POULTRY.
BEFORE FIRST USE
Remove all packaging, both inside and
outside the oven, before using the ap-
pliance. Do not remove the rating plate.
RATING PLATE
• You can find it on the front frame of the
oven cavity. Alternatively the rating plate
can be also found on the back or top of
some models.
• Do not remove the rating plate from the
appliance. It can invalidate the guarantee.
INITIAL CLEANING
• Remove all parts from the appliance.
• Clean the appliance before first use.
Caution! Do not use abrasive cleaning
agents! This can damage the surface.
Refer to chapter "Care and Cleaning".
PREHEATING
Set an oven to maximum temperature and
run an empty oven for 1 hour, to burn off
any residue from the cavity surface. Acces-
sories can become hotter than in normal
use. During this period an odour can be
emitted. This is normal. Make sure the
room is well ventilated.
HOB - DAILY USE
CONTROL KNOBS
Symbol Description
no gas supply / off position
ignition position / maximum
gas supply
minimum gas supply
IGNITION OF THE BURNER
Warning! Be very careful when you
use open fire in kitchen environment.
The manufacturer declines any
responsibility in case of misuse of the
flame.
Always light the burner before you put
cookware on it.
electrolux 7

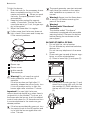
To light the burner:
1. Push the knob for the necessary burner
down completely and turn it to the
maximum position
. When you push
the knob, the spark generator starts
automatically.
2. Keep the knob pushed for approxi-
mately 10 seconds. This lets the ther-
mocouple warm up. If not, the gas sup-
ply is interrupted.
3. Adjust the flame after it is regular.
If after some tries the burner does not
light, check if the crown and its cap are
in the correct positions.
1
2
3
4
1
Burner cap
2
Burner crown
3
Ignition candle
4
Thermocouple
Warning! Do not keep the control
knob pushed for more than 15
seconds.
If the burner does not light after 15
seconds, release the control knob, turn
it into off position and try to light the
burner again after minimum 1 minute.
Important! You can light the burner
without electrical device (e.g. when there is
no electricity in the kitchen). To do so, put
the flame near the burner, push the related
control knob down for 10 seconds and turn
it counterclockwise to the maximum gas
release position.
If the burner accidentally goes out, turn
the control knob to the off position and
try to light the burner again after mini-
mum 1 minute.
The spark generator can start automat-
ically when you switch on the mains,
after installation or a power cut. It is
normal.
Warning! Always turn the flame down
or switch it off before removing the
pans off the burner.
Warning!
Cooking with "Durotherm"
cookware
The double-walled "Durotherm"
cookware is equipped with removable
warming bottom. Remove the bottom
before placing the cookware on the
pan support.
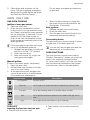
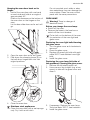
IN CASE OF SMELL OF GAS:
1. Do not light fire, do not smoke.
Do not activate any electrical switches,
devices, etc.
Do not use any telephone in the same
house.
2. Close main gas tap and all burner regu-
lators, no other manipulations!
A) Press in lower flap (1) and open (2):
1
2
A
B) Inside press in main gas tap (1) and
close it by turning right until you feel
the resistant (2). Both indicators on
the tap will turn from green into red
(3):
B
2
1
3
8 electrolux

3. Open doors and windows, air the
room. Call gas supplying emergency
service from outside the house (possi-
bly Electrolux Service Center).
Do not alarm occupants by telephone
or door bell.
OVEN - DAILY USE
GAS OVEN COOKING
Ignition of oven gas burner:
1. Open the oven door.
2. Push the oven temperature control
knob and turn it to the maximum posi-
tion. Keep it pushed for some seconds,
but no more than 15 seconds. Do not
release it until the flame comes on.
Push of the oven temperature control
knob causes automatically start of the
spark generator.
If the oven gas burner does not come
on or if it accidentally goes out:
1. Release the gas oven control knob
and turn it to the “ Off“ position.
2. Open the oven door.
3. After one minute, try to light the
oven gas burner again.
Manual ignition:
If there is no power supply, temporarily.
1. Open the oven door.
2. Hold a flame near the hole in the bot-
tom of the oven cavity.
3. At the same time push the gas oven
control knob and turn it anticlockwise
to the maximum temperature.
4. When the flame comes on, keep the
gas oven control knob pushed for ap-
proximately 15 seconds.
After ignition:
1. Release the gas oven control knob.
2. Close the oven door.
3. Turn the gas oven control knob to the
necessary temperature setting.
Oven safety device:
The gas oven has a thermocouple. It stops
the gas flow, if the flame goes out.
You can not use the gas oven and the
electrical grill at the same time.
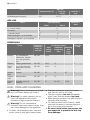
OVEN FUNCTIONS
The oven function control knob (refer to
"Product Description") allows you to set the
oven to the required cooking function.
To set an oven function, turn the oven func-
tion control knob clockwise to the symbol
of the function (refer to the table below).
Oven function Description
OFF position The oven is OFF.
Oven fan Use to roast or to roast and bake simultaneously with any shelf.
Turn spit Use to spit roasting meat or for smaller pieces of meat.
Grill Use to grill flat food items placed in the middle of the grill and to
toast.
Light Use to light up the oven interior, e.g. for cleaning.
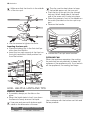
TURN SPIT
Inserting the food into the turn spit:
• Place a fork on the turn spit.
• Then position the food and a second
fork.
electrolux 9

Make sure that the food is in the middle
of the turn spit.
• Use the screws to tighten the forks.
Inserting the turn spit:
• Place the baking tray in the first shelf po-
sition from the bottom.
• Insert the turn spit support at the front on
the right-hand side in shelf position five
from the bottom.
The clip must be kept down to keep
the handle secure on the turn spit.
• Push the tip of the spit into the turnspit
hole on the left-hand side of the back
wall of the oven until it locks into place.
• Place the groove in front of the handle on
the notch provided on the turn spit sup-
port.
• Remove the handle.
1
3
5
• Choose the Turn spit oven function.
COOLING FAN
When the appliance operates, the cooling
fan switches on automatically to keep the
surfaces of the appliance cool. If you switch
off the appliance, the cooling fan stops.
HOB - HELPFUL HINTS AND TIPS
ENERGY SAVINGS
• If possible, always put the lids on the
pans.
• When the liquid starts to boil, turn down
the flame to barely simmer the liquid.
Use pots and pans with bottom appli-
cable to the dimension of burner.
Burner Diameters of cookware
Rapid 140 mm - 200 mm
Burner Diameters of cookware
Semi-rapid 100 mm - 180 mm
Auxiliary 100 mm - 160 mm
Use cookware with the bottom as thick and
flat as possible.
10 electrolux

OVEN - HELPFUL HINTS AND TIPS
Warning! Always close the oven door
when you cook, even while grilling.
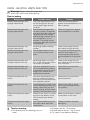
Tips for baking
Baking result Possible cause Remedy
Bread/yeasted doughs and
sponge cakes fall flat.
If the oven temperature is too
low, the dough can rise and
then go down again and be-
come flat.
Check the set temperature
against recommendations in ta-
bles or recipes.
Bread/yeasted doughs and
sponge cakes fall flat.
Bread/yeasted doughs have
not risen properly. Excessively
long rising time after rolling out
can give a flat result. Bread/
yeasted doughs should rise at
room temperature, out of
draughts. The dough should
spring back after light pressure
on the surface.
Check the rising times against
recommendations in recipes.
Bread/yeasted doughs and
sponge cakes fall flat.
Not enough yeast or baking
powder.
Check in the recipe that you
have taken the right amount.
Bread/yeasted doughs and
sponge cakes fall flat.
If the fat/liquid mixture is too
hot, it ruins the effect of the
yeast.
The correct temperature of the
liquid for fresh yeast is 37°,
concerning dry yeast see the
recommendations on the pack-
et.
Bread/yeasted doughs and
sponge cakes turn out dry.
Not enough liquid, too much
flour, or the wrong type of flour
can result in dry bread.
Check in the recipe that you
have taken the right amounts of
flour and liquid.
Bread/yeasted doughs and
sponge cakes turn out dry.
If the oven temperature is too
low, the material being baked
must remain in the oven much
longer to be cooked, and it
therefore becomes dry.
Check that you have set the
right temperature.
Cakes/oven dishes are too
brown.
If the oven temperature is too
high, the cakes/oven dishes
become too brown before they
are completely cooked.
Check that you have set the
right temperature.
Cakes/oven dishes are too
brown.
Food positioned too high in the
oven is receiving too much top
heating, when using top and
bottom heating, and the oppo-
site effect when placed too low.
Check in the table or recipe
that you have chosen the cor-
rect position.
Cakes/oven dishes are pale in
colour.
Aluminium foil, a tray or a roast-
ing pan on the bottom of the
oven is blocking the bottom
heating.
Make sure that there is nothing
in the bottom of the oven.
Cakes/oven dishes are pale in
colour.
Light-coloured baking tins pro-
duce paler cakes than dark-
coloured tins.
Change to darker-coloured
baking tins.
Tips for roasting:
• Put baking tray as dripping tray on 1
level.
• Preheat oven for 10 minutes.
• Specifications are for 1 kg of food.
• Fry meat in pan before roasting.
electrolux 11

Tips for grilling:
• Put baking tray as drip tray on top
level.
• Preheat oven for 3 minutes.
• Grilling times are given on each side:
Side 1 / Side 2
Tips for preserving:
• Tray must be on lowest level!
• There must be a gap between the
glassware.
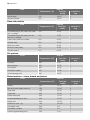
COOKING TABLES
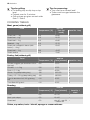
Meat, game (without grill)
Food with fan
Temperature [°C] Time [mi-
nutes]
Level for 1 tray
Roast pork – 1 kg 210 80-90 2
Roast veal – 1 kg 210 60-70 3
Roast beef – 1 kg 210 80-90 2
Meatloaf – 1 kg 210 55-70 2
Roast pork wrapped in bacon (with
bacon) – 1.2 kg
210 55-65 2
Roast beef – 1 kg 240 18-25 2
Roast venison 210 70-80 2
Poultry, fish (without grill)
Food with fan
Temperature [°C] Time [minutes] Level for 1 tray
Chicken nuggets (put aluminium foil on
the tray!)
255 13-15 3
Chicken, 1 – 1.2 kg 230 45-55 2
Duck, 1.5 – 2 kg 200 80-90 2
Goose, 3 kg (deep baking tray) 190 100-120 2
Turkey, 4.5 – 5.5 kg (deep baking tray) 180 190-220 2
Trout in aluminium foil, 300 g (strong
foil)
210 20-25 3
Trout filets 200 g each 210 20-25 2
Roasting
Food with fan
Temperature [°C] Time [minutes] Level for 1
shelf
Lamb 150 90-110 1
Veal / pork chops 150 80-100 1
Roast beef 150 blue 45 – rare 50
– medium 60
1
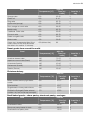
Cakes, cup cakes, tarts – biscuit, sponge or cream mixtures
12 electrolux

Food with fan
Temperature [°C] Time [mi-
nutes]
Level for 1
tray
Sponge cake 200 25-30 3
Swiss roll 230 8-10 4
Ring cake 190 65-70 2
Apple cake (sponge) 200 50-60 2
Rum, orange or carrot cake 220 20-25 3
Marble cake 200 65-70 2
Traditional Tiroler cake 200 55-65 2
Coconut cake 190 60-70 3
Sweet courgette cake 200 50-60 3
Walnut cake 190 50-60 3
Cream tart / cheesecake (after 90 mi-
nutes, switch off the oven and leave
the cake in for another 10 minutes)
180 (without fan) 90 3
Sweet goods from around the world
Food with fan
Temperature [°C] Time [mi-
nutes]
Level for 1
tray
American banana cake 190 70-75 2
Itaparica coconut cake (Brazil) 190 50-60 3
Linzertorte (Austria) 190 40-45 3
Sachertorte (Austria) 190 70-75 3
Savarin (France) 190 25-30 3
Christmas bakery
Food with fan
Temperature [°C] Time [mi-
nutes]
Level for 1
tray
Milano cookies and any light butter
cookie
200 10-15 3
Dried cookies 160 13-17 3
Gingerbread or honey cake mixture 200 12-18 3
Chräbeli or Springerli (Swiss anissed
cookies - dry out on the tray overnight)
170 15-20 3
Small baked goods – choux pastry, shortcrust pastry, meringue
Food with fan
Temperature [°C] Time [mi-
nutes]
Level for 1
tray
Small baked cakes 220 30-40 3
Shortcrust pastry bases for tarts 200 20-25 3
Small shortcrust pastry tarts 200 15-20 3
electrolux 13

Food with fan
Temperature [°C] Time [mi-
nutes]
Level for 1
tray
Bird’s nests 190 20-25 3
Almond cookies 230 20-25 3
Flans and pastries
Food with fan
Temperature [°C] Time [mi-
nutes]
Level for 1
tray
Crumbled dough, filo pastry with fresh
fruit + custard
230 40-50 3
Crumbled dough, filo pastry with fro-
zen fruit + custard
230 45-55 3
French flans (without custard) 230 30-35 3
Cheese flans 220 35-45 2
Mushroom flans 240 30-35 3
Broccoli / leek pastry 210 40-50 3
Surprise pastry 210 40-45 3
Filo pastries
Food with fan
Temperature [°C] Time [mi-
nutes]
Level for 1
tray
Canapés 220 8-15 3
Ham pastries 230 20-25 3
Filo parcels 230 18-20 3
Pork filet in pastry 220 35-45 3
Small sausage rolls 230 22-25 3
Raised pastries – cakes, breads and pizzas
Food with fan
Temperature [°C] Time [mi-
nutes]
Level for 1
tray
Savarin 200 34-40 3
Bee sting cake (deep cake tin) 190 20-25 4
Ring cake 190 45-50 2
Yeast plait 220 25-35 3
Swiss bread rolls 220 15-20 3
Loaves depending on size 220 40-50 3
Bread rolls 230 20-25 3
Swiss ham rolls 1 kg 190 90-100 2
Frischback rolls 250 4-6 3
Frischback cookies 250 3-5 3
Pizzas (original baking tray) 250 9-12 1
14 electrolux

Food with fan
Temperature [°C] Time [mi-
nutes]
Level for 1
tray
Pizzas (fire clay trivet – preheat for 20
minutes)
250 9-12 1
Toast, bakes, gratins
Food with fan
Temperature [°C] Time [mi-
nutes]
Level for 1
tray
Hawaii toast 255 10-14 2
Mushroom toast 255 10-14 2
Noodle casserole 220 40-50 2
Cherry soufflé (2 l tin) 220 35-45 2
Potato gratin 220 50-60 1
Tomatoes with cheese topping 220 25-30 3
Baked alaska 255 2-3 3
Vegetables, rice, corn – as side dishes
Food with fan
Temperature [°C] Time [mi-
nutes]
Level for 1
tray
Corn, covered 220 30-35 2
Rice, covered 220 25-30 2
Oven chips (par-boiled) 230 30-40 2
Oven chips (raw) 230 35-40 3
Oven potatoes / roast potatoes 230 30-40 3
Duchess potatoes 230 20-25 3
Swiss specialities
Food with fan
Temperature [°C] Time [mi-
nutes]
Level for 1
tray
Prättigauer Pitte (Grisons) 190 30-35 3
Pear bread (eastern Switzerland) 210 45-50 3
Carrot cake (Aargau) 190 40-45 3
Pie (Glarn valley) 210 32-38 3
Spice bread 190 18-20 3
Spicy goods from around the world
Food with fan
Temperature [°C] Time [mi-
nutes]
Level for 1
tray
Musaka (Greece) 200 40-50 2
Lasagne (Italy) 210 45-55 2
electrolux 15

Food with fan
Temperature [°C] Time [mi-
nutes]
Level for 1
tray
Stuffed pepper (Hungary) 210 65-75 2
GRILLING
Food Time [minutes] Level for 1
shelf
Side 1 Side 2
2 - 4 pork cutlets 9 8 4
Filet steak 6 5 5
1 chicken halves 17 16 2
Grilled sausages – up to 6 pieces 6 4 4
Sausages in spirals – up to 4 pieces 9 6 4
PRESERVING
Food Preserving
tempera-
ture [°C]
with fan
Preserving times Level for
1 tray
Until
boiling
starts
Additional
preserving
time
Standing
time
(oven
OFF)
Berries e.g. strawberries,
blueberries, raspber-
ries, ripe gooseber-
ries
180-190 35-45 - - 1
Berries Unripe gooseberries 180-190 35-45 15 - 1
Stone
fruits
e.g. fruits with hard
peel pears, quinces,
plums
180-190 35-45 15 - 1
Vegeta-
bles
Carrots 180-190 50 15 60 1
Vegeta-
bles
Mixed pickles 180-190 50 15 - 1
Vegeta-
bles
Kohlrabi, peas, as-
paragus
180-190 50 80-120 45-60 1
HOB - CARE AND CLEANING
Warning! Switch the appliance off and
let it cool down before you clean it.
Warning! For safety reasons, do not
clean the appliance with steam
cleaners or high-pressure cleaners.
Warning! Do not use abrasive
cleaners, steel wool pads or acids, they
can cause damage to the appliance.
• To clean the enamelled parts, cap and
crown, wash it with warm soapy water.
• Stainless steel parts wash with water,
and then dry with a soft cloth.
• The pan supports are not dishwasher
proof; they must be washed by hand.
• Make sure you position the pan supports
correctly after cleaning.
• To make burners work correctly, make
sure that the arms of the pan supports
are in the centre of the burner.
•
Be very careful when you replace the
pan supports to prevent the hob top
from damage.
16 electrolux

You can remove the pan supports to easily
clean the hob. After cleaning the hob, make
sure the pan supports are correctly posi-
tioned. Pay attention when you replace the
pan supports to prevent the glass hob top
from scratching. When you wash the pan
supports by hand, take care when you dry
them as the enamelling process occasional-
ly leaves rough edges. If necessary, remove
stubborn stains using a paste cleaner.
After cleaning, dry the appliance with a soft
cloth.
Scratches or dark stains on the glass
ceramic have no effect on how the ap-
pliance operates.
Removing the dirt:
1. – Remove immediately: melting plas-
tic, plastic foil, and food containing
sugar. Use a special glass ceramic
scraper. Put the scraper on the glass
ceramic surface at an acute angle
and slide the blade on the surface.
–
Stop the appliance and let it cool
down before you clean: limescale
rings, water rings, fat stains, shiny
metallic discolorations. Use a special
cleaner for glass ceramic or stainless
steel.
2. Clean the appliance with a damp cloth
and some detergent. The pan supports
are not dishwasher proof; they must
be washed by hand. After cleaning,
make sure that the pan supports are
correctly positioned.
3. At the end rub the appliance dry
with a clean cloth.
PERIODIC MAINTENANCE
Periodically speak your local Service Force
Centre to check the conditions of the gas
supply pipe and the pressure adjuster, if fit-
ted.
OVEN - CARE AND CLEANING
• Clean the front of the appliance with a
soft cloth with warm water and cleaning
agent.
• To clean metal surfaces use a usual
cleaning agent
• Clean the oven interior after each use.
Thus you can remove dirt more easily
and it does not burn on.
• Clean stubborn dirt with a special oven
cleaner.
• Clean all oven accessories (with a soft
cloth with warm water and cleaning
agent) after each use and let them dry.
• If you have nonstick accessories, do not
clean them using an aggressive agents,
sharp edged objects or dishwasher. It
can destroy nonstick coating!
CATALYTIC WALLS AND ROOF
The walls and the roof with a catalytic coat-
ing are self-cleaning. They absorb fat which
collects on walls while the oven operates.
To support this self-cleaning process
heat the oven without any food
regularly:
• Turn the oven light on.
• Remove accessories from the oven.
• Select an oven function.
• Set the oven temperature to 250 °C and
let oven operate for 1 hour.
• Clean the oven cavity with a soft and
damp sponge.
Warning! Do not attempt to clean
catalytic surface with oven sprays,
abrasive cleaners, soap or other
cleaning agents. This will damage the
catalytic surface.
electrolux 17

Discolouration of the catalytic surface
has no effect on catalytic properties.
SHELF SUPPORT RAILS
Removing the shelf support rails
1. Pull the front of the shelf support rail
away from the side wall.
2. Pull the rear shelf support rail away
from the side wall and remove it.
Installing the shelf support rails
Install the shelf support rails in opposite se-
quence.
The rounded ends of the shelf support
rails must point to the front!
REMOVING THE HEATING ELEMENT
You can remove the heating element to
clean the oven cavity. In this case proceed
as follows for possible cleaning actions:
Warning! Ensure that the oven has
cooled down sufficiently so that you
can touch heating elements safely!
There is a risk of burns!
1. Hold the heat element with two hands
at the front.
2. Pull the heating element out of the plug
connection to the front.
3. Reassembly in reverse order. Make
sure the heating element has a
good fit in the connecting socket
when inserting.
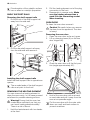
OVEN DOOR
To clean the oven door remove it.
Caution! Be careful when you remove
the door from the appliance. The door
is heavy!
Removing the oven door
1. Open the oven door as far as it goes.
2. Lift up clamping levers (A) on the two
door hinges fully.
A
A
3. Close the oven door until the first posi-
tion (angle approximately 45°).
45°
4. Hold of the oven door with one hand
on each side and pull it away from the
oven at an upwards angle.
Put the oven door with the outer side
down on a soft and level surface to
prevent scratches.
18 electrolux

Hanging the oven door back on its
hinges
1. Hold of the oven door with one hand
on each side and hold at an angle of
approximately 45°.
Position the recesses on the bottom of
the oven door on the hinges on the
oven.
Let the door slide down as far as it will
go.
2. Open the oven door as far as it goes.
3. Fold down the clamping levers (A) on
the both door hinges back into their
original positions.
A
4. Close the oven door.
Stainless steel appliances:
Clean the oven door with a wet sponge
only. Dry it with a soft cloth.
Do not use steel wool, acids or abra-
sive materials as they can damage the
oven surface. Clean the oven control
panel with the same precautions
OVEN LAMP
Warning! There is a danger of
electrical shock!
Before you change the oven lamp:
• Switch off the oven.
• Remove the fuses in the fuse box or
switch off the circuit breaker.
Put a cloth on the bottom of the oven
for protection of the oven light and
glass cover.
Replacing the oven light bulb/cleaning
the glass cover
1. Turn the glass cover anti-clockwise to
remove it.
2. Clean the glass cover.
3. Replace the oven light bulb with appli-
cable 300°C heat-resistant oven light
bulb.
4. Install the glass cover.
Replacing the oven lamp (left side of
the appliance) Cleaning the glass cover
1. Remove the left shelf support rail.
2. Use a narrow, blunt object (e.g. a tea-
spoon) to take off the glass cover and
clean it.
3. If necessary: Replace the oven lamp.
Technical data: 300°C, heat resistant.
4. Install the glass cover.
electrolux 19

5. Install the left shelf support rail.
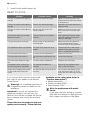
WHAT TO DO IF…
Problem Possible cause Remedy
There is no spark when lighting
the gas
There is no electrical supply Make sure that the unit is con-
nected and the electrical supply
is switched on.
There is no spark when lighting
the gas
There is no electrical supply Examine the house electrical in-
stallation fuse.
There is no spark when lighting
the gas
Burner cap and crown are
placed uneven
Make sure that the burner cap
and crown are in correct posi-
tions.
The flame is blow out immedi-
ately after ignition
Thermocouple is not heated
sufficient
After lightning the flame, keep
the knob pushed for approxi-
mately 5 seconds.
The gas ring burns unevenly Burner crown is blocked with
food residues
Make sure that the injector is
not blocked and the burner
crown is clear of food particles.
The appliance does not operate The fuse in the fuse box is re-
leased
Control the fuse. If the fuse is
released more than one time,
refer to a qualified electrician.
The oven does not heat up The oven is not switched on Switch on the oven
The oven does not heat up The necessary settings are not
set
Control the settings
The oven lamp does not oper-
ate
The oven lamp is defective Replace the oven lamp
Overheated oven cooling sys-
tem (warning lamp operates)
The internal ventilation is
blocked
Switch off the appliance and
refer to Service Centre
Steam and condensation settle
on the food and in the oven
cavity
You left the dish in the oven for
too long
Do not leave the dishes in the
oven for longer than 15-20 mi-
nutes after the cooking process
ends
If you can not find a solution to the prob-
lem, refer to your dealer or the Service
Force Centre.
Warning! Let a qualified electrician or
competent person do repairs to the
appliance.
Important! If you do not operate the
appliance correctly, the visit from the
Service Force Centre or dealer will not be
free of charge, even during the warranty
period.
These data are necessary to help you
quickly and correctly. These data are
available on the rating plate (refer to
"Product description")
• Model description ............
• Product number (PNC) ............
• Serial number (S.N.) ............
Hints for appliances with metal
fronts:
If you open the door during or immedi-
ately after the baking or roasting proce-
dure, steam can show on the glass.
20 electrolux
Page is loading ...
Page is loading ...
Page is loading ...
Page is loading ...
-
 1
1
-
 2
2
-
 3
3
-
 4
4
-
 5
5
-
 6
6
-
 7
7
-
 8
8
-
 9
9
-
 10
10
-
 11
11
-
 12
12
-
 13
13
-
 14
14
-
 15
15
-
 16
16
-
 17
17
-
 18
18
-
 19
19
-
 20
20
-
 21
21
-
 22
22
-
 23
23
-
 24
24


Ask a question and I''ll find the answer in the document
Finding information in a document is now easier with AI
Related papers
-
Electrolux GHGL4045SP User manual
-
Electrolux GHL245SW User manual
-
-
-
Electrolux GHL345WE User manual
-
-
Electrolux EKM6130AOW User manual
-
-
-
