Page is loading ...

NetbridgeUHD_manual_EN_181015b.doc
digital audio
format
bridging system
4Quadrant 3G-SDI to MADI and AoIP bridging
Netbridge UHD
Netbridge UHD is an advanced interface for simple and fast bridging between Audio-over-IP (AES67 &
Dante™), MADI and 3G-SDI infrastructures, supporting four quadrant UHD.
With its 64 channel MADI and AoIP interface and the possibility to embed and de-embed up to 64 SDI audio
channels, it may handle up to 192 audio channels in total.
Features
• Interface for AoIP (AES67 or Dante
TM
)
• Two AoIP twork ports for redundant or switch operation
• Dual MADI I/O connection
• Dual AES3id MADI receiver and transmitter
• Word length 24bit
• Extended mode (64ch)
• 64 channel bridging between MADI and AoIP network
• 16 channel bridging between each SDI interface and MADI and AoIP network
• 128 channel shuffling inside the Netbridge AoIP network
• One or four 3G-SDI interfaces for HD and UHD operation
•
Built in 3G-SDI video delay for lip-sync compensation for immersive audio
processing for all four quadrants
General Remarks
Internally the Netbridge is built from c8k system components.
I.e. 3G-SDI interfaces, the MADI and AoIP interface and a frame controller. It provides internal
communications and a web server to set up the components. You can open the GUI by using the IP
address of the frame controller as an URL.
Important Note! For Information on how to setup the IP configuration of the frame controller, pls. refer to the
manual of the C8702 in the addendum.
The 19" frame has an audio bus system to route signals between the components. You can send signals
from the SDI de-embedder to the bus and receive signals from the bus to embed them into SDI. Similar
applies to the signals from and to the MADI interface as well as the AoIP interface.

digital audio
format
bridging system
Netbridge UHD
4Quadrant 3G-SDI to MADI and AoIP bridging
2/5
The transport of audio signals via the back plane must be synchronized to a reference clock provided by
the clock master. The clockmaster must be selected via a hardware switch of either one of the SDI
components or the AoIP component.
Important Note! You must observe the front panel MASTER LEDs to see which component provides the
master clock for the Netbridge UHD. By default the SDI interface dedicated to the first UHD quadrant is set
up for clock master. Please get in touch with the Jünger Audio support team for further instructions if you are
not sure how to change the sync master.
All AoIP related parameters and AoIP routing are accessed via Audinates Dante
TM
Controller
software. Please download Audinates Dante
TM
Controller from:
https://audinate.com/products/software/dante-controller
Install and run the software to configure your Dante
TM
network.
The AoIP interface automatically switches sync to the selected master clock, whenever the Dante
TM
interface is allowed to sync from external. This configuration can be found in the Dante
TM
Controller under
the ‘Clock Status’ tab:
External means a sync source that may either be the SDI interface or the MADI port.
The routing inside the Netbridge UHD is done via the GUI, presented by the built-in web server.
Important Note! The Netbridge UHD is set up for a default routing at the factory.
All 16 channels from each of the four SDI interfaces are sent to the back plane busses via 8ch mux mode.
SDI Q1 > Bus 1,2 / SDI Q2 > Bus 3,4 and so forth. The AoIP intreface pics up these signals and puts it on the
AoIP network. From the AoIP interface 64 channels are routet to the SDi embedders of the four SDI modules.
I parallel the audio chennels of the SDI embedders are sent to the MADI intreface.

digital audio
format
bridging system
Netbridge UHD
4Quadrant 3G-SDI to MADI and AoIP bridging
3/5
Technical Specifications – MADI interface
Standards Relevant specifications comply with AES10-2008 and AES11-2009.
Audio 24bits, transparent forwarding of PCM
Audio Sample Rates 44.1, 48kHz
64/56 channels @ 44.1 and 48kHz
Impedance 75Ohm
Input level 0.15 … 0.8Vpp @ 75Ohm
BNC Input
Cable length (max.) 150m (Belden 1694A)
64/56 channels @ 44.1 and 48kHz BNC Output
Impedance 75Ohm
Output voltage 0.6Vpp (typ.) @ 75Ohm
General Features • Input cable equalizer for extended range and robustness
• Reference grade word clock recovery, master-sync capable
• Dedicated routing for non-processed channels, all channels
(max. 64) can be routed to/from the device or looped through
• AES3 channel status management, non-audio detection
Technical Specifications – AoIP (AES67 / Dante
TM
) interface
Standards Audio-over-IP by Audinate Dante™ Digital Audio Networking Standard
AES67 compliant
Audio 24bits, transparent forwarding of PCM and compressed audio
Audio Sample Rates 44.1, 48kHz
Inputs and Outputs 2 x Gigabit Ethernet RJ45 connectors (100M/1Gbit),
primary and secondary port
Inputs 64 channels @ 44.1, 48kHz
Outputs 64 channels @ 44.1, 48kHz
General Features • AES67 compliant
• Network master-sync can be provided by c8k frame
• Master-sync capable
• Non-audio detection for input channels
• Glitch-free Dante™ audio redundancy using dual Ethernet
networks

digital audio
format
bridging system
Netbridge UHD
4Quadrant 3G-SDI to MADI and AoIP bridging
4/5
Technical Specifications – 3G-SDI interface
Standards Video complies with SMPTE 424/425M (3G, Level A and B), SMPTE 292M
(HD) or SMPTE 259M (SD). Automatic format detection.
Audio embedding and de-embedding complies with SMPTE 299M (3G,
HD) or SMPTE 272M-AC (SD).
Metadata embedding and de-embedding complies with SMPTE 2020-2.
Video Data Rate 2970/296Mbps (3G), 1485/1483.5Mbps (HD), 270Mbps (SD)
Video Formats 1080p23.975, 24, 25, 29.97, 30, 50, 59.94, 60
1080i50, 59.94, 60
720p23.975, 24, 25, 29.97, 30, 50, 59.94, 60
625i50, 525i59.94, …
Video Delay User selectable 0 …15frames, can be disabled
Audio 24bits, transparent forwarding of PCM and compressed audio
Audio Channels 16 inputs and 16 outputs (4 groups with 4 channels each)
Audio Sample Rate 48kHz (SDI compliant)
Audio Delay Embedder audio delay selectable 0 … 320ms per channel
Metadata (RDD6) 1 channel input and 1 channel output, SDID selectable
Impedance 75Ohm
Return loss > 15dB, 5 … 1485MHz
> 10dB, 1485 … 2970MHz
Cable length (max.) 250m @ SD for Belden 1694A cable
230m @ HD for Belden 1694A cable
140m @ 3G for Belden 1694A cable
BNC Input
Jitter tolerance > 0.7UI (Alignment)
Impedance 75Ohm
Output voltage 0.8Vpp (typ.)
Return loss > 15dB, 5 … 1485MHz
> 10dB, 1485 … 2970MHz
BNC Output
Output jitter < 0.2UI (Alignment), < 0.5UI (Timing)
Video Latency Input to Output 120 … 200pixel, depends on video standard
Audio Latency Input to Output Embedder and de-embedder combined
HD, 3G < 0.6ms
SD typ. 1.5ms (< 2ms)
General Features • Power fail relay bypass (may be activated via GUI)
• Lip-Sync compensation for processed and non-processed audio
signals
• Dedicated routing for non-processed channels, all channels
(max. 16) can be routed to/from the device or looped through
• Test pattern generator
• Master-sync capable
• ITU-R BT.1685 / ARIB STD-B39 metadata support

digital audio
format
bridging system
Netbridge UHD
4Quadrant 3G-SDI to MADI and AoIP bridging
5/5
Set-up GUI
The GUI shows the building blocks as grey squares. By clicking on the spanner tool you gain access to
the settings of one of the building blocks of the Netbridge UHD.
Use the IP address of the Controller as an URL:
When you click on the spanner tool, the web pages of the respective module will open. Pls. refer to
the attached Manuals:
C8702 Frame controller
C8405 3G/HD/SD SDI interface
C8316 MADI & AoIP interface

Netbridge UHD
Frame Controller
C8702
digital audio
format
bridging system
Page 2/
23
Installation
Location of labels and switches on the C8702 module.
The default IP address label is located on the “Coldfire” chip of the controller module
and on the front panel of the module.
While the MAC address is printed on a label here:
The FAIL LED flashes red if a power failure is detected on the carrier board.
SW1 #1 <A> must be OFF
Set SW1 #2 <B> to ON (all other to OFF) if only one power supply is installed.
Set SW1 #3 <C> to ON (all other to OFF) if the Frame Controller is installed in a
C8942 frame.
Set SW1 #3 <C> and <D> to ON (all other OFF) if the Frame Controller is installed
in a C8912 frame.
SW2 #1 - #3 <DEV 0> / <DEV 1> / <DEV 2> must be ON
Set SW2 #4 <CAN-TERM> to ON (terminate the CAN bus) if no sync module is installed.
If a brx 8x remote panel is connected, it must be off.
SW1
SW2
A
B
C
D
ON DIPON DIP
DEV 0
DEV 1
DEV 2
CAN-TERM
FAIL
GND
02 08
AD 20
7E 83
MCF5282CVT66
Default IP
10.110.145.105

Netbridge UHD
Frame Controller
C8702
digital audio
format
bridging system
Page 3/
23
Important Note! For high density applications with C8491 or C8492 status display
and C8492(B) compact modules, it is possible to operate the CAN bus if 1MBit/s is used:
with 1MBit/s to increase the internal bandwidth for loudness logging
and metering. After power-up the C8702 checks the CAN bus and
automaticlly sets its CAN bus speed accordingly. If by accident one
inserts a low speed module afterwards, the C8702 will enter "CAN bus
off mode" and will reboot after a while until that module is removed.
Don't mix up modules which are set to different CAN bus speeds.
For loudenss logging, live plot or bar graph display you must use the J*AM from version 2.9.0 and higher.
Technical specifications
Processor Motorola MCF8250 Coldfire
RTC DS1306
Controller Module
Operating System eCos
LAN RJ45 10/100Mbit Ethernet
RS232 D-Sub 9-pin controller serial interface #1
External Connectors
CAN RJ45 CAN1.1 extension of internal bus
Front panel switch INIT Reset (warm start)
Initialize (factory default)
Front panel LED STATUS Yellow = booting / init feedback
Green = operating
IP address 10.110.xxx.yyy default calculated from
Ethernet MAC address
Net mask 255.255.0.0
Gateway No entry
Controller CAN ID 0
Frame address 0
Default settings
Can termination OFF
Power Supply 5Vdc (4.75 … 5.25V), max. 250mA
Dimension 3RU, 4HP, 160mm depth
Connector DIN41612
Operating temperature 0 … 40ºC
Non-operating -20 … 70ºC
Environmental
Humidity < 90%, non-condensing

Netbridge UHD
Frame Controller
C8702
digital audio
format
bridging system
Page 4/
23
Connector pin assignments
Set up of the module
The communication with the C8k modules is done via the CAN bus, i.e. the Frame Controller “talks”
to the C8k modules via CAN bus while external applications communicate via TCP/IP over Ethernet
with the C8702. The CAN bus is a simple two-wire differential serial bus, it operates in noisy electrical
environments with a high level of data integrity. Its open architecture and user-definable transmission
medium makes it extremely flexible. Capable of high-speed (1 Mbits/s) data transmission over short
distances (40 m) and low-speed (5 kbits/s) transmissions at lengths of up to 10,000 m, the multi-
master CAN bus is highly fault tolerant, with powerful error detection and handling designed in.
Important Note! Junger Audio uses a default bit rate of 125 kbit/s and guarantees cable lengths of up to
300m if one connects a brc (broadcast remote controller). As an exeption for high density application with
C8942 and C8912 compact frames and C8491, C8492 and C8492(B) compact modules, the internal CAN
bus may operate with 1Mbit/s. In this case it is not possible to use brc controllers!
Very important is the termination of the transmission medium to avoid signal degradation by
reflections.
Setting the frame ID of a C8k frame:
• The frame address switches DEV0 – DEV2 must be set to ON. The frame controller does not
support multiple frames anymore.
Termination of the CAN bus:
• The CAN bus must be terminated by two 120Ω resistors on both ends. The frames have one
integrated terminator on the back plane. A decision must be taken how to deal with the second
one. You may either use the Sync interface or the Frame Controller to terminate the bus. If the
CAN connector of the C8702 is used for an external remote controller (e.g. the brc), the bus
must be terminated on the remote controller (at the far end).
Important Note! The CAN-TERM switch must be set to OFF if it is terminated on the Sync-Module.
If no Sync-Module is installed (in case a MADI / SDI or AES interface operates in Master-Mode),
the CAN bus must be terminated by SW2-4. If a brx 8x panel is connected it must be turned off and
termination must be turned on on the brc 8x panel.
RJ45 LAN
Pin # Function
1 Tx +
2 Tx -
3 Rx +
4
5
6 Rx -
7
8
RJ45 CAN
Pin # Function
1 CAN-H
2 CAN-L
3
4 GND
5 GND
6
7
8
D-Sub RS232
Pin # Function
1 DCD
2 Tx D
3 Rx D
4 DTR
5 GND
6 DSR
7 CTS
8 RTS
9 N.C.

Netbridge UHD
Frame Controller
C8702
digital audio
format
bridging system
Page 5/
23
Setting the mode switch for single power supply operation:
• if only one power supply is installed (e.g. the C8911 frame has only one PS)
the mode switch “B” must be set to ON in order to turn power fail monitoring off.
Setting the mode switch for C8942 high density frames:
• For the C8942 frames the mode switch “C” must be set to ON to turn sync fail monitoring off
(this frame type has no central sync source) and fan monitoring on.
Setting the mode switch for C8912 dual power supply 19" 1RU frames:
• For the C8912 frames the mode switches “C” and "D" must be set to ON to turn
fan monitoring on.
Reset the C8702:
• press the INIT button briefly at any time and the Frame Controller will reboot immediately.
Important Note! Rebooting the Frame Controller has no effect on audio processing.
Initialize the C8702 to factory default settings:
• Approx. 40 sec. after power is turned on or after pressing the INIT button briefly (reset function),
the STATUS LED lights yellow. Now you may press the INIT button and hold it firmly until the
STATUS LED flashes three times. This is an acknowledgement that the C8702 has been
initialized to factory default settings (you may also hold down the INIT button at any time until the
STATUS LED flashes three times).

Netbridge UHD
Frame Controller
C8702
digital audio
format
bridging system
Page 6/
23
Setting the IP address
Important Note! If you are not familiar with the Internet Protocol, you must contact an administrative
person of your IT department for help.
There are two principal ways to change the IP configuration. You can use the so-called console
interface or you may use a Web Browser.
1. Connect with a PCs COM port:
* use a physical or virtual (via a serial < > USB adaptor) COM port
* connect it via a 1:1 cable to the RS232 9-pin connector
* run a terminal program (115.2-8-N-1, no handshake)
* select that COM port
* press <ENTER>:
You will get a similar window that shows the momentary IP configuration and a Configuration
Menu. The layout depends on the screen settings and the OS. The content of that menu may vary
depending on the Frame Controller firmware version.
1.1 Select: “Change Network configuration” <2> <ENTER>
You must set an IP address and the subnet mask. If you skip the “Netmask”
the IP address will not be changed. Gateway address is optional and may be skipped.
1.2 Select: “Reboot” <8> <ENTER>
Press small <y> and <ENTER> to start the reboot process
2. Connect the C8702 via an Ethernet cross over cable to a PC:
2.1 Change the network setting of the PC
The PC must be given an IP address from the address room of the C8702 default IP address.
The factory default IP address is printed on a label on the controller module (see installation).
The subnet mask of the factory default address is 255.255.0.0.

Netbridge UHD
Frame Controller
C8702
digital audio
format
bridging system
Page 7/
23
Important Note! If the C8702 has an unknown IP configuration you may initialize it to factory default
settings (see above). This will restore the factory default IP configuration.
2.3 Open a browser and enter the default IP address in the URL field:
2.4 On the web site click on the spanner tool
This opens the “SYSTEM CONFIG” tab of the Frame CONTROLLER setup.
2.5 Enter the desired NETWORK configuration:
2.6 Press <CHANGE NETWORK CONFIGURATION>
2.7 Reboot the C8702:
In order to make the IP configuration permanent you must reboot the frame controller.

Netbridge UHD
Frame Controller
C8702
digital audio
format
bridging system
Page 8/
23
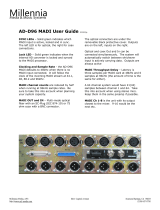
Web technology based GUI
The GUI is based on common web technologies so you can display it nearly everywhere.
External Ethernet based access to the Junger devices is maintained by a dedicated 32Bit
communication processor that is part of the C8702 Frame Controller module.
The communication processor does not control the module parameters directly. It transfers
commands and data from and to a module control processor which on the other hand controls the
module parameters as well as GPI/Os. The module control processor and the communication
processor both communicate via the CAN bus internally. Therefore the external communication is
shielded somewhat from the audio processing by this two tier approach. I.e. you can update the
firmware of the Frame Controller without disturbing the audio processing.
The communication processor runs a HTTP and an UDP server. You may also activate a
Telnet, an Ember server and a Proxy to communicate with the brc remote controller.
As a fee-based option you may activate a SNMP agent as well.
Over a serial 1:1 connection (RS232: 115200, 8, N, 1, no protocol) you will gain access to the
console interface (see IP set up above). It offers low level communication for administrative,
service and testing purposes. The functions available from the console interface may very from
different Frame Controller firmware versions.
RS232
LAN
DSP
* LevelMagic
* AudioFail
* MixMatrix
module
control processor
Audio I/O
Bus
selector
c8k frame internal CAN bus
CAN
MCF5282CVT6
6
C8702 Frame Controller
Example C8k module
communication processor

Netbridge UHD
Frame Controller
C8702
digital audio
format
bridging system
Page 9/
23
Settings for the browser
The GUI functions are based on web technology. Due to the permanet changes of browser versions
we try to support Windows IE and Google Chrome as best we can, but we do all testing on Mozilla
Firefox (54.x at the moment of editing this document).
For proper operation, the environment needs some settings which are not always set up by default
when installing the OS, so you must check it yourself:
* You must “allow cookies” from the Junger Units.
* Pay attention to settings of 3
rd
party tool bars (like Yahoo) which may overwrite the browser
general settings!
* In order to receive any kind of files (e.g. frame back-ups, presets) from the Frame Controller,
the security options must be checked to allow for downloads.
- Automatic prompting for downloads = Enable
- File download = Enable
Important Note! To display bar graph meters the C8702 will launch a JAVA Web Start application. This
requires the installation of an actual Java Runtime Environment 8.x (or higher) on the PC. You will get it
as a free download from a lot of sites around the world or directly from the license owner Oracle:
https://ww.java.com/en/download
If you click on the meter icon of a c8k module, The frame controler will provide a *.jlnp file
for download :
This file contains all nessecary information for the
JAVA Web Start launcher that in turn will start the
JAVA Virtual Machine (JVM).
You will be promted if you want to run the application:
If you confirm,
the applet will display the respective bar graph meters:

Netbridge UHD
Frame Controller
C8702
digital audio
format
bridging system
Page 10/
23
* If the PC is part of a MS Domain, you must check if the LAN settings are correct. If you have
configured your IE settings manually you must disable “Automatically detect settings”. Otherwise
it could happen that your settings are overwritten automatically at next reboot.
* You must declare the browser as an exception for the Windows
®
Firewall in order to maintain
proper UDP data transfer from and to the JAVA Web Start application. If you see security
issues for your system you may use the METERING configuration (see further below) to limit the
UDP port numbers instead of making an exception for all incoming network connections.
Setting of frame information
The Frame Name and the Frame Location as well as the System Contact are used by the
SNMP sysObject OIDs (Object Identifier).
Activation of the security feature
The web interface of Junger Audio units offers a two tier security schema.
* Operators can view everything and load presets.
* Administrators can set up C8k frames including their modules.
They are allowed to change parameters and write presets.
You must check “Password checking enabled” to activate this feature, you will be notified about the
default settings:
If you click <OK> the Frame Controller will close all open sessions and you must log in again as user
"admin" with the default password "admin".
Now you may change passwords for both the admin and the operator:

Netbridge UHD
Frame Controller
C8702
digital audio
format
bridging system
Page 11/
23
Setting UDP port range for metering
In order to receive data for the meter bar graph display, if a local firewall is active, you must open it
for the browser application or you must reserve UDP ports (for which the firewall will be held open).
Here you can tell the frame controller which UDP port(s) are reserved for metering:
After the launch of the JAVA Web Start bar graph meter application it will be told by the frame
controller which ports it may check for receiving UDP data packets.
On the counterpart, the PC, you must define an exception for the firewall.
Open Fire Wall settings and go to exceptions (example from Windows XP OS):
1. right click on the network symbol in the windows task bar
2. select ”Change Windows Firewall settings”
3. click on the “Exceptions” tab
4. open the “Add Port” menu:
Here you must give this rule a unique name (e.g. “c8k frame #17”) and assign it a UDP port number.
Important Note! If you want to connect from different PCs with one and the same c8k frame, it is
sufficient to use one UDP port per c8k frame because different PCs will open different IP socket
connections with the same frame controller.
If you want to connect from one PC with different frames, a unique UDP port number for every remote
frame is necessary! Therefore you may assign a range of UDP ports for the Frame Controller:
Important Note! Connection of multiple JAVA applets from the same PC with the same module is not
implemented! In such case the previous applet will be closedkilled.

Netbridge UHD
Frame Controller
C8702
digital audio
format
bridging system
Page 12/
23
Setting of CAN BUS speed
You can select between the two CAN bus speeds: Normal (125kBit/s) or High (1Mbit/s) and the
Automatic detection of the installed modules.
Important Note! Don't mix up modules which are set to different CAN bus speeds.
High speed CAN bus is only available for C8491, C8492, C8492(B) and C8817-3.
Selecting services
For special applications you may activate the following services:
Maintenance Interface via RCP is for internal use only.
Telnet Server For remote access to the console interface via TCP/IP you must enable the Telnet
Server (TCP port 22).
BRC Proxy If a brc 8x is connected via the CAN bus one must activate this option. Compared
with previous implementation, the brc remote panel no longer talks to the modules
directly. A proxy instance is used as the "man in the middle".
Enable EmBER protocol support
VSM Support / Ember enabled You may directly connect with a VSM application or use the
Ember or Ember+ protocol to remote control the c8k frame.
For details of the VSM system see http://www.l-s-b.de/uk
and for Ember code depository go to: http://code.google.com/p/ember-plus/
Important Note! Right now we support both, the old Ember and the Ember+ protocol. It is our intention to
remove the old Ember server as soon as VSM fully supports Ember+.
We highly recommend you base your implementation on Ember+.

Netbridge UHD
Frame Controller
C8702
digital audio
format
bridging system
Page 13/
23
Setup of SNMP functions
Important Note! SNMP protocol is a licensed feature that must be purchased for the C8k system.
Pls. contact your local dealer.
Junger Audio supports SNMPv1 GET PDUs (Protocol Data Unit) for polling the c8k frame only.
We do not support SNMP SET PDUs. The agent may also send Traps on predefined conditions
and/or may fire GPOs via the C8k GPI/O interface (C8817).
The setup of the SNMP functions is done via the Frame Controller SYSTEM CONFIG menu,
if the SNMP option is activated:
Here you can tell the Frame Controller a Trap Sink IP Address, its Port Number and the
Community string which must be used for basic authorization.
You may enable Traps and/or set a respective GPO number for use by GPI/O module(s).
In principle, the module generates verious status information and sums (or rather condenses)
fail conditions if there are multiple inputs or processing channels.
The Frame Controller polls the modules permanently for such status information and sums
(condenses) that information for the entire frame. An external monitoring tool (SNMP Manager) may
poll the SNMP agent based on the Junger-C8K-MIB-4. The MIB and the associated document can be
requested from Junger Audio.
The SNMP manager can also “sit and wait” to receive Traps from the SNMP agent and may poll the
frame afterwards. The procedure depends on the implementation of the management tool.
For legacy monitoring applications, the c8k frame may be equipped with GPI/O module(s). In this case
the system can fire GPOs (relay closures) based on the above settings.

Netbridge UHD
Frame Controller
C8702
digital audio
format
bridging system
Page 14/
23
Retrieving diagnostics information
The diagnostic file is an assembly of log information from the frame controller for investigation by
Junger Audio staff. After pressing the <SAVE DIAGNOSTIC FILE> soft button an XML file will be
generated. You must download it to your PC and send it to Junger Audio GmbH if requested.
Important Note! “Thorough diagnostics” is a more comprehensive procedure that will interrupt audio
processing in some of the modules. Only use this process if advised by Junger support team.
Update of the Frame Controller firmware
The firmware for the C8702, called “image” (example: "rel_c8702_1_19_0-32665.img"),
must be “burned” into the flash memory of the Frame Controller.
You may get such an image by http download of a ZIP file from Junger Audio.
Below is an example of a respective URL:
www.junger-audio.com/download/firmware/C8000/C8702/rel_c8702_1_19_0-32665_fw-32679.zip
Such zip file contains an image file and actual module firmware packed into an archive file
(example: "rel_c8000_1_19_x_fw-32679.arc") as well as updated manual(s) and other relevant current
documents. After downloading you must unzip it and store the file(s) locally.
Open the SOFTWARE UPDATE pane of the Frame Controller:

Netbridge UHD
Frame Controller
C8702
digital audio
format
bridging system
Page 15/
23
You must browse for the appropriate image file from the previously unpacked ZIP. Once done you
must press the <START UPDATE NOW> soft button. This process has 3 steps. The controller will
upload the image file from the PC into its memory, afterwards it will erase the flash memory and finally
burn the new image file into it.
First you will get the message that the file is being transferred. Afterwards you will see a progress bar
when the process has started:
When finished, the browser will show a
message:
Click <OK> and the browser will reload the web site from the Frame Controller in order to be
up to date. It is recommended to flush the browser cache to get rid of older content.

Netbridge UHD
Frame Controller
C8702
digital audio
format
bridging system
Page 16/
23
Possible problems when updating from older Frame Controller firmware
If you can not reach the GUI via an actual browser you must do a little trick to update the frame
controller. You must reboot the C8702 by briefly pressing the <INIT> button (or rebooting it from the
console interface). After approx. 60sec (boot up time) you should open the browser again and enter the
URL:
http://<C8702-IP-address>/standalone-update.html
The following page will open:
Proceed with the image update as described above. When finished you will get a pop up, saying the
update was o.k. (it takes approx. 4 - 5 mins – be patient pls.).
Important Note! There was a change in the way the Frame Controller image is sent from the PC
to overcome a possible bottleneck of non-fragmented RAM. If you update from an older version (< 2660)
you should reboot the Frame Controller before starting the image update. This will ensure that there is
enough non-fragmented RAM for the existing update procedure.
If the Frame Controller reboots with the old firmware you must use the "-a" image:
(example) "rel_c8702_1_17_8-28002-a.img".
In rare events (if you come from a very old firmware it might be necessary that the update is performed
in a two tier approach: First use the "minimal" image:
"rel_c8702_minimal_image_1_0_1-30583.img" (the image number may change over time) and as a
second step update the actual release.
/