Model Name
RM40D RM48D
Panel
Size
101 cm 121 cm
Display area
885.6 mm (H) x 498.15 mm (V) 1054.08 mm (H) x 592.92 mm (V)
Dimensions
(W x H x D / Weight)
Without Stand
906.6 x 532.9 x 65.1 mm /
7.6 kg
1075.1 x 627.6 x 65.5 mm /
11.1 kg
With Stand
906.6 x 578.2 x 196.4 mm /
8.3 kg 1075.1 x 673.8 x 203.9 mm / 12.0 kg
Audio Output
10 W + 10 W
Power Supply
AC 100 to 240 VAC (+/- 10%), 60 / 50Hz ± 3Hz
Refer to the label at the back of the product as the standard voltage can vary in different countries.
Environmental
considerations
Operating
Temperature : 0
°
C - 40
°
C (32
°
F - 104
°
F)
Humidity : 10 % - 80 %, non-condensing
Storage
Temperature : -20
°
C - 45
°
C (-4
°
F - 113
°
F)
Humidity : 5 % - 95 %, non-condensing
- Plug-and-Play
This SMART Signage TV can be installed and used with any Plug-and-Play compatible systems.
Two-way data exchange between the SMART Signage TV and PC system optimizes the SMART Signage TV settings.
SMART Signage TV installation takes place automatically. However, you can customize the installation settings if desired.
- Due to the nature of the manufacturing of this product, approximately 1 pixel per million (1ppm) may appear brighter or darker on the panel. This does not
affect product performance.
- This device is a Class A digital apparatus.
(For India Only)
This product is RoHS compliant.
For more information on safe disposal and recycling visit our
website www.samsung.com/in or contact our Helpline numbers -
18002668282, 180030008282.
Web Site : http://www.samsung.com/displaysolutions/signagetv
Download the user manual from the website for further details.
Step5 Play Content
Downloading MagicInfo Express 2 Free
- To use the create content tool, first register your store. The name of the registered store is automatically entered in the template. The registered business hours is set as the default business hours when a content schedule is created.
- A video tutorial on using the create content tool can be found on YouTube.
Click [ ] at the bottom left of the home screen.
- Quick Start: This mode automatically configures the layout according to the selected element.
Even beginners can easily design content using this mode.
- Custom Design: This mode allows professional and advanced users to design content using custom layouts.
- Send a schedule to the product or a USB device.
Playing content from your SMART Signage TV
Schedules can be sent directly to the product using the below methods. If there are two or more devices that have the same name, go to
MENU
m
> Network > Device Name and change the device names to make them distinguishable.
If there is a wireless network available.
Refer to Step4. Initial Setup > Network Settings.
If there is no wireless network available.
On your Signage TV, go to
MENU m
> Network > Soft AP (Wi-Fi Hotspot) and turn it on. Next, check the TV name and password.
Go to the Wi-Fi setup on your PC. Select your TV name and enter the password.
When you use USB
(available for PC software)
Schedules can be sent to a USB device. Connect the USB device to your display. The schedule will play automatically.
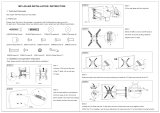
5 6
3 4
1
2
Before assembling the product, place the product down on a flat and stable surface so that the screen is
facing downwards.
Disassembly is in the reverse order of assembly.
Stand Installation
<Installation is complete>
Starting MagicInfo
MagicInfo is a business solution that allows the product to be used as signage (advertising media).
Press the HOME or MagicInfo Player I button on the remote control to run the MagicInfo browser. You can browse or play content stored on the internal
memory or a USB storage device.
Playing content from the internal memory or
a compatible USB
Play compatible images or videos stored in the internal memory or the connected USB.
Playing content from your compatible computer or
mobile device
The content sent via MagicInfo Express 2 will be displayed as a schedule. You can also edit the schedule using your mobile device.
For more information on how to use the MagicInfo Express 2 or mobile app, refer to Step6.
If the internal memory is insufficient, connect a USB
device and go to
Options
→
Settings
→ Default Storage at the top right of the MagicInfo browser. Change the option to USB.
* To find out how much internal memory is left, press INFO on the remote control.
Schedule
Device : All Content : All
Sort by : File Name
Options
Step3 Connect Compatible Source Devices
HDMI IN 2
(DVI)
HDMI IN 1
(STB)
USB
(
5V 0.5A)
/ CLONING
ANT IN
AIR/CABLE
AUDIO
OUT
RS232C IN
AUDIOL R
VIDEO
AV IN
PC IN
PC
AUDIO
IN
Antenna
USB device
PC
Set Top Box
Camcorder
PC
Speaker
Pre-connection Checkpoints
-
Before connecting a source device, read the user manual provided with it.
The number and locations of ports on source devices may differ from device to device.
-
Do not connect the power cable until all connections are completed.
Connecting the power cable during connection may damage the product.
-
Connect the sound ports correctly: left = white and right = red.
-
Check the types of ports at the back of the product you want to connect.
-
If the product is in portrait orientation, it is not possible to change Source List.
-
Depending on the country or region.
Specications
Contact SAMSUNG WORLD WIDE
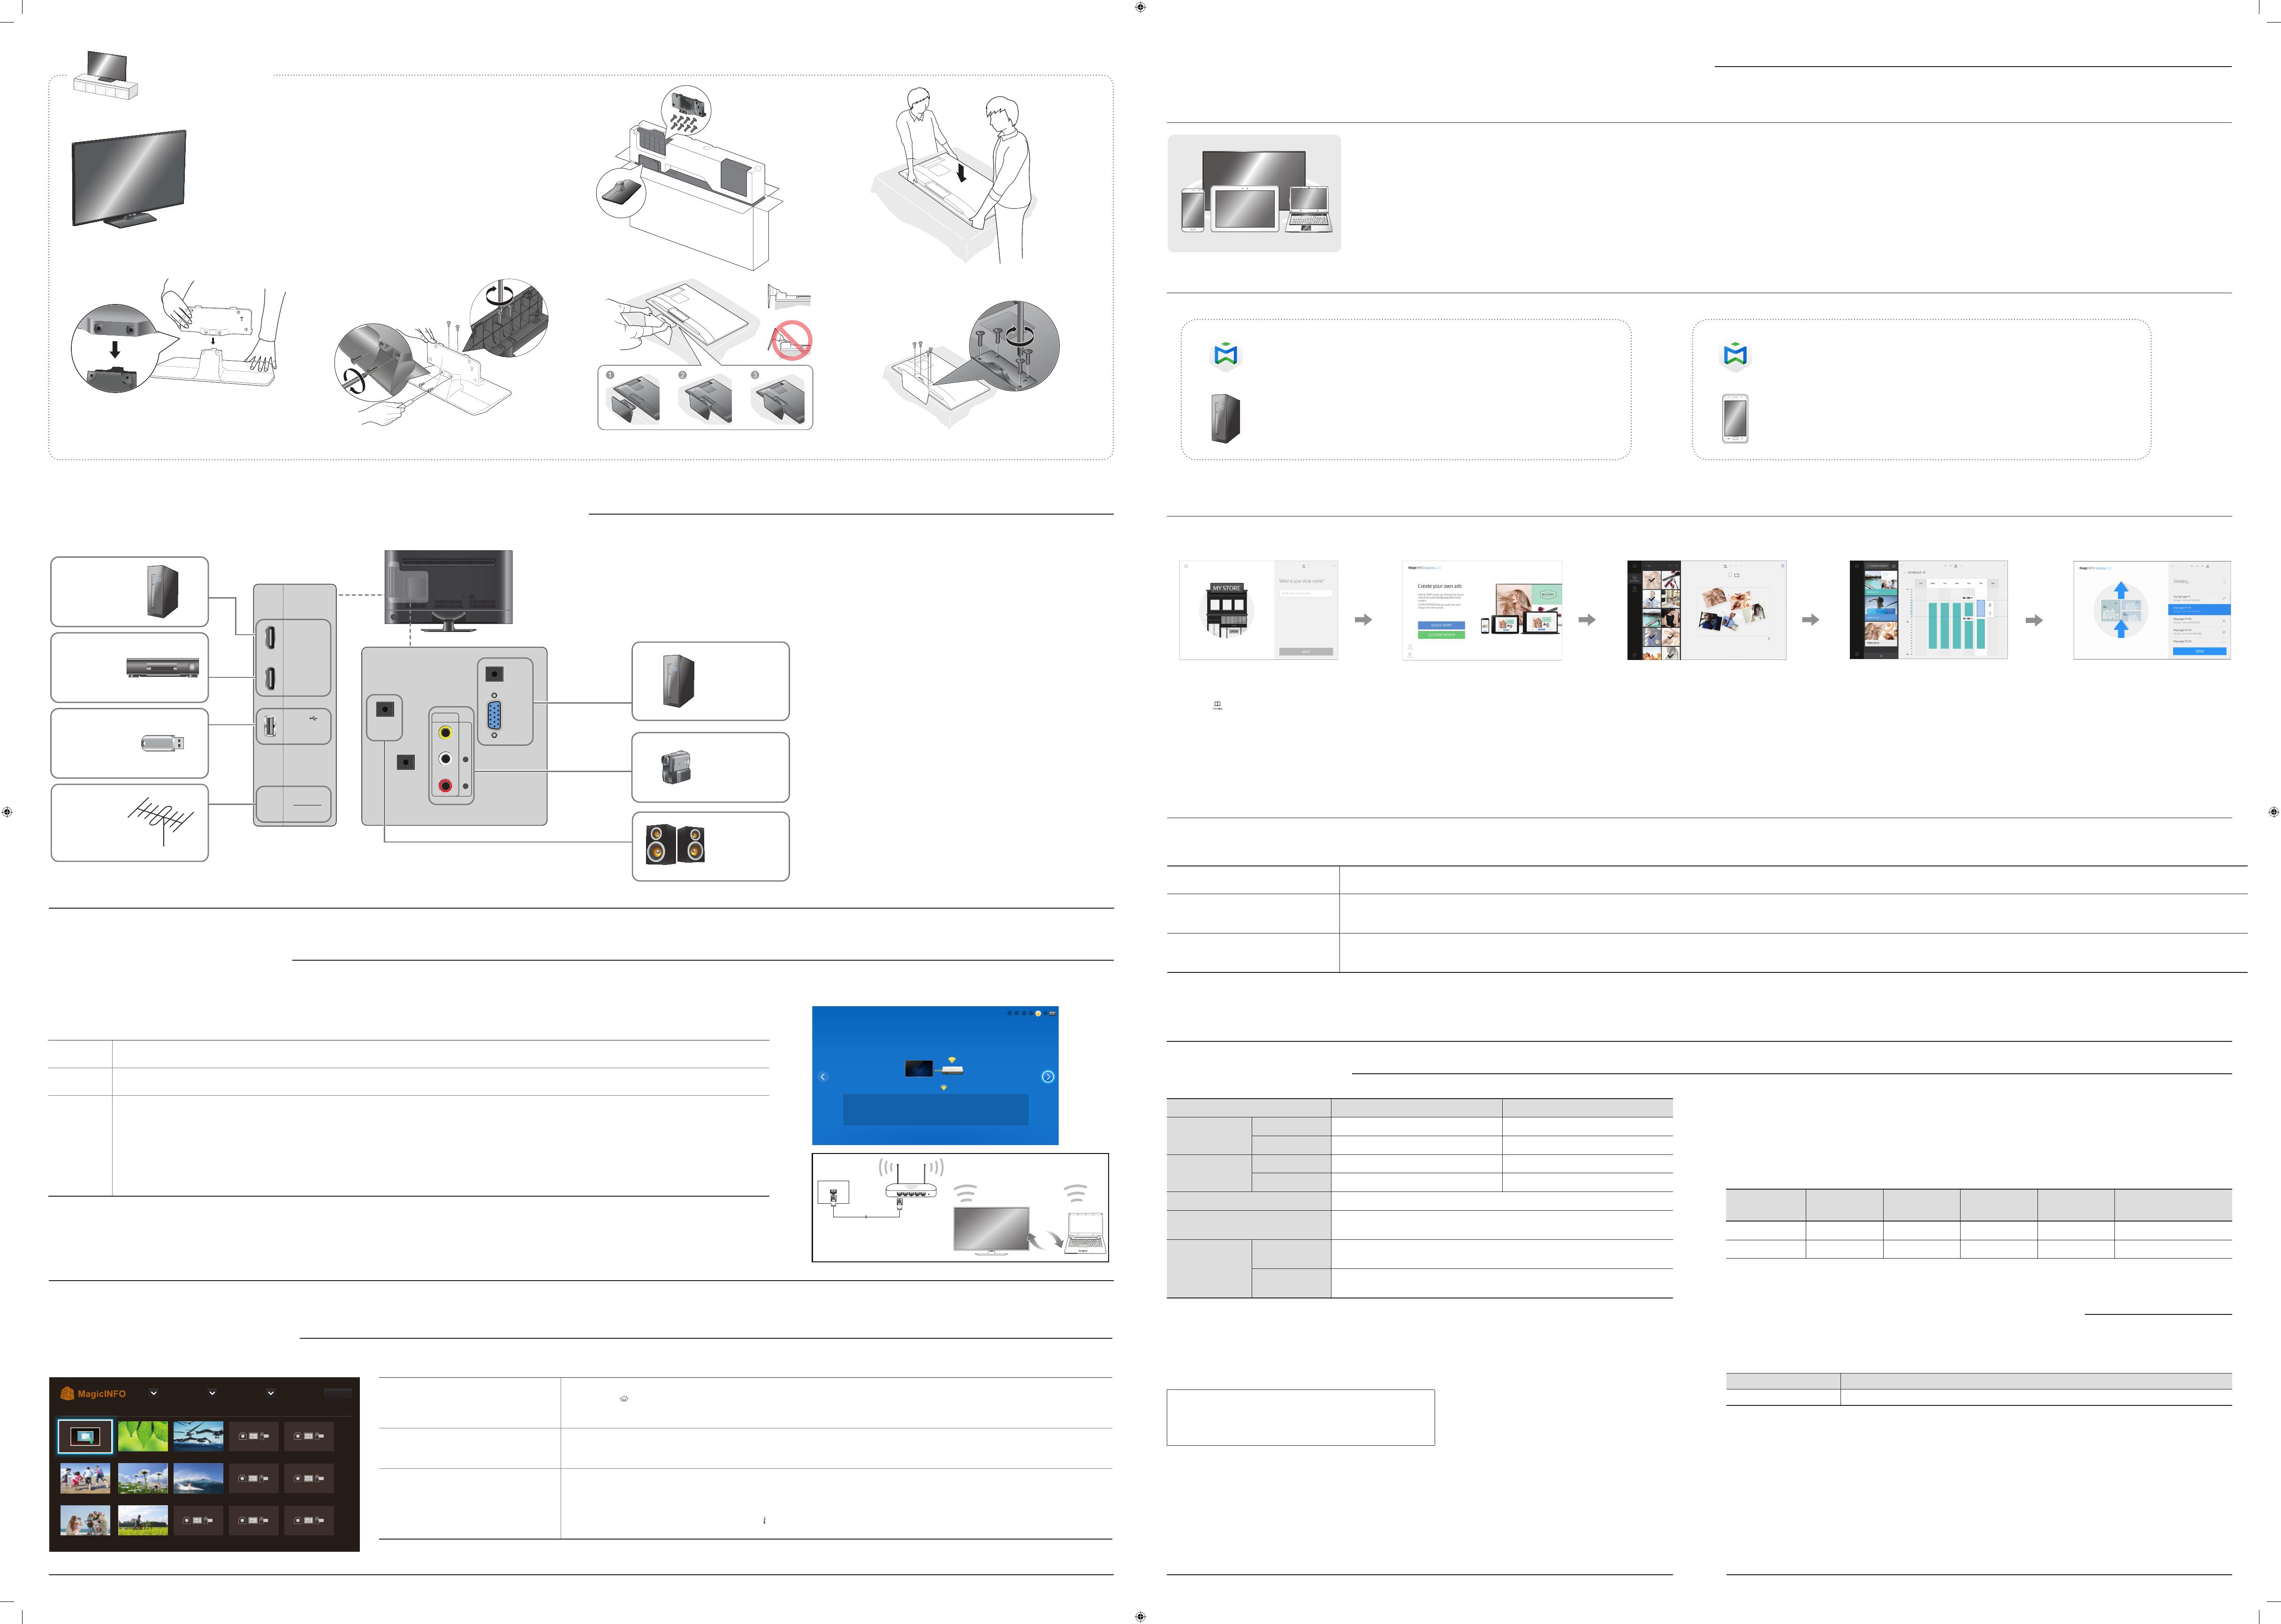
Step6 Create & Schedule Your Business Content
Creating content and schedules
Initial Setup
Home Create Content Schedule Content Send
Step4 Initial Setup
After powering on the product for the first time, configure basic settings such as the language, channel and time.
Language
→
Regional Settings
→
Channel Source
→
Auto Tuning (Auto Tuning does not appear if Set-top box or No TV(Signage Only) is selected.)
→
Network Settings
→
Clock
→
Auto Power Off
→
Setup Complete!
Channel Source
Select the source of your live TV signal.
Auto Tuning
You can automatically search broadcast signals and save retrieved channels.
Network
Connect to a wireless network to use the product as a TV+Signage.
* To use as a TV only, press the Next button and skip the Network Settings. This also applies if no wireless networks are available. You can change settings later by selecting
MENU m > Network > Network Settings.
1. Available wireless networks are listed automatically in
Network Settings
. Select a network name (SSID) to connect.
2. Enter your security key (
Enter password.
) and select
Done
.
The product may try to automatically connect to a wireless network that is not secure.
3. If wireless networks are not listed automatically, select
Add Network
and enter a network name (SSID) to manually search for a network.
1
2
3
MagicInfo Express 2 software provides easy-to-use tools to create, edit, schedule and deploy your custom content through the Samsung SMART Signage TV.
The Mobile App makes content management more convenient using your smartphone or tablets. Create and schedule in-store menu boards, welcome screens, slideshows and promotions to complement and reinforce your unique business environment.
Starting MagicInfo Express 2
Country Customer Care Centre
INDIA
1800 3010 8282
Step2 - Type B
Network
Network Settings
AP000
Your wireless network is setup and ready to use.
Ready to play your business content.
-Run the Content Creator on your PC, then create and schedule your content. You can
send it to the Signage TV using the wireless network.
-Refer to the Content Creator manual for more information.
1 2 3 4 5 6
ATTENTION
: This product is qualified for the BEE Star rating in the ‘Standard’ Mode.
The Objectives of Star Labeling Program is designed to promote energy efficient products and practices.
When the television is initially set up, it is designed to meet the BEE Star Labeling requirements while maintaining optimum picture quality.
• Changes to certain functionalities of this television (TV Guide, Picture/sound etc) may change the power consumption.
• Depending upon such changed setting (eg., Retail mode), the power consumption may vary which possibly could exceed the stated energy consumption.
To reset the television to Star rating qualified settings, select ‘Standard’ mode from the initial set-up procedure in ‘factory settings’ under the ‘Set-up’ menu.
Model Name Type Screen Size (inches) Screen Size (cm) Star rating
Annual Energy consumption
(kWh/Year)
LH40RMDWLGU/XL LED 40 101 5 152
LH48RMDWLGU/XL LED 48 121 5 174
To download the software on your PC, visit
http://www.samsung.com/displaysolutions/signagetv
Click the download button on the website and install MagicInfo Express 2 on your PC.
For details on how to download the mobile app and on its features, go to
http://www.samsung.com/displaysolutions/signagetv
MagicInfo Express 2 MagicInfo Express 2
1 2 3 4
5
[RMD-QSG]BN68-06719R-01.indd 2 2015-11-09 �� 10:52:32