Samsung RM40D Quick start guide

Type
Quick start guide

Samsung RM40D: Versatile Entertainment and Information Display for Various Applications

Samsung RM40D is a versatile TV and signage solution that offers a wide range of features to meet your diverse needs. With its ability to function as both a TV and a signage display, it provides flexibility for use in various settings.

Key Features and Capabilities:

  1. TV and Signage Functionality: The RM40D can be used as a regular TV for entertainment purposes or as a signage display for commercial use. You can easily switch between these modes to suit your requirements.

  2. Content Creation: Using the provided MagicInfo Express Content Creator software, you can create engaging content for your signage display. This allows you to showcase promotional videos, images, and other information to capture the attention of your audience.

H
48”~55”
32”~40”
48”~55”
32”~40”
2-1
Follow steps
1
(drill test holes)
2
(drill the screw holes) and fix
H
(Plastic Anchor) on the wall.
* Screws are not needed.
* Drill holes in the wall and remove the guide sheet.
2-2
D
I
H
Fasten
D
(Bracket Distance) to
H
(Plastic Anchor) on the wall, using
I
(Screw).
F
2-4
Attach
F
(Bracket Wall), as shown in the diagram.
2-3
E
D
Insert the tab of
D
(Bracket Distance) into the hole of
E
(Cover Distance).
G
2-5
Fix the assembled bracket using
G
(Screw).
3-1
K
N
J
N
J
N
K
N
Top: Fix
J
(Holder TV Top) using
N
(Screw).
Bottom: Fix
K
(Holder Support) using
N
(Screw).
3-2
M
K
L
K
Attach
L
(Holder TV Bottom A) and
M
(Holder TV Bottom B) to
K
(Holder Support).
3-3
Install the product on the wall bracket. A click sound means it is attached
correctly.
M
Extend
M
(Holder TV Bottom B) and connect the cables.
3-4
Move the product side to side slightly to level it.
BN68-06719G-01
RM40D RM48D
The terms HDMI and HDMI High-Definition Multimedia
Interface, and the HDMI Logo are trademarks or registered
trademarks of HDMI Licensing LLC in the United States and
other countries.
SMART Signage TV
You can use the product as a TV, and as signage (advertisement media) using the
Content Creator
programme
on your computer.
-
The warranty will be void in the event of a breakdown due to exceeding the maximum
recommended hours of use per day of 16 hours.
Step1 ~ 4
To use it as a TV only, follow Step1 through Step4.
Step1 ~ 6
To use it as a TV+signage, follow
Step1
through
Step6
.
1
Quick setup guide
2
Warranty card
(Not available in some locations)
3
Regul
at
ory guide
4
User manual /
MagicInfo Express Content Creator USB
5
Min
i Wall-m
ount Kit
6
St
and b
ase
7
St
and
neck
8
Rem
ote
Control
9
Ba
tteries
(Not available in some loc
ations)
0
Pow
er cord
The following images are for reference only. Real-life situations may dier from what is shown in the images.
Store the box in a dry area so that it can be used when moving the product in the future.
* Make sure no component is missing in the package. Contact the vendor where you purchased the product if any components are missing.
* The provided USB memory is read-only. Its contents cannot be edited or deleted.
Step1 Unpack
Step2 Install
Type
A
Wall Mount Installation
A
VESA STANDARD
(2.09”)53mm
200mm (7.88”)
400mm (15.75”)
200mm (7.88”)400mm (15.75”)
48”~55” 32”~40” 32”~40” 48”~55”
B
C
X 8
1-4
Remove the paper tape at the centre of
A
(Drill guide sheet).
A
Attach
B
(Leveler) to the appropriate spot at the centre of
A
(Drill guide sheet).
B
A
1-5
1-1
Place the product on a soft cloth to protect the panel.
1-6
C
B
32”~40”
48”~55”
Fix
A
(Drill guide sheet) to the wall using
C
(Sticker). Make sure that
B
(Leveler) is level.
1
2
D
X 2
E
X 2
F
G
X 2
H
X 4
I
X 4
Check the type of the wall before installing.

Make sure the wall where the provided mini wall mount kit will be installed is flat, smooth and perfectly vertical.
Dry Wall, Gypsum-board, SheetRock: Please use a qualified installer to install the Wall Mount Bracket.



Standard Installation Requirements by Wall Type

* MDF = Medium Density Fiberboard
* PW = Plywood
Min. 50mm
Min. 10mm
MDF, PW
MDF, PW, etc.
With reinforcement
Min.
50mm
Min. 10mm
MDF, PW
MDF, PW
Art Wall
Min. 30mm
MDF, PW
(Exc. drywall
thickness)
Min.
25mm
Min. 10mm
MDF, PW
Concrete
Art Wall
Min. 30mm
Mixed Concrete
Wall (Exc. drywall
thickness)
Min.
25mm
Cannot be mounted on unreinforced wall or drywall surfaces.

0~24mm
MDF, PW,
Concrete
Without
reinforcement
Art Wall
Cannot install on drywall
Drywall
Installing on a drywall with stud reinforcements

3mm(1/8")
65mm(2.5")
Installation Requirements

15mm
Check the location of the studs and then insert the screws.
Minimum Stud Size: 51 x 102 mm (2 x 4 in), Predrill 3mm holes before inserting the screws.
The holes must be drilled along the centre axis of the studs.
Inserting the screws without predrilling can split the studs.
Manufacturer will not be responsible for any issue arising from your failure to follow these installation instructions.
3
J
X 2
K
X 2
L
M
N
X 4
Step2 - Type
A
To install the product using the wall-mount
kit, refer to "Wall Mount Installation".
Included components
To install the product using the stand, refer to
"Stand Installation" on the next page.
Included components
c
Contact the dealer where you purchased the
product if any components are missing.
The appearance of the components may
differ from the images shown.
Mini Wall-mount Kit /
A
VESA STANDARD
(2.09”)53mm
200mm (7.88”)
400mm (15.75”)
200mm (7.88”)400mm (15.75”)
48”~55” 32”~40” 32”~40” 48”~55”
B
C
X 8
Drill guide sheet / Leveler / Sticker /
  
D
X2
E
X2
F
G
X 2
(M5X15)
H
X 4
Plastic Anchor /


I
X 4
Bracket Distance / Cover Distance / Bracket Wall / Screw / Screw /
    
J
X2
K
X2
L
M
N
X 4
(M8X40)
Holder TV Top /
Holder Support /
Holder TV Bottom A /
Holder TV Bottom B /
Screw /


A
B

1 2
9mm (11/32")
65mm (2.6")
2mm (3/32")
5mm (0.2")
Type
B
c
4
1-3
Place
A
(Drill guide sheet) on the back of the product to conrm the locations of VESA holes.
* To install the product in portrait orientation, lay it down vertically to test the requirements.
32”~40”
32”~40”
1-2
The product can be installed in either landscape or portrait orientation. Select an orientation.
* If installing the product in portrait orientation, TV broadcasts and video playback may be limited.
You can create content using the
Content Creator
programme.
-
To install the product in portrait orientation, refer to the diagram found under
"Installing in Portrait Orientation" below.
Case 1. TV Case 2. TV+Signage
Wall Mount Type Stand Type
Right
left low part
To use in portrait orientation, make sure that the connectors are on the side that faces down when installing.
Front
Back
Wall
<Installation is complete>
Step2 - Type
A
6 7
8 9 0
1 2 3
4
5
Components
Components
Components
Mounting your
SMART Signage TV
Installing the wall-mount kit
Preparations before installation
Checking the Components
Connecting cables
Installing in Portrait Orientation

Content Creator

16


.
Step4

Step1

.
Step6

Step1




USB
1

2


3

4


5

6

7

8


9


0


.""









H

2
1



I


H

D



F



E

D


G



N

J



N

K


B
M
A
L



K





B
M





A
 
A

B




B

C

A


.
A





.
Content Creator



"









Precautions when installing the wall-mount kit

342102 51












 




Book 1.indb 1 2014-12-08  5:03:46
Model Name
RM40D RM48D
Panel Size
40 CLASS (40.0 inches / 101 cm) 48 CLASS (47.6 inches / 121 cm)
Display area
885.6 mm (H) x 498.15 mm (V) 1054.08 mm (H) x 592.92 mm (V)
Dimensions
(W x H x D / Weight)
Without Stand
906.6 x 532.9 x 65.1 mm /
7.6 kg
1075.1 x 627.6 x 65.5 mm /
11.1 kg
With Stand
906.6 x 578.2 x 196.4 mm /
8.3 kg 1075.1 x 673.8 x 203.9 mm / 12.0 kg
Audio Output
10 W + 10 W
Power Supply
AC 100 to 240 VAC (+/- 10%), 60 / 50 Hz ± 3 Hz
Refer to the label at the back of the product as the standard voltage can vary in different countries.
Environmental
considerations
Operating
Temperature : 32°F - 104°F (0°C - 40°C)
Humidity : 10 % - 80 %, non-condensing
Storage
Temperature : -4°F - 113° F (-20°C - 45°C)
Humidity : 5 % - 95 %, non-condensing
Power Consumption
Normal Operation Stand-by
Typical Rating Max
Power Indicator
O On
Power Consumption RM40D
68 W 89 W 98 W 0.5 W
RM48D
79 W 104 W 114 W
-
Plug-and-Play
This SMART Signage TV can be installed and used with any Plug-and-Play compatible systems. Two-way data exchange between the SMART Signage
TV and PC system optimizes the SMART Signage TV settings. SMART Signage TV installation takes place automatically. However, you can customize the
installation settings if desired.
- Due to the nature of the manufacturing of this product, approximately 1 pixel per million (1ppm) may appear brighter or darker on the panel.
This does not affect product performance.
- This device is a Class A digital apparatus.
Web Site : http://www.samsung.com/displaysolutions/signagetv
Download the user manual from the website for further details.
Step3 Connect Source Devices
HDMI IN 2
(DVI)
HDMI IN 1
(STB)
USB
(
5V 0.5A)
/ CLONING
ANT IN
AIR/CABLE
COMMON
INTERFACE
AUDIO
OUT
RS232C IN
AUDIOL R
VIDEO
AV IN
PC IN
PC
AUDIO
IN
Antenna
USB device
PC
Set Top Box
Camcorder
PC
Speaker
Step5 Play Content
5 6
3 4
1
2
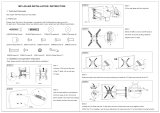
Before assembling the product, place the product down on a flat and stable surface so that the screen
is facing downwards.
Disassembly is in the reverse order of assembly.
Stand Installation
<Installation is complete>
Step4 Initial Setup
After powering on the product for the rst time, congure basic settings such as the
language, channel and time.
Language
Regional Settings
Channel Source
Auto Tuning
(
Auto Tuning
does not appear if
Set-top box
or
No TV(Signage Only)
is selected.)
Network Settings
Clock
Auto Power O
Setup Complete!
Channel Source
Select the source of your live TV signal.
Auto Tuning
You can automatically search broadcast signals and save retrieved chan-
nels.
Network
Connect to a wireless network to use the product as a TV+Signage.
* To use as a TV only, press the
Next
button and skip the
Network Settings
. This also applies if no wireless networks are
available. You can change settings later by selecting
MENU
m >
Network
>
Network Settings
.
1. Available wireless networks are listed automatically in
Network Settings
. Select a network name (SSID) to connect.
2. Enter your security key (
Enter password.
) and select
Done
.
The product may try to automatically connect to a wireless network
that is not secure.
3. If wireless networks are not listed automatically, select
Add Network
and enter a network name (SSID) to manually search for a network.
Starting MagicInfo
MagicInfo is a business solution that allows the product to be used as signage
(advertising media).
Press the
HOME
or
MagicInfo Player I
button on the remote control to run the
MagicInfo browser. You can browse or play content stored on the internal memory
or a USB storage device.
Playing content from
the internal memory
or USB
Play images or videos stored in the internal memory or the connected USB.
Playing content from
your computer or
mobile device
The content sent via
MagicInfo Express Content Creator
will be displayed as a
schedule. You can also edit the schedule using your mobile device.
For more information on how to use the
MagicInfo Express Content Creator
or
mobile app, refer to
Step6
.
If the internal memory is insucient, connect a USB device and go to
Options
Settings
Default
Storage
at the top right of the MagicInfo
browser. Change the option to USB.
* To nd out how much internal memory is left, press
INFO
on the remote
control.
Schedule
Device : All Content : All
Sort by : File Name
Options
Pre-connection Checkpoints
-
Before connecting a source device, read the user manual provided with it.
The number and locations of ports on source devices may dier from device to device.
-
Do not connect the power cable until all connections are completed.
Connecting the power cable during connection may damage the product.
-
Connect the sound ports correctly: left = white and right = red.
-
Check the types of ports at the back of the product you want to connect.
-
If the product is in portrait orientation, it is not possible to change
Source List
.
-
Depending on the country or region.
Specications Contact SAMSUNG WORLD WIDE
Step6 Create & Schedule Your Business Content
Step2 - Type
B
For details on how to download the mobile app and on its features, go to http://www.samsung.com/displaysolutions/signagetv.
Network
Network Settings
AP000
Your wireless network is setup and ready to use.
Ready to play your business content.
-Run the Content Creator on your PC, then create and schedule your content. You can
send it to the Signage TV using the wireless network.
-Refer to the Content Creator manual for more information.
1 2 3 4 5 6
Starting
MagicInfo Express Content Creator
Using the mobile app








-

-

-
-
-.
Source List

-







Auto Tuning

Channel Source

Regional Settings

Language

No TV ) Signage Only(

Set-top box

Auto Tuning
Setup Complete !

Auto Power Off

Clock


Network Settings
Channel Source

Auto Tuning


Network


Next



Network Settings

Network

MENU
m

.
Network Settings
.
Network Settings

1

.
Done

Enter password.
2



3


Add Network





MagicInfo Player I

HOME

USB


USB
USB





MagicInfo Express Content
Creator



MagicInfo Express Content Creator

.
Step6

USB

Storage
Default

Settings

Options
.USB


INFO



.
- The
Content Creator
programme is installed on a computer and used to create or edit business content to create schedules. Conveniently create content using the default templates in the programme.
Congure the time settings to play the content during business hours. Content sent to your
SMART Signage TV
will automatically play based on the specied time settings.
- Use the MagicInfo mobile app to edit a schedule currently playing on your
SMART Signage TV
or send image or video les stored on a mobile device to your TV for playback.
-
Content Creator



SMART Signage TV


-

SMART Signage TV

MagicInfo Express Content Creator

Schedules can be sent directly to the product using the below methods. If there are two or more devices that have the same name, go to
MENU
m
>
Network
>
Device Name
and change the device names to make them distinguishable.
If there is a wireless network available.
Refer to
Step4. Initial Setup
>
Network Settings
.
If there is no wireless network available. On your
Signage TV
, go to
MENU
m
>
Network
>
Soft AP (Wi-Fi Hotspot)
and turn it on. Next, check the TV name and password.
Go to the Wi-Fi setup on your PC. Select your TV name and enter the password.
When you use USB Schedules can be sent to a USB device. Connect the USB device to your display. The schedule will play
automatically.
3
Playing content from your
SMART Signage TV

Device Name
< Network <
MENU
m





.
Network Settings

Step4



Soft AP ) Wi-Fi Hotspot(

Network

MENU
m

Signage TV



USB
USBUSB
SMART Signage TV

- If you install the programme for the first time, the tutorial automatically starts to explain the features of the programme step by step.
For details on how to use a feature when using the programme, press at the top right.
- Press the
Create Content
button to create content using default templates or edit previously created content.
- Using the
Schedule Content
menu, organize content for playback on certain days of the week at specific time slots to create a weekly schedule.
- Send a schedule to the product or a USB device.
1.
Create Content
2
Select Template
3
Customize Template
4
Schedule Content
5
Send
2
-

 
-

Create Content

-
Schedule Content

-.USB

Creating content and schedules
Connect the USB that came with the product to your PC. The install screen appears automatically.
Select
MagicInfo Express Content Creator
to install the programme.
If the install screen does not appear automatically, run the autorun.exe le stored on the USB using a le browser.
Alternatively, download and install it from the website at http://www.samsung.com/displaysolutions/signagetv.
When the install process starts, congure the language, area and other required settings by pressing Next when
prompted.
1

USB

MagicInfo Express Content Creator

USB







Content Creator

Installing
Content Creator
on your computer
Country Customer Care Centre
ALGERIA 021 36 11 00
BAHRAIN 8000-4726
EGYPT 08000-726786 and 16580
IRAN 021-8255
JORDAN 06 5777441 (B2B)
KUWAIT 183-2255 (183-CALL)
MOROCCO + 212 522586969
OMAN 800-SAMSUNG (726-7864)
PAKISTAN 0800-SAMSUNG (72678)
QATAR 800-2255 (800-CALL)
SAUDI ARABIA 920021230
SYRIA 18252273
TUNISIA 920021230
TURKEY 0850 2010 222
U.A.E 800-SAMB2B (726-222)






USB




Book 1.indb 2 2014-12-08  5:04:04
  • Page 1 1
  • Page 2 2

Samsung RM40D Quick start guide

Type
Quick start guide

Samsung RM40D: Versatile Entertainment and Information Display for Various Applications

Samsung RM40D is a versatile TV and signage solution that offers a wide range of features to meet your diverse needs. With its ability to function as both a TV and a signage display, it provides flexibility for use in various settings.

Key Features and Capabilities:

  1. TV and Signage Functionality: The RM40D can be used as a regular TV for entertainment purposes or as a signage display for commercial use. You can easily switch between these modes to suit your requirements.

  2. Content Creation: Using the provided MagicInfo Express Content Creator software, you can create engaging content for your signage display. This allows you to showcase promotional videos, images, and other information to capture the attention of your audience.

Ask a question and I''ll find the answer in the document

Finding information in a document is now easier with AI