Model Name
RM40D RM48D
Panel Size
40 CLASS (40.0 inches / 101 cm) 48 CLASS (47.6 inches / 121 cm)
Display area
885.6 mm (H) x 498.15 mm (V) 1054.08 mm (H) x 592.92 mm (V)
Dimensions
(W x H x D / Weight)
Without Stand
906.6 x 532.9 x 65.1 mm /
7.6 kg 1075.1 x 627.6 x 65.5 mm / 11.1 kg
With Stand
906.6 x 578.2 x 196.4 mm /
8.3 kg 1075.1 x 673.8 x 203.9 mm / 12.0 kg
Audio Output
10 W + 10 W
Power Supply
AC 100 to 240 VAC (+/- 10%), 60 / 50 Hz ± 3 Hz
Refer to the label at the back of the product as the standard voltage can vary in different countries.
Environmental
considerations
Operating
Temperature : 32°F ~ 104°F (0°C ~ 40°C)
Humidity : 10 % - 80 %, non-condensing
Storage
Temperature : -4°F ~ 113°F (-20°C ~ 45°C)
Humidity : 5 % - 95 %, non-condensing
- Plug-and-Play
This
SMART Signage TV
can be installed and used with any Plug-and-Play compatible systems. Two-way data exchange between the
SMART Signage TV
and
PC system optimizes the
SMART Signage TV
settings.
SMART Signage TV
installation takes place automatically. However, you can customize the installation
settings if desired.
- Due to the ture of the manufacturing of this product, approximately 1 pixel per million (1ppm) may appear brighter or darker on the panel.
This does not aect product performance.
- This device is a Class A digital apparatus.
Power Consumption
Normal Operation Stand-by
Typical Rating Max
Power Indicator
O On
Power Consumption RM40D
68 W 89 W 98 W 0.5 W
RM48D
79 W 104 W 114 W
- The displayed power consumption level can vary in dierent operating conditions or when settings are changed.
Web Site : http://www.samsung.com/displaysolutions/signagetv
Download the user manual from the website for further details.
Step5 Play Content
Downloading MagicInfo Express Free
Starting
MagicInfo Express Content Creator
- If you install the programme for the first time, the tutorial automatically starts to explain the features of the programme step by step.
For details on how to use a feature when using the programme, press at the top right.
- Press the
Create Content
button to create content using default templates or edit previously created content.
- Using the
Schedule Content
menu, organize content for playback on certain days of the week at specific time slots to create a weekly schedule.
- Send a schedule to the product or a USB device.
Schedules can be sent directly to the product using the below methods. If there are two or more devices that have the same name,
go to
MENU
m
>
Network
>
Device Name
and change the device names to make them distinguishable.
If there is a wireless network
available.
Refer to Step4. Initial Setup
<
Network Settings
.
If there is no wireless network
available.
On your
Signage TV
, go to
MENU
m
>
Network
>
Soft AP (Wi-Fi Hotspot)
and turn it on. Next, check the
TV name and password.
Go to the Wi-Fi setup on your PC. Select your TV name and enter the password.
When you use USB
(available for PC software)
Schedules can be sent to a USB device. Connect the USB device to your display. The schedule will play automatically.
5 6
3 4
1
2
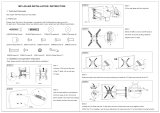
Before assembling the product, place the product down on a flat and stable surface so that the screen
is facing downwards.
Disassembly is in the reverse order of assembly.
Stand Installation
<Installation is complete>
Starting MagicInfo
MagicInfo is a business solution that allows the product to be used as signage (advertising media).
Press the
HOME
or
MagicInfo Player I
button on the remote control to run the
MagicInfo browser. You can browse or play content stored on the internal memory or a USB
storage device.
Playing content from the
internal memory or USB
Play images or videos stored in the internal memory or the connected USB.
Playing content from your
computer or mobile device
The content sent via
MagicInfo Express Content Creator
will be displayed as a schedule.
You can also edit the schedule using your mobile device.
For more information on how to use the
MagicInfo Express Content Creator
or mobile
app, refer to
Step6
.
If the internal memory is insucient, connect a USB device and go to
Options
→
Settings
→
Default
Storage
at the top right of the MagicInfo browser. Change the option to USB.
* To nd out how much internal memory is left, press
INFO
on the remote control.
Schedule
Device : All Content : All
Sort by : File Name
Options
Specications Contact SAMSUNG WORLD WIDE
Step6 Create & Schedule Your Business Content
Creating content and schedules on your PC
Playing content from your
SMART Signage TV
1.
Create Content 2. Select Template
3.
Customize Template
4.
Schedule Content
5.
Send
Step2 - Type
B
1
2
3
MagicInfo Express software provides easy-to-use tools to create, edit, schedule and deploy your custom content through the Samsung SMART Signage TV.
MagicInfo Mobile App makes content management even more convenient using your smartphone or tablets. Create and schedule in-store menu boards, welcome screens, slideshows and promotions to complement and reinforce your unique business
environment.
HEB
.הטמ יפלכ הנופ ךסמה רשאכ ביציו רשי חטשמ לע הטמ יפלכ םינפה םע רצומה תא חנה ,רצומה תבכרה ינפל
.הבכרהל ךופה רדסב עצבתמ קוריפה
דמעמה תנקתה
HEB
>המלשוה הנקתהה<
HEB
HEB
MagicInfo תלעפה .)םוסרפל הידמ( טולישכ רצומב שמתשהל רשפאמש יקסע ןורתפ אוה MagicInfo
ןפדפד תא ליעפהל ידכ קוחר-טלשב MagicInfo Player I ןצחלה לע וא
HOME
לע ץחל
.USB ןוסחא ןקתהב וא ימינפה ןורכיזב ןסחואמש ןכות ליעפהל וא שולגל לכות .MagicInfo
ןורכיזהמ ןכות תלעפה
USB ןקתהמ וא ימינפה
.רבוחמה USB-ה ןקתהב וא ימינפה ןורכיזב םינסחואמה םינוטרס וא תונומת לעפה
וא בשחמהמ ןכות תלעפה
דיינה רישכמהמ
ךורעל םג לכות .םינמז חולכ גצוי
MagicInfo Express Content Creator
ךרד חלשנש ןכותה
.ךלש דיינה רישכמה תועצמאב םינמזה חול תא
,דיינל םושייב וא
MagicInfo Express Content Creator
-ב שומישה ןפוא לע ףסונ עדימל
.Step6 האר
Default
←
Settings
←
Options
לא רובעו USB ןקתה רבח , קיפסמ וניא ימינפה ןורכיזה םא
.USB-ל תורשפאה תא הנש .MagicInfo ןפדפד לש הנוילעה תינמיה הניפב
Storage
.קוחר-טלשב
INFO
לע ץחל ,ראשנ ימינפ ןורכיז המכ ררבל ידכ *
HEB
- .בלש רחא בלש ,תינכותה לש תונוכתה תא ריבסהל ידכ יטמוטוא ןפואב לעפות הכרדהה תכרע ,הנושארה םעפב תינכותה תא ןיקתמ התא םא
.הנוילעה תינמיה הניפב לע שקה ,תינכותב שומיש תעב יהשלכ הנוכתב שומישה ןפוא לע םיטרפל
- .רבעב רצונש ןכות ךורעל ידכ וא לדחמ תרירב תוינבת תועצמאב ןכות רוציל ידכ
Create Content
ןצחלה לע ץחל
- .יעובש םינמז חול רוציל ידכ ,תויפיצפס ןמז תוצבשמבו עובשב םימיוסמ םימיב הלעפהל ןכותה תא ןגרא ,
Schedule Content
טירפתה תועצמאב
- .USB ןקתהל וא רצומל םינמז חול חלש
HEB
.Samsung SMART Signage TV-ב ךלש תישיא םאתומה ןכותה לש הסירפו ןומזת ,הכירע ,הריצי ךרוצל םיטושפ םילכ תקפסמ MagicInfo Express תנכות
.ךלש טלבאטה וא םכחה ןופלטה תועצמאב רתוי דוע חונל ןכות לוהינ ךפוה MagicInfo דיינל םושייה
.ךל תידוחייה תיקסעה הביבסה תא קזחלו םילשהל ידכ תונחב םיעצבמו תויפוקש תוגצמ ,החיתפ יכסמ ,םיטירפת תוחול ןמזתו רוצ
HEB
תבותכב רקב ,ךלש בשחמל הנכותה תא דירוהל ידכ
http://www.samsung.com/displaysolutions/signagetv
.ךלש בשחמב MagicInfo Express תא ןקתהו טנרטניאה רתאב הדרוהה ןצחל לע ץחל
HEB
לש App Store-ב וא Google Play תונחב רקב ,טלבאטל וא םכחה ןופלטל דיינל םושייה תא דירוהל ידכ
.ךלש דיינה ןקתהב MagicInfo םושייה תא ןקתהו Apple
MagicInfo Express Content Creator
תלעפה
HEB
ךלש בשחמב םינמז תוחולו ןכות תריצי
HEB
םניחב MagicInfo Express תדרוה
HEB
HEB
לא רובע ,םש ותוא ילעב רתוי וא םירישכמ ינש םימייק םא .ןלהלש תוטישה תועצמאב רצומל תורישי םינמז תוחול חולשל ןתינ
.םהיניב ןיחבהל היהי ןתינש ידכ םירישכמה תומש תא הנשו
Device Name
>
Network
>
MENU
m
.הנימז תיטוחלא תשר שי םא.
Network Settings
> תינושאר הרדגה .Step4 ןייע
.הנימז תיטוחלא תשר ןיא םא
,ןכמ רחאל .וז תורשפא לעפהו Soft AP ( Wi-Fi Hotspot) > Network >
MENU
m
לא רובע ,Signage TV-ב
.המסיסהו היזיוולטה םש תא קודב
.המסיסה תא ןזהו היזיוולטה םש תא רחב .ךלש בשחמב Wi-Fi-ה תרדגהל רובע
USB-ב שומיש תעב
)בשחמ תנכות רובע ןימז(
.תיטמוטוא לעפוי םינמזה חול .גצל USB-ה ןקתה תא רבח .USB ןקתהל םינמז תוחול חולשל ןתינ
SMART Signage TV
-מ ןכות תלעפה
SAMSUNG WORLD WIDE םע רשק רוצ
HEB
HEB
http://www.samsung.com/displaysolutions/signagetv :טנרטניא רתא
.טנרטניאה רתאמ שמתשמל ךירדמה תא דרוה ,םיפסונ םיטרפל
Step3 Connect Source Devices
Pre-connection Checkpoints
-
Before connecting a source device, read the user manual provided with it.
The number and locations of ports on source devices may dier from device to device.
-
Do not connect the power cable until all connections are completed.
Connecting the power cable during connection may damage the product.
-
Connect the sound ports correctly: left = white and right = red.
-
Check the types of ports at the back of the product you want to connect.
-
If the product is in portrait orientation, it is not possible to change
Source List
.
HEB
רוביחה ינפל תרוקיב תודוקנ
- .רישכמל הוולנש שמתשמל ךירדמה תא ארק ,רוקמ רישכמ רבחתש ינפל
.םינושה םירישכמב םינוש תויהל םייושע ןהלש םימוקימהו רוקמה ירישכמב תואיציה רפסמ
- .םירוביחה לכ תמלשהל דע למשחה לבכ תא רבחל ןיא
.רצומל קזנ םורגל לולע םירוביחה עוציב ןמזב למשחה לבכ רוביח
- .םודא = ןימיו ןבל = לאמש :יוארכ לוקה תואיצי תא רבח
- .רבחל ךנוצרבש רצומה בגב תואיציה יגוס תא קודב
- .
Source List
תא תונשל ןתינ אל ,ךרואל ןוויכב ןקתומ רצומה םא
רוקמה ירישכמ רוביח
HEB
יקסע ןכות לש ןומזתו הריצי
HEB
Step4 Initial Setup
After powering on the product for the rst time, congure basic settings such as the language,
channel and time.
Language
→
Regional Settings
→
Channel Source
→
Auto Tuning
(
Auto Tuning
does not
appear if
Set-top box
or
No TV(Signage Only)
is selected.)
→
Network Settings
→
Clock
→
Auto Power O
→
Setup Complete!
Channel
Source
Select the source of your live TV signal.
Auto Tuning
You can automatically search broadcast signals and save retrieved channels.
Network
Connect to a wireless network to use the product as a TV+Signage.
* To use as a TV only, press the
Next
button and skip the
Network
Settings
. This also applies if no wireless networks are available. You
can change settings later by selecting
MENU
m <
Network
<
Network
Settings
.
1. Available wireless networks are listed automatically in
Network
Settings
. Select a network name )SSID( to connect.
2. Enter your security key )
Enter password.
( and select
Done
.
The product may try to automatically connect to a wireless network
that is not secure.
3. If wireless networks are not listed automatically, select
Add Network
and enter a network name )SSID( to manually search for a network.
Network
Network Settings
AP000
Your wireless network is setup and ready to use.
Ready to play your business content.
-Run the Content Creator on your PC, then create and schedule your content. You can
send it to the Signage TV using the wireless network.
-Refer to the Content Creator manual for more information.
1 2 3 4 5 6
HEB
ץורעה ,הפשה ומכ תויסיסבה תורדגהה תרוצת תא עבק ,הנושארה םעפב רצומה תלעפה רחאל
.העשהו
תורשפאה(
Auto Tuning
←
Channel Source
←
Regional Settings
←
Language
← ).הרחבנ
No TV(Signage Only)
וא
Set-top box
תורשפאה רשאכ העיפומ אל
Auto Tuning
Setup Complete!
←
Auto Power O
←
Clock
←
Network Settings
Channel
Source
.יח רודישב היזיוולטה תוא לש רוקמה תא רחב
Auto Tuning
.ורזחואש םיצורע רומשלו רודיש תותוא יטמוטוא ןפואב שפחל ךתורשפאב
Network
.טוליש+היזיוולטכ רצומב שמתשהל ידכ תיטוחלא תשרל רבחתה
לע גלדו
Next
ןצחלה לע ץחל ,דבלב היזיוולטכ רישכמב שמתשהל ידכ *
.תונימז תויטוחלא תותשר ןיא רשאכ םג הלח וז תורשפא .
Network Settings
תויורשפאב הריחב ידי-לע רתוי רחואמ דעומב תורדגהה תא תונשל ןתינ
.
Network Settings
>
Network
>
MENU
m
רחב .
Network Settings
תחת תיטמוטוא תוגצומ תונימז תויטוחלא תותשר .1
.רבחתהל ידכ )SSID( תשר םש
.
Done
תורשפאב רחבו )
Enter password.
( החטבאה חתפמ תא ןזה .2
.תחטבואמ הניאש תיטוחלא תשרל תיטמוטוא רבחתהל הסני רצומהש ןכתיי
תורשפאב רחב ,יטמוטוא ןפואב תויטוחלא תותשר תוגצומ אל םא .3
.ינדי ןפואב תשר שפחל ידכ )SSID( תשר םש ןזהו
Add Network
תינושאר הרדגה
הפעלת תוכן
HEB
ישיא בשחמ
ישיא בשחמ
ואדיו תמלצמ
לוקמר
ריממ
USB ןקתה
הנטנא
Country/Area Customer Care Centre
AUSTRALIA 1300 362 603
INDONESIA
021-5699-7777
0800-112-8888 (Toll Free)
JAPAN 0120-363-905
MALAYSIA
1800-88-9999
+603-7713 7420 (Overseas contact)
MYANMAR +95-1-2399-888
NEW ZEALAND 0800 726 786
PHILIPPINES
1-800-10-726-7864 [PLDT Toll Free]
1-800-8-726-7864 [Globe Landline and Mobile]
02- 422-2111 [Standard Landline]
SINGAPORE 1800 7267864 | 1800-SAMSUNG
TAIWAN
0800-32-9999
0809-00-5237 (B2B / Dealer)
THAILAND
0-2689-3232
1800-29-3232 (Toll free)
VIETNAM 1800 588 889
BANGLADESH
09612300300
08000300300 (Toll free)
INDIA
1800 40 SAMSUNG (1800 40 7267864) (Toll-Free)
1800 5 SAMSUNG (1800 5 7267864) (Toll-Free)
SRI LANKA 011 SAMSUNG (011 7267864)
ISRAEL *6963
To download the software on your PC, visit
http://www.samsung.com/displaysolutions/signagetv
Click the download button on the website and install MagicInfo Express on your PC.
To download the mobile app on your smartphone or tablet, visit the Google Play Store or
AppleAppStore and install MagicInfo app on your mobile.
MagicInfo Express MagicInfo