Page is loading ...

Citrix CloudPlatform
(powered by Apache
CloudStack) Version
4.5 Installation Guide
Revised March 13, 2015 06:00 pm IST
Citrix CloudPlatform

Citrix CloudPlatform (powered by Apache CloudStack) Version 4.5 Installation Guide
Citrix CloudPlatform (powered by Apache CloudStack) Version
4.5 Installation Guide
Revised March 13, 2015 06:00 pm IST
Author Citrix CloudPlatform
© 2014 Citrix Systems, Inc. All rights reserved. Specifications are subject to change without
notice. Citrix Systems, Inc., the Citrix logo, Citrix XenServer, Citrix XenCenter, and CloudPlatform
are trademarks or registered trademarks of Citrix Systems, Inc. All other brands or products are
trademarks or registered trademarks of their respective holders.
If you you want to learn about installing CloudPlatform, read this document.

iii
1. About this Guide 1
1.1. About the Audience for this Guide ................................................................................. 1
1.2. Using the Product Documentation .................................................................................. 1
1.3. Experimental Features .................................................................................................. 1
1.4. Additional Information and Help ..................................................................................... 1
1.5. Contacting Support ....................................................................................................... 2
2. Planning for Your CloudPlatform Installation 3
2.1. CloudPlatform Installation Task Flow ............................................................................. 3
3. System Requirements 5
3.1. Operating System Requirements ................................................................................... 5
3.2. Hardware Requirements ................................................................................................ 5
3.3. Web Browser Requirements .......................................................................................... 5
3.4. Network Requirements .................................................................................................. 5
3.5. Ports that CloudPlatform Uses ...................................................................................... 6
4. Preinstallation Tasks 7
4.1. Preparing the Operating System to Host the Management Server .................................... 7
4.1.1. Downloading CloudPlatform Installation Package ................................................. 7
4.1.2. Verifying the Fully-Qualified Host Name .............................................................. 8
4.1.3. Setting the Value of SELinux Variable ................................................................. 8
4.1.4. Verifying Connectivity ......................................................................................... 8
4.1.5. Configuring a Local yum Repository .................................................................... 9
4.1.6. Configuring User Process Limits ......................................................................... 9
4.1.7. Enabling NTP for Synchronizing Time ............................................................... 10
4.1.8. Installing and Configuring the Database ............................................................ 11
4.1.9. Configuring Network File System (NFS) Shares ................................................. 13
5. Installing CloudPlatform Management Server 17
5.1. Install the Management Server on the First Host .......................................................... 17
5.2. Prepare the System VM Template ............................................................................... 19
5.3. Security Considerations for Management Server ........................................................... 21
5.3.1. Enabling HTTPS for CloudPlatform Management Server .................................... 21
5.3.2. Configuring SSL Ciphers for Management Servers ............................................. 23
5.4. Logging on to CloudPlatform Web UI ........................................................................... 23
6. Logging on to the Management Server Web UI 25
7. Configuring Cluster Management Server Set Up 27
7.1. Installing Additional CloudPlatform Management Servers .............................................. 27
7.1.1. Management Server Load Balancing ................................................................. 27
7.2. Replicating Database (Optional) ................................................................................... 27
7.2.1. Failover ............................................................................................................ 29
8. Installing the Usage Server (Optional) 31
8.1. Requirements for Installing the Usage Server ............................................................... 31
8.2. Steps to Install the Usage Server ................................................................................ 31
9. Upgrading CloudPlatform to the Latest Version 33
9.1. Upgrading from 4.3.x to 4.5.0 ...................................................................................... 33
9.2. Upgrading from 4.2.x to 4.5.0 ...................................................................................... 38
9.3. Upgrading from 3.0.x to 4.5.0 ...................................................................................... 43
9.4. Upgrading Operating System version of KVM Hosts to RHEL 6.3 from RHEL 6.0 or
6.1 .................................................................................................................................... 49
9.5. Updating the Existing vCenter Password for the VMware Clusters Created in
CloudPlatform 3.0.6 (VMware only) .................................................................................... 50
9.6. Upgrading vCenter Server Version 5.1 to Version 5.5 ................................................... 51

Citrix CloudPlatform (powered by Apache CloudStack) Version 4.5 Installation Guide
iv
9.7. Upgrading KVM Agents (KVM Only) ............................................................................ 51
9.8. Upgrading Hyper-V Agents (Hyper-V Only) ................................................................... 52
9.9. Upgrading KVM Host Opearting System ....................................................................... 53
9.10. Upgrading KVM Hosts ............................................................................................... 54
9.11. Upgrading Secondary Storage VMs and Console Proxy VMs ....................................... 55
9.12. Upgrading the Virtual Routers Selectively ................................................................... 55
9.13. Changing a Standard vSwitch Zone to a VMware dvSwitch Zone (VMWare Only) .......... 56
9.14. Upgrade CloudPlatform Bare Metal Agent on PXE and DHCP Servers ......................... 56
9.15. Updating SystemVM.ISO ........................................................................................... 57
9.16. Upgrading and Applying Hotfix on XenServer Hypervisor Hosts ................................... 58
9.16.1. Upgrading to a New XenServer Version .......................................................... 58
9.16.2. Applying Hotfixes to a XenServer Cluster ........................................................ 60
9.16.3. Installing CloudPlatform XenServer Support Package (CSP) ............................. 63
9.16.4. Upgrading to XenServer 6.2 SP1 Hotfix XS62ESP1005 .................................... 63
9.17. Upgrading from Apache CloudStack to CloudPlatform ................................................. 64
A. Latest System VM Templates 65
Index 69

Chapter 1.
1
About this Guide
1.1. About the Audience for this Guide
This guide is meant for anyone responsible for installing CloudPlatform such as cloud administrators
and Information Technology (IT) administrators.
1.2. Using the Product Documentation
The following guides provide information about CloudPlatform:
• Citrix CloudPlatform (powered by Apache CloudStack) Installation Guide
• Citrix CloudPlatform (powered by Apache CloudStack) Concepts Guide
• Citrix CloudPlatform (powered by Apache CloudStack) Getting Started Guide
• Citrix CloudPlatform (powered by Apache CloudStack) Administration Guide
• Citrix CloudPlatform (powered by Apache CloudStack) Hypervisor Configuration Guide
• Citrix CloudPlatform (powered by Apache CloudStack) Developer's Guide
For complete information on any known limitations or issues in this release, see the Citrix
CloudPlatform (powered by Apache CloudStack) Release Notes.
For information about the Application Programming Interfaces (APIs) that is used in this product, see
the API documents that are available with CloudPlatform.
1.3. Experimental Features
CloudPlatform product releases include some experimental features for customers to test and
experiment with in non-production environments, and share any feedback with Citrix. For any issues
with these experimental features, customers can open a support ticket but Citrix cannot commit to
debugging or providing fixes for them.
The following experimental featues are inluded in this release:
• Advanced Networking in Baremetal
• Linux Containers
• Supported Management Server OS and Supported Hypervisors: RHEL7/CentOS 7 for experimental
use with Linux Containers
1.4. Additional Information and Help
Information on accessing Citrix Knowledge Center and about contacting technical support.

Chapter 1. About this Guide
2
1.5. Contacting Support
The support team is available to help customers plan and execute their installations. To contact the
support team, log in to the support portal at support.citrix.com/cloudsupport
1
by using the account
credentials you received when you purchased your support contract.
1
http://support.citrix.com/cloudsupport

Chapter 2.
3
Planning for Your CloudPlatform
Installation
This chapter explains how you can plan for the successful installation of CloudPlatform in your
environment.
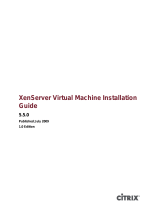
2.1. CloudPlatform Installation Task Flow
The following chart displays the tasks that you must complete to install CloudPlatform successfully.
Each box in the chart represents a task or a bunch of associated tasks that you must perform. The
arrows indicate the sequence in which you must perform these tasks.

4

Chapter 3.
5
System Requirements
This chapter describes the requirements for installing CloudPlatform Management Server.
3.1. Operating System Requirements
Following are the minimum Operating System requirements for installing CloudPlatform.
Preferred Operating Systems:
• RHEL versions 6.3, 6.4, 6.5, and 7 (64-bit)
• CentOS versions 6.3, 6.4, 6.5, and 7 (64-bit)
Note
RHEL 7 and CentOS 7 are supported only for experimental use with Linux Containers (LXC)
hypervisor.
Citrix recommends you to purchase a RHEL support license. Citrix support will not be helpful in
resolving issues with the underlying RHEL operating system.
3.2. Hardware Requirements
Following are the minimum hardware requirements for installing CloudPlatform:
• CPU - 64-bit X86 CPU
• Memory - 4 GB
• Hard Disk - 50 GB of local disk. Citrix recommends to use 500 GB when secondary storage is on
the same machine with Management Server.
3.3. Web Browser Requirements
The Web browsers that the CloudPlatform Web UI supports are:
• Mozilla Firefox versions 26 to 33
• Google Chrome 38.x
• Apple Safari 7.1
• Microsoft Internet Explorer versions 9, 10 and 11
3.4. Network Requirements
Following are the minimum network requirements for installing CloudPlatform. This section describes
the ports, protocol, firewall considerations, and so on, required for installing CloudPlatform
• One NIC card with static IP address.
• Fully-qualified domain name for the machine where you want to install the Management Server
software.

Chapter 3. System Requirements
6
• Default user file-creation mode mask (umask). The value is 022.
If the value is not 022, several files might not be accessible to the cloud user, which would result in
installation failure.
• Red Hat Network Account - Enable SELinux on the RHEL Operating System.
3.5. Ports that CloudPlatform Uses
This section lists the ports that CloudPlatform and its entities use for communication.
Management Server
The following ports are opened on Management Server:
Port Function
8080 Default port for CloudPlatform web server.
8096 Port for the user or client to communicate with
Management Server (unauthenticated).
9090 Port for the communication among Management
Servers in a cluster.
8250 Port for the agents (hypervisor agents such as
KVM agent, Secondary Storage VM (SSVM),
and Console Proxy VM (CPVM)) to communicate
with Management Server.
MySQL Database Server
The following port is opened on MySQL database server:
Port Function
3306 Helps Management Server communicate with
MySQL database server.
System VMs
The following port is opened on System VMs (virtual router, Secondary storage VM (SSVM), and
(CPVM)):
Port Function
3922 Helps Management Server communicate with
system VMs.
Secondary Storage
The following port is opened on secondary storage:
Port Function
111/2049 Helps Management Server communicate with
secondary storage.

Chapter 4.
7
Preinstallation Tasks
4.1. Preparing the Operating System to Host the
Management Server
You must do the following tasks:
• Section 4.1.1, “Downloading CloudPlatform Installation Package ”
• Section 4.1.2, “Verifying the Fully-Qualified Host Name ”
• Section 4.1.3, “Setting the Value of SELinux Variable ”
• Section 4.1.4, “Verifying Connectivity ”
• Section 4.1.5, “Configuring a Local yum Repository ”
• Section 4.1.6, “Configuring User Process Limits ”
• Section 4.1.7, “Enabling NTP for Synchronizing Time ”
• Section 4.1.8, “Installing and Configuring the Database”
• Section 4.1.9, “Configuring Network File System (NFS) Shares ”
4.1.1. Downloading CloudPlatform Installation Package
This section describes how you can download the CloudPlatform version 4.5 installation package to
the system where you want to install Management Server.
1. Access the Citrix - Downloads website at https://www.citrix.com/English/ss/downloads/
Note
To download the installation packages, you must need an active My Citrix account.
2. On the left-side of the Citrix - Downloads website, under Find Downloads, select CloudPlatform
as the product and click Find.
3. On the CloudPlatform page, expand CloudPlatform 4.5 and navigate to the CloudPlatform 4.5
page to view the installation package information.
4. Identify the CloudPlatform 4.5 installation package that you want to download and click Download
on the right side.
5. In the Download Agreement page, select I have read and certify that I comply with the above
Export Control Laws and click Accept.
6. In the Citrix Download Manager page, click Download Now.

Chapter 4. Preinstallation Tasks
8
A file with a name similar to CloudStack-VERSION-NOSVERSION.tar.gz will be downloaded to
your computer.
Section 5.1, “Install the Management Server on the First Host ”
4.1.2. Verifying the Fully-Qualified Host Name
To verify the Fully-Qualified Host Name of the host where you install Management server, do the
following:
1. Log-in to the operating system of the host using the root privileges.
2. Run the following command to verify the fully-qualified host name:
# hostname --fqdn
This must return a fully qualified host name. For example, managament1.lab.example.org. If the
command fail to elicit an appropriate result, you must verify whether the /etc/hosts file contains
the fully-qualified host name.
4.1.3. Setting the Value of SELinux Variable
Security-Enhanced Linux (SELinux), the Linux kernel security module, enables CloudPlatform to
support access control security policies. If you are using RHEL operating system, you must verify
whether SELinux is configured on your operating system. Then, you can set the value of SELinux
variable to "permissive".
1. Log on to the operating system of the host using the root privileges.
2. Check to see whether SELinux is installed on your machine. In RHEL, SELinux is installed and
enabled by default. Run the following command to verify this:
# rpm -qa | grep selinux
3. Using vi editor, edit the /etc/selinux/config file and set the value of the SELINUX variable to
“permissive”. This ensures that the permissive setting will be maintained after a system reboot.
# vi /etc/selinux/config
4. Run the following command to set the value of SELinux to permissive and make it effective
immediately, without requiring a system reboot.
# setenforce 0
4.1.4. Verifying Connectivity
To ensure that the computer where you want to install management server can connect to the
Internet, do the following:
1. Log-in to the operating system of the host using the root privileges.
2. Use the ping command to verify connectivity. For example, you can ping www.citrix.com.

Configuring a Local yum Repository
9
# ping www.citrix.com
4.1.5. Configuring a Local yum Repository
If you do not have a Red Hat Network account, you need to configure a local Yum repository.
1. Log on to the operating system of the host using the root privileges.
2. If you are working with a physical host, insert the RHEL installation CD. If you are using a VM,
attach the RHEL ISO.
3. Mount the CDROM to /media.
4. Create a repo file at /etc/yum.repos.d/rhel6.repo. In this repo file, insert the following
lines:
[rhel]
name=rhel6
baseurl=file:///media
enabled=1
gpgcheck=0
Note
If you are using RHEL 7 and you do not have a Red Hat Network account, register it online from
the Red Hat site. Then, run the following:
# subscription-manager register --username <username> --password <password> --auto-
attach
# subscription-manager repos --enable=rhel-7-server-rpms
# subscription-manager repos --enable=rhel-7-server-optional-rpms
4.1.6. Configuring User Process Limits
For smoother functioning, it's recommended to increase the maximum user process limit on RHEL 6
platforms. The default value is 1024. To modify the value, perform the following:
1. Log in to the operating system of the host as a cloud user.
2. Modify the following:
# /etc/security/limits.d/90-nproc.conf
To increase the value to 2048, run the following:
# cloud soft nproc 2048

Chapter 4. Preinstallation Tasks
10
Note
You must perform this configuration and set the nproc value to 2048 to ensure the
uninterupted collection of usage statistics and log rotation.
3. Log out.
A reboot is not required for this to take effect; however, the user must be logged out.
4. To check whether the value has been updated, run the following as the cloud user:
# ulimit -u
4.1.7. Enabling NTP for Synchronizing Time
NTP is required to synchronize the clocks of the servers in your cloud. To enable NTP on the host, do
the following:
1. Run the following command to install NTP:
# yum install ntp
2. Using vi editor, edit the NTP configuration file to point to your NTP server.
# vi /etc/ntp.conf
In the NTP configuration file, add one or more servers with the names of the NTP servers you
want to use.
For example:
server 0.xenserver.pool.ntp.org
server 1.xenserver.pool.ntp.org
server 2.xenserver.pool.ntp.org
server 3.xenserver.pool.ntp.org
3. Run the command to restart the NTP client.
# service ntpd restart
4. Make sure NTP will start again upon reboot.
# chkconfig ntpd on

Installing and Configuring the Database
11
4.1.8. Installing and Configuring the Database
CloudPlatform uses a MySQL database server to store its data. Usually in an enterprise environment,
the CloudPlatform Management Server is installed on multiple nodes and the MySQL database is
installed on a separate node.
The following procedure explains how to install and configure MySQL database on a separate node.
4.1.8.1. Installing and Configuring MySQL Database on a Standalone
Server
This section describes how to install MySQL on a standalone node, separate from the Management
Server. This configuration is intended for a deployment that includes several Management Server
nodes.
1. Check the version of MySQL that you have installed.
• For RHEL 6.x, you must install MySQL version 5.1.73 or higher.
If you have installed any previous versions of MySQL, do the following before you proceed:
a. Uninstall the MySQL version that is earlier than 5.1.73.
b. Log on as root user to your database node and run the following commands. If you are
going to install a replica database, then log-in to the master.
# yum install mysql-server
# chkconfig --level 35 mysqld on
• For RHEL 7.0, you must install MySQL version 5.6.21.
2. Edit the MySQL configuration and insert the following lines in the [mysqld] section.
Location of [mysqld] section is /etc/my.cnf or /etc/mysql/my.cnf, depending on your OS.
You can place these lines below the datadir line. The max_connections parameter should be
set to 350 multiplied by the number of Management Servers you are deploying. This example
assumes two Management Servers.
innodb_rollback_on_timeout=1
innodb_lock_wait_timeout=600
max_connections=700
log-bin=mysql-bin
binlog-format = 'ROW'
expire_logs_days=10
max_binlog_size=100M
skip-name-resolve

Chapter 4. Preinstallation Tasks
12
Note
If you are not using the database replication, you can use the expire_logs_days
and the max_binlog_size parameters to truncate the MySQL binary logs. The
expire_logs_days parameter defines the number of days to store the binary log files. The
max_binlog_size parameter defines the maximum size of each bin log file.
The binlog-format variable is supported in MySQL versions 5.1 and greater. It is not
supported in MySQL 5.0. In some versions of MySQL, an underscore character is used in
place of the hyphen in the variable name. For the exact syntax and spelling of each variable,
consult the documentation for your version of MySQL.
3. Start the MySQL service, then invoke MySQL as the root user.
# service mysqld start
# mysql -u root
4. MySQL does not set a root password by default. It is very strongly recommended that you set
a root password as a security precaution. Run the following command, and substitute your own
desired root password for <password>. You can answer "Y" to all questions except "Disallow root
login remotely?". Remote root login is required to set up the databases.
mysql> SET PASSWORD = PASSWORD('password');
From now on, start MySQL with mysql -p so it will prompt you for the password.
5. To grant access privileges to remote users, perform the following steps.
a. Run the following command from the mysql prompt, then exit MySQL:
mysql> GRANT ALL PRIVILEGES ON *.* TO ‘root@%’ WITH GRANT OPTION;
mysql> exit
b. Restart the MySQL service.
# service mysqld restart
c. Open the MySQL server port (3306) in the firewall to allow remote clients to connect.
# iptables -I INPUT -p tcp --dport 3306 -j ACCEPT
d. Edit the /etc/sysconfig/iptables file and add the following lines at the beginning of the INPUT
chain.
-A INPUT -p tcp --dport 3306 -j ACCEPT

Configuring Network File System (NFS) Shares
13
After you install Management Server on the first node, you must configure the database client on the
same node. For more information, see steps 4 and 5 of Section 5.1, “Install the Management Server
on the First Host ”
4.1.8.2. Security Consideration for MySQL
Ensure that you change the default passwords for all accounts after the MySQL installation by running
mysql_secure_installation. For more information, see mysql_secure_installation — Improve MySQL
Installation Security
1
.
4.1.9. Configuring Network File System (NFS) Shares
NFS Shares On a Distinct Node:
This section describes how to set up Network File System (NFS) shares for secondary and (optionally)
primary storage on an NFS server running on a separate node from the Management Server node.
The exact commands for the following steps may vary depending on the version of the operating
system that you use.
Warning
(KVM only) Ensure that no volume is already mounted at your NFS mount point.
1. On the storage server, create an NFS share for secondary storage. If you are using NFS for
primary storage, create a second NFS share. For example:
# mkdir -p /export/primary
# mkdir -p /export/secondary
2. To configure the new directories as NFS exports, edit /etc/exports. Export the NFS share(s) with
rw,async,no_root_squash. For example:
# vi /etc/exports
Insert the following line.
/export *(rw,async,no_root_squash)
3. Export the /export directory.
# exportfs -a
4. To mount the secondary storage on your Management Server, continue with the steps 5 and 6 of
Section 5.1, “Install the Management Server on the First Host ”. Then, restart the Management
Server host.
1
http://dev.mysql.com/doc/refman/5.7/en/mysql-secure-installation.html

Chapter 4. Preinstallation Tasks
14
Two NFS shares called /export/primary and /export/secondary are now set up.
If you want to configure the NFS shares for primary and secondary storage on the Management
Server node, do with the following steps:
1. Edit the /etc/sysconfig/nfs file.
# vi /etc/sysconfig/nfs
Uncomment the following lines:
LOCKD_TCPPORT=32803
LOCKD_UDPPORT=32769
MOUNTD_PORT=892
RQUOTAD_PORT=875
STATD_PORT=662
STATD_OUTGOING_PORT=2020
2. Edit the /etc/sysconfig/iptables file.
# vi /etc/sysconfig/iptables
Add the following lines at the beginning of the INPUT chain:
-A INPUT -m state --state NEW -p udp --dport 111 -j ACCEPT
-A INPUT -m state --state NEW -p tcp --dport 111 -j ACCEPT
-A INPUT -m state --state NEW -p tcp --dport 2049 -j ACCEPT
-A INPUT -m state --state NEW -p tcp --dport 32803 -j ACCEPT
-A INPUT -m state --state NEW -p udp --dport 32769 -j ACCEPT
-A INPUT -m state --state NEW -p tcp --dport 892 -j ACCEPT
-A INPUT -m state --state NEW -p udp --dport 892 -j ACCEPT
-A INPUT -m state --state NEW -p tcp --dport 875 -j ACCEPT
-A INPUT -m state --state NEW -p udp --dport 875 -j ACCEPT
-A INPUT -m state --state NEW -p tcp --dport 662 -j ACCEPT
-A INPUT -m state --state NEW -p udp --dport 662 -j ACCEPT
3. Run the following commands:
# service iptables restart
# service iptables save
4. If NFS v4 communication is used between client and server, add your domain to /etc/idmapd.conf
on both the hypervisor host and Management Server.
# vi /etc/idmapd.conf
Remove the character # from the beginning of the Domain line in idmapd.conf and replace the
value in the file with your own domain. In the example below, the domain is company.com.
Domain = company.com
5. Restart the Management Server host.


16
/