Page is loading ...

ACTION CAMERA
Detailed User Guide
Read this rst
Before use, be sure to read “Read This
Before Using the Camera” (p.2 -p.4)
GC-XA1

2
EN
Read This Before Using the Camera
Safety Instructions
• Beforeusingtheproductinwater,besuretoreadp.3andtousetheproductcorrectly.
• Malfunctionduetomisusebythecustomerisnotcoveredbywarranty.
• Donotusethisproductinwaterdeeperthan5m(16.4ft)orforlongerthan30minutes.
• Donotdrop,punctureordisassemblethecamera.
• Usethecamerawithcare.Roughhandlingmaydamagetheinternalcomponents.
• Donotexposethecameratohightemperature.
• Pleasenoticethatthecamerabodymaybecomewarmwhenoperatingitforanextendedperiod.
• Testforproperoperationbeforeusingthecamera.
• Onlyuseaccessoriessuppliedbythemanufacturer,suchasadapterandbattery.
• InordertopreventtheExternalShortCircuitofbattery,pleaseusethebatterybag.
• Removethebatteryifthecameraisnotgoingtobeusedforlongperiods.
• Whentemperatureofthecamerareachesto67°C(152°F),analarmiconwillpopout( ).Onceit
reachesto70°C(158°F),thecamerawillturnoffautomaticallyforsafetyconcern.
Product Information
• Designsandspecicationsofthecameraaresubjecttochangewithoutnotice.Thisincludesprimary
productspecications,software,andthisuser’smanual.
• ThisUser’sManualisageneralreferenceguideforthecamera.
• Theillustrationsinthismanualmaynotbethesameastheactualdesignofyourcameraandthose
youseeontheLCDscreen.
Using at low temperatures
Onskislopes,athighelevations,andinothercoldareaswherethetemperaturedropsbelowfreezing
0°C(32°F),keepthecamerawarminsideclothingorotherinsulatingmaterial.
• Prolonged contact with the metallic portions of the exposed can trigger frostbite and other
damagetotheskin.
• Temperatures between 0 and -10°C (32 and 14°F) temporarily lower battery performance,
reducingthetimeavailableforphotography.
• Chargingisnotpossibleattemperaturesbelowfreezing0°C(32°F).
• Turning on the thoroughly chilled camera can result in lower LCD monitor performance,
producingaslightlydarkerscreen,afterimages,andothertemporaryissues.
• Leavingsnowandwaterdropletsonthecamerainafreezingenvironmentcanproduceice
crystalsinsidethegapssurroundingthepowerbutton,controlbuttons,speaker,microphone,
etc.,interferingwithbuttonoperationandreducingsoundlevels.

3
EN
IMPORTANT: Water, dust, and shock resistance
Note
• Donotimmersethecamerainhotspringsorotherwaterwithtemperaturesof40°C(104°F)
orabove.
• Do not expose the camera to high pressures or shocks associated with swift currents,
waterfalls,divingintowater,etc.
•Droppingorotherwiseexposingthecameratoshocksvoidsthewaterproofwarranty.Contact
yourJVCServicerepresentative.
•Thiscameradoesnotoat.Useastraporothermeasuretopreventlosingitinthewater.
• Before opening or closing the cover, wipe off any moisture and move to a low-humidity
environment.
•Immediatelywipeoffanydetergent,soap,hotspring,bathadditive,oil,sunscreen,orother
chemicalscomingintocontactwiththecamera.
• Water resistance
Thecameraoperatesfor30minutesatdepthsupto5m(16.4ft).Thisisequivalenttothe
IECStandardpublication529IPX8.
• Dust resistance
ThisisequivalenttotheIECStandardpublication529IP6X.
• Shock resistance
ThiscameraclearscompanytestingcompliantwithMIL-STD-810FMethod516.5Shock:
droppingontoplywood3cm(1-3/16”)thickfromaheightof2m(6.5ft).
Make sure that the cover rim seal, the SD slot, and the jacks
are intact and free of hair, lint, sand, dust, and other foreign
matter. If there is any damage, contact your distributor or
JVC Service representative.
securelyclosethecover.
Press the cover until it closes with an audible snap.

4
EN
IMPORTANT: Water, dust, and shock resistance
After Using
3.Dry.
Thoroughlywipewithadry,softclothanddryinawellventilatedlocationoutofdirectsunlight.
Facethemicrophoneopeningdownwardortakeothermeasurestoeliminateanywatertrapped
inside.
Allowingsandtodryonthecamerarisksscratching.Washitoffandwipethecameradry.
Thoroughlywipeoffanyforeignmatterorwaterdropletsinsidethebottomcover.
Notes
•Donotdrywithahairdryerorotherheatsource.Degradedwaterresistancecanresult.
•Donotleavethecameraforextendedperiodsinfreezingtemperaturesorattemperaturesof
40°C(104°F)orabove:underdirectsunlight,inaparkedcarinthehotsun,ornearaheater,
forexample.Degradedwaterresistancecanresult.
•Afterusingthecamerainorneartheocean,rstsoakitfortenminutesinabundantfresh
watertodissolvethesaltandthenrinseitwithmorefreshwater.
•Donotleavethecamerainsaltwaterorwithsaltwaterdropletsonit.Corrosion,discoloration,
anddegradedwaterresistancecanresult.
•Detachthestrapbeforerinsingthecamerainfreshwater.
•Removeallwaterdropletsbeforeconnectingcablesorchargingthecamera.
•Weshallbearnoresponsibilityfordatalostduetowaterimmersion.
•Werecommendreplacingthesealannuallytomaintainwaterresistance.ContactyourJVC
Servicerepresentative.(Chargesapply.)
• Alwayskeepthebatterycoverclosedbeforeuse.
• Attachwithpropertripodandinstallwiththeproductwithgoodcareincaseofslippingoff.
• Donotcontactwithanymetalmaterialtothemetalpartsoftheproductwhenoperateincase
ofbreakdown.
Afterunderwateruseorexposuretodustyconditions,promptlyrinsethecamerawithfresh
waterandthoroughlydry.
1.Holddownthepowerbuttonforasecondtoturnoffthecamera.
Makesurethatthecoverissecurelyclosed.
2.Rinsewithfreshwater.
Immersethecamerainacontainerwithenoughfreshwatertocovercompletelyit.
Operatethebuttonstoforceoutanymaterialcaughtinthegapsaroundthem.
Donotcleanwithsoap,detergent,alcohol,orotherchemicals.
Donotrinsethecameraundertapsorotherpowerfulwatersources

5
EN
Contents
Read This Before Using the Camera ................................................... 2
Section 1 Getting to Know Your Camera ........................................... 6
Section 2 Getting Started .................................................................... 9
Section 3 Enjoying the Record Mode .............................................. 12
Section 4 Enjoying the Playback Mode ........................................... 18
Section 5 Setting Your Camera ....................................................... 21
Section 6 WiFi to PC-WiVideo Program ......................................... 25
Section 7 WiFi to Mobile-WiVideo Program .................................... 29
Section 8 WiFi to Cloud-Ustream ..................................................... 37
Section 9 Viewing Photos and Videos on TV .................................. 40
Section 10 Viewing Video & Photo on PC ......................................... 41
Section11SpecicationsandSystemRequirements ..................... 42
Section 12 Troubleshooting ............................................................... 44
Section 13 Wi-Fi Warning ................................................................... 46
Cautions
Remember that this unit is intended for private consumer use only.
Anycommercialusewithoutproperpermissionisprohibited.(Evenifyourecordaneventsuchasa
show,performanceorexhibitionforpersonalenjoyment,itisstronglyrecommendedthatyouobtain
permissionbeforehand.)
Trademarks
•HDMIisatrademarkofHDMILicensing,LLC.
•Windows®iseitherregisteredtrademarkortrademarkofMicrosoftCorporationintheUnitedStates
and/orothercountries.
•MacintoshisaregisteredtrademarkofAppleInc.
•iMovie,iPhoneandiPhotoaretrademarksofAppleInc.,registeredintheU.S.andothercountries.
•YouTube™,theYouTubelogoandAndroid™aretrademarksand/orregisteredtrademarksofGoogle
Inc.
•Intel,IntelCore,andPentiumaretrademarksorregisteredtrademarksofIntelCorporationorits
subsidiariesintheUnitedStatesandothercountries.
•Wi-Fi,Wi-Filogo,Wi-FiCERTIFIED,Wi-FiCERTIFIEDlogo,WPA,andWPA2aretrademarksor
registeredtrademarksofWi-FiAlliance.
•Otherproductandcompanynamesincludedinthisinstructionmanualaretrademarksand/or
registeredtrademarksoftheirrespectiveholders.
•Markssuchas™and®havebeenomittedinthismanual.
TM

6
EN
Section 1
Getting to Know Your Camera
Overview
Thiscamerawitha5MegaPixelsensorcantakeH.264formatvideos.TheH.264technologyallows
for extendedvideo recording with less memory. High quality images 5 mega-pixels can also be
deliveredsmoothly.WithacolorLCDmonitor,youcanviewandexaminethevideoandphotoeasily.
ThecameraalsofeaturesvideorecordingatanHDresolutionof1920x1080.Youcanalsoconnect
ittoanHDTVviaanHDMIcable,andeasilyplaybacktherecordedhigh-denitionvideosonthe
widescreenHDTV.
Moreover,thecameraisequippedwithWiFimoduleandtheexclusiveapplication.Youcanbroadcast
livestreamingofthecameraonUstreamwebsiteviaWiFi.Yourfamilyandfriendscanwatchthelive
videostreamingofthecameraontheirsmartphones,tablets,orcomputers.
ThecameracanalsoconnectwithyourcomputerviaWiFi.Itcanbeawirelesswebcamforyour
on-linevideochatting.ThroughWiFiconnecting,youcantransferthevideosandphotosonyour
computer,andmonitorlivevideofromyourcamera.
Whitebalancecaneitherbeadjustedautomaticallyorchangedmanually.A5xdigitalzoomhelps
youtocontroloverthevideoandphotoyoutake.Thevariedeffectoptions,suchasTimeLapse,
makerecordingmorefun.
Note
• Partialmemoryofthebuilt-inmemoryisusedforthecamera’sFirmwarecodeandsoftware.
• For the WiFi connectivity working correctly, make sure the bundled WiVideo program (for
Windows
®
basedsystemsonly)isinstalledandthewirelessLANmoduleofyourcomputeris
activated.
Standard Accessories
Unpackthepackageandmakesureallstandardaccessorieslistedareincluded:
• BatteryPack
• USBCable
• FlexibleMount
• FlexibleMountBase
• GoggleMount
• LensProtectorCover
• LCDProtectorFilm

7
EN
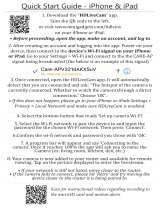
Front View
Bottom View
Strap Hook
Tripod Socket
[Record]/[SET]/[Play]/[Pause]Button
Microphone
Speaker
LCD Monitor
Lens
[Wide]/[Previous]Button
[Tele]/[Next] Button
Power Button
Power/Charge Light
Protect from dropping with
a strap or similar measures

8
EN
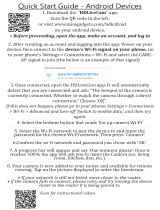
Side/Rear View
Tripod Mounting Socket
[MENU]/[Delete] Button
Mini USB 2.0 Port (Inside)
HDMI Mini Connector (inside)
[Playback]/[Exit] Button
Port/Slot Cover Latch
Battery Slot (inside)
SD Slot (inside)

9
EN
Section 2
Getting Started
Loading the Battery
Beforeusingthecamera,youmustloadthesuppliedLithium-ionrechargeablebattery.
1.Toopencover,followandpush2directionsasshown.
2.Pressthebuttondownandthenpushthecoveroutward.
3.Insertthebatteryaccordingtothecorrectpolaritymarks(+or-).
4.Closethebatterycoverrmly.
Note
• Differentbatterytypesandsurroundingtemperaturesmayaffectthebatteryperformance.
• Neverexposethebatterytoaheatingequipment(e.g.,microwaveoven)andattempttodispose
ofabatterybyburningorbythrowingitintoare.Heatcancausethebatterytoexplodeand/
orreleasecausticliquid,bothwhichmaypossiblycauseseriousinjury.
• Turnthepoweroffandstopusingthebatteryifyouobservetheconditionofexcessiveheaton
thebattery.
1
2

10
EN
Charge your battery
YoumustuseJVCauthenticatedadapter(AC-V17LU)andtheUSBcable.ConnectUSBcable,press
</>toselect[Adapter],andthenpress[SET]button.
Ablinkinglightwillindicateactivecharging.
Inadapterchargingmode,thefullchargingtimeforadepletedbatteryisabout3.5hoursandthelight
willturnoffautomaticallyafterthechargingiscompleted.
InPCUSBchargingmode,alongerchargingtimeisrequired.(about5.5hours)
Note
• Neverchargethebatterybyamethodotherthanasinstructed.Doingsomaycauseareor
explosionpossiblyresultinginseriousinjury.
• UseJVCauthenticatedadapter(AC-V17LU)onlywiththeindicatedpowersupplyvoltage.
• Usewithanyotherpowersupplyvoltagemightcauseelectricshock.
• Besurethatthepoweroutletyouplugtheadapterintoiseasilyaccessible.Whenyouneedto
disconnectpowerfromthecamera,besuretounplugthepowercordfromtheelectricaloutlet.
• Itis notfeasible totake avideo whileadapter isapplied, thoughEndless REC/TimeLapse
wouldstillwork.
Inserting and Removing a SD Card (Optional)
1.Removethebatterycoverandthebattery.
2.Insertthememorycardintotheslotuntilitlocksproperly.
3.ToremoveaninstalledSDcard,pressthecardinwardstoreleaseit.
4.Whenthecardpopsout,gentlyremoveitfromitsslot.
5.Recommendedmemorycapacity:2GBorabove.

11
EN
Turning the Video Camera On
• Toturnonthecamera:
• Pressthe[PowerButton]fortwosecondtoturniton.
ConguringtheInitialDateandTimeSetup
• Thetimesettingscreenappearstoallowyoutosetupdateandtime:
Operation Display Screen
1. Adjustthenumericvaluebypressing
2. Pressthe[SETbutton]( )togotothenextsetting.
Getting Started
• Torecordvideo:PresstheMENUbuttonthenpressthe[ SETbutton ](
).Select ( on-screen
icon)onthescreentoswitchtotheVideomode( ).Pressthe[ Recordbutton ]torecord
video.Tostoprecording,pressitagain.
• Totakeaphoto:Press theMENUbuttonthenpress the[ SETbutton ] ( ).Select ( on-
screenicon)onthescreentotoswitchtothePhotomode( ).Pressthe[ Recordbutton ] to
takephoto.
• Toviewstoredvideosandphotos:Touch toswitchtothePlaybackmode.
Turning the Camera Off
• Toturnoffthecamera:Youcaneitherpressthe[ PowerButton]fortwosecond.
/

12
EN
Section 3
Enjoying the Record Mode
Button Function
To power on or off:
•Holditfortwoseconds.
•Afteridlingfor5minutes,thecamerawillturnoffautomatically.
To record:
•InVideoMode,presstotakevideo.
•InPhotoMode,presstotakephoto.
To zoom in or out:
•+:ZoomIn.
•-:Zoomout.
To access menu
•Presstoopentheoptionmenu.
•Use/tochangebetweentheoptions.(e.g.
VIDEO/PHOTOMODE,WIFI,RESOLUTION,WHITEBALANCE).
To review videos/photos
•Presstogototheplaybackmode.
•Youcanviewordeletetherecordedles.

13
EN
Video Recording
• Select (on-screenicon)onthescreentoswitchtotheVideomode( ).
• Pressthe[RecordButton]tostartrecording.Whenavideoisbeingrecorded,atimeindicator
willdisplayontheLCDmonitor( ).Tostoprecording,pressitagain.
• Presstoviewtherecordedvideo.
• Fourresolutionsettingsareavailable:
Video Quality
Full HD (1080p 30fps)
HD (960p 30fps)
HD (720p 60fps)
HD (720p 30 fps)
WVGA (848x480)
Photo Capturing
• Select
(on-screenicon)onthescreentoswitchtothePhotomode( ).
• Pressthe[ RecordButton
]totakephoto.
• Press toviewthephoto.
Using Zoom Function
• Thezoommagniesimageswhenrecordingvideoortakingphoto.
1.Tozoomin/out,presstheTele/Wide(+/-)Button.
2.Itcanbesetfrom1X~5X(5XDigitalzoom)

14
EN
Options for Record Menu
MenuFlow
1. Press onthescreentoopentheMenu.
2. Use / tochangethepages.
3. PresstheSET buttontoselect.
Video Photo Setting
• VideoResolution
• WhiteBalance
• TimeLapse
• EndlessREC
• DIS
• PictureInversion
• Self-Timer
• PictureInversion
• WhiteBalance
• VIDEO/PHOTO
• Wi-FiMenu
• Volume
• TVSystem
• Language
• TimeSetting
• Format
• DefaultSetting
• Update

15
EN
Video Resolution
Fourresolutionsettingsareavailable.
• Full HD (1080p 30):Recordvideosat1920x1080p30fpsresolution.
• HD (960p 30):Recordvideosat1280x960p30fpsresolution.
• HD (720p 60):Recordvideosat1280x720p60fpsresolution.
• HD (720p 30):Recordvideosat1280x720p30fpsresolution.
• WVGA (848X480): Recordvideosat848x480p30fpsresolution.
Operation Display Screen
1. Inthemenupage,selectthe[ VideoResolution ]iconon
thescreen.
2. Press[ Previous ]or[ Next ]buttontochoosethedesired
option.
3. Pressthe[ SETbutton ]tovalidatethesetting.
4. Pressthe[ Playbackbutton ]toreturn.
White Balance
Thecameraadjuststhecolorbalanceofimagesautomatically.Sixmanualwhitebalancesettingsare
available:
• Auto: Thecameraautomaticallyadjustswhitebalance.
• Daylight: Underoutdoorcondition.
• Fluorescent: Underuorescentlightcondition.
• Tungsten: Undertungstenlightcondition.
• Blue (marine): Underbluewatercondition.
• Green (marine): Undergreenwatercondition.
Operation Display Screen
1. Inthemenupage,choosethe[ WhiteBalance ]icon
onthescreen.
2. Press [ Previous ] or [ Next ] button to choose the
desiredoption.
3. Pressthe[ SETbutton ]tovalidatethesetting..
4. Pressthe[ Playbackbutton ]toreturn..

16
EN
DIS(Digital Image Stabilization)
Recordwithaneffectofreducingcamerashaketoresultinmorestablevideo.
Operation Display Screen
1. Inthemenupage,choosethe[ DIS ]icononthescreen.
2. Press[ Previous ]or[ Next ]buttontochoosethedesired
option.
3. Pressthe[ SETbutton ]tovalidatethesetting.
4. Pressthe[ Playbackbutton ]toreturn.
WithoutStabilization StabilizationON
Time Lapse
Recordstillimagesatspecicintervalsyoucansetandplaythemasonevideole.Thiseffectisgood
forrecordingcloudscapes,seedgerminatingandowersopening.
• Off:DisableTimeLapse.
• 1 Second.: Recordoneframepersecond.
• 5 Seconds: Recordoneframeevery5seconds.
Operation Display Screen
1. Inthemenupage,choosethe[ TimeLapse ]icononthe
screen.
2. Press[ Previous ]or[ Next ]buttontochoosethedesired
option.
3. Pressthe[ SETbutton ]tovalidatethesetting.
4. Pressthe[ Playbackbutton ]toreturn.

17
EN
Self-Timer
Theself-timerallowsyoutotakephotoswithaten-secondtimedelay.TheLEDlightonthefrontofthe
camerawillalsoblink.Thespeedofblinkingwillincreasejustbeforethephotoistaken.
Operation Display Screen
1. Inthemenupage,choosethe[ Self-Timer ]icononthe
screen.
2. Press[ Previous ]or[ Next ]buttontochoosethedesired
option.
3. Pressthe[ SETbutton ]tovalidatethesetting.
4. Pressthe[ Playbackbutton ]toreturn.
Endless REC
TheEndlessRECallowsyoutorecordvideowithafteen-minutetimeintervalwithoutstopping.
Operation Display Screen
1. Intthemenupage,choosethe[ EndlessREC ]iconon
thescreen.
2. Press[ Previous ]or[ Next ]buttontochoosethedesired
option.
3. Pressthe[ SETbutton ]tovalidatethesetting.
4. Pressthe[ Playbackbutton ]toreturn.
Note
• VideoResolutionofthisfunctionis720p30only.
Picture Inversion
ThePictureInversionallowsyoutoreviewthepicturesinversely.
Operation Display Screen
1. Inthemenupage,choosethe[ PictureInversion ]icon
onthescreen.
2. Press[ Previous ]or[ Next ]buttontochoosethedesired
option.
3. Pressthe[ SETbutton ]tovalidatethesetting.
4. Pressthe[ Playbackbutton ]toreturn.

18
EN
Section 4
Enjoying the Playback Mode
Button Function
TheButtonshavethefollowingfunctionsinPlaybackMode.
To power on or off:
•Pressdownfortwosecondstoturnonorturnoffthecamera.
Tochooseandenablethele:
•Pressdowntochooseandenabletheleyouwanttoreview.
To turn next or previous:
•>:Next.
•<:Previous.
Todeleteles:
•Presstodeletetheles.
To exit the playback mode
•Presstoexittheplaybackmode.

19
EN
Video Playback
Operation Display Screen
1. IntheVideoPlaybackmode,press[ SET ]buttontoplay
orpausethevideo.
2. Press[ Previous ]buttontogotothepreviousvideo;press
[ Next ]buttontogotothenextvideo.
3. Whileplayingvideo,press[ Previous ]or[ Next ]buttonto
enablefastrewindorforwardfunction.
4. Press[ Playback ]buttontoexit.
Note
• Thenumberatthetopleftcornerisrecordingtime;toprightisthenumberofimages.
Delete Videos
Operation Display Screen
1. Press[ MENU ]buttontogototheDeleteoptionscreen.
2. Press[ Yes ]todeletethecurrentvideoor[ No ]tocancel
theoperationandtoexit.
Note
• Ifamemorycardhasbeeninserted,youcanonlydeletethosevideosstoredonthecard.

20
EN
Photo Playback
Operation Display Screen
1. InthePhotoPlaybackmode,press[ Previous ]buttonto
gotothepreviousphoto;press[ Next ]buttontogotothe
nextphoto.
2. Press[ Playback ]buttontoexit.
Delete Photo
Operation Display Screen
1. PressdeletebuttontogototheDeleteoptionscreen.
2. Select[ Yes ]todeletethecurrentvideoor[ No ]tocancel
theoperationandtoexit.
Note
• Ifamemorycardhasbeeninserted,youcanonlydeletethosephotosstoredonthecard.
/