Page is loading ...

Assembly Instructions: 2360-4/6 (Garvin)
IMPORTANT:
• ALL INSTALLATION WORK SHOULD BE DONE BY ACCREDITED PROFESSIONAL.
• SHUT OFF POWER SUPPLY AT FUSE OR CIRCUIT BREAKER!
• USE ONLY THE SPECIFIED BULBS. DO NOT EXCEED THE MAXIMUM WATTAGE!
CLEANING TIPS
Treat the xture gently! Regular cleaning will reduce the need for deep cleaning. For regular cleaning, turn off the light and wipe down the
xture with a clean lint-free cotton or microber cloth. Never spray cleaner directly onto the xture.
For Customer Service, contact
the place of purchase.
PREPARING FOR INSTALLATION
Remove all of the contents from the carton. See the important notes above. Shut off the power
atthecircuitbreakerandcompletelyremovetheoldxturefromtheceiling,includingtheold
mountingstrap.
Fromthepartsbagremovethemountingstrapassembly.Oneendofnipple(G)shouldbe
attachedtomountingstrap(A)withwasherandhexnut(CandF)inplace.Theotherend
shouldhavecanopyloop(H)attached.Matchthethreadedholesofmountingstrap(A)to
thespacingoftheholesonthejunctionbox.Attachmountingstrap(A)tothejunctionbox
usingmountingscrews(B)andascrewdriver.Tightensecurely.Unscrewcanopyloopcollar
(I)fromcanopyloop(H).Passcanopy(D)overthemountedcanopylooptotesttheheight.
Approximatelyhalfofthecanopyloop’sexteriorthreadsshouldbeexposed,andcanopyloop
collar(I)shouldtsnuglyontothecanopyloop.Removecanopy(D)andadjusttheheightof
nipple(G)andcanopyloop(H)untilthedesiredheightisreached.
Smooth / Black /
Transparent (L)
Black (Hot)
Ribbed / White /
Transparent (N)
Bare Copper / Transparent with
Green Interior / Green
White (Neutral)
Green
(Ground)
FINISHING THE INSTALLATION
Pushcanopy(D)uptotheceilingandslidecanopyloopcollar(I)upbeneaththecanopy.Tightlythreadcanopyloopcollar(I)onto
canopy loop (H) to secure canopy (D) in place. Slide candle sleeves (U) over sockets (T). Install bulbs (N - not provided) into sockets (T) in
accordancewiththexture’sspecications.Donotexceedthemaximumwattage.Yourinstallationisnowcomplete.Turnonthepower
andtestthexture.
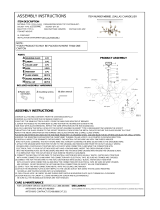
ASSEMBLING THE FIXTURE
Haveanassistantsupportthexture’sweightanduseloops(R)ofconnectorrods(L)toattach
theconnectorrodstohooks(Q).Rods(O)areonthexture’swires,butnotconnectedtothe
xture.Bymeasuring,determinethecorrectnumberofrodsandchainneededforproper
hangingheight.Tolengthenthexture,addadditionalrodsorchain.Ifadditionalrodsare
needed,contacttheplaceofpurchasetoorder.Toshortenthexture,trimthewirestothe
desiredlengthaddingatleast8to10extrainchestothatlength.Slideanyexcessrodsoffthe
xture’swirestodiscard.Threadthewiresthroughtherodsandpullthewiresuntiltautbefore
threadingtherodstogether.Threadbottomrod(O)ontopost(P).Attachtoploop(M)tothetop
of top rod (O).
Ifnecessary,useapairofplierstoopenandremoveanyexcesschain.Attachoneofchain
connectors (K) to each end of chain (J). Use one of chain connectors (K) to attach chain (J) to
toploop(M)andclosethechainconnector.Feedthexture’swiresupthroughthechain(every
threelinksorso),pullingthewiresuntiltaut.Slidecanopyloopcollar(I)andcanopy(D)ontothe
chain and wires. Use the free chain connector (K) to attach chain (J) to canopy loop (H).
A
B
C
D
E
F
G
H
I
J
K
M
O
P
S
T
U
Q
R
L
N
CONNECTING THE WIRES
Haveanassistantsupportthexture’sweightwhile
completingthewiring.Cutawayexcesswires.Threadthe
xture’swiresthroughcanopyloopandnipple.Attachthe
xture’swirestothepowersupplywiresfromthejunctionbox.
Connect black to smooth/black/transparent (L) wire; white to
ribbed/white/transparent(N)wire;groundtoground(greenor
copper).Twisttheendsofthewirepairstogether,andthen
twist on a wire connector. Make sure all twists are in the same
direction.Ifthereisnogroundwire(greenorcopper)from
thejunctionbox,locategroundscrew(E)onmountingstrap
(A)andwrapthexturegroundwirearoundthegreenground
screw(E).Useascrewdrivertosecuregroundscrew(E)onto
themountingstrap.Tuckallwiresneatlyintothejunctionbox.
Bottom View of 6 LT
View of 4 LT
View of 6 LT
/